You need to be able to fall from a height correctly and deliberately not only in winter, when there is a lot of ice around, but also during any activity that concerns extreme pastime. Many sports bring a huge amount of adrenaline, but it is better if parkour does not entail injuries or other dangerous consequences. Fears of falls can be the only obstacle to active recreation or hobbies. You can forget about these worries and fear only by learning the skill of falling from a height. There is some professional guidance that will help you land correctly after falling from a small or significant height.
So, what nuances need to be studied and taken into account so as not to harm yourself when you enjoy your favorite vacation and activity?
5.1. RULES FOR PERFORMING TRAINING PARACHUTE JUMPS.
When boarding an airplane, the skydiver must occupy only the seat assigned to him.
After the release carabiner has engaged the release rope, it is prohibited
touch the carabiner and hold on to the pull rope.
During the climb it is prohibited
get up from your seat and move around the passenger cabin. This is permitted only at the request of the issuer.
To avoid the parachute touching parts on the plane, you are not allowed to press against the side of the plane or turn sharply.
When the releaser turns on the safety device on the reserve parachute (at the command of the crew commander at an altitude of at least 700 m), you should make sure (by listening) that the device is turned on, the time interval has expired and the reserve parachute pack has not opened.
To perform a parachute jump, the commands are set:
—
preliminary -
“GET READY”
- accompanied by two short siren signals and the inclusion of a yellow light display, duplicated by the voice of the issuer,
— executive — “JUMP”
- a long siren signal, the green light display turns on, accompanied by the voice of the person issuing “GO.”
— if it is necessary to stop the parachutists’ ejection, the command “LEAVE” is given by voice,
accompanied by the activation of a siren signal and the inclusion of a red light display.
The number of parachutists performing jumps in one pass of the aircraft is determined by the jump director depending on the height of the jump, the exercise being performed, the level of training of the parachutists and the size of the landing area.
In one run it is allowed to perform jumps only with the same type of parachutes.
Good must be with fists. unless he has more modern weapons.
How to jump from a height without hurting yourself?
I understand that this is off topic, but experience suggests that those who master martial arts understand this.
Now for the second day they are showing a fire at an institute in Moscow. My office rented space there, but, thank God, I left there three months ago. True, all my former colleagues, which I am very happy about, managed to jump out of the burning building. It’s not strange that it burned down - I’ve never seen such fire safety chaos as in this junk: all the exits are boarded up (the spare staircases were used as utility rooms for money), there’s dust, the only small exit is blocked by a turnstile like on a bus.
For the information of me and all my friends: how can one competently jump out of windows if it gets really hot? Jump with your feet down or like a fish, upside down as if in water; turning over in the air; try to land on your back, on your knees, etc.?
My people are a little coordinated - we practice flamenco, and there they put at least some kind of coordination. In general, I will be grateful to a kind soul who will tell me how to jump (or rather, land) correctly from a height.
We just learned from our dance teachers that after a jump you should never land on your entire foot - you will break your spine. That’s why after jumping in dancing we land on our toes.
Comments
Correctly - with your back to the fire awning :-)
IMHO it’s better to break your legs on asphalt or lawn than to break your spine. Some people think it's on the back. The topic was quite actively discussed after 9/11 and the terrorist attacks in Moscow.
An anchor placed on the side of the window and a climbing rope are in control :-)
1) Jumped from the second floor of an ordinary residential building. Below there was a heap of all sorts of soft debris. The landing was very comfortable.
2) Jumped from the second floor of a non-residential building onto concrete. The height was about five meters. The landing was not comfortable. However, I didn’t break anything.
5.2. PREPARATION FOR THE JUMP AND SEPARATION FROM THE AIRCRAFT.
When the specified jump altitude is reached and the aircraft enters the drop course, the command “Get Ready” is given.
At this command, the releaser gestures to the parachutists of the first group jumping on approach that they need to stand up, opens the door and stands at its rear edge, preventing the parachutists from prematurely separating from the plane.
Having received the command “Get Ready,” the parachutist must:
— stand up, visually check the engagement of the carabiner, make sure that the device on the reserve parachute is not unlocked (the locking cord must be in the loop);
- go to the door (if the parachutist jumps first in the approach) or stand behind the parachutist jumping earlier;
— with your right hand, grab the traction ring, place your left hand on top of your right (Fig. 1).
On the command "Jump"
parachutists leave the plane in the established order.
The first to leave the plane are the parachutists sitting on the left side, closer to the door. After the parachutists of the left row, the paratroopers of the right row leave the plane in the same order.
At the command “Go” the parachutist separates from the plane
.
Separation from the aircraft is carried out in the following sequence:
— rest the middle of the foot of your left leg on the rear lower corner of the door;
- bending slightly, smoothly push off from the door sill, perpendicular to the axis of the aircraft, feet down;
- after separating from the plane, place your right foot next to your left;
- in order to ensure normal opening of the parachute during a fall, try to maintain a vertical position and grouping until the moment the parachute opens (dynamic impact).
| Rice. 1. The position of the parachutist before separation from the aircraft | Fig 2. Separation of the parachutist from the aircraft |
What factors are decisive?
To increase your jumping height, it is important not only to train, but also to have appropriate physical training and adhere to a healthy lifestyle. Those who have seriously decided to achieve good jumping ability must:
- visit the gym regularly;
- create all the conditions for the full strengthening and restoration of muscles, getting enough sleep and eating right;
- record the results achieved once a month.
The main thing is to start training prepared. First, do a warm-up for about 10-20 minutes, then stretch. If you neglect to warm up, there is a high risk of injury.
If you follow all the recommendations, exercise 3-4 times weekly, without missing training, then literally in a month your jumps will be significantly higher than before starting classes.
builderbody.ru
5.3. ACTIONS OF A PARACHUTTER IN THE AIR.
After separation from the aircraft in free fall (during stabilization), maintain the formation until the parachute is fully deployed. Make a delay in opening the parachute, determined by the jump task (after 3 s of a stabilized fall), with a sharp movement of the right hand, pull out the parachute opening pull ring. At the moment of pulling out the ring, group yourself (Fig. 2)
Having felt a jerk (dynamic shock) - the parachute has opened - the parachutist must:
- raise your head up and look around the dome,
— after making sure that it is in working order and deployed correctly, pull out the locking cord of the device on the reserve parachute;
- look around and make sure that there are no parachutists nearby at a dangerous distance for descent; inspect from the front, left, right, above and behind;
- look around and make sure that there are no parachutists nearby at a dangerous distance for descent. Inspection should be done from front left, right, top and back.
After making sure that there is no danger in the alignment, make a comfortable landing in the suspension system.
To do this, you need to grab the left group of straps with your left hand, and place the thumb of your right hand on the circular strap at the seat. Having pulled the left group of straps down, use the thumb of your right hand to move the circular strap forward until it fits comfortably (Figure 3). Having moved the circular strap to the right, change the position of the hands and move the circular strap to the left
| Fig.3 Threading the main strap of the harness. | Fig.4. The use of gliding when descending by parachute. |
Having made a comfortable landing in the suspension system, determine the direction of descent and the place of your likely landing. If necessary (presence of obstacles at the intended landing site), take measures to avoid landing on an uneven surface, forest, water, obstacles, by changing the magnitude and direction of the attitude, changing the direction of movement and horizontal speed of movement using control lines, and on an uncontrolled canopy - by sliding (Fig. 4).
Sliding is divided into shallow and deep. For shallow sliding, you need to take 3 - 4 adjacent slings and pull them up to a length of 2 m. For deep sliding, the slings are selected to one third of the length. It takes some time for the canopy to gain speed.
To increase the attitude, it is necessary to tighten the front group of risers, and to decrease the rear. To move left and right, use the left and right groups of free ends of the suspension system, respectively. Slide to a height of at least 150 m.
When performing a slide, you must remember that when sliding, the canopy begins to unfold towards the tense risers. Therefore, when sliding for a long time, the lines need to be sorted so that the canopy always slides in the right direction.
You need to stop sliding when your body is positioned facing the wind.
When parachuting, the canopy may sway, which can be eliminated by tightening the front or rear straps. When tilting the canopy forward from the vertical axis, tighten the rear straps. When the canopy reaches a vertical position, release the rear straps and, when moving the canopy back, tighten the front straps.
After two or three tensions of the straps, the rocking stops.
Technique for proper falling and landing in parkour
You need to be able to fall from a height correctly and deliberately not only in winter, when there is a lot of ice around, but also during any activity that concerns extreme pastime. Many sports bring a huge amount of adrenaline, but it is better if parkour does not entail injuries or other dangerous consequences. Fears of falls can be the only obstacle to active recreation or hobbies. You can forget about these worries and fear only by learning the skill of falling from a height. There is some professional guidance that will help you land correctly after falling from a small or significant height.
So, what nuances need to be studied and taken into account so as not to harm yourself when you enjoy your favorite vacation and activity?
5.4. PREPARATION FOR LANDING.
Before landing, in advance (taking into account the time of canopy rotation) to a height of m, prepare for landing and take the correct body position for landing:
- turn around to face the wind so that the ground runs back under your feet. The direction of the wind is determined by the arrow laid out on the landing site and by the displacement of local objects on the ground relative to the parachutist.
- bring your legs together at the knees and feet and, depending on the wind speed, move them forward, and in calm weather keep them almost vertical, half-bent at the knees
- feet are parallel to the ground.
When the position is correctly occupied, all objects on the ground seem to move under the parachutist’s feet, strictly in front. If objects move to the side or from under the feet (wind from the side or in the face), on an uncontrolled canopy it is necessary to use the sliding method - by pulling one of the straps, turn the canopy in the desired direction so that the body takes a position facing the wind (the wind blows at the back ). In this position, the parachutist’s hands remain free before landing, and the parachutist can eliminate possible swaying before landing and apply braking.
If the parachutist finds himself facing downwind before landing, and there is no height to turn the canopy using the gliding method, he must use the method of crossing the straps to turn the body so that he is facing downwind (Fig. 5).
When objects move on the ground from right to left, a turn is made to the right; when objects move from left to right, a turn is made to the left into the wind.
| Rice. 5. Position of the arms when turning using the method of crossing the straps. | |
| - to the right | - to the left |
To turn to the right by crossing the straps, you must:
— grab the left group of straps of the free ends of the suspension system above your head with your right hand so that your hand passes from the inside between the right group of straps and your face;
- grab the right group of straps from the outside with your left hand;
- spreading your arms to the sides, pull the straps until the body turns to a position in which objects on the ground will move strictly “under your feet.”
To turn left, change the position of your hands.
When performing turns using the crossing strap method, you must remember:
— the body rotates towards the inner (between the face and the straps) arm;
— crossed straps must be held until your feet touch the ground;
- when the straps are released, the body will return to its original position
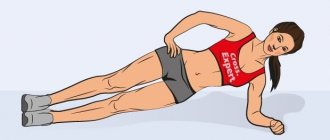
Training program
To increase your jump height in absolutely any sport, you must first improve your physical fitness. An athlete needs to be healthy, strong and resilient. Physiological well-being is the basis without which it is impossible to effectively and correctly carry out training for the development of certain muscle groups.
Jumping rope
A popular and very simple exercise that is actively used in training by basketball players, gymnasts, boxers, and volleyball players. Jumping with this affordable and easy-to-use sports equipment allows you to develop both the soleus and calf muscle groups.
You should start exercising with a skipping rope for 15 to 20 minutes. Then, when the athlete feels more confident, the load is increased to half an hour. For the result to be noticeable, you need not only to jump, but also to do it correctly. You need to lift it off the floor (ground) with both feet, while keeping your ankles as close to each other as possible.
If everything is done correctly, the effect will become noticeable in at least two weeks, maximum after a month.
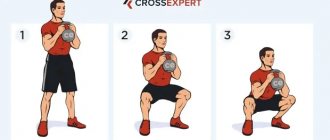
Squats
The main exercise for bodybuilders, which is performed with weights. It is aimed at developing the abdominal muscles, lower back muscles, and leg muscles. Only this exercise allows you to strengthen all the necessary muscles of the groups in order to jump really high.
In relation to such sports disciplines as gymnastics, volleyball and basketball, squats for high jumps need to be varied with pushing. When squatting, reaching a parallel line with the floor surface, you need to jump out of the assumed position. You need to land quickly, and try to make the amplitude of the jump as large as possible.
You need to perform squats at least 10-15 times, taking a break of 3-4 minutes.
Calf raises
Aimed at strengthening the calf muscles. They need to be performed until the calves are completely burned so that the amplitude is maximum. It is recommended to do at least 20-30 repetitions. The last phase involves standing on your toes and then smoothly lowering onto your heels.
Lifts should be performed smoothly and not jerkily. Weights are added gradually, in parallel with the increase in endurance. As soon as the athlete is ready, instead of lifting, they begin to perform buckles on their toes or pick up dumbbells.
5.5. PARACHUTTER LANDING.
LANDING IN STRONG WIND. ACTIONS AFTER LANDING.
10-15 seconds before touching the ground, take a ready position and meet the ground in a grouped state. It is necessary to touch the ground with the full soles of both legs at the same time (to avoid sprained ankle joints or other injuries to the legs). Keep the tops parallel to the landing surface
. To reduce the force of the impact when landing, you need to slightly bend your knees and keep them tense until you meet the ground, touching and doing a slight squat to soften the impact.
At the moment of landing, the parachutist should not try to stay on his feet - he must fall forward or on his side (in strong winds, roll).
To reduce the horizontal speed at the moment your feet touch the ground in the wind, it is necessary (if your hands are not busy turning around by crossing the straps) to tighten the rear straps of the free ends of the harness system as much as possible and hold them in this position until landing. In this case, the air coming out from under the edge of the canopy will create a reactive force directed against the wind, which will slightly reduce the horizontal component of the speed. To achieve the most stable position when landing in calm conditions, you should slightly tighten the front straps, creating a horizontal speed for the canopy.
After landing, it is necessary to immediately extinguish the canopy of the parachute to avoid “dragging” the parachutist along the ground under the influence of the wind.
The following methods are used to extinguish the dome:
— having landed, quickly get to your feet and run behind the dome on the leeward side (Fig. 6),
- when pulling, you need to take several lower lines and, intercepting them with your hands, vigorously pull them towards you until the canopy goes out (Fig. 7).
— disconnect the dome from the suspension system using locks.
| Rice. 6 Extinguishing the canopy by running into the leeward direction. | Rice. 7 Extinguishing the canopy by tightening the lower lines. |
Upon landing, extinguish the canopy, remove the harness, carefully assemble and place the parachute in a portable bag, and arrive at the collection point.
Recommendations for proper falls
You will not have much time to make the right and thoughtful decision - only a split second. If you have an object in your hands that you were holding, immediately get rid of it so that it flies away from you at a certain angle. Forget about the value of things, and just focus on saving your life and health. There are several types of falls to navigate: