Alexey Paevsky
May 18, 2012
Nowadays everyone has a hobby. Well, or it should be. My hobby is old books. Recently there was an addition to my home library. I found the “Book of Health Edited by Russian Clinicians”
— supplement to the magazine “Around the World” for 1906.
This is a fairly thick volume of 520 pages, which can be called an analogue of the Takzdorovo.Ru website from a century ago. It talks about the human body and how to stay healthy. Of course, just like on our website, this book also has a section with exercises. True, the Lumiere brothers did not make videos about health, so the collection is decorated with illustrations. It’s interesting that all the exercises presented are quite appropriate now
. I suggest you look at how our great-grandfathers and great-grandmothers did gymnastics, and try to perform these exercises yourself. Let's start with gymnastics for the arms.
Exercise "eight"
The first exercise is designed to develop the hands and wrists. It's called the figure-of-eight movement of the hand. We spread our arms to the sides and use our hands to describe figure eights lying on our sides in the air. First in one direction, then in the opposite direction. Despite the fact that at the beginning of the 20th century there were no personal computers or mobile phones, this exercise is very useful for office workers
. Such movements are an excellent prevention of carpal tunnel syndrome.
Authors and compilers: Antonov N.V. – senior methodologist; Bogryashov A. A., Danilina N. A. – methodologists
Methodological recommendations for strengthening the hands and fingers (including using an electronic wrist expander) in physical education lessons
Explanatory note
Methodological recommendations have been developed to help physical education teachers and additional education teachers of educational organizations in Moscow to organize a physical education lesson using exercises to strengthen the hands and fingers. Methodological recommendations will contribute to the prevention of childhood injuries and the prevention of injuries in physical education lessons.
An analysis of the causes of injury to students in physical education lessons shows that the most common injuries are bruises, sprains of the joints connecting the phalanges of the fingers, fractures and dislocations of the fingers.
Using exercises will help prevent damage to the ligaments and muscles of the hands.
The main content of performing exercises to strengthen the hands and fingers
Exercises that help strengthen the fingers and hands can be divided into exercises with objects (exercises with balls, gymnastic sticks, electronic wrist expanders, gyroscopic simulator) and exercises with your own body weight (exercises with hangs and supports).
I. Exercises with objects
Before starting the exercises, you must first do a general warm-up, warm up the muscles of the arms and shoulder girdle, massage and rub your hands and fingers.
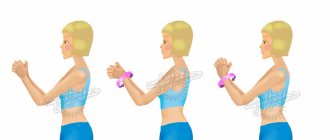
Exercises with an electronic wrist expander:
1. Squeezing the expander with a grip with the handles down until the expander is completely closed (the handles touch). Perform 6–8 times with your right and left hands.
2. Squeeze the expander with a grip with the handles up until the expander is completely closed. Perform 6–8 times with your right and left hands.
3. Hold the compressed expander with a grip with the handles up on a straightened arm. Exercise time: 15–30 seconds with right and left hands.
4. Hold the compressed expander with a grip with the handles down on a straightened arm. Exercise time: 15–30 seconds with right and left hands.
5. Squeezing the expander with three fingers: thumb, index and middle. Perform 6–8 times with your right and left hands.
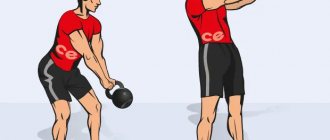
6. Grip with the handles down on a straightened arm, holding the band with the load suspended on it with the compressed handles of the expander. Exercise time: 15–30 seconds with right and left hands.
Exercises with a gyroscopic trainer:
A gyroscopic exercise machine is a hand exercise machine that uses the exerciser’s own strength. The principle of operation of a gyroscopic simulator is that when a constant external force is applied to the gyroscope, it begins to turn around an axis that does not coincide in direction with the main axis. The direction of rotation does not coincide with the direction of application of the external force. The magnitude of precession is directly proportional to the size of the external applied force. If you stop the external influence, the precession process will also end instantly, but the rotor will continue to rotate.
The dimensions of the simulator are small, it has a spherical shape. An adult can easily wrap his palm around it and hold it with one hand.
The housing contains a gyroscope device; it has a hole that provides access to the rotor during the initial spin-up of the simulator. In models of simulators in which there is no such access to the rotor, there are special small holes designed so that a plastic starter (a thin strip with teeth) can be passed through them. It spins the rotor by means of a rack and pinion transmission.
1. Starting position – hold the machine in an outstretched arm with an overhand grip. Circular movements with the brush to the right, left, “in a figure eight”. Execution time: 1–2 minutes. in each direction with the right and left hand.
2. I. p. – hold the simulator in an outstretched arm with an underhand grip. Circular movements with the brush to the right, left, “in a figure eight”. Execution time: 1–2 minutes. in each direction with the right and left hand.
3. I. p. – hold the machine in the arm bent in front of the chest, with an overhand grip. Circular movements of the hand and forearm to the right, left, “in a figure eight.” Execution time: 1–2 minutes. in each direction with the right and left hand.
4. I. p. – hold the machine in the arm bent in front of the chest with an underhand grip. Circular movements of the hand and forearm to the right, left, “in a figure eight.” Execution time: 1–2 minutes. in each direction with the right and left hand.
5. I. p. – hold the simulator with your fingertips in an outstretched arm with an overhand grip. Circular movements with the brush to the right, left, “in a figure eight”. Execution time: 1–2 minutes. in each direction with the right and left hand.
6. I. p. – hold the simulator with your fingertips in an outstretched arm with an underhand grip. Circular movements with the brush to the right, left, “in a figure eight”. Execution time: 1–2 minutes. in each direction with the right and left hand.
7. I. p. – hold the simulator with three fingers: thumb, index and middle grip from below. Circular movements of the hand and forearm to the right, left, “in a figure eight.” Execution time: 1–2 minutes. in each direction with the right and left hand.
8. I. p. – hold the simulator with three fingers: thumb, little finger and ring grip from below. Circular movements of the hand and forearm to the right, left, “in a figure eight.” Execution time: 1–2 minutes. in each direction with the right and left hand.
Exercises with balls:
1. Squeezing a tennis ball with your fingers, two fingers (thumb and index), three fingers (thumb, index and middle), each finger separately. Perform 10–15 times each way.
2. Throwing and catching a medicine ball with two and one hands (the weight of medicine balls varies from 1 to 5 kg). Perform 10–15 times each way.
3. Lifting and holding a medicine ball weighing 1 kg with one hand. Squeeze the ball with your fingertips using an overhand grip. Exercise time: 15–30 seconds.
4. Lifting and holding a medicine ball weighing 3 and 5 kg with both hands. Squeeze the ball with your fingertips using an overhand grip. Exercise time: 15–30 seconds.
Exercises with a gymnastic stick:
1. Take a gymnastics stick in the middle. Rotate the gymnastic stick to the right and left with your fingers. Perform 10–15 times with the right and left hands.
2. Take the gymnastics stick in the middle. Turn the hand left and right. Perform 10–15 times with the right and left hands.
3. Take the gymnastics stick by the end. Circular movements in a figure eight in front of you. Perform 10–15 times with the right and left hands.
4. Take the gymnastics stick by the end. Hold the gymnastic stick in an outstretched hand, the end of the stick is directed to the side. The exercise time is 30–45 seconds.
5. Take the gymnastic stick by the end, the free end of the stick is lowered down, the thumb is pointing up. Rotate the stick until the free end of the stick is raised up. The thumb is pointing down. Perform 10–15 times with the right and left hands.
II. Exercises with your own body weight
Hanging exercises:
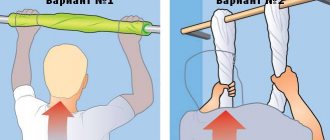
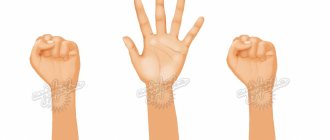
1. Hanging on the bar on your fingers (on four fingers, on three, on two and on one finger). Exercise time: 15–30 seconds. To make the exercise easier, you can use hanging while lying on a low bar.
2. Hanging on a bar with a larger diameter (wrap the bar with fabric to increase the diameter or use special rubber pads). Exercise time: 15–30 seconds. To make the exercise easier, you can use hanging while lying on a low bar.
3. Hanging on a climbing rope: hanging on two hands, hanging on one hand, hanging with a regular and reverse grip. Exercise time: 15–30 seconds.
4. Climbing a rope without using your legs. Perform 3-4 times.
5. Hanging on a fingerboard for training climbers: on four fingers, on three, on two and on one finger, on two and on one hand. Exercise time: 15–30 seconds. To make the exercise easier, you can use a lying down hang.
Standing exercises:
1. Support lying on the tips of your fingers: on five fingers, on four, on three, on two, on two and on one hand. Fold your fingers so that they form a wide bowl.
Exercise time: 15–30 seconds. To make the exercise easier, you can use an emphasis on a bench.
2. Bending and extension of the arms while lying down (“push-ups”) on the tips of the fingers: on five fingers, on four, on three, on two, on two and on one hand. Perform 10–15 times.
3. Standing facing the wall at a distance of 1–1.5 m, push off the wall with your fingers. Perform 10–15 times.
The developed exercises are recommended to be used in the main part of a physical education lesson to develop physical qualities. The time spent doing the exercises should not exceed 10 minutes. When performing exercises, safety precautions must be observed.
Recommended reading
1. Volleyball: a textbook for higher educational institutions of physical culture / Edited by A. V. Belyaev, M. V. Savin. - M.: Physical culture, education, science, 2000. - 368 p., ill.
2. Kholodov Zh.K., Kuznetsov VS Theory and methodology of physical education and sports: textbook. aid for students higher textbook establishments. – M.: Publishing House, 2000. – 480 p.
"Satisfied" exercise
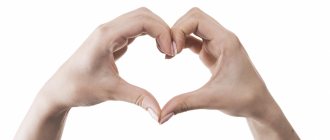
Place your palms together at shoulder level. Now quickly rub your hands together, pressing one palm against the other as tightly as possible. This exercise perfectly strengthens almost all the muscles of the arms, especially the flexor muscles, as well as the anterior pectoral muscles. The publication reports that the exercise gives good results when the muscles in question are partially paralyzed (apparently a common problem in the 1900s), as well as when you need to quickly warm up cold hands.
One two Three…
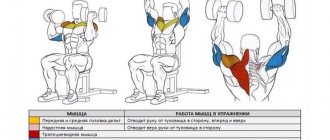
Now a slightly more complex and amplitude exercise. It is performed in six stages. On the count of “one” we lower our hands down, on the count of “two” - from this position, bending our arms at the elbow, we reach our fingers to our shoulders. On the count of “three,” we spread our arms to the sides, on the count of “four,” we reach out to the shoulders, leaving the forearms apart. On the count of “five” we raise our hands up, on the count of “six” we again touch our shoulders with our fingers. You need to keep your back straight during this exercise.
Exercise "sawyer"
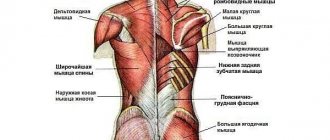
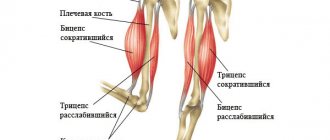
The next exercise is also unusual for a modern person. Nowadays, few people use wood for heating, and in those years there was even a special profession - a wood cutter. Let's get started. We bend the torso forward, one arm is pulled up to the armpit, the other is straightened forward and down. We change the position of our hands: with one hand we seem to be pulling something towards ourselves, with the other we are pushing away. During this exercise, all the muscles of the arms, shoulders and back work comprehensively.
How to make your wrists wider and stronger
Anyone who sets a goal can enlarge their wrist. To achieve a high-quality result, you need to prioritize 2 criteria: quality and time. It may take about a year to enlarge your wrist by even 1-2 cm. Neither the amount of training nor the amount of weight that can fit in your hand will change this fact.
The path to the result must be built on compliance with the basic rules:
- Regularity. How quickly you can achieve your desired goal depends on the frequency of training. Having a pre-prepared study schedule will help you stick to your plan. This will help you track your progress and stay motivated.
- Recovery time . By its natural structure, this part of the body is not surrounded by a large amount of muscle and fat. Therefore, training to increase this area is especially difficult.
- Nutrition. A balanced diet and a sufficient amount of protein will help not only exaggerate the results of training, but also maintain it in the future.
- Moderation. Daily training and numerous repetitions will not bring you closer to the desired result. Harm, injury and lack of desire to move on are the only things this will lead to.
- Diversity. Different variations of exercises provide different loads on the muscles, which makes it possible to work the wrist completely. A variety of workouts will prevent fatigue and loss of interest in exercise.
- Inventory. To build muscle mass you need to lift weights. The more varied the equipment, the more possibilities and variations of exercises. You can use weights, expanders, weights, sports belts, and barbells.
- Warm up. Preparing the body is a mandatory step before every workout. Preliminary warm-up and stretching of the hands will not only prevent injuries, but also increase the effectiveness of the exercises.
- Safety precautions. Compliance with the rules for performing exercises will not only prevent the occurrence of injuries, but will also help you understand which muscles are working at a certain moment, whether the load is evenly distributed, and what the result will be.
- Patience. Persistence and endurance are the basis of moral strength and motivation. Determination is easy to lose, so you need to constantly remind yourself of the goal and its significance.
- Set an achievable goal. Anyone can increase the volume of their wrists, but only taking into account individual capabilities. For example, according to body type, people are divided into ectomorphs, mesomorphs and endomorphs. For the former, gaining muscle mass is a difficult and long process, for the latter, it’s the opposite. Still others differ in the amount and speed of fat growth. But this feature does not deprive ectomorphs or endomorphs of the opportunity to enlarge their wrist. You just need to sensibly assess your strengths and work hard.
Exercise "mower"
To complete this complex there is another “retro movement”.
Imagine that you have a scythe in your hands and swing this tool. The torso should be motionless. The exercise can be performed either standing still or while moving. I’ll add on my own that when I had the opportunity to work with a real scythe, the next day I learned that I had many muscles that I didn’t even know existed. Working with a scythe is a very challenging and useful exercise that allows you to work the deep muscles of the spine. And finally – about pleasant things. The exercise section of the “Book of Health” is not limited to these six numbers. This means there are new old exercises ahead. Tags:
- Story
- Exercises
Treatment tactics
In the early stages, you will be offered conservative treatment that will reduce pain and increase finger mobility. Some methods of physiotherapy for arthrosis will improve blood circulation and restore metabolism, activate tissue regeneration and reduce pain. The following techniques are also practiced:
- osteopathy and manual therapy - to strengthen muscles, improve mobility, restore periarticular blood flow;
- reflexology – helps relieve inflammation and swelling, improves the functioning of damaged interphalangeal joints;
- hirudotherapy – can replace several medications at once;
- physical therapy – relaxes muscles and strengthens muscles.
Intra-articular injections of the Noltrex synovial fluid prosthesis help stop the progression of arthrosis. The principle of action is simple: the gel gets inside the joints and takes on the functions of the missing lubricant, pushes apart the thin cartilaginous surfaces and nourishes them. The friction of the cartilages stops, they are no longer destroyed by mechanical stress, and the person does not experience pain.
If an orthopedist recommends intra-articular injections, then all is not lost
Hands need careful care, and it’s not just a matter of choosing the right cream or cosmetic procedures. We also need to take care of the interphalangeal joints, because they determine how confident and accurate our fine motor skills will be. Regularly stretch your fingers, do exercises, protect your hands from injuries and hypothermia - then the risk of developing arthrosis will be much lower.