Today I will tell you in detail about what the correct barbell squat technique should look like, and also give you some useful tips on the topic. It is known that the squat is one of the least favorite exercises for many athletes and there are a number of reasons for this:
- — Psychological - the leg muscles make up 40% of the total body weight, thanks to which, in squats, we can work with weights two or even three times our body weight. Needless to say, this is scary? It’s one thing to simply drop a barbell, and another thing to drop a projectile that could easily break a slightly less prepared person in the literal sense of the word;
- - Anatomical - some people, due to the length of their legs, simply cannot perform squats safely, since when they are related to the length of the spine, the load will fall not on the attachment points in the pelvis, but on the vertebrae themselves. More recently, Alexey Lesukov in the video from Iron Rating “How one jock killed two fighters!” identified a similar problem in one of his wards;
- - Physical - as mentioned above, the most important thing in the squat is, undoubtedly, the technique of squatting with a barbell. Powerlifting, as a sport that focuses on this movement, will tell you a lot about the fact that this particular exercise is the most difficult purely mechanically. He has the greatest range of motion, the greatest number of muscles are involved in the work, and so on. Please note that, as a rule, when performing classical exercises, you start to sweat not after push-ups or crunches, but after squats! And this speaks for itself.
In order to overcome the fear of this exercise and even fall in love with it, it is important to know what the correct technique for performing squats with a barbell looks like. I will tell you about three ways to perform this exercise below, just so that everyone can choose what is closest to them.
For men and women Determination of body fat percentage
To date, there are no methods for determining body fat that are suitable for individuals with strong muscle development. All existing methods are designed (with the exception of hydrostatic weighing) for certain groups of the population (for example, boys and girls, older men and women athletes in general, students of both sexes, etc.). Therefore, the best that can be hoped for (excluding, of course, possible access to underwater weighing with all the necessary equipment and technical personnel) will be more or less accurate interpolation.
Over the past few years, I have hydrostatically weighed quite a number of eventers and have found that simpler methods of determining the desired percentage using skin folds and anthropometric measurements are quite inaccurate (compared to the very accurate hydrostatic method). On average, these simpler methods make an error of 3-4%, overestimating the actual percentage of fat tissue in the body. So, for example, if using the skinfold technique the percentage of fat is determined to be 18%, then the actual percentage of fatty tissue in the body of a given triathlete is approximately 14-15%.
Thus, male and female eventers will likely need to subtract a small number from the data they obtain using the techniques described below. It should be remembered, however, that such a subtraction is more appropriate when measurements are made in relation to individuals with highly developed muscles, such a subtraction may be very insignificant (if it makes sense at all) when it comes to beginner triathletes.
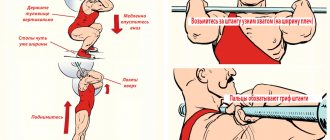
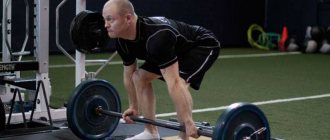
"Lifter" technique of squats with a barbell
The most common technique for performing squats with a barbell, since it is in this case that we use the largest array of muscles, working in a more comfortable position, which allows us to take more weight on the projectile. If you want to know more about these “classic” squats, then you will find all the information, popular questions and the like in this article. Don’t be lazy and take a look once, you will definitely learn something important for yourself.
- — Technique: spread your legs wider than your shoulders (spread your arms and bend them at the elbows, draw a parallel line from your elbow to the floor - these are the points where your feet should be), the barbell is fixed in a classic way, your toes are pointed to the sides. When squatting, pay special attention to your back, it should be straight.
- - Benefits: greater emphasis on the quadriceps, a strong degree of stretching of the hamstrings and a massive load on the buttocks. There is also a static load on the rectus vertebral muscle of the back.
- — Nuances: when following a similar squatting technique, the amplitude of movement decreases and stability increases, but it is extremely important not to immediately grab a large weight, but to first work out the stabilizer muscles.
Men's body fat levels
The best counting technique I have ever encountered is that developed by Zuti and Golding of Kent State University. The technique was developed based on anthropometric data of adult men (aged 25 to 50 years). Therefore, this technique is not applicable for athletes under 25 years of age. Here is the calculation formula:
% fat = 8.7075 + 0.489309 (waist circumference, cm) +
+ 0.448561 (fold of skin on the chest, in mm) —
- 6.358583 (diameter of the right wrist, cm).
This counting technique has a standard error of plus or minus 2.29% compared to the hydrostatic technique.
A very simple technique that does not require the use of calipers to measure skin folds is the following technique, applicable to college-aged men.
Muscular body weight = 92.42 + 1.082 (naked body weight, in pounds)
- 4.15 (waist circumference at the navel, in inches).
Then calculate your fat percentage as follows:
% body fat = body weight - body weight without fat x 100 / body weight.
There is another technique, again used for students.
Body density = 1.1043 - 0.001327 (fold of skin on the thigh, in cm) -
- 0.001131 (subscapular fold of skin, in mm).
Then calculate your fat percentage as follows:
% fat = 100 (4.570 / body density - 4.142).
The last two methods have an error of plus or minus 4% and are not as accurate as the first, but nevertheless, perhaps, more acceptable for young people. In any case, do not forget to subtract 3-4% from the result obtained, especially if you have powerful muscle mass.
Starting strength, squat, part one (M. Rippetoe)
The squat has been the most important and most misunderstood exercise in the training arsenal for a long time. The full-range exercise known as the squat is the most beneficial exercise in the weight room, and our most significant tool for building strength, power and mass. .
Figure 2-1 Depth marks for a full squat. Top of the knee (A) and hip joint shown by the crease edge of the shorts (B). B - the side of the line created by these two points should go below the parallel with the ground.
The reason the squat is so effective is because of the way it uses the core muscles. Core strength is a big deal, and fortunes have been made selling new ways to train the core muscles. A proper squat perfectly balances all the forces acting on the knees and hips, using these muscles exactly as their skeletal biomechanics dictate they should be used, throughout their entire anatomical range of motion. The postural muscles of the lower back, upper back, abdominal and lateral trunk muscles, rib muscles, and even the shoulders and arms are used isometrically. Their static tension supports the body and transfers the kinetic energy of the main movements to the bar. The core muscles act as the transmission, while the hips and legs act as the engine. Notice that the core of the body is at the center of the squat, that the muscles become smaller the further they are from the core, and that the squat works them at exactly that priority. Balance is achieved by the interaction of the postural muscles with the pelvis and legs, starting from the foot on the ground and moving up to the bar, and is controlled by significant activity of the central nervous system under the conscious control of the athlete's mind. In addition, the systemic nature of movement performed with heavy weights produces a hormonal response that affects the entire body. The core is not just strengthened, it is strengthened in the context of an overall physical and mental impact. The squat is misunderstood because it involves a lot of muscles - more than most people realize - and most people who don't understand it have never done it correctly. This means that they cannot appreciate the true essence of the movement and interaction of all muscles acting in a coordinated manner, since for a correct understanding this must be experienced independently. The more people learn to squat correctly, the more people will understand the squat, and like ripples on the water, knowledge and power will spread through the masses. This process begins here, with you.
Figure 2-2. Whole-body strength development originates in the pelvis, and the ability to generate power decreases with distance from the pelvis. Note also that the further away from the center of the body, the greater the angular velocity at which the body part can move, allowing the application of force through acceleration. From a concept by David Webster, versions of which were used by Tommy Kono and Bill Starr. This concept has recently taken on new life under the names “core strength,” “core stability,” and “functional training.” It seems pretty clear to the authors that an athlete with a 250kg squat has a more stable core than the same athlete with a 100kg squat would have.
Squat depth - safety and importance
The full squat is the lower body exercise of choice for both safety and athletic strength. The squat, done correctly, is not only the safest knee exercise, it creates a more stable knee than any other leg exercise. The important part of the last statement is the qualification “done correctly.” Correctly means deep, with the pelvis extending below the level of the top of the kneecap. That's right - that means in full amplitude. Any squat that is not deep is a partial squat, and a partial squat targets the knee and quadriceps without loading the glutes, adductors, and biceps. The biceps femoris, groin and gluteal muscles perform their function in the squat when the pelvis is retracted to a state of full bend, where they tense - the full squat position (Fig. 2-3). The biceps muscles, attached to the tibia and ischial tuberosity of the pelvis, and the adductor muscles, attached between the medial femur and various points on the pubic bone, reach full extension at the very bottom of the squat, when the pelvis tilts forward with the torso, retracting the ends of the muscles. In this extended position they give a slight kick from the bottom which will look like a "bounce" and which you will learn more about later. The tensile force pulls the tibia back toward the buttocks, balancing the forward pulling force of the quadriceps. The biceps muscles do their job with the help of the adductors and gluteal muscles, straightening, or “breaking” the pelvis.
Figure 2-3. Muscular effects on the knee. The anterior force generated by the quadriceps is balanced by the posterior force generated by the biceps femoris in the deep squat position. Depth is the key: partial (high) squats primarily target the quadriceps and lack balance.
In a partial squat, which cannot produce full tension on the biceps, most of the force against the tibia is directed upward and forward, away from the quadriceps and their joints on the front of the tibia, below the knee. This creates an anterior shear force in the knee that pulls the tibia forward from the patellar tendon without the countervailing pull of the opposing biceps muscles. This shear force—and the resulting unbalanced load on the knee—is probably the biggest problem with partial squats. A significant portion of tendonitis was caused this way, and the blame fell on the “squat”.
Figure 2-4. Squat depth variations commonly found in the gym. A. Quarter squat. B. Half squat. C. A position often confused with parallel, where the lower surface of the thigh is parallel to the ground. D. Parallel squat meeting the criteria established in Figure 2-1.
The biceps muscles benefit from being engaged in a full squat, becoming stronger in direct proportion to their anatomical portion of the work of the movement, as determined by the mechanics of the movement itself. This fact is often overlooked when ACL tears and their relationship to the training program are discussed. The anterior cruciate ligament stabilizes the knee: it protects the tibia from moving forward relative to the femur. As we have already seen, the biceps muscle group does the same. Underdeveloped, weak biceps muscles thus play a role in ACL injuries, and full squats work the biceps muscles while partial squats do not. Since the biceps muscles protect the knee during a full squat, the biceps muscles, which are stronger from full squats, can protect the anterior cruciate ligaments during the activities we squat to prepare for. In fact, athletes who lack anterior cruciate ligaments can safely squat with heavy weights because the anterior cruciate ligaments are not stressed when performing a full squat correctly (Figures 2-5).
Another problem with partial squats is the fact that very heavy weights can be lifted due to the short range and high mechanical efficiency of the quarter squat position. This exposes the practitioner to back injuries as a result of the extreme stress on the spine that results from lifting a weight on the back that is perhaps three times the weight that can be safely used in a proper deep squat. Many football coaches are fans of the partial squat because it allows them to claim that their 17-year-old forward can squat 300kg. Your interest is in getting stronger (at least it should be), not in a mindless numbers game. If it's too hard to squat below parallel, it's too hard on your back.
Figure 2-5. Knee forces in a squat. The hamstrings and adductors pull the tibia posteriorly, and the overall effect of the anterior quadriceps tendon involvement is forward pressure on the tibia. With sufficient depth, the front and rear forces are balanced. The anterior and posterior cruciate ligaments stabilize the anterior and posterior movement of the femur relative to the tibial plateau. With a proper squat, these ligaments have very little work to do.
Olympic weightlifters provide an excellent illustration of the safety and benefits of the full squat. At the 2004 Olympics, 167 of the 192 countries in the world competed in Olympic weightlifting. More than 10,000 people compete annually at IWF events, and the number of participants from 167 countries ranges from approximately 2 to 5 million (China alone claims more than a million weightlifters). All over the world, weightlifters squat below parallel safely, often using some form of exercise, either with a bar on their back or on their front, every day. It's true: they squat below parallel every training day, and most programs take six days a week. Isn't it amazing that they are strong and not under the care of an orthopedic surgeon? There is simply no other exercise, and certainly no machine, that creates central nervous system activity levels, improved balance and coordination, skeletal loading and increased bone density, muscle stimulation and growth, connective tissue stress and strength, psychological strength and resilience, and overall systemic fitness. training is better than a properly performed full squat. Unless you have an injury that prevents you from performing them at all, anyone who lifts weights should learn how to squat correctly.
Learning to squat
The squat starts with a power rack, or squat racks, depending on what is available. Set the rack height so that the bar in the rack is level with the middle of your chest. Many will think that this is too low, but it is better to have the bar removed from the racks a little low than to then rise on your toes and return the heavy weight to the rack. Often an empty rack in this position will look low because the diameter of the bar resting in the hooks tells the eye a different picture of the actual height in the rack. When the bar is placed in the rack, the eye will be more satisfied with this setup. We'll use a fairly neutral foot position, with heels about shoulder-width apart and toes pointed out about 30 degrees (Figure 2-6). Excessive width overextends the pelvis at the bottom of the movement, excessive narrowness interferes with the stretching of the hip adductors and causes the quadriceps to press into the abdomen in larger practitioners, both of which interfere with proper depth. Many people use a stance that is too narrow, so make sure your stance is wide enough to allow a good position underneath. Look down at your feet and remember the picture of what you see.
Figure 2-6. Squat leg position map, top view. Figure 2-7. Your point of view from the rack
Now begins the key part of learning the movement. You must master a position where you are at the bottom of a proper squat, without the bar. It is very important to do this first without a bar because any errors in position can be easily corrected without a bar, which adds complexity to the system. And if you've already been here without a bar, getting into this position again with a bar is much easier. Take the correct stance and squat down completely. Don't even think about stopping high, just go down. Make sure to support your feet in the correct position because sometimes a lack of flexibility can change your stance when lowering. If it changed while you were going down, correct it now. Next, place your elbows between your knees, palms together, and spread your knees apart. Generally, this will be a good bottom position, and if your flexibility is not very good, the position acts as a stretch if you hold it for a few seconds. Remember, proper depth is essential in the squat, and this low position now lays the foundation for you to achieve good depth. Stay in the bottom position for a few seconds to stretch a little. If holding a position tires you, it indicates that you are not flexible enough. Stand up and rest for a few seconds, and return down to further stretch and become more familiar with the bottom position. This is the most important part of learning how to squat properly because adequate depth is the difference between a squat and a partial squat.
Figure 2-8. Use your elbows to stretch into the correct position at the bottom. The thighs are parallel to the feet, the feet are flat on the floor at the correct angle, the pelvis is tilted back, the knees are just slightly beyond the toes, and the back is at an angle that will allow the bar to be placed over the middle of the foot, about 45 degrees.
Figure 2-9. Your knees should be just slightly in front of your toes.
Now it's time to pay attention to some important details regarding the bottom position. Your feet should be flat on the floor, your knees should be in a line parallel to your feet, and your knees should extend just slightly forward beyond your toes. Your back should be as flat as possible, but if it's not perfect, we'll fix it later. Also note that it is tilted approximately forty-five degrees rather than vertical. You may think it's vertical, but it won't and shouldn't be. A word about the position of the knee and the function of the adductor, or “groin” muscles. This method uses a stance that requires the outside position of the knees, at the bottom and when lowering down. Knees-out play two important roles in the squat: they allow you to go deeper, and they add adductor muscles to the movement. Regarding depth, the previously mentioned abdominal pressing effect affects most people, depending on the degree of fullness. The tendency to limit the drop of the hips when the belly is pressed against them is almost universal, as is the tendency to round the lower back when this happens. This, combined with the fact that if the toes point forward, as usual with a narrow stance, the knees will also go forward, makes the correct depth difficult to achieve. The knees can move forward until they literally touch the floor without the hips dropping below the knees (Figure 2-10). Your knees should reach a point just in front of your toes, and this position will depend on your anthropometry (a funny way of saying “individual physical parameters”). If your knees stop far in front of your toes, you'll have to lean forward too much to maintain your balance. Knees that are too far forward create too much of an angle at the knee, placing your weight on your toes and making the pelvic drive from the bottom position ineffective because the biceps muscles are lost.
Figure 2-10. Knee position does not determine depth. Same depth, different knee positions. Depth is a function of hip position only.
The role of the adductors in the squat is a little more difficult to understand. One sure sign of weak adductors is an inability to keep your knees apart during a squat, a symptom that is sometimes interpreted as weakness of the adductors on the outside of the thigh. Therefore, a good understanding of anatomy is necessary here. Please note that all of these muscles mainly originate in the groin area and attach to the medial part of the femur. Thus, their function will be to reduce the distance between these two points. When you squat all the way down, or just squat down, notice what happens to the distance between these two points - it increases, which is easy to demonstrate by placing one finger on the beginning of the groin area (do this in privacy, please) and the other finger on the inside knee (Figure 2-13). As you ascend, the points will move closer together, demonstrating the fact that these muscles are contracting during the squat. The hip adductors can only function in a squat when the knees are apart. If the knees are together, pointing forward and the thighs are parallel, the groin muscles are in a position where they are already contracted without lifting any weight. This forces the quadriceps to do all the work, and the adductors do not contribute at all to the movement. Since we're trying to strengthen more muscles and lift more weight, it makes sense to use the adductors during the squat. If you have an injury in the groin area, this information is also useful: you can squat in a narrow stance until you recover.
Figure 2-11. Knee position and its effect on the angle of the back. Translation: Back more horizontal – The back is more horizontal. Shins closer to vertical – Shins closer to vertical. Back more vertical – The back is more vertical. Knees more forward – the knees are more forward.
Figure 2-12. Anatomy of the adductor muscles of the right thigh.
Figure 2-13. Demonstration of the function of the adductor muscles of the thigh. Note the differences in the length of the cord along the inner thigh, illustrating the change in adductor length between the top and bottom positions of the squat. The adductors stretch on the way down and contract on the way up, helping to straighten the hip. The adductor muscles are an important part of the “posterior chain.”
Electromyographic studies have shown that the gluteal and biceps femoris muscles are the primary movers from the bottom of a full squat (the adductors are also involved, although not noted by many researchers), and it is better to think of this movement as a “pelvic movement.” Once the bottom position is achieved, rise up, giving upward momentum to your pelvis. Up, not forward. This will keep your weight squarely over your entire foot, instead of moving to your toes. Think of a chain attached to your pelvis, lifting you straight up from the bottom position (Figure 2-14). Don't think about straightening your knees, don't think about pushing the floor with your feet, don't think about your legs at all. Just move your pelvis from bottom to top and the rest will take care of itself. Keep your chest lifted as you move your pelvis so that your back maintains the same angle to the floor as you rise from the deep position. This important detail should not be missed. Recall our previous discussion of using the biceps femoris muscles in the squat. A squat is not a leg press, and pushing the floor with your feet creates an inadequate command for the biceps, adductors, and glutes to use their power in the lift from below. Pelvic extension is the first part of the upward movement from the bottom position. When you think about lifting your butt up from a low position, the nervous system has a simple, effective way of triggering the correct motor units to begin straightening the pelvis. If you have difficulty with this movement, it may be helpful to have a coach or partner press down on your sacrum while you are in the bottom position, and then lift up against the pressure. If you can do this in balance, you are lifting correctly.
Figure 2-14. An interesting way to visualize the pelvic impulse in a squat.
Figure 2-15. Tilt of the back during lifting from below is critical for proper functioning of the pelvis. The correct angle is created when the bar is directly under the line of the shoulder blades and exactly above the middle of the foot vertically, the back is kept tight in the lumbar and thoracic regions, the knees are parallel to the correctly set feet, and sufficient depth has been achieved, as will be described later.
Now you are ready to squat. You have already been in the position where you will be at the bottom - now you will simply lower yourself down with the bar. First, rub talcum powder on your hands. Talcum powder is always a good idea because it dries out the skin, and dry skin is less likely to wrinkle and rub off than wet skin, and thus less prone to calluses. If there is no talc in the hall, bring it with you. If this is not allowed, change the hall. Look at the neck. Always empty at first. Always. Very soon there will be plenty of time to add weight. The rack should be set so that the bar rests approximately in the middle of the sternum, in a position that is not too high or too low for the back. The preferred position of the bar is NOT high on the holders, just below the neck, although this is the position preferred by Olympic weightlifters. Use a lower position where the bar is directly under the shoulder blade line, on the rear deltoids. This lower position reduces the leverage created by the weight of the bar being transmitted down the back to the pelvis, creating less twisting force on the lower back and therefore making the exercise safer (Figure 2-18). If your shoulders are not flexible enough to get into this position at first, they will stretch out over a few weeks. Until then, a high bar position can be used if necessary, but continue to move the bar as low as possible.
Figure 2-16. The position of the bar in the rack should be approximately in the middle of the sternum.
Figure 2-17. Position of the bar relative to the skeletal anatomy of the back.
Figure 2-18. The twisting force acting on the lower back increases with increasing distance between the bar and the pelvis. The rigid segment of the torso acts as a lever acting on the pivot point in the pelvis. The longer the distance between the force of the loaded bar and the pelvis, the greater the twisting force acting on the lower back.
Grasp the bar with an even grip measured from the marks placed on the bar for this purpose. A standard fingerboard has 16.5 - 17 inches (42.24 - 43.52 cm) between the ends of the outer checkering, and 32 inches (81.92 cm) between the finger marks, these grooves are in the 1/8 inch (3. 2 mm) indicate the maximum permitted grip width for the bench press. Clearly, the width of your squat grip will vary depending on your shoulder width and flexibility, but generally your hands will be positioned between these two marks. A narrower grip will allow a flexible person to better support the bar with the muscles in the back of the shoulder when the elbows are raised, and a wider grip will allow a non-flexible person to feel more comfortable under the bar. Either way, a narrower grip tightens your shoulder muscles so that the bar is supported by the muscles and doesn't dig into your back. The thumb should rest on top of the bar so that the hand can be kept in a straight line with the forearm. If a lack of flexibility (usually in the chest or shoulders, not in the hands) prevents you from getting into this position, use the high bar position until proper stretching helps you develop enough flexibility to move it down to a better position.
Figure 2-19. Hand placement on the bar. Note that your thumb is resting on top of the fingerboard and your hand is between the outer ring and the inner edge of the checkering.
Figure 2-20. Comparison of wide and narrow grips. Notice the difference in upper back muscle tension, and the resulting difference in bar support potential.
Figure 2-21. Aligning the brush on the fingerboard. The correct grip keeps your hand over the bar and the entire weight of the bar on your back. An incorrect grip intercepts some of the weight, loading the hands and elbows. The folds in the tape illustrate the difference.
Keeping your grip in the right place, duck your head under the bar and assume a position with the bar on your back. The bar should be positioned in the correct place—right under the “bone” you feel at the top of your shoulder blades, with your hands and thumbs on top of the bar—and then locked in place by lifting your elbows and chest at the same time (Figure 2-22). This action tightens your back muscles, and lifts your ribcage, placing the thoracic spine in a long, “straight” position, and corrects many of the problems often seen with a rounded back. In this way, enormous weights can later be lifted safely. First and foremost, always step back from the stance. Always! Never put the bar back in the rack while stepping backwards. Never! This cannot be done safely. You should never be in a position that forces you to step back when returning the weight to the rack at the end of the set. You can't see the hooks, and even if there are observers who can tell you, eventually an accident will happen. The bar should come off the rack in the same position you would squat in, with your torso and shoulders tense, chest and elbows raised, and head tilted forward. Everything should be the same as before a full squat, and the bar should be released from the hooks by straightening the knees and pelvis, just like at the top of the squat. This way you can safely remove any weight from the racks. Improper execution creates many problems. It is very common to remove the bar with a relaxed back and chest, and then try to tighten it all up before squatting. It is obviously much easier to tense the muscles and then put weight on the tense muscles, than to take the weight, let it slam into the back through the relaxed muscles until it comes to rest on some part of the skeleton, and then try to tense everything underneath. Remove the bar as if it were a squat and you won't have these problems.
Figure 2-22. Raising the elbows and chest at the same time “pinches” the bar between the arms and back, creating a stable back and chest position and keeping the bar firmly on the back of the deltoids.
Figure 2-23. Correct position for removing the bar from the racks.
Once the bar is off the rack, don't walk around with it, taking three or four steps back before preparing to squat. This is unnecessary and can cause problems if the set is heavy, spotters are unreliable, and the road back to the posts is simply too far on that particular day. One good step back is enough to clear the posts and allow any observers to do their thing, while minimizing the hassle of getting back up. The position should be the same as that used during the stretch. Heels should be approximately shoulder-width apart, toes turned outward about 30 degrees. You may need to turn your toes out a little more than you would like to get them into the correct position.
Now you are ready to squat with an empty bar. Exactly with an empty neck! All the preparation has been done, the correct bottom position is fresh in your memory, and you are now in the correct starting position. All you have to do is the same as you did while stretching. Only two parts are different: first, you don't have the ability to use your elbows to push your knees apart, so you have to do it with your brain. And second, don't linger below. Lower yourself down and immediately come back up, giving momentum to your butt directly from the bottom up, not forward. Now, take a deep breath and hold it, look at a point on the floor 6 feet (183cm) in front of your position, and squat down.
Original taken from lake_spirit article: Starting strength, squat, part one
Rate this article:
[Total: 0 Average: 0]
Similar
The percentage of body fat in women and the method for calculating it
In women, fat is deposited more unevenly in the body than in men, and therefore it is necessary to use not only different sites for measuring skin folds and anthropometric measurements, but also a larger number of them. This makes the procedure for calculating the desired percentage somewhat more complicated. Here is the best method known to me, which has advantages over others also because it does not require the use of calipers.
Body weight without fat, in kg = 8.987 + 0.732 (weight in kg) +
+ 3.786 (wrist diameter, cm) —
— 0.157 (abdominal circumference, cm) —
— 0.249 (hip circumference, cm) +
+ 0.434 (forearm circumference, cm).
Then calculate your fat percentage as follows:
1. Convert your lean body weight to pounds by multiplying kilograms by 2.2046 (or keep it in kilograms if you've mastered the metric system).
2. Body fat percentage = body weight - body weight without fat / body weight.
As in the case of calculating this percentage for men, the standard error is about plus or minus 4%, and if the woman using this equation has more developed muscle mass than is usually the case in women, then all 4% should be subtracted from the result. result.