Squats with weights on the chest, called front squats, are rarely done by modern athletes. Many people have heard about this method of performing a well-known basic movement, but due to ignorance of the technique, it is rarely included in the training program. Meanwhile, the front squat gained popularity even before the era of bodybuilding: it was practiced by athletes while preparing for a power push of a barbell.
- What muscles are used during front squats?
- Benefits of Front Squats
- Technique for performing front squats with a barbell on the shoulders
- Features of the front grip during a front squat
- Step-by-step front squat technique
- Video: how to properly squat with a barbell on the front
- Smith machine front squat
- Video: Smith machine front squat technique
- Front squats with dumbbells and kettlebells
- Video: chest squat technique
- Recommendations for performing front squats
All about preparation, grip and technique.
If you regularly work out at the gym, your leg day is probably not complete without squats. For example, avoid squats with a low barbell position, because they allow you to work the maximum number of muscles of the posterior chain - a group of muscles that are located in the back. The rule is simple: more weights - more muscles involved.
But there are other squat techniques that are just as effective as low bar squats. For example, many athletes and amateurs include a high bar squat in their training plan. It is similar to the “low” version of the squat, except that the bar is placed higher on the back.
But the list of variations does not end there. There is another type of squats with a barbell that you can safely try at your next workout: these are front squats, or front squats.
We talk about their advantages and implementation techniques below.
Summarize
- It is necessary to take the correct position of the back before removing the bar from the racks, and not vice versa.
- Keep your elbows as high as possible, but at the same time you should be comfortable.
- Don't slouch - keep your back straight and your chest forward to better stabilize the bar.
- Do not lift your heels off the floor or place any objects under them.
- When you stand up, do not bring your knees inward.
- For beginners and not only - do not chase heavy weights, but strive to complicate the technique of performing the exercise, as experienced professionals do.
- Remember, everything should be in moderation - learn to feel your body.
- And lastly, before you start squats, you should consult your doctor. Since, perhaps, such a load is prohibited for you.
Exercise, eat right and get better - good luck to you.
Why are they needed?
crossfit.com
You want to improve your clean technique. When you perform a clean, you are forced to do a front squat to get from the bottom to the Olympic lift. So, if you want to get better from the bottom of the fulcrum for cleans, you should definitely include front squats in your training program.
You need complementary exercises for your lower body. If you're an advanced lifter, your training plan likely includes complementary exercises. They are similar to the main ones, but are done a little differently in order to work the muscles that are involved in the main lift (elevator), but from a different angle. For example, sumo deadlifts can complement deadlifts.
An excellent complementary exercise to low bar squats is the front squat. If the former use the hamstrings and hamstrings more, the latter - frontal - work the quadriceps and buttocks more. The exercises are similar, but each of them places more or less emphasis on certain muscle groups.
You cannot squat with a low barbell position. Due to injury, some athletes simply cannot perform low squats. For example, those with hip problems find low squats very painful. And because front squats don't require you to flex your hip muscles, people can easily tone their lower body.
And while front squats require more knee flexion, research has shown that they actually put less pressure on the knees than low squats. This led the team to conclude that “front squats are more beneficial than back squats for people with knee problems—such as a torn meniscus—and for long-term joint health.”
So if you're having trouble with back squats, try replacing the exercises with a front squat.
Description of the exercise
The exercise is classified as complex, so you should start learning it after mastering the correct technique of classic squats. The exercise focuses on the inner part of the quadriceps, the so-called teardrop muscle. To perform it, a certain flexibility in the shoulder joint is required.
If the ankle joint is not flexible enough, then it is better to place support under the heels, in the form of wooden blocks or pancakes. Feet should be placed shoulder width apart, not wider.
Preparation and grip
1Gai.Ru (translation) / artofmanliness.com
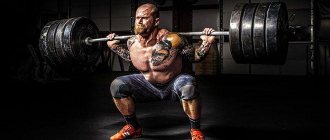
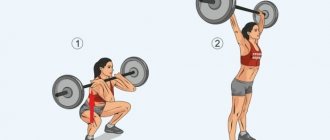
As the name suggests, unlike other squats, which place the barbell on your back in a high or low position, the front squat places the bar on the front of your body—across your front deltoids.
Ideally, you want to grip the barbell so that your front delts form a nice, solid “shelf.” All so that the bar can rest on it while you do the exercise.
Here's how to build this muscle shelf:
- Grasp the barbell with a narrow grip (shoulder-width apart). Grasp the bar with your thumbs.
- Get closer to the bar and extend your elbows forward. So much so that your shoulders are almost parallel to the floor. The higher your elbows, the stronger your muscle shelf will be, on which the barbell will rest.
- Stand up straight and remove the barbell from its hooks. Voila - you are in the starting position for a front squat. Or in the A-pillar position.
Squats with a barbell on your shoulders
To begin this exercise, you need to select the correct weight of the projectile. Typically, working approaches are performed with a barbell weighing 70-90% of the athlete’s one-time maximum.
Approach the bar placed on the racks. Grab it with your hands, placing them slightly wider than shoulder-width apart. Straighten up and take the weight of the barbell onto yourself. The bar should lie in the area of the trapezius muscles; do not place it on the neck, as this can lead to injury.
After lifting the projectile completely from the rack, take a couple of steps back. Squats with a barbell should be performed from the starting position “feet shoulder-width apart.” At the same time, turn your toes slightly to the sides so that it is convenient to maintain your balance.
Inhale and lower yourself down. Don't squat too low to avoid damaging your knee joints. It will be enough to lower yourself until your thighs are parallel to the floor.
During the exercise, try not to bend your back. In this case, the technique of squats with a barbell will be disrupted, the load will be redistributed, and you can injure your lower back.
Another important point: do not lift your heels off the floor. The foot should be completely on it throughout the entire set. As you rise, begin to exhale when you feel that you have overcome the maximum load. The video below will tell you all about how to squat correctly. Barbell squat technique and comments from professional trainers.
Here are some tips to help you master barbell squats faster:
- The abdominal muscles should be constantly tense. This gives the body stability and prevents unnecessary movements.
- When you rise on your toes, you risk losing your balance or damaging your knees.
- At the lowest point, your knees should not go beyond your toes.
- By placing your feet narrow, you will shift the load to your quadriceps. If you place them wider than recommended, your hamstrings will take the weight.
- Before you figure out how to squat correctly, you shouldn't take too heavy a projectile. First you need to establish the correct technique for squatting with a barbell.
The type of squats described above is the most common. However, there are several more variations that are definitely worth trying out during training.
Alternative grips
1Gai.Ru (translation) / artofmanliness.com
The standard front squat, where you wrap your thumbs around a barbell, requires a lot of wrist mobility. If you do not have such mobility, then keep several alternative methods of capture:
Remove a few fingers from the barbell. Try taking your pinky and ring fingers off the bar and hold it with your index, middle and thumb. The bar will be securely attached to the deltoid "shelf" so you don't have to use all your fingers to hold it in place.
Try a wider grip. If you have a short humerus and a long forearm, you will lack the wrist flexibility needed for a narrow grip. So try gripping the bar with a wider grip.
Use belts. If you have lifting straps, you can use them to grip the bar. Simply wrap them around the bar, grab them with your hands, and extend your elbows forward.
Try a cross grip. Another good option if you have trouble holding the bar in a front rack. Cross your arms and step under the bar. Place the barbell in the “dimple” between your thumbs and the rest of your palms. The bar should still rest predominantly on the front of your shoulders, with your thumbs holding it in place. Raise your elbows up so that your shoulders are parallel to the floor. And, of course, stand up straight.
Benefits of Exercise
A distinctive feature of this type of squats is the location of the bar, which is unusual for many athletes. Unlike the more standard version, the barbell is placed on the chest and deltoids, and not on the back muscles at all.
This variation results in the back being in an almost vertical position, which radically changes the load on the body. And the muscles that are involved in the work change radically.
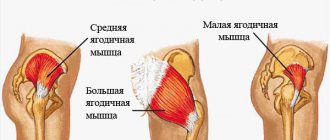
What muscles work:
- The main work is done by muscle units such as quadriceps.
- The auxiliary muscles are the gluteus maximus, gastrocnemius, soleus, posterior thigh muscles, as well as the rectus and oblique abdominal muscles.
Thus, there are a huge number of advantages in using this type of squats:
- An undeniable help in building well-developed thighs, a strong lower back and strong abs.
- Reducing the compressive effect on the spinal column, and therefore on the entire back, minimizing knee injury.
- Lack of lumbar torque.
- There is a high probability of performing the exercise with the correct technique. Otherwise, the barbell will immediately fall to the floor and you won’t be able to squat. And mastering the correct technique is crucial in any athlete’s training cycle.
- Formation of impressive core muscles, development of more reliable stability.
- If a plateau occurs when training your legs, it easily eliminates this problem, literally exploding muscle growth.
- Promoting better fat burning.
Execution technique
1Gai.Ru (translation) / artofmanliness.com
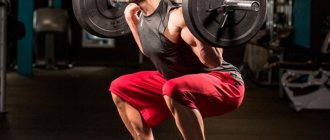
- Once you've positioned the barbell and moved into a front rack, it's time to squat.
- Position. Place your feet slightly narrower than shoulder width, with your toes slightly turned out to the sides.
- Watch your elbows to keep your body upright. Unlike low bar squats, where you lean your torso slightly, you want your upper body to remain upright throughout the exercise. To do this, simply repeat to yourself that your elbows should “look” up. If you find yourself leaning forward slightly as you lift, remember that your elbows come up first.
- Another helpful signal is to look straight ahead.
- Take a deep breath and slowly lower yourself down, pushing your knees forward so that your pelvis is below parallel with the floor. Remember to keep your torso upright, always thinking about your elbows.
- Get up quickly. The eccentric portion of the squat should be fast. Push off!
- And don't choke yourself! The bar will be located quite close to the throat. Be careful not to let it put too much pressure on it, so as not to cut off the blood supply to the brain. Otherwise, it will lead to fainting and loss of consciousness. Not cool.
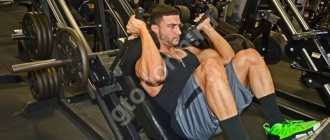
Smith machine front squat
Weighted front squats place great demands on maintaining a vertical position during execution - otherwise the projectile will fall to the floor.
If you have no training experience, it is advisable to perform a front squat in a Smith machine. In this device, the bar moves along a given path. It is much easier for an athlete to maintain a stable body position and focus on concentrated work on the hips: the exercise in this version uses the quadriceps more.
Approaching the simulator, set the bar at the level of the collarbones. You need to sit under him so that he lies on the front delts. The projectile is taken with one of the types of grips. The feet are located directly under the bar or slightly in front of it, hip-width apart.
Having assumed this position, remove the bar from the supports, straighten the body and begin the exercise.
- After taking a deep breath, they smoothly lower themselves into a squat. The pelvis moves down and slightly back, the knees only move down. They shouldn't go beyond your socks. The deflection in the lower back remains. The most difficult part of the trajectory is when you exhale.
- In the lower position, the thighs will reach parallel to the floor. If your physical fitness allows, you can squat deeper, the main thing is to avoid rounding your back.
- Using the force of the quadriceps, they lift up, returning to the starting position.
Do 8-12 repetitions in 3-4 sets.
vr
Experienced athletes can use an “explosive” technique in this exercise, which consists of powerfully pushing the body upward after a short pause at the bottom. It is important that the bar does not come off your shoulders.
Video: Smith machine front squat technique
Preparation for execution
Before performing a front squat, you should prepare your muscles, tendons and joints well. To this end, you need to follow universal sports practice - perform a lighter version of the exercise.
It would be best to perform a series of squats with minimal weights - a bar or dumbbells on your shoulders. During the process of adaptive loads, the warm-up weight should be brought to the maximum level, which will be 85-90% of the working weight.
The load when performing a front press for beginners should take into account gender differences: for men, working weight is up to 30 kg, for women – up to 20 kg. The number of repetitions and approaches is the same - 3-4 sets of 12 times.
Main mistakes made
It may seem to many that there are no difficulties and everything is so easy that strict control of the technique and its periodic recall are not even worth attention. However, this is not entirely true. Errors are quite common even among experienced athletes. Among them are the following:
- Perform the exercise quickly and jerkily. In the pursuit of speed, the necessary measured rhythm, which is simply necessary to engage all the muscle fibers of the legs and buttocks, completely disappears.
- Full or partial blocking of the knees. It should be noted that straightening the knees in a standing position removes the load from the quadriceps muscle and transfers it to the joints, which is not very useful and promotes progress, and it can also lead to unwanted injuries.
- Incorrect position of the head and back. If these parts of the body cannot stay straight without deviation, the body tilts forward or the barbell falls to the floor.
- Limitation of range of motion. This results in muscle fibers not being used to their maximum capacity, which slows down overall muscle growth.
- Incorrectly selected working weight. If you want to take record-breaking weights or perform squats with a weight similar to classic squats, the execution technique completely breaks down.
- Holding the barbell with the strength of your arms and wrists. Such excessive wringing quite simply becomes the cause of a rather painful sprain or dislocation. The ideal bar placement is with the deltoids in front, the elbows in front, and the wrists just helping to support the weight.
- Incorrect distribution of the total load. The horizontal axis of movement of the bar passes through the very middle of the foot. Compliance with this condition ensures the optimal level of back tilt.