FacebookTwitterPinterestEmailWhatsAppVKontakte
The plank is perhaps the best exercise for strengthening your core and abdominal muscles. By regularly performing various types of plank exercises for 15 minutes, you can improve your flexibility and overall body condition, improve your mood and reduce back pain, as well as lose weight and get a flat stomach. In fact, people who consistently do elbow stands and other variations of this movement feel much more confident anytime, anywhere! So let’s roll up our sleeves and learn how to correctly perform this wonderful movement and at the same time figure out how the plank exercise is beneficial for the body of women and men!
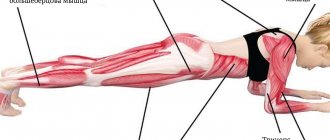
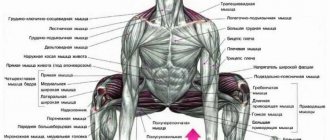
Muscle work in the plank
The following muscles work:
- The cervical spine and deep back muscles are strengthened. In the future, it will be easier to maintain your posture, and fatigue when working at the computer will decrease. The plank prevents the occurrence of osteochondrosis.
- Hands. They take on half the total weight, due to which they quickly become stronger. The arms do not acquire muscle relief, but only become slender and toned. Biceps and triceps work.
- Press. Not only the stomach is tightened, but also the sides. The entire abdominal region works, including the oblique muscles.
- Legs. After the first classes, both calves and thighs will hurt. You can increase the load on this area by alternately raising your legs in the plank.
- Buttocks. Exercises will tighten the gluteal muscles and prevent the development of cellulite. During the exercise, they should be tense.
The plank exercise uses more muscles than the crunch. The benefit of the plank is to work the core muscles; there is less risk of harm, since the exercise is static and quite simple.
How to do the exercise correctly
How to stand in the plank correctly so as not to cause harm to your health and at the same time lose weight:
- the heels should be brought together; in this position, the load on the abs increases due to the fact that it is difficult to maintain balance;
- the legs should be tense, this is how the maximum load on the abs is achieved;
- strain your buttocks during the plank for weight loss - this way you can work out the subgluteal fold and put a good load on your abs;
- It is better to pull the abs towards the ribs and spine;
- do not interrupt your breathing, even if it is difficult to breathe;
- there is no need to create a load on the joints, so you should place your elbows exactly shoulder-width apart;
- The plank for men can initially be performed with weights - ask someone to put a barbell disc on your back;
- To work out all the muscles as efficiently as possible, perform a set of plank exercises - several varieties in a row.
Benefits and harms
To lose weight, it is much more productive to use vigorous exercise. However, the plank trains endurance and strengthens the entire body.
Benefits of plank exercise
- All abdominal muscle groups are involved, which allows you to work out your abs well.
- The muscle corset is strengthened, especially the back muscles that support the spine. With prolonged practice, posture improves.
- The core muscles, which are responsible for body balance, equilibrium, and support of internal organs, are strengthened.
- The plank can be static, dynamic, you can give the body a more intense load, accelerating weight loss, working out the abs.
- Metabolism accelerates, making weight loss faster and easier.
Contraindications
Performing the plank may be contraindicated for persons with health problems.
Let's talk about those who should not do the plank, because the exercise is prohibited if:
- injuries of the spine or intervertebral discs, for example, hernia;
- injuries to ligaments or tendons in the wrist joint, ankles;
- the presence of inflammation in the muscles;
- late pregnancy;
- caesarean section (carried out less than 6 months ago);
- going through the recovery period after surgery.
Advantages
The plank helps:
- Strengthen several muscle groups;
- Work on problem areas in the abdomen and waist;
- Improve posture;
- Maintain balance;
- Develop endurance.
The plank is completely safe for joints and, thanks to its various variations, is suitable for all athletes.
Static bar
This exercise focuses on the hands or forearms, using only your own body weight. The torso remains motionless during execution, but all muscle groups work.
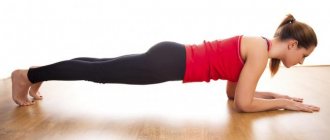
Classic plank with outstretched arms
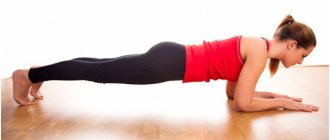
This is a beginner exercise that you need to master before trying the dynamic plank. The press does the most work. The emphasis is on straight arms, perpendicular to the floor. The back is a straight line. The buttocks and abs are tense.
You cannot perform the plank at the expense of technique; the muscles will not work correctly. If you experience severe pain, it is better to shorten the exercise time, but do it technically.
Classic plank technique
This is a bar for beginners who need to master the technique of the exercise. As soon as you manage to stand for 1-2 minutes while doing a regular plank, you can make the stand more complicated.
Technique:
- Get on your knees, placing them hip-width apart.
- Place your palms directly under your shoulders. You need to ensure that the weight is evenly distributed throughout the palm.
- Stretch your legs back, focusing on your toes. The heels look back, the top of the head tends forward.
- Keep an eye on the pelvis, it doesn’t fall down or lift up. Look at the floor in front of you.
- The abs are tense. Shoulders and neck are relaxed. Remove the arch in the lower back.
- Perform the exercise for 30 seconds.
- To exit the exercise, you need to lower your knees and lift your body up.
To lighten the load, just place your feet a little further apart.
Elbow stand technique
The elbow stand or plank is suitable for beginners; otherwise it is called the lower plank. There is less risk of injury due to reduced stress on the wrists. Standing on your elbows works your abs and upper back better.
Technique:
- Emphasis on the forearms. We do not join our hands together, our forearms are parallel to the body.
- Bring your legs straight back, weight on your toes.
- The abs are tense, the stomach is pulled in, the heels are pulled back.
- You need to make sure that your back and knees are extended in one line. You cannot sink in the shoulder blades or lower back.
- Do not raise your head up, look down in front of you.
- The elbow is located exactly under the shoulder, the arm forms a 90° angle.
- The buttocks do not rise or sag down.
- You cannot turn your elbows too far away from you; they should strive to be as parallel to the body as possible.
- Perform the exercise from 30 to 120 seconds.
By combining a classic plank and an elbow stand, i.e., by alternating them, you get an excellent exercise for working the abdominal and arm muscles. When performing, the body does not swing, but is fixed parallel to the floor.
Side plank
It trains the arms, gluteus medius and maximus muscles well, and tightens the side. Correct execution of the side plank prevents the development of cervical and lumbar osteochondrosis.
Technique:
- Lie on your side. Place your elbow exactly under your shoulder. Lean on your forearm, which completely touches the floor.
- The feet lie one on top of the other. Legs straight, do not bend your knees. The back is straight.
- Raise your body. The thigh does not touch the floor. The body is elongated in a straight line. Look ahead.
- Perform the exercise for 15 seconds. To lighten the load, you need to tense your abs and buttocks before lifting your torso.
- To increase the load, the leg is raised above the floor, holding it for 15-30 seconds.
Reverse plank
The reverse plank will get rid of flabby buttocks and cellulite, tighten your legs, abs, and inner arms. The exercise stretches and loads the back muscles.
The reverse plank tones your core muscles. Thanks to them, the body stabilizes and holds the internal organs. You will notice ease when walking, and it will be easier to maintain your posture.
Technique:
- Sit on the mat, straighten your legs. Hands stand shoulder width apart. The emphasis is on the elbows or hands. For beginners, it’s better to start by resting on your elbows.
- Raise your pelvis, stretch your legs, the body is a straight line from the chest to the toes.
- The head looks straight ahead, there is no need to throw it back or press it to the chest.
- The shoulders are relaxed, the buttocks and abs are tense.
- Maintain this position for 1 minute. Perform in the morning and evening for 30-90 seconds.
Reinforced bar
This bar is suitable for experienced athletes. It differs from the classic stance by extending the opposite arm and leg, i.e. lifting the right leg with the left arm and vice versa.
Technique:
- Take a lying position. Place your hands shoulder-width apart. Lean on your forearm, or place your arms straight perpendicular to the floor.
- Raise your torso, stretch out in a straight line.
- Extend your left arm straight forward and lift your right leg up. Remain in this position for at least 15 seconds.
- Return to plank. Extend your right arm and left leg. Also keep your balance for at least 15 seconds.
Dynamic bar
A dynamic stance includes movements and changes in body position. The load on those muscle groups that are not involved in the static version increases. The dynamic plank is a weight loss plank.
On one hand
This exercise works the muscles of the arms and abs. The maximum load goes to the supporting hand.
Technique:
- Take a lying position. The hands are located directly under the shoulders. Legs straight and brought together.
- Raise your body and bring it into a straight line. The pelvis and shoulders are at the same level as the body. Arms straight.
- Shift your body weight slightly to the right and place your left hand behind your back. You can also straighten it and place it parallel to the floor.
- The shoulders and hip remain motionless; you cannot lean to the side. The right hand holds the weight of the body.
- Execution time 5-10 seconds. Then return to the classic plank and change hands.
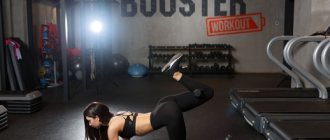
On one leg and one arm
It is quite difficult to perform the exercise correctly, observing the technique. When performing, much more calories are spent, the abs, muscles of the arms and legs are well worked out, and the buttocks work.
Technique:
- Take a classic plank with straight arms. Legs are brought together.
- Bring your left hand forward. Raise your right leg. Maintain balance for 15-30 seconds.
- Return to the classic plank, extend your right arm, left leg. Stand in this position for 15-30 seconds.
Side plank
Here the abs work especially hard and the back becomes tense. Not recommended if you have problems with the spine or lower back.
Technique:
- Lie on your side and place your forearm exactly under your shoulder. The feet lie parallel, one on top of the other.
- Lift your pelvis off the floor, stretching your torso into a straight line. Knees straight, head looking straight ahead. Emphasis on the forearm. The abs and buttocks are tense.
- In a dynamic plank, the pelvis is not fixed, but sways up and down.
Contraindications
You should not perform the exercise if you have been diagnosed with the following diseases:
- Osteochondrosis;
- Lumbosacral hernias;
- Spinal injuries;
- Shoulder arthrosis;
- Joint diseases.
It is also not recommended to perform the plank after surgery, during pregnancy and in the postpartum period. It is advisable to consult a doctor before starting exercise, especially if you are going to exercise with back pain. You should not start exercising immediately after eating; you need to wait a couple of hours.
In some cases, healthy people complain of back pain after doing the exercise. This happens because the muscles become sore due to a lack of physical fitness.
If you feel severe pain while performing the exercise, you need to stop the training process. Pain may occur due to incorrect execution technique or holding the plank for too long.
Combination plank
The result of this exercise is pumped up abs and arms. It can be a complete exercise for losing excess weight.
Technique:
- Stand in a classic plank position with your arms outstretched.
- Lower yourself onto your forearms. There is no need to linger.
- Raise yourself back to plank position with your arms outstretched.
- Perform the exercise for 30-45 seconds.
With twisting
This exercise strengthens your back and abdominal muscles. Performed once a day for 2-3 minutes, preferably together with cardio exercises.
Technique:
- Take a classic plank, focusing on your forearms.
- Rock your pelvis, bringing your left or right side closer to the floor.
- Perform the exercise for 20 seconds.
Execution Rules
You need to carefully monitor the exercise technique. Beginners are advised to practice in front of a mirror. The surface for training should be flat; you can exercise on the floor or mat.
The body represents a single line. There should be no kinks in the pelvis or lower back. The back is straight. The pelvis is in line with the body, it does not sag down or protrude outward. Focus on your hands and toes.
During execution, the gluteal muscle and abs are tensed. In this case, you need to consciously relax your arms and neck so as not to overload the cervical spine.
Stress in the cervical spine and severe lumbar deflection can cause serious health problems.
Program
Static exercise does not require much training time, but the exercises must be systematized. Therefore, try to stick to a month-long program from the very beginning that will improve your performance.
Spending just 5 minutes a day (and that's the maximum!), you can adjust your waist, buttocks and hips, reducing their volume while maintaining beautiful definition. The long-awaited elimination of fat folds will give you a feeling of lightness. It’s not without reason that this unique exercise is included in all well-known body work programs - bodybuilding, yoga and fitness.
Basic mistakes
Raising the pelvis above head level. This position relieves the load from the entire muscle corset, the meaning of the exercise is lost. The pelvis should be one straight line with the body.
Head lift. A deflection appears in the cervical region, which causes overstrain of the neck muscles. Your gaze should be directed to the floor in front of you. With prolonged violation of technique, disturbances in the functioning of the cervical spine may occur, and muscles will ache.
The hands are locked, and the elbows are spread to the sides. In this position, the head drops down and control over the shoulder blades is lost. Muscles are tense unevenly. Elbows and forearms should be parallel to the body.
Bend in the lower back. The stronger back muscles work, and the weak ones do not receive stress. With constant bending, problems with the lower back may occur.
Raising the shoulder blades. When the shoulder blades are located above the head, sagging of the thoracic region appears, which also provokes an uneven load. The back should be straight.
Recommendations
- It has been proven that if a person simply counts to himself while doing the plank, he will do more on the side that is stronger. Therefore, download a stopwatch to your phone so as not to overload one side of your body;
- Use a long gym mat to avoid slipping. You can put an additional mat under your elbow;
- Try not to break the angles, so that the humerus is perpendicular to the floor and the elbow remains strictly under the shoulder;
- Don't do the plank with your shoulder to your ear;
- The trapezius should remain relaxed, and you should not squeeze your neck during the exercise.
Plank duration
In an exercise like the plank, the main thing is regularity, not duration. During execution, it is very important to monitor the technique, otherwise there is no point in using the plank in your training.
Canadian scientists have long talked about how many times a day you definitely need to do the plank. Several approaches of 10-30 seconds are much more effective than a 5-10 minute plank once a day. In the first case, endurance is trained, and in the second, the muscles are simply clogged.
1 minute
It will be difficult for beginners to overcome even this time threshold. The plank makes your abs, legs, and arms shake. But even during this time, the muscles warm up, acquire tone, blood circulation improves, and metabolism accelerates. 1 minute of planking can burn 5 calories.
5 minutes
Planking burns 25 calories in 5 minutes. This time is enough for the muscles not only to warm up, but also to have time to start clenching. Beginners will be guaranteed strong and toned muscles.
10 minutes
10 minutes of planking burns 50 calories. The muscles become much more overstrained, especially in the arms and abs. Posture is strengthened. You can only perform such a long plank for a personal record. Short-term, but repeated approaches bring much more benefit. It is not recommended to stand in the plank for more than 10 minutes.
Optimal time
Everyone must choose the time independently, in accordance with the capabilities of the body. If it is easy for a person to stand in the plank for 1 minute, you can increase the number of approaches to 2-3 per day. Then replace the sets with one 5-minute plank.
If it is difficult to stand in the plank even for 1 minute, you need to start with 30 seconds, adding another 5-10 seconds every day.
The load is increased gradually so as not to damage the muscles and ligaments. You need to feel your comfort level. Tension should not develop into unbearable pain.
Monthly schedule
Those who find it easy to start with 20 seconds can set any time as their starting point. The main thing is to stick to the basic rules.
The essence of the graph is as follows:
- every 6th day of training is a day off, i.e. the bar is not met;
- the new time needs to be fixed so that the body gets used to this load; 2 to 3 days are allotted for this;
- first you should increase the time by 5-10 seconds, then you can increase the load by 30 seconds.
| Day | Seconds | Day | Seconds |
| 1 | 25 | 16 | 120 |
| 2 | 25 | 17 | 120 |
| 3 | 35 | 18 | rest |
| 4 | 35 | 19 | 150 |
| 5 | 40 | 20 | 150 |
| 6 | rest | 21 | 180 |
| 7 | 45 | 22 | 180 |
| 8 | 45 | 23 | 180 |
| 9 | 60 | 24 | rest |
| 10 | 60 | 25 | 210 |
| 11 | 90 | 26 | 210 |
| 12 | rest | 27 | 240 |
| 13 | 90 | 28 | 240 |
| 14 | 105 | 29 | 270 |
| 15 | 105 | 30 | 270 |
Efficiency
The benefit of this exercise lies not only in freeing the body from fat folds. First of all, experts consider it as part of the treatment of certain diseases.
When performed regularly and correctly, it can:
- pump up the back muscles well;
- eliminate manifestations of osteochondrosis of the neck and lower back;
- have a significant impact on the muscles of the arms, legs, abs and buttocks;
- make the following muscles work to the limit: external and internal obliques, transverse abdominal muscles, rectus abdominis;
- improve posture;
- relieve pain in the shoulder blades and spine;
- increase blood circulation;
- prevent the negative consequences of a sedentary lifestyle.
But will the plank exercise help you lose weight? There is no doubt about this, since after just a month of regular exercise the results will be visible to the naked eye:
- fatty tissue will disappear primarily on the lower part of the body, so the bar is recommended for losing weight in the abdomen and sides;
- waist size will decrease by 2 cm;
- weight will drop to 4 kg;
- the buttocks will become firmer;
- the legs will become slender, since their muscles bear the main load;
- your tummy will finally be flat due to the powerful training of your abdominal muscles;
- your arms will lose weight and at the same time become pumped up, since the triceps and biceps are actively involved in the training.
When it comes to how many calories the plank exercise burns, opinions differ. Typically, figures are given from 5 to 12 calories per minute. It depends on your weight, correct training, and all sorts of complications of the classic version of the stance.
One of the main advantages of this method of losing weight is the absence of contraindications, only benefits for the body and organism. The only harm it can cause is soreness. But over time, the muscle pain that is characteristic of any sports activity should go away.