Share:
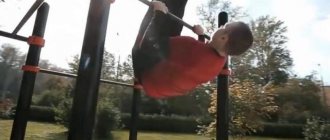
Lifting legs while hanging on a bar (Toes to Bar) is one of the most effective abdominal exercises, due to the fact that when performing it, the body is in a stretched position, so our muscles also receive a colossal load in the negative phase of the movement (when lowering the legs) .
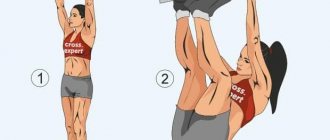
There are several variations of this exercise: hanging straight leg raises, bent leg raises, alternating leg raises, toe raises to the bar, and “angle” (statically maintaining a right angle between the legs and body). We will talk about all of them in more detail below.
Also in our article today we will examine the following aspects:
- What are the benefits of doing this exercise;
- Types of leg lifts while hanging on the horizontal bar and also the technique of performing the exercise;
- CrossFit complexes containing this exercise.
Benefits of hanging up on a horizontal bar
- Working out the entire abdominal mass, with an emphasis on the lower part (usually the most lagging behind).
- Tightening the lower abdomen, creating a sculpted and aesthetic appearance.
- Strengthening your core muscles.
- Prevention of inguinal and umbilical hernias.
- Strengthening the abdominal wall and maintaining the correct position of the internal organs.
It is also worth noting a certain “stretching” of the vertebrae, which chiropractors often use to relieve pain. Moderate decompression from being in a hanging position (even with muscle tension) helps eliminate pain associated with the spine.
Why are they needed?
Exercise on the horizontal bar is recommended if you need to strengthen the spinal column and prevent the development of ailments affecting it.
Such training will help:
- significantly strengthen the muscle corset;
- improve posture;
- normalize blood flow in the vertebral area;
- relieve the load from the discs between the vertebrae;
- relieve pain in various parts of the spine;
- improve back flexibility;
- fix the correct position of the vertebrae.
Raising your legs or hanging on a horizontal bar helps treat and prevent spinal diseases. It is important to include it in training for people leading a sedentary lifestyle.
What muscles work
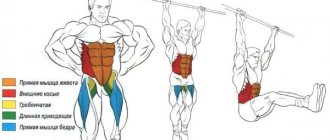
The main muscle targeted for hanging leg pull-ups, as with other abdominal exercises, is the rectus abdominis. However, unlike crunches, the nerve endings that cause the muscle to contract act on the lower part of the rectus muscle. Therefore, despite the fact that it is a solid muscle in the form of a long rectangular plate, it is necessary to divide its training into “top” and “bottom”.
List of muscles involved:
- Rectus abdominis muscle.
- Iliopsoas.
- Sartorius.
- Comb.
The oblique muscle practically does not work if the movement is performed without moving the legs to the sides.
Example training program
Each organism has its own characteristics, so the program must be compiled individually. This training scheme serves as an example only. The number of approaches and repetitions is based on visiting the gym 3 times a week:
- Week 1 – 2 sets of 5 reps.
- Week 2 - 2 sets of 7-10 repetitions.
- 3rd and 4th weeks - 3-4 sets of 8-15 repetitions or 2 of 20.
After 2-3 months of systematic training, you will be able to do 2-3 sets of 100 times.
To make your abs look like the photos of trained handsome men and women, do the exercises correctly and stick to your diet. If you find it difficult to perform hanging leg raises, start with crunches and lateral bends.
Sign up for our gym: a personal trainer will create an individual training program for you (classical or CrossFit) and help you perform all the exercises correctly.
Technique for raising legs while hanging on a horizontal bar
The hanging straight leg raise is also called the “corner” because of the position of the body at the peak point.
Hanging leg raise technique:
- Hang on the horizontal bar, gaze directed ahead, body in an upright position. Legs are brought together.
- Begin to raise your legs forward until they are parallel to the floor. Movement occurs only in the hip joint.
- After exhaling, take a short pause (0.5-1 second) at the peak point, then slowly and under control lower your legs down.
Determine the width of your arms and grip so that you can hang for as long as possible. Typically, the most natural grip is an overhand grip (palms facing forward) with your hands shoulder-width apart.
To make it more challenging and put more stress on the target area, try doing hanging crunches with your pelvis tucked forward. In this case, the legs should be raised above parallel level.
Tips and tricks
Below we give some tips and recommendations on the technique of performing hanging lower limb lifts, which will help to avoid gross mistakes and wasted efforts for beginners and to perform the exercise efficiently for those whose sports training is at an average and higher level.
Basic mistakes of newbies
Beginners tend to make the following mistakes that should be avoided:
- strong swaying of the body and lifting of the lower limbs by inertia - when done this way, the exercise will bring absolutely no benefit;
- relaxation of the muscles of the shoulder girdle;
- helping with hands;
- improper breathing.
To avoid swinging, you need to learn to lower your legs smoothly and pause when they reach the lowest point.
About the features of the exercise and common mistakes:
Execution Features
- When performing the exercise, you can use straps to secure your hands on the bar and elbow clamps. They will help you focus only on your abdominal muscles.
- The hands are not used during execution; they are relaxed and are used only for gripping.
- For maximum load on the oblique abdominal muscles, it is necessary to twist the body left and right - this is done with bent knees, which turn in different directions, rising each time.
- When lifting your legs, you need to tuck your pelvis - this will allow you to maximally tense your abdominal muscles.
- Inertia is unacceptable when performing this exercise. The ankle should rise and fall at each segment of the amplitude in the same amount of time.
- The lowering of the lower limbs should not be carried out completely - they should stop at the level of 15-25°. This way the abdominal muscles will remain tense throughout the entire exercise.
- It is not recommended to attach additional weights to your shins. The legs are a normal load to achieve the desired result.
- The chest must be kept open.
- If you feel pain in the lower back, you need to spread your toes and knees, while leaving your heels closed to each other. This should be more comfortable.
- If you cannot stabilize your body, you can ask a partner or instructor to hold you from behind.
- You need to look straight ahead. The chin resting on the chest is undesirable.
- At the end point of lifting your legs and after fixing them for two seconds, you need to additionally tense your abs.
- For beginners, it will be easier to do lifts of the lower extremities in a vertical position on the Swedish wall or parallel bars with a vertical back.
- The smaller the angle between the body and the hips, the greater the load on the abs.
Raising your legs only parallel to the floor does not give any results to the abdominal muscles. It should be above an angle of 90°. - A reverse grip on the bar is not recommended.
- The main attention should be paid not to raising the lower limbs, but to lowering them.
Technique for raising knees on a horizontal bar
This is the most common option. Because of its simplicity, it is considered a “starting point” in progression and is suitable for absolutely all athletes. Despite the different leg positions, hanging bent leg raises for abs have the same effect. The only difference with straightened legs is that with straightened knees the legs are harder to lift. Because of this, athletes often perform movements using the strength of their legs rather than their abs.
Technique:
- Hang from the horizontal bar. The body is a single straight line, legs are brought together.
- Begin to bend your legs and lift them in front of you until your thighs are parallel to the floor (shins are perpendicular to the floor).
- Pause for 1 second and slowly lower your legs down.
While holding at the peak point, exhale forcefully to empty your lungs of air (this causes more tension in your abdominal muscles).
Advantages and disadvantages
Pros:
- Raising your legs to the bar develops strength and endurance of the rectus abdominis muscle, especially its lower part. The technique also affects the deep abdominal muscles, which are less likely to be activated in simple crunches.
- Since the technique is complex, the exercise will allow you to make progress in developing your abdominal muscles. This is also facilitated by stabilization of the position by the core muscles, which will eliminate unnecessary swaying and inertia.
- Bringing your legs to the bar allows you to not only get six-pack abs, but also significantly increase their strength, preparing you for complex basic exercises with weights.
- There are simplified variations of the exercise that allow beginners to eventually prepare for a full leg raise that touches the bar.
- Strengthens the grip and endurance of the accessory muscles involved in hanging. Increases the strength of ligaments and tendons.
Minuses:
- Raising the legs to the horizontal bar is not suitable for beginner athletes at the initial stage of training, since they require not only trained abdominal muscles, but also strong stabilizer muscles and grip, which develop over time.
- Since the technique is difficult, untrained muscles have to perform the movement due to inertia and jerking, which leads to injuries.
- The technique may cause discomfort to the hands, shoulders and arms. Most often, a weak ligamentous apparatus does not allow you to fully train the target muscles, since the arms get tired before the abdominal muscles become tired.
- High risk of falling due to slipping palms. You can protect yourself by using magnesium or special straps.
Contraindications and possible harm
Raising the legs on the horizontal bar is an effective exercise, but it should not be used in the training process by those who have had an injury to the shoulder joint, forearm, hand, pectoral muscles, or shoulder muscle mass.
The leg raising exercise is contraindicated if you have a previous fracture of the fingers . It is believed that leg raises using a bar will benefit the spine, but in some cases the exercise can be harmful.
Doctors do not recommend using it for people with problems:
- in the cervical spine, for example, with osteochondrosis, dizziness, tinnitus, and general well-being may deteriorate;
- in the last stage of scoliosis, hanging on the horizontal bar can cause deformation of internal organs, which can ultimately cause pinched nerve endings;
- intervertebral hernia, with this diagnosis there is a possibility of displacement of the vertebrae and pinching of the cerebrospinal fluid canal.
You should stop lifting your legs on the horizontal bar if you experience pain in the lumbar region.
For biceps
There is a big misconception that working out on the horizontal bar allows you to gain huge muscle mass, like bodybuilders. This is not so, the apparatus helps to form a beautiful relief and add mass, but in no way allows you to pump up biceps of the same volume as those of bodybuilders. Heavy basic exercises will help you add 3-5 cm in arm volume with regular exercise, which will make your body athletic and fit.
In a week or two, the muscles will not have time to strengthen, so you should prepare for regular exercise in order to get the coveted relief. In addition to the biceps, the process in any exercise will involve the back muscles, so the complex will simultaneously give a good load to the biceps muscle and strengthen the muscular frame of the skeleton.
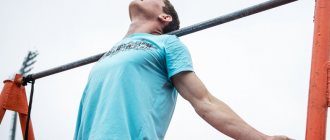
Close-grip pull-ups
The position of the hands determines which group of muscle fibers will be involved in the work. For the biceps to work, the grip must be reverse or straight (it is better to combine or alternate), with the distance between the hands less than shoulder level, approximately 15-20 cm from each other. It can be combined with a parallel grip, when the palms are located at the same level as the shoulders, but not on the bar, but on the side handles, opposite each other.
In order to affect the back as little as possible and put more stress on the biceps, it is necessary to perform pull-ups correctly:
- At the beginning, it is necessary to control that the movement does not begin with pushing out with the legs, which is what beginners do. Lifting up should be done only with the help of the biceps. If this cannot be done, then a set of push-ups will help tone your arms, after which you will be able to lift your own body weight only with the strength of the biceps muscle.
- The load on the biceps does not occur during the entire pull-up, but only until reaching 90 degrees in the elbow bend. After this, the latissimus muscle is included in the process, its participation allows you to reach the bar with your chin.
- At the top point, a slight load is distributed between the back and deltoid fibers.
The main thing is not just to mechanically perform the necessary movements on the horizontal bar, but to feel your body, the load and the stages of work of each part of the muscular skeleton.
Parallel grip
It is performed on horizontal bars, where there are special crossbars that allow you to grip in such a way that your palms are opposite each other. High bars parallel to each other, located at a distance of 30-60 cm, are suitable. The starting position for pull-ups with a parallel grip with emphasis on the biceps is hanging on outstretched arms.
The upward movement should begin while inhaling, so that more oxygen is supplied at maximum load. Exhale sharply to the top point, when the chin touches the bar. When performing, you need to try to ensure that the amplitude is maximum. To do this, you need to imagine that the athlete wants to touch the crossbar not with his chin, but with his chest. There is no need to go down sharply when you reach the end point. It is better to take a deep breath, control the movement, smoothly straighten your elbows, holding your body weight with your biceps.
For triceps
Triceps is an extensor muscle that consists of three fibers, they are responsible for flexion and extension of the arm at the elbow joint. Therefore, the most effective will be those in which the maximum load falls on the elbows. They are activated with every rise and fall, when the arms are placed 20-30 cm wider than the shoulders. Therefore, to pump up the triceps, it is recommended to do these movements as slowly as possible. However, there are also certain exercises that utilize the triceps muscle to a greater extent.
Lateral pull-ups
For this type of pull-up, you will need the edge of a horizontal bar or a fairly wide apparatus. The athlete places his hands one in front of the other without any gap between them, the body position is parallel to the crossbar. The lift is carried out until the arms are fully bent at the elbow joint, moving the head away from the crossbar, alternately in each direction. You need to lower yourself slowly until your arm is fully extended. On each approach, it is necessary to change the position of the hands so that the one that was in front moves back, and vice versa.
Power output
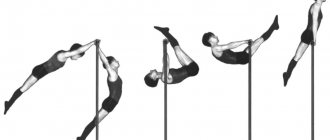
This horizontal bar exercise involves lifting your entire body over the bar, up to waist level. For beginners, it is better to first master simpler types of pull-ups, and only when they do not cause difficulties can you begin to perform power exercises. It is recommended to start doing it with one hand, alternating. And only after complete power output on one arm can be achieved without problems, you can begin to pull yourself up and push the body with both hands.
The technique for performing this exercise is very complex:
- Hand placement. Making a forceful exit is only possible if the wrists are positioned above the level of the bar when gripping. If the condition is not met, then nothing will work except high pull-ups. Beginners should pay special attention to the positioning of their hands; if they cannot make a forceful exit, in most cases failures occur precisely because of the low position of the wrist. The hands should be in a position from which they can easily rotate under the influence of a small impulse.
- Pull-ups to the chest. To perform the exercise, you need to learn how to pull yourself up to your chest, that is, reach the crossbar with your chest.
- Belly touch. The next step is to pull up above your chest until your stomach touches the bar. If you lack strength, you can use a push with your legs or your whole body.
Beginners are recommended to do this with only one hand. After pulling up to the level of the chin, one palm needs to be rotated so that it is positioned with the wrist above the crossbar and becomes a supporting one. After this, you need to try to lift the body weight with one hand first, while helping to hold it with the other. After straightening one arm, do the same with the one that helped.
