Content
- 1 Pull-up on a low bar 1.1 Suspension bridge
- 1.2 Pull-ups on a low bar
- 1.3 Self-assisted one-arm low bar pull-up
- 1.4 One-arm low bar pull-up
- 1.5 Low bar plyometric pull-up
- 2.1 Elbow bridge
GTO standards for the test (test) “Pull-ups from hanging on a high bar”
| Stage (age) | Boys\Men | ||
| Bronze | Silver | Gold | |
| Stage I (6-8 years) | 2 | 3 | 4 |
| II stage (9-10 years) | 2 | 3 | 4 |
| III stage (11-12 years) | 3 | 4 | 7 |
| IV stage (13-15 years) | 6 | 8 | 12 |
| V stage (16-17 years old) | 9 | 11 | 14 |
| VI stage (18-24, 25-29 years) | 10 | 12 | 15 |
| 7 | 9 | 13 | |
| VII stage (30-34, 35-39 years) | 5 | 7 | 12 |
| 4 | 6 | 10 | |
| VIII stage (40-44, 45-49 years) | 4 | 6 | 9 |
| 3 | 5 | 8 | |
| IX stage (50-54, 55-59 years) | 2 | 4 | 7 |
| 2 | 3 | 6 | |
GTO standards for the test 'Pull-up from hanging on a high bar' - expand
GTO standards for the test 'Pull-up from hanging on a high bar' - collapse
Pull-ups on a low bar[edit | edit code]
Posted by BJ Gaddour
During its execution, the biceps, muscles of the forearms, back and back of the shoulder girdle work. In addition, since the body is located in an almost horizontal position, the muscles of the lower back, buttocks and posterior thigh muscles have to work intensively to rigidly hold the plank pose. Even the abdominals have to work hard to stabilize the lumbar spine and prevent it from flexing excessively. In general, pull-ups on a low bar are easier to perform than pull-ups on a high bar because you have to lift less weight than your body weight.
Replacement for home:
At home, you can use any pole that is placed on two adjacent chairs.
Low bar pull-ups have several advantages over barbell bent-over rows. First, low bar pull-ups without weights do not require as much hamstring flexibility and lower back strength as are required to bend over and pull a heavy barbell. Secondly, low bar pull-ups allow you to quickly adjust your body angle and leg position to make the exercise easier or more difficult. When working with a barbell, you would have to add or remove discs. Thirdly, pull-ups on a low bar are the exact opposite of push-ups in terms of the nature of the movements. And the better you do pull-ups, the better you will do push-ups. Low bar pull-ups are the first exercise in this book that requires gymnastics equipment. As the name suggests, you need a crossbar. This can be a horizontal bar with an adjustable bar height or hanging straps that can be attached to a door, to a wall, to a ceiling, to a pole, to a tree, whatever. However, if you don’t want to spend money on equipment, there is always something in the house that you can use to pull yourself up. The following are just some alternative options.
- Reach under a sturdy table and grab the sides with your hands. You can also throw a long, rolled towel over the table and hold onto the dangling ends.
- If there is no equivalent horizontal bar, you can wrap both hands around a vertical pole or thin trunk, holding it like a baseball bat. The towel wrap method also works here.
- Grasp the door frames with your hands (or one of the frames with both hands).
- Hold the seats of two sturdy chairs with your hands (ideally they should be at hip level).
- Place a sturdy mop on two chairs or other two supports of equal height. It will serve as a crossbar for you.
Progression of pull-ups on a low bar
| Level 1 Complete zero | Level 2 Elementary | Level 3 Intermediate | Level 4 Advanced | Level 5 Superhero |
| Suspension bridge | Low bar pull-up | Self-assisted one-arm low bar pull-up | One-arm low bar pull-up | Low bar plyometric pull-up |
Suspension bridge[edit | edit code]
Suspension Bridge
This exercise sets the stage for all subsequent progressions by teaching you how to start correctly from hollow body pose. If possible, use a “lock” grip - four fingers wrap around the bar from above and your thumb from below. At the same time, try to wrap your thumb around your index and/or middle finger. Bend your wrists slightly so that your little fingers slide along the top edge of the bar. This is the strongest type of grip. In this case, the shoulder joints take the most stable position, since a torque is created that screws the humerus into the socket of the joint. If the bar is too thick for this type of grip, grab it with all five fingers from above and press down with your index finger with your thumb.
Leg position
: Legs brought together. Although this technically reduces the area of support, it will be easier for you to mobilize the muscular corset to stabilize the spine with a slight arch in the lower back.
Suspension bridge technique
Initial position
- Grab the bar or strap handles with a lock grip.
- The head is in a neutral position (ears are in line with the shoulder, hip and ankle joints). The gaze is directed between the hands.
- Straight legs rest your heels on the floor. The hips are raised so that the body forms one straight line from head to heels.
- Take a hollow body pose: tighten your thigh muscles, gluteal muscles and abdominal muscles, pull your chest and shoulders down.
Perfect execution
- Hold the suspension bridge for a while, maintaining a hollow body pose throughout the exercise.
- Focus on deep abdominal breathing without allowing your chest to rise.
Target
You should be able to hold this pose several times for 60 seconds before moving to the next level.
Regression (decrease) of exercise difficulty
- Easier option
: Increase the area of support by spreading your arms or legs.
- An even easier option
: Bend your knees so that your feet are directly under your knees.
- Easiest Option
: Increase your body angle by performing a bent over suspension bridge. This will make the work easier since you will have to hold less weight. This method works most effectively if you hold onto a vertical pole, door frames, or the handles of hanging straps. In this case, to change the angle of the body, it is enough to move your legs forward or backward.
Progression (increase) of exercise difficulty
- More difficult option
: Bed, but narrow your grip until your hands touch your thumbs.
- Even more challenging
: Raise your feet onto the step platform and perform a suspension bridge with your feet elevated.
- The most difficult option
: Perform a suspension bridge on one leg. Raise one leg while simultaneously straining the gluteal muscles of the supporting leg to prevent the pelvis from tilting relative to the floor surface (a). A further complication is the one-arm suspension bridge. In the starting position, the shoulders are located exactly under the crossbar (the width of the grip is equal to the width of the shoulders). For better balance, also spread your legs shoulder-width apart. Then release one hand (b). Do you feel confident enough? Then also lift the opposite leg with the non-working arm (c).
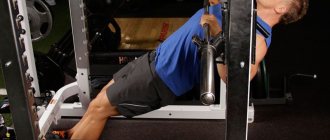
Pull-ups on a low bar[edit | edit code]
Low Bar Pull-Ups
Low bar pull-ups are the exact opposite of push-ups, so alternating these exercises in a superset is a good idea. When performing pull-ups on a low bar, your forearms should be kept as vertical as possible. This will avoid injuries to the elbow joints. You need to do pull-ups on a low bar no less often (in terms of the number of approaches and repetitions) than do push-ups. If you have problems with your shoulder joints or are addicted to performing bench presses and neglecting barbell rows, then low bar pull-ups should be performed twice or even three times as often as push-ups to correct the structural imbalance.
There are many types of bar grips. We will consider a normal grip to be straight when the palms are shoulder-width apart. You can spread your arms wider if you want to work your upper back and hamstrings more, or place them closer if you want to work your forearms and biceps. An underhand grip provides even more stress to the biceps. If you perform pull-ups while holding parallel bars, the side edges of a table, or the outer edges of two chairs of the same height, use a neutral grip (palms facing each other). The use of suspension straps allows you to rotate your hands during the exercise, which reduces the load on the shoulder joints.
Technique for performing pull-ups on a low bar
Initial position
- Grab the bar or strap handles with a lock grip.
- The head is in a neutral position (ears are in line with the shoulder, hip and ankle joints). The gaze is directed between the hands.
- Straight legs rest your heels on the floor. The hips are raised so that the body forms one straight line from head to heels.
- Take a hollow body pose: tighten your thigh muscles, gluteal muscles and abdominal muscles, pull your chest and shoulders down.
Perfect execution
- Begin the movement by lowering your shoulders down and back, and pressing your elbows to your sides.
- Bending your elbows at right angles, hold this position for 1-2 seconds and imagine that you are trying to crush a walnut with your shoulder blades.
- Reverse the movement to return to the starting position and repeat.
Target
You should be able to complete several sets of 10 reps before moving on to the next level.
Regression (decrease) of exercise difficulty
- Easier option
: Increase the area of support by spreading your arms or legs.
- An even easier option
: Bend your knees so that your feet are directly under your knees.
- Easiest option
: Increase the angle of your body by performing bent-over pull-ups. Stand by holding the pole of a door frame or the handle of a hanging strap. This allows you to change the angle of your body simply by stepping your feet forward or backward. Lean back, straightening your arms. This is the starting position. Now pull yourself up, bending your elbows, and return to the starting position. Repeat.
Progression (increase) of exercise difficulty
- More difficult option
: Bed, but narrow your grip until your hands touch your thumbs.
- An even more difficult option
: Raise one leg while simultaneously straining the gluteal muscles of the supporting leg to prevent the pelvis from tilting relative to the floor surface.
- The most difficult option
: Reduce the angle of your body and perform pull-ups with your legs elevated. Raise your feet onto the step platform This will force you to lift more weight. If you raise your legs above shoulder level, the exercise becomes especially difficult.
Self-assisted one-arm low bar pull-up[edit | edit code]
Self-Assisted One-Arm Low Bar Pull-Up
When performing these pull-ups, the working arm accounts for about 70 percent of the load. One option is uneven pulling. With one hand, the working hand, hold onto the crossbar and with the other, the auxiliary, the ends of the towel thrown over the crossbar. The lower relative to the crossbar you hold onto the towel, the less help the auxiliary hand provides to the working one. I also like this option because it develops the grip strength of the secondary hand, putting more stress on the muscles of the thumb and palm.
Technique for performing low bar pull-ups on one arm with self-help
Initial position
- Grab the bar with your working hand just above your shoulder.
- Throw the towel over the bar and grab the ends with your supporting hand.
- Raise your legs straight onto the step platform
- Take a hollow body pose: tighten your thigh muscles, gluteal muscles and abdominal muscles, pull your chest and shoulders down.
Perfect execution
- Begin the movement by lowering your shoulders down and back, and pressing your elbows to your sides.
- Bending your elbows at right angles, hold this position for 1-2 seconds and imagine that you are trying to crush a walnut with your shoulder blades.
- Reverse the movement to return to the starting position and repeat.
Target
You should be able to complete several sets of 10 reps before moving on to the next level.
Regression (decrease) of exercise difficulty
- Easier option
: Increase the area of support by spreading your legs.
- Even easier option
: Increase the leverage effect by bending your knees so that your feet are directly under your knees.
- Easiest option
: Perform bent-over pull-ups. This will make the work easier since you will have to hold less weight. This method works most effectively if you hold onto a vertical pole, door frames, or the handles of hanging straps. In this case, to change the angle of the body, it is enough to move your legs forward or backward.
Progression (increase) of exercise difficulty
- More difficult option
: To further reduce the role of the auxiliary hand and the effect of leverage, perform the “Archer Pull-up” exercise. Fully straighten the auxiliary arm, moving it to the side so that the lion's share of the load falls on the working arm. Perform all repetitions on one working hand, and then switch hands.
- Even more difficult option
: When performing the Archer Pull-up exercise, gradually reduce the number of fingers with which you hold the bar with your secondary hand to reach a two- or even one-finger grip.
- The most difficult option
: When performing this pull-up, keep one leg suspended and, tensing the gluteal muscles, make sure that the pelvis is parallel to the floor. This option strengthens the gluteal muscles and the posterior thigh muscles of the supporting leg.
One-arm low bar pull-up[edit | edit code]
One-Arm Low Bar Pull-Up
If your lower back, hips, and abdominal muscles don't work in sync when doing these pull-ups, you'll end up twisting and turning on the bar like you're at a 70's disco. That's why the technique
This exercise, unlike the exercises of the previous levels, must be started with bent legs (feet exactly under the knees, shins positioned vertically), otherwise the task will be simply overwhelming. It is also useful for balance to pull your non-working arm up past the bar.
Although you should try to minimize rotation of the body so that the pelvis and shoulder girdle remain parallel to the floor, it is unlikely to completely avoid rotation. It is permissible to slightly rotate the shoulder and thigh from the non-working side up and towards the working hand diagonally. At the same time, the shoulder and hip should move synchronously to prevent twisting in the lumbar region.
Technique for performing pull-ups on a low bar on one arm
Initial position
- Grasp the bar with your working hand using a lock grip. Pull your other hand towards the ceiling.
- Bend your knees and place your feet on the floor directly below your knees. The hips are raised so that the body forms one straight line from the head to the knees.
- For greater stability, spread your legs wider than shoulder width.
- Take a hollow body pose: tighten your thigh muscles, gluteal muscles and abdominal muscles, pull your chest and shoulders down.
Perfect execution
- Begin the movement by lowering your shoulders down and back, and pressing your elbows to your sides.
- Bending your elbows at right angles, hold this position for 1-2 seconds and imagine that you are trying to crush a walnut with your shoulder blades.
- Reverse the movement to return to the starting position and repeat.
Target
You should be able to complete several sets of 10 reps before moving on to the next level.
Regression (decrease) of exercise difficulty
- Easier Option
: Perform the eccentric phase of the pull-up by lowering your body (take 3 to 5 seconds to do this). To rise to the starting position, help yourself with your other hand.
- An even easier option
: Perform isometric pull-ups, holding the top (or bottom) position for a while.
- Easiest option
: Perform bent-over pull-ups. This method works most effectively if you hold onto a vertical pole, door frames, or the handles of a harness. In this case, to change the angle of the body, it is enough to move your legs forward or backward.
Progression (increase) of exercise difficulty
- More difficult option
: Reduce the area of support by gradually bringing your legs together until they touch.
- An even more difficult option
: Lift one leg (of the same name as your working arm) from the floor and tighten the gluteal muscles of the supporting leg so that the pelvis is parallel to the floor
- Hardest variation
: Increase the relative load by fully straightening your legs so that your entire body forms one straight line. This makes the exercise extremely difficult because you not only have to lift more weight, but you also have to prevent your hips from bending. But its implementation can be made even more difficult if you raise your feet on a step platform. If you are able to cope with such a difficult exercise, your exceptional strength can only be envied.
Low bar plyometric pull-up[edit | edit code]
Low Bar Plyometric Pull-Ups
One of the major drawbacks of free-weight training is that it does not allow you to train explosive pulling power the way you can with free weights or machines. Olympic weightlifting events such as the snatch and clean and jerk, as well as kettlebell swings, allow you to quickly transfer force from the lower half of the body to the upper half, sharply straightening your legs at the ankle, knee and hip joints, while pulling the weight with your arms. Plyometric pull-ups can solve this problem. Begin the exercise with your legs bent so that your feet touch the floor directly below your knees. In addition, before each explosive pull-up, take a 5-second pause in the lower position so as not to disrupt the technique. Subsequently, you will be able to perform this exercise without pausing.
Technique for performing plyometric pull-ups on a low bar
Initial position
- Grab the bar or strap handles with a lock grip.
- Bend your knees and place your feet on the floor directly below your knees. The hips are raised so that the body forms one straight line from the head to the knees.
- Take a hollow body pose: tighten your thigh muscles, gluteal muscles and abdominal muscles, pull your chest and shoulders down.
Perfect execution
- Begin the movement by lowering your shoulders down and back, and pressing your elbows to your sides.
- Bending your elbows at right angles, hold this position for 5 seconds and imagine that you are trying to crush a walnut with your shoulder blades.
- Then quickly lower yourself to the starting position and immediately pull yourself up to the top position again as quickly as possible. During the entire exercise, the legs should be fully extended at the hip joints.
Target
You should be able to perform several sets of 10 repetitions.
Regression (decrease) of exercise difficulty
- Easier option
: Maintain a 5-second pause not in the upper, but in an easier, lower position with your arms fully extended.
- An even easier option
: Perform bent over plyometric pull-ups. This method works most effectively if you hold onto a vertical pole on door frames or the handles of hanging straps. In this case, to change the angle of the body, it is enough to move your legs forward or backward.
- Easiest option
: Combine pull-ups with squat jumps into a single exercise to speed up metabolism throughout the body. When you help yourself with your legs, it becomes easier to pull yourself up and perform more explosive movements. This method works best with hanging straps attached to the wall. Squat until your arms are fully extended, and then jump and pull yourself up on your arms at the same time. Lift off the floor and land softly in the bottom position of a squat and repeat.
Progression (increase) of exercise difficulty
- More difficult option
: If you hold onto the crossbar or parallel bars with your hands, then at the top point of the lift, release your hands for a moment, and when the rise gives way to a fall, grab it again. To make it more difficult, you can clap your hands or change the width of your grip mid-flight, alternating between a wide, normal and narrow grip, or using a mixed grip (when one hand holds the bar with a forward grip, and the other with a reverse grip).
- Even more difficult option
: Straighten your legs so that your whole body forms one straight line. This makes the exercise extremely difficult because you not only have to lift more weight, but you also have to prevent your hips from bending.
- Hardest Option
: Lower your body angle and perform plyometric pull-ups with your legs elevated. Raise your feet onto the step platform This will force you to lift more weight. If you raise your legs above shoulder level, the exercise becomes especially difficult.
How to improve personal results?
Below is a short series of tips and practical recommendations, taking into account which you will be able to identify your weak points in pull-ups, draw appropriate conclusions for yourself and conquer new sporting heights.
Strengthening the hands and forearms
Strengthen your hands and forearms with other exercises. A high number of repetitions in pull-ups on the bar is impossible without a strong grip and resilient forearms. Perform the following exercises to improve your results: hanging from a horizontal bar (with additional weights or with extenders), towel pull-ups, rope climbing without legs, squeezing a resistance band and various static-dynamic exercises that strengthen your ligaments and tendons. This point especially applies to those who have suffered injuries to the elbow or carpal ligaments. Without proper strengthening work, you risk causing the injury to recur because the ligaments may not be ready to handle serious strength work.
Additionally, strengthen the muscles of your back and arms. If you've already gained a decent amount of muscle mass through other free weight exercises, it won't be too difficult to work your way up to 20-25 pull-ups per set.
Clean technique
Minimize cheating in your movements. Don't deceive yourself: just because you completed the last few reps, engaging your lower back and legs, you won't become stronger, and the number of technically correct pull-ups in one approach won't move forward. In addition, you cannot be 100% sure that such a “dirty” way of doing the exercise will not lead to injuries and loss of results.
To learn how to do pull-ups “cleanly” and without jerking, a good option would be to perform pull-ups along a wall or other stationary vertical surface. You will need a smooth, low wall or door: hang on the top of it with your fingertips and lean your chest, stomach and front of your thighs as much as possible against it. The movement is further complicated by the frictional force that arises between your body and the wall. The work turns out to be more isolated, cheating is almost completely absent.
Variety of execution techniques
Variety is the key to continuous progress in training. Perform pull-ups in as many variations as possible: wide or narrow grip, forward or reverse, with or without additional weights. Due to such complex work, you will strengthen the entire array of back muscles, and also increase your strength endurance.
Perform hanging pull-ups on a bar in different styles. From time to time it is worth adding variety to the training process and doing pull-ups not only in the classic style, but also in a more “pump” version, due to the isolated work of the latissimus dorsi muscles. The athlete does not need to try to reach as high as possible and fully straighten at the bottom point; working in such a limited amplitude, you do not allow the back muscles to relax for a second, which significantly increases their strength potential and ability to work in a large range of repetitions.
Recipes for healthy eating
Beef rolls with bacon in the oven
- 13.9 g Protein
- 9.9 g Fat
- 3.6 g Carbohydrates
- 163.5 kcal
60-80 min.
- #wine
- #second course
- #beef
- #baking
- #greenery
- #dinner
- #olive oil
- #onion
- #spices
- #dinner
- #garlic
Other recipes
Options[edit | edit code]
Elbow bridge[edit | edit code]
Rest your elbows on the floor, keeping them close to your body. Now, while doing push-ups on your elbows, try to lift your body off the floor and hold this pose isometrically for a while. You can also swing up and down if you want. It will be easier for you to perform this exercise if you fully extend your legs at the hip joints. With your legs fully extended, this exercise will be much more difficult to perform.
Elbow pull-ups[edit | edit code]
Rest your elbows on two step platforms of equal height. You can place mats, towels or pillows under your elbows to make the exercise more comfortable. Bend your knees so that your feet are directly under your knees, and fully extend your hips so that your torso is straight. Don't arch your lower back
Throughout the entire exercise, the body forms one straight line from head to knees. Push up on your elbows, squeezing your shoulder blades and sticking your chest out. Having risen as high as possible (you don’t have to raise your shoulders yet), squeeze your shoulder blades and fix this position for 1-2 seconds, then return to the starting position and repeat.
One-arm pull-up with body rotation[edit | edit code]
Perform a standard one-arm pull-up (a), aiming your non-working arm at the ceiling as you rise. As you lower, rotate your upper body (but not your lower back) and reach down with your non-working arm (b). It is important that the humerus of the working arm remains in the socket of the joint. Also make sure that your shoulders and hips move as one, avoiding twisting at the lower back.
Climber pull-up[edit | edit code]
This is the most advanced form of pull-ups because the entire body is supported by one arm. Grasp the bar or handle of the hanging strap with your working hand. With your supporting hand, grab the wrist of your working hand and pull yourself up. To make the exercise more challenging, move your supporting hand to the elbow of your working arm, then to the biceps, and finally to the shoulder.
Horizontal pull-up "Spider"[edit | edit code]
Another way to transfer more of the load to one side of the body when performing pull-ups is through additional leg movements. When performing these pull-ups, you, while rising on a low bar, simultaneously bend one leg and pull it with your knee towards the elbow of your arm of the same name. The exercise can be made more difficult by fully extending the raised leg and, in the upper position, extending it to the side. The need for a counterweight forces more weight to be transferred to the opposite arm. Perform all repetitions by lifting the same leg and then switch sides or change sides after each repetition.
Read also[edit | edit code]
- Pull-ups
- 50 pull-ups in 7 weeks
- Pull-up training for beginners
- Pull-up program
- Pull-up training program
- Pull-up diagram on the horizontal bar
- What muscles work when doing a pull-up?
- How to increase the number of pull-ups
- Pull-up exercises on the horizontal bar
- Pull-ups on the machine
- Pull-ups on the bar
- Pull-ups for the back
- Pull-ups: Jackknife
- One arm pull-ups
- Close grip pull-ups
- Horizontal pull-ups
- Pulling dumbbells to the chest on a fitball