This program was used by US Marine Major Charles Lewis Armstrong
to prepare for his attempt to set the world record for the most number of pull-ups in a set.
The program provides everything necessary for physical improvement: variety, overload and regularity
. Those who followed the program achieved remarkable results in 6-8 weeks. Most, if not all, were able to complete at least 20 pull-ups in one set at the end of the program.
I pay special attention to the regularity of the program
— the effectiveness of training and the result depend on this. Performing the exercises listed below daily is the key to achieving the maximum of 20 pull-ups per set. You should train at least 5 days in a row every week!
Morning workout
three sets of maximal push-ups every morning
. Push-ups are one of the best exercises for strengthening all the muscles in the shoulder girdle. Major Armstrong described his morning training as follows:
“After getting up, I did my first set of push-ups on the deck. Then I went to the bathroom and cleaned myself up. Then he returned to the deck again and performed a second set of push-ups, after which he again went to the bathroom to shave. After shaving, I returned to the cabin and performed the third set of push-ups. Finally waking up after completing all the approaches, I took a relaxing shower.”
This workout should be done daily in the morning. Since most of us take at least about 4 weeks to reach our goal, during this time you will find this morning workout easy enough to become a habit, or at least begin to appreciate your morning shower more.
We recommend doing this workout daily to help you adjust to your workout routine.
Hands
Loaded arm curls
Program 25 pull-ups
Stand up straight and grab the barbell. Your arms should be shoulder-width apart and fully extended. The hands should hold the bar with a “reverse grip”. The back should be straight.
Read also: How to keep up with a stronger cyclist: advice for weak and beginners
Smoothly lift the barbell up to your upper chest and up to your neck. Your elbows should be completely bent. Also smoothly lower the barbell to the starting position. When performing the exercise, hold the bar tightly. Try to maintain a stable position while performing the exercise slowly. If you do this exercise too quickly, your core will swing and you will begin to perform the exercise not from the strength of your arms, but from the momentum generated.
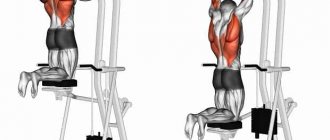
Arm extension with load
To train your triceps, hold a dumbbell in your right hand and place your left knee on a bench. The arm with the dumbbell should be bent at the elbow and pressed against the body.
Pull your hand with the dumbbell back to the limit. When performing the exercise, your back should be straight. After fully straightening your arm, return to the starting position. Repeat the exercise for the other hand.
In general, cyclists find it much easier to perform forward back bends than back bends. Strengthening your lower back (lower back) muscles will allow you to increase your pedaling power, especially when climbing hills.
Training program
Now let's move on to the main part of the training program. I recommend that you start doing pull-ups at least 3-4 hours after your morning push-ups. The program is divided into 5 training days (Monday to Friday). On weekends (Saturday, Sunday), be sure to take a break from training. During the week it is very important not to skip training days. Finally, doing pull-ups is more important than doing push-ups (if you do need to miss part of the day for any reason).
The program is designed specifically to improve performance in a specific exercise - pull-ups on the horizontal bar.
. Also, this program can be used for pull-ups with different grips. Efficiency depends on the quality of the exercises; the number of repetitions does not matter. You should strive for perfect form on every rep. Don't fool yourself.
For help with 50 pull-ups
A pull-up program can include 50 pull-ups. This method is quite common and effective, so it is popular. This type of program is aimed at the effective development of muscles of various groups. The classes are based on dynamics, which makes it possible to get the desired result in a short time.
Many people are capable of doing no more than 10 pull-ups on the bar, and for some the highest values remain the ultimate dream. The result of the training will be the ability to perform 50 pull-ups at a time. This value is very impressive, so most people have doubts about its reality.
In a month you can reach 30 pull-ups, and then 50 and above. At the same time, the body is able to transform and achieve the desired parameters. You can strive to increase the amount of exercise, but for many it is enough to stick to the level already achieved to keep the body in shape.
This system of pull-ups on the horizontal bar is considered special, so before you begin to implement it, you need to familiarize yourself with the rules. The first stage of the program is a test task. You need to do the maximum possible number of pull-ups on the bar in 1 approach. At the same time, there is no need to exaggerate your values, since this does not contribute to the effective implementation of the program in the future.
Based on the results obtained, you need to decide how the training will take place every day. To do this, the choice is made on one of the cycles. In the first stages, you need to strictly adhere to the selected values, not forgetting about rest.
Day 3
From this day on, you will train using so-called “training sets”.
Training sets:>
To determine your “training set”
, you'll have to experiment a little. “Training set” is a certain fixed number of repetitions. One person may have 5 reps in a training set, another may have more or less, etc. The number of reps in your “training set” should be such that you can complete 9 sets with that number. Let's say you can do 9 sets of 5 reps. This means your “training set” is 5 reps. If you can do more, then increase the amount, if in the last approaches you cannot complete the required amount, reduce it. The idea is to do the same number of reps for all sets.
The best indicator of the number of repetitions in a “training set” is Day 4. If you successfully completed Day 3, try adding 1 repetition to your “training set” on Day 4. Now, if you manage to complete more than 9 sets on Day 4, add another rep .
It is important not to change the number of repetitions
in a “training set” throughout the day.
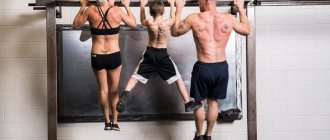
If it becomes very difficult for you, still do not reduce the number of repetitions. Your 9 sets will be divided into 3 types of pull-ups: 3 sets with a wide grip, 3 sets with a medium grip, and 3 sets with a close underhand grip. Rest after each set - no more than 60 seconds.
Conclusion
The program is truly effective and complex; not everyone can perform it perfectly, especially those who are starting from scratch. If the number of pull-ups is a maximum of 2 repetitions, do not despair and continue training, after two months you will significantly increase the number of pull-ups. But for beginners, in my opinion, it is better to rest more often and do pull-ups 2-3 times a week so that the muscles have time to recover. Armstrong's program is more suitable for more advanced athletes who want to increase the number of repetitions in one set in the shortest possible time.
Day 4
Do as many “training sets” as possible. That is, if in the previous day you did 9 sets, now you should do the maximum number of sets, changing your grip every 3 approaches. Rest between sets is 60 seconds.
You should do sets until you have the strength to complete a full “training set.” Get ready for this to be your longest training day of the week.
If you do more than 9 “workout sets” today, then next week add 1 rep to all “workout sets” you do.
Unique rules for performing exercises correctly
The horizontal bar keeps a large number of secrets, knowledge of which will help you give your body an ideal look in a short time. The final result primarily depends on the correct execution of pull-ups and the type of grip used.
- The back is slightly arched, and the legs must be straight when pulling up.
- Pull-ups are performed smoothly, using muscle power, without using jerks.
- Inhale deeply, and as you exhale, pull your body towards the horizontal bar.
- Rise all the way to touch the bar with your chin.
- Pursuing the goal of building muscle mass, lifting is done slowly, lowering is done quickly.
- To strengthen muscles, increase endurance and power, exercises are done like this: ascent quickly, descend slowly.
- You can achieve maximum flexibility of the tendons and stretching in the muscles with the following scheme: a sharp rise, a quick descent, with free sagging in intervals of up to ten seconds.
- When descending from the horizontal bar, you need to gently place your feet on the ground, without jumping.
https://youtube.com/watch?v=Pi78TTSqQOk
Back
Bend forward with a barbell
To strengthen the muscles of the upper back, perform the following exercise. Take a bent position and grab the barbell with an overhand grip. Your back should be straight, your arms should be fully extended, and your feet should be bent; your knees should be shoulder-width apart.
Keeping your back straight, lift the barbell toward your lower chest. In this case, the elbows should be spread apart and “look at the ceiling.”
Back stretch
This is a great exercise for stretching the erector spinae muscles. Use a special simulator to perform this exercise. Clasp your arms across your chest. Place your feet and thighs on the supports of the machine. The back should be straight. You should be in a comfortable position on the machine to perform forward bends at a 20-degree angle.
Bend forward at an angle of 20 degrees. Your hands should remain pressed to your chest. When bending, the rest of your body should remain stationary. After bending, return to the starting position. Repeat this exercise up to 20 times in each series. This exercise should be performed in no more than three series (approaches) so as not to overload the back.
Read also: How to recover after training if your legs can no longer support you
One of the weakest points for cyclists (as for most people) is the abdominals. Strong abdominals increase a cyclist's power when finishing, climbing, and performing work during an individual time trial. Weak abdominals can lead to lower back pain because the abdominal muscles are in balance with the lower back muscles.
Strength training in this area is especially important for improving the mountain and sprint qualities of a rider, as well as for eliminating lower back pain.
Abdominal Press
Crunches
Take a position lying on your back on the floor. Bend your knees, cross your arms over your chest. Do not bend your neck while performing the exercise. The soles of your feet should be pressed firmly to the floor, 6 inches apart.
Read also: 9 Hard CrossFit Workouts You Can Do at Home
Try to raise your torso at a 45-degree angle from the floor to your knees. Do not lift your lower back off the floor. When performing this exercise, you only lift your shoulders. After reaching the limit position, remain there for several seconds. Then return to the starting position. After you have strengthened your abdominals, you can put a small “pancake” from the barbell on your chest and perform the exercise with additional load.
Do-it-yourself Armstrong ceiling installation
Now let's start the installation work - you need to start with installing the wall corner. Everything is simple here - we arm ourselves with a hammer drill or a screwdriver and, depending on the type of walls in the room, fasten the corner along pre-marked lines. In the corners, these elements are joined with a 45˚ trim.
Having dealt with the perimeter, you can begin installing the bulk of the suspensions. There is nothing complicated here either. In the marked places we drill a hole, insert a plug into it and fasten the assembled “butterfly” through the loop of the knitting needle inserted into it.
Installation of Armstrong ceiling photo
At the next stage, the installation of the Armstrong ceiling involves the installation of guides. Here, too, everything is brilliantly simple - the profile is simply put on the hooks of the suspensions. Both ends of it should lie on the wall corner. If the profile is very long, it must be trimmed, and if it is short, then it must be extended - this is done simply: the missing section is cut off from a similar profile and attached using special latches, which are provided for in the design of this profile.
When all the guides are installed, they must be oriented in the plane. To do this, we stretch a couple of transverse threads and, by adjusting the height of the suspensions, achieve such a position that all the profiles in the room barely touch these threads.
Now you can go further and install long jumpers. To install them, there are special elongated slots in the guides - the jumper simply snaps into them. As work progresses, you will have to add hangers - each jumper will need to be secured in the middle. Having dealt with the long jumpers, short ones are installed - they are mounted in exactly the same way as the long ones.
Armstrong ceiling installation - instructions
And the last stage, which includes the Armstrong suspended ceiling installation technology, is the installation of cards and lighting fixtures. With cards, everything is quite simple - they are inserted into cells and do not require additional fastening. The lamps will require more attention - in the corners of the cell (in which a square lighting fixture is to be installed), you need to additionally install 4 pendants. If you don’t like the office version of lighting fixtures for the Armstrong ceiling, then you can use spotlights - they are embedded directly into the cardboard card itself.
Do-it-yourself Armstrong suspended ceiling installation technology
This is how you make an Armstrong suspended ceiling with your own hands. There is nothing complicated in this process, the main thing is to do everything consistently and clearly maintain the horizon level.