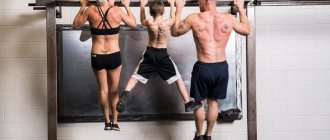
Pull-ups for beginners
And now some advice for those who start doing pull-ups on the horizontal bar from scratch, that is, simply cannot do a single pull-up. Don't get discouraged and just hang for a start. Do special exercises regularly to strengthen your hands. This is an essential part of your training program because without a strong grip your hands will slip. Take your time - it’s better to increase your results gradually than to get injured in a sudden rush.
Pull-ups on a horizontal bar for beginners have a number of special techniques that will help you improve your personal results in this exercise in a short time. Here are a few of them:
- Negative repetitions. Perform as if you had already pulled yourself up on the horizontal bar. Your chin is over the bar and your arms are bent. But you achieve this with the help of an auxiliary object - a chair or bench. Lower yourself as slowly as you can. Perform three to four sets of several exercise attempts. This complex is also good for those who have not trained for a long time and have just resumed training.
- Pull-ups with the help of a partner. Hang on the horizontal bar, and let your partner grab you from behind and help you lift. Three approaches are performed with a decrease in the number of exercises. Remember that the main burden should fall on you.
- Half pull-up. Position your chair so that your arms are bent 90° to the bar, as if you were doing half a pull-up. Do the rest yourself. The number of approaches and pull-ups performed is similar to other sets of exercises for beginners.
- A special exercise machine or elastic band. Many gyms have special machines (gravitrons) to make pull-ups easier, and they are especially popular with girls. An elastic band can serve as a complete replacement. Elastic bands for pulling up on the horizontal bar will not only reduce the load, but also regulate it using a counterweight.
Makatserchyk - stock.adobe.com
How to learn to do pull-ups?
About 90% of girls cannot do a single pull-up on the bar.
This fact is motivated by the following reasons:
- poorly developed muscles;
- lack of training;
- overweight.
This formulation of the question corresponds to reality only partially. In fact, women's muscles are more mobile than men's, and the body is more flexible.
To do pull-ups, you need the harmonious development of all muscles, rather than just strength. Therefore, a competent training routine is enough to teach any girl how to do pull-ups.
No exercise can prepare you for a pull-up.
The key to success is, first of all, the correct placement of the technique from the beginning. To do this, the entire technical side of training must be included in the appropriate program.
Action plan: to increase the number of pull-ups on the horizontal bar
So, let's summarize. Here's a general plan of action designed to help you achieve your first pull-up, then 10-12 reps per set, first weighted pull-up, and so on, in the fastest way possible:
Step 1: How to Achieve 10-12 Pull-Ups Per Set (twice a week)
- Scapular pull-ups: 3 sets of 10-12 reps;
- Banded pull-ups: 3 sets of 6-12 reps;
- Kneeling lat pulldown: 3 sets of 10-15 reps;
- Reverse rows: 3 sets of 8-12 reps (minimum body angle to the floor);
- Negative pull-ups: 2-3 sets of 30 seconds.
Perform two sets of max-rep pull-ups before this workout, as well as 1-2 weight training sessions throughout the week.
Step 2: Improve the result
- Perform weighted pull-ups twice a week (devote one day to other pull-up variations) for 3-4 sets of 6-10 reps.
- Start with a weight of 1-2.5 kg, and add 1-2.5 kg as you are able to perform 3-4 sets of 10 repetitions.
- After 4 weeks of hard training, take a week off or do a week of training with minimal impact.
I hope you will see that with the right approach you can achieve significant results. And this step-by-step program, which builds protocol and exercise into your weekly plan, shows you how to properly progress over time. So you can break through the ceiling and achieve results in the most effective way, just like countless other participants who have successfully completed the program.
Methods
There are several methods that will increase the number of repetitions.
Reverse and forward progression method
Reverse progression technique:
- The exercises are performed for six days. Every day 6 approaches are carried out.
- In the first approach, the maximum number of pull-ups is performed, then in subsequent approaches the number of exercises is reduced by 1.
- Every day the maximum number of pull-ups increases by 1.
- At the beginning of the first and at the end of the sixth approach, you need to hang on the bar with straight arms for 10 seconds.
- After the sixth day there is a break. Then the exercises are repeated 5 times for 6 days.
Direct progression method:
- Exercises are performed for 6 days. Every day 3 approaches are carried out.
- The number of pull-ups is the same in each approach. Every day the number of pull-ups increases by 1.
- On the seventh day, rest and then again 5 times for 6 days.
Both techniques are designed for beginners.
Negative pull-ups
These pull-ups are designed for those who cannot do full pull-ups. You need to grab the horizontal bar with your hands and push off the ground with your feet to take a position as if you were doing a pull-up. Fix the position: the chin is above the bar, the gaze is looking up, the chest touches the horizontal bar. Then slowly lower down.
Lewis Armstrong program
The training is designed for 5 days a week with a break of two days. Every day, push-ups are performed to failure in 3 sets. Three hours after push-ups, pull-ups are performed. The main thing in the technique of this program is not quantity, but quality.
It should be done like this:
- Day one: five sets of pull-ups to failure. There is a 90 second break between sets.
- Second day: first one repetition is performed, then one repetition is added in each approach and so on until failure. There is a 10 second break between sets.
- Third day: three approaches are performed with a wide grip, three with a medium grip, three with a narrow grip. Between sets the break is 1 minute. Number of repetitions until failure.
- Day four: On this day, do as many approaches as possible. Every three approaches the grip changes: wide, medium and narrow. There is a 1 minute break between sets.
- Fifth day: choose the hardest day of the four previous ones and repeat it.
Ladder
The ladder on the horizontal bar can be straight or reverse. Performing a reverse ladder:
- The exercise is done as many times as possible.
- Rest 30 seconds.
- Perform as many pull-ups as possible.
- Rest 30 seconds.
- Pull-ups are carried out until there is no strength to pull yourself up even once.
Straight ladder method:
- Pull up 5 times.
- Rest until you feel ready to perform the next approach.
- Then, with each approach, one pull-up is added, and so on until the limit.
The straight ladder is carried out every other day. The program must be recorded on paper for better perception of information.
With extra weight
A pull-up vest is required for training. The horizontal bar should hang at such a distance that you can reach it with your hands without jumping.
Technique:
- Put on a vest and approach the horizontal bar.
- Firmly grasp the bar with the required grip.
- As you exhale, bend your arms and pull your body up until your chin is above the bar.
- Inhale and go back.
- Repeat the required number of repetitions.
Instead of a vest, you can use a backpack, in which you need to put weight plates.
To select the weight you need:
- Determine for yourself the maximum weight with which it is possible to perform one pull-up without violating the execution technique or jerking.
- If the goal of the workout is to build muscle mass, take 70-85% of the maximum weight. Number of repetitions 8-12 times.
- To increase muscle and back strength, take 85-95% of the maximum. Reps 2-4.
- For strength endurance, 50-70% of the maximum is taken. Repeats 15-20.
Contraindications
Before exercising on the horizontal bar, you should consult your doctor, as there are contraindications. For some diseases, you can perform a certain set of exercises.
You can’t do exercises on the bar when you have:
- intervertebral hernia;
- osteochondrosis in acute form;
- scoliosis;
- joint diseases;
- problems with excess weight;
- diseases of the musculoskeletal system (kyphosis, lordosis).
Those who have recently had sprains or torn ligaments should hold off on training.
The training program for pull-ups on the horizontal bar must be selected taking into account physical capabilities and health status. All exercises must be performed gradually so as not to harm the body.
Author: Julia Winters
Article design: Oksana Grivina
Pull-ups
General rules
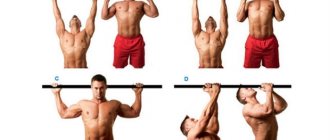
1. Hold the bar firmly. Use a medium overhand grip: your hands grab the bar at shoulder level.
2. Avoid sudden movements or jerks. It’s better to do it once smoothly than three times with a jerk.
3. Each pull-up consists of 4 phases:
- Climbing (35% of the time)
- Fixation (15%)
- Descent (35%)
- Pause (15%)
3. When rising, your gaze should be directed upward to the sky or ceiling. The chin is slightly raised. It's like you're pulling yourself up to the bar with your chest.
4. At the top point, the chin should be above the bar.
5. Avoid slow lifting and sudden lowering. When lowering, you should, just as when lifting, use your muscles and not give in to the force of gravity. Lowering and rising should be the same in speed and duration.
6. Exhale - while lifting and fixing over the bar, inhale - during descent and pause.
7. Ideally, lifting is done without swinging or using the legs. At the initial level, you can close your eyes to this point.
Scheme of pull-ups on the horizontal bar from scratch
0. To start, simply hang from the bar.
Bend your back, look up at the bar and the sky (ceiling). Feel your body in this position.
1. First day
Our beginner pull-up program starts with simulating pull-ups.
Grabbing the bar, try to lift your body a little, pause a little and lower yourself down. The lowering is equal in time to the ascent and occurs smoothly. The essence of the simulation is to provide an opportunity to correctly perform a minimal pull-up without concentrating on achieving the goal. We monitor breathing, body position, direction of gaze and execution technique.
2. First week
During the first week, our pull-up routine from scratch involves the use of a chair or the assistance of a partner.
We do full pull-ups, but with partial weight. For this purpose we use, for example, a stool, chair or any other elevation. The point is that part of the weight falls on the auxiliary object. To do this, you need to bend your legs at the knees and rest on an auxiliary object with your fingers or lifting your legs. The same function can be performed by a partner who will hold the legs at the shin or ankle.
As part of this stage of the program for beginners on pull-ups on the horizontal bar, we train daily or every other day. We perform 5-8 repetitions in 3 approaches.
3. Second week
Our zero bar pull up program in week two focuses on half pull ups or learning how to lower properly.
The half pull-up is also known as the negative pull-up. We can call it negative because Pull-ups like this don’t happen: we train not to drop sharply.
Holding the bar with our hands and pushing off the ground with our feet, we assume a position as if we had pulled ourselves up. We fixate: the chin is above the bar, the gaze is directed upward, the chest almost touches the bar. Then we lower ourselves smoothly.
We perform 5-8 negative pull-ups in 3 approaches.
4. Third week
In the third week of the pull-up scheme on the horizontal bar from scratch, we alternate exercises with the help of an auxiliary object or a partner and a negative version. If pull-ups are easy, increase the number of repetitions to 15-20.
It shouldn't be easy. It must be a load that can be overcome with effort.
The more perfect you are at doing light pull-ups in week three, the more successful you will be at doing full pull-ups.
5. Fourth week. Full pull-ups.
The previous three weeks of the beginner's pull-up program were necessary for the body to get used to physical activity and “understand” in which direction it needs to adjust. For a person who starts pull-ups on the horizontal bar from scratch, the issue of physiological adjustment is extremely important. After all, instead of sitting, you are going to build muscle mass. For our body, this is a completely different way of working.
Follow the general rules for pull-ups that we gave above.
Alternate between forward and reverse grips every day. Don't do them together in the same workout.
Start with the maximum number of pull-ups you can do. 3 pull-ups is very good. Do 3 approaches. It's okay if on the third approach you only do 1 pull-up. As soon as the number of repetitions in the first and last set is equal, add 1 extra repetition. Continuing the program from zero pull-ups on the horizontal bar, over time your muscles will get stronger, and the number of repetitions will increase to 5, 10, 15, 20.
Advantages and disadvantages
Pull-ups on the horizontal bar (the training program must be drawn up individually) has the following advantages and disadvantages:
| Advantages | Flaws |
| Horizontal bars are always available at any site near the house. There is no need to go anywhere and spend money. You can also install a crossbar at home. | During training on the horizontal bar, all muscles are worked out, except for the legs. Therefore, the load on the legs must be carried out separately. |
| By exercising for 10-15 minutes a day, you can achieve visible changes in the body and improve your condition. | To build muscles, regular exercises on the bar are not enough. You need to separately purchase and use various items (weights). |
| If a person is unable to pull himself up, he can simply hang on the bar. A couple of minutes of exercise a day can improve the condition of your back and gradually make your arms stronger. | If the horizontal bar is located outside, then you should always adapt to weather conditions. |
| There is virtually no risk of injury on the bar. | For those who have not played sports before, it will be difficult to start training on the horizontal bar. |
| Anyone, regardless of gender and age, can exercise on the horizontal bar. |
Training cycles. Pull-up diagram on the horizontal bar
If, after taking the test, you find that you have completed less than five pull-ups, then you need to start your training with pull-ups such as negative pull-ups. Now, a few words about how negative pull-ups are performed.
You need a support with which to hang on the bar at the top - your chin on top of the bar, but you don't need to put it on it. Now you need to lower yourself until your arms are completely straight, as slowly as possible. Then repeat as many times as needed.
| Day | Sets and reps | Total | ||||
| First | 1 | 7 | 5 turns | 5 | 7 times | 26 |
| Second | 2 | 8 | 6 turns | 6 | 8 times | 31 |
| Third | 3 | 9 | 6 turns | 6 | 8 times | 33 |
| Fourth | 4 | 9 | 7 turns | 7 | 9 times | 37 |
| Fifth | 5 | 10 | 8 turns | 8 | 10 times | 41 |
| Sixth | 6 | 10 | 8 turns | 8 | 12 times | 44 |
4-5 reps
In this cycle, as in the previous one, you will need to do negative repetitions.
| Day | Sets and reps | Total | ||||
| First | 4 | 9 | 6 turns | 6 | 9 times | 34 |
| Second | 5 | 9 | 7 turns | 7 | 9 times | 37 |
| Third | 6 | 10 | 8 turns | 8 | 10 times | 42 |
| Fourth | 6 | 11 | 8 turns | 8 | 11 times | 44 |
| Fifth | 7 | 12 | 10 turns | 10 | 12 times | 51 |
| Sixth | 8 | 14 | 11 turns | 11 | 14 times | 58 |
6-8 reps
| Day | Sets and reps | Total | ||||
| First | 2 | 3 | 2 turns | 2 | 3 times | 12 |
| Second | 2 | 3 | 2 turns | 2 | 4 times | 13 |
| Third | 3 | 4 | 2 turns | 2 | 4 times | 15 |
| Fourth | 3 | 4 | 3 turns | 3 | 4 times | 17 |
| Fifth | 3 | 5 | 3 turns | 3 | 5 times | 19 |
| Sixth | 4 | 5 | 4 turns | 4 | 6 times | 23 |
9-11 reps
| Day | Sets and reps | Total | ||||
| First | 3 | 5 | 3 turns | 3 | 5 times | 19 |
| Second | 4 | 6 | 4 turns | 4 | 6 times | 24 |
| Third | 5 | 7 | 5 turns | 5 | 6 times | 28 |
| Fourth | 5 | 8 | 5 turns | 5 | 8 times | 31 |
| Fifth | 6 | 9 | 6 turns | 6 | 8 times | 35 |
| Sixth | 6 | 9 | 6 turns | 6 | 10 times | 37 |
12-15 reps
| Day | Sets and reps | Total | ||||
| First | 6 | 8 | 6 turns | 6 | 8 times | 34 |
| Second | 6 | 9 | 6 turns | 6 | 9 times | 36 |
| Third | 7 | 10 | 6 turns | 6 | 9 times | 38 |
| Fourth | 7 | 10 | 7 turns | 7 | 10 times | 41 |
| Fifth | 8 | 11 | 8 turns | 8 | 10 times | 45 |
| Sixth | 9 | 11 | 9 turns | 9 | 11 times | 49 |
16-20 reps
| Day | Sets and reps | Total | ||||
| First | 8 | 11 | 8 turns | 8 | 10 times | 45 |
| Second | 9 | 12 | 9 turns | 9 | 11 times | 50 |
| Third | 9 | 13 | 9 turns | 9 | 12 times | 52 |
| Fourth | 10 | 14 | 10 turns | 10 | 13 times | 57 |
| Fifth | 11 | 15 | 10 turns | 10 | 13 times | 59 |
| Sixth | 11 | 15 | 11 turns | 11 | 13 times | 61 |
| Seventh | 12 | 16 | 11 turns | 11 | 15 times | 65 |
| Eighth | 12 | 16 | 12 turns | 12 | 16 times | 68 |
| Ninth | 13 | 17 | 13 turns | 13 | 16 times | 72 |
21-25 reps
| Day | Sets and reps | Total | ||||
| First | 12 | 16 | 12 turns | 12 | 15 times | 67 |
| Second | 13 | 16 | 12 turns | 12 | 16 times | 69 |
| Third | 13 | 17 | 13 turns | 13 | 16 times | 72 |
| Fourth | 14 | 19 | 13 turns | 13 | 18 times | 77 |
| Fifth | 14 | 19 | 14 turns | 14 | 19 times | 80 |
| Sixth | 15 | 20 | 14 turns | 14 | 20 times | 83 |
| Seventh | 16 | 20 | 16 turns | 16 | 20 times | 88 |
| Eighth | 16 | 21 | 16 turns | 16 | 20 times | 89 |
| Ninth | 17 | 22 | 16 turns | 16 | 21 times | 92 |
26-30 reps
| Day | Sets and reps | Total | ||||
| First | 16 | 18 | 15 turns | 15 | 17 times | 81 turns |
| Second | 16 | 20 | 16 turns | 16 | 19 times | 87 turns |
| Third | 17 | 21 | 16 turns | 16 | 20 times | 90 rev. |
| Fourth | 17 | 22 | 17 turns | 17 | 22 times | 95 |
| Fifth | 18 | 23 | 18 turns | 18 | 22 times | 99 |
| Sixth | 19 | 25 | 18 turns | 18 | 24 times | 104 |
| Seventh | 19 | 26 | 18 turns | 18 | 25 times | 106 |
| Eighth | 19 | 27 | 19 turns | 19 | 26 times | 110 |
| Ninth | 20 | 28 | 20 turns | 20 | 28 times | 116 |
31-35 reps
| Day | Sets and reps | Total | ||||
| First | 20 | 25 | 19 turns | 19 | 23 times | 106 |
| Second | 22 | 25 | 21 turns | 21 | 25 times | 114 |
| Third | 23 | 26 | 23 rev. | 23 | 25 times | 120 |
| Fourth | 24 | 27 | 24 turns | 24 | 26 times | 125 |
| Fifth | 25 | 28 | 24 turns | 24 | 27 times | 128 |
| Sixth | 25 | 29 | 25 turns | 25 | 28 times | 132 |
| Seventh | 26 | 29 | 25 turns | 25 | 29 times | 134 |
| Eighth | 26 | 30 | 26 turns | 26 | 30 times | 138 |
| Ninth | 26 | 32 | 26 turns | 26 | 32 times | 142 |
36-40 reps
| Day | Sets and reps | Total | ||||
| First | 23 | 27 | 22 turns | 22 | 26 times | 120 |
| Second | 24 | 28 | 24 turns | 24 | 28 times | 128 |
| Third | 25 | 29 | 24 turns | 24 | 29 times | 131 |
| Fourth | 26 | 30 | 25 turns | 25 | 30 times | 136 |
| Fifth | 26 | 31 | 25 turns | 25 | 31 times | 138 |
| Sixth | 26 | 31 | 26 turns | 26 | 26 times | 135 |
| Seventh | 27 | 31 | 26 turns | 26 | 32 times | 142 |
| Eighth | 28 | 32 | 26 turns | 26 | 32 times | 144 |
| Ninth | 28 | 34 | 27 turns | 27 | 34 times | 150 |
More than 40 repetitions
| Day | Sets and reps | Total | ||||
| First | 25 | 28 | 24 turns | 24 | 27 times | 128 |
| Second | 25 | 29 | 25 turns | 25 | 28 times | 132 |
| Third | 25 | 30 | 25 turns | 25 | 29 times | 134 |
| Fourth | 26 | 31 | 25 turns | 25 | 31 times | 138 |
| Fifth | 26 | 32 | 26 turns | 26 | 31 times | 141 |
| Sixth | 27 | 32 | 26 turns | 26 | 26 times | 137 |
| Seventh | 27 | 34 | 26 turns | 26 | 33 times | 146 |
| Eighth | 28 | 34 | 26 turns | 26 | 34 times | 148 |
| Ninth | 29 | 35 | 27 turns | 27 | 35 times | 153 |
Here is a pull-up program on the horizontal bar, with which you can achieve pretty good results. This bar training program will help you in any case, no matter how many pull-ups you want to do. This can be either 20 or 30 times - you can use this program. But one pull-up pattern on the horizontal bar is good, but two are better
And the second pull-up program is a pull-up diagram that will help you get to 25 pull-ups on the bar.
But one pull-up pattern on the horizontal bar is good, but two are better. And the second pull-up program is a pull-up circuit that will help you get to 25 pull-ups on the bar.
How to stay in shape with pull-ups[edit | edit code]
So, you have achieved your goal. Amazing! Regardless of how many pull-ups you've done in a row—10, 25, or 50—I'm confident that the work you've done has helped you make significant improvements in terms of building strength and creating muscle definition.
Now that you've mastered the technique of performing multi-grip pull-ups, you can use this exercise to maintain and maintain your current fitness and impressive muscles, or even challenge yourself further by turning to the more difficult variations described in Part III. Pull-ups can be a mainstay of your workout routine for years to come, but try not to show off your prowess too often in the gym, on the sports field, or anywhere else where there's something overhead to grab onto—your newfound ability might make people jealous. Like any superhero, you should only use your supernatural powers for worthy causes.
Since you've put so much work into achieving this level of proficiency, don't lower the bar by forgetting to include pull-ups in your regular training schedule. The ability to do a pull-up on a bar is fundamentally different from the ability to ride a bicycle: if you stop loading the muscles necessary for pulling up, you will lose them. Regularly performing at least 10 repetitions two or three times a week will be a good way to ensure that you maintain the strong, lean, defined muscles you've built in this program. And if you want to continue working on building sculpted arms, abs, hand strength, forearms, and overall body shape, then incorporate a series of advanced movements into these reps.
What exercises can you do on the bar?
The crossbar provides a wide field for sports imagination. Here you can perform a huge number of exercises that develop different muscle groups.
Burpee
The burpee exercise is popular among athletes of various categories, especially among martial artists who prefer to develop endurance, agility and strength.
The execution method is as follows: you need to take the IP. – stand in front of the horizontal bar, arms at your sides, feet shoulder-width apart. We squat down at a fast pace, jump into a prone position and do one push-up. We also dynamically return to a squatting position with a jump, jump again and return to the standing position, pull ourselves up, and jump to the ground. Exercise.
Core
Core is a set of exercises for developing mass, strength and endurance, training different muscle groups.
The technique of performing “core” must be adopted i.p. – arms down, feet shoulder-width apart. We jump up to the horizontal bar, pull ourselves up, raise our straight legs perpendicular to the body, lower them down, raise our legs again, but now bent at the knees at a right angle. Then we lower our legs again and raise them again, this time up, so that our toes touch the crossbar. We jump to the ground and repeat the exercise at least five times.
But among all the existing techniques with a horizontal bar, the most popular is the pull-up training program, which, with due persistence, will help build strength and endurance.
It’s worth dwelling in a little more detail on the issue of competently performing pull-ups on the horizontal bar, because the final result largely depends on the quality.
How to do pull-ups correctly
The back and legs must be straight, you need to rise all the way to touch the bar with your chin.
The crossbar is fraught with a lot of secrets, knowing which you can quickly get yourself into perfect shape.
- If you are going to build mass, then you need to go up slowly and come down quickly.
- If you need to strengthen your muscles, increase power and endurance, then you need, on the contrary, to quickly rise and descend slowly.
- For good stretching and flexibility, you need to quickly perform both the ascent and descent, and give yourself about ten seconds of sagging in between sets.
There are several types of pull-ups, let's look at them.
- Straight grip. The backs of the hands are directed towards the crossbar.
- Narrow - arms are located at shoulder level.
- Average - hands at the level of ten centimeters wider than the shoulders.
- Wide - unlike the first two, it implies a wide placement of the hands at the maximum distance from each other.
- Reverse grip. The hands are directed with the palms towards the horizontal bar. Like the direct grip, the reverse grip is divided into three subtypes:
- narrow;
- average;
- wide.
Choosing workout clothes
Clothing for pull-ups on the horizontal bar should be comfortable and not restrict movement. For footwear, it is better to use sneakers. The choice of clothing for training depends on the time of year and weather.
In winter, when choosing clothes, you need to consider the following points:
- Don't dress too warmly. Physical exercise will keep you from freezing. It is better to use several layers of clothing (thermal underwear, T-shirt and jacket).
- It is advisable to purchase thermal underwear for sportswear.
- It is better to avoid wearing cotton clothes, as a person will sweat during the workout and the fabric will get wet. Therefore, it is better to give preference to synthetics.
- You should remember to protect your hands with gloves. You must put a hat on your head.
In summer you can wear cotton clothes with added elastane. Men can train in a T-shirt and shorts or pants. Some people prefer to exercise without a shirt. For women, you should choose a top or tank top and leggings or shorts. The girl also needs to pay attention to the choice of sportswear.
When doing exercises on the horizontal bar, your hands sometimes slip off the bar. To avoid this, you can purchase special gloves for practicing on the bar. They can reduce the number of calluses and help you feel more confident on the horizontal bar.
Don't miss the most popular article in the section: Body drying for girls. Training program, detailed nutrition menu for the month by day.
Why do non-horizontal bar people need pull-ups?
The simplest and most common sports equipment in courtyards and school playgrounds is a horizontal bar. Housewives hang a carpet on it, children use the horizontal bar as a football goal, and with its help you can increase your strength. The pull-up is a simple, basic exercise that works the entire body and builds endurance.
With regular, short-term meetings with the horizontal bar, you will quickly feel how:
- the number of repetitions you do in one approach increases;
- increases endurance and grip strength;
- The muscles of the fingers are trained and the hands become stronger.
As a bonus, you will strengthen your core muscles, become stronger, your back and arm muscles will appear (or become more expressive), and you will not have scoliosis.
You can do pull-ups with a straight and reverse grip, a medium grip (work the back muscles, biceps, latissimus and brachialis), a wide grip (trapezius, teres latissimus muscles), a narrow grip (latissimus, brachialis and serratus muscles).
Part 1: Assistive movements
Now let’s figure out what exercises you need to do to learn how to do pull-ups even if you can’t do it even once. When you learn to do at least one repetition on the bar, you will begin to study according to a special training program for beginners and subsequently will be able to do 10-20 pull-ups on the horizontal bar.
Hanging on bent arms
To strengthen the muscles of the shoulder girdle and arms, and learn how to pull yourself up without jerking, start by hanging with your arms bent. To perform it, climb onto the bar from the stand; it should be of such a height that your chin is above the horizontal bar. Grab it so that your palms are facing you. Pull yourself up and keep your hang slightly above the bar. Stay in this position for as long as you can. As you progress toward pull-ups, gradually increase your hang time. This is the first step to starting pull-ups from scratch.
Dead hang
The dead hang develops arm strength and allows you to gradually strengthen them to move on to pull-ups. To perform it, climb onto the bar from the stand; it should be such a height that you can barely reach the horizontal bar. Grab it so that your palms are facing away from you. Pull yourself up a couple of centimeters, spreading your elbows out to the sides. Bend your knees to step off the stand, hang and hold this position for as long as you can.
Your shoulders should not rise during this exercise. If you feel your shoulders pulling upward, you need to build up more strength before moving on to actual pull-ups. In order to quickly learn how to do pull-ups and do it easily, you will have to work hard on the horizontal bar. But this technique works great!
Slow lowering of the body
Lowering your body down also takes practice. To get into the position from which you will lower yourself, place a stand under the bar, grab your hands approximately shoulder-width apart, with your palms facing you. Tighten your muscles and step off the stand. Go down very slowly. Then go back on the stand and repeat the process.
This exercise must be performed each time until you can lower yourself slowly. You must be able to control the speed of your body. This is necessary in order to train the muscles and increase the number of pull-ups in the future. If you fall down from the top position, you are not ready for pull-ups yet.
Develop a schedule for pull-ups
| Approach/day | Monday | Wednesday | Friday | Sunday | Tuesday | Thursday | Saturday |
| Approach #1 | 1-2 | 3 | 4 | 3 | 5 | 6 | 2 |
| Approach #2 | 2-3 | 4 | 3×2 | 4 | 3×3 | 4 | 4 |
| Approach #3 | To capacity (3+) | 2×2 | To capacity (5+) | 2×3 | To capacity (7+) | 3×3 | To capacity (10+) |
You must have a rep scheme and training program. Each workout, work on one aspect as you progress towards real pull-ups. Set a schedule and alternate between different techniques; between classes, do not forget to take rest days so that you can study well later.
- Start with a hang. Do sets of about 20 to 30 seconds with one to two minutes in between. Do these workouts every other day to strengthen your muscles - this is important physical preparation for learning how to do pull-ups.
- Then proceed to lower the body. Try to do eight repetitions of the movement. Perform two or three sets, resting for about a minute between each set. Do this exercise through training, it is a good system.
- As you become more comfortable with the lift-up exercises, begin to combine hanging and lowering exercises, remembering to rest between sets. Gradually, you will find that it is easy for you to lift your body and move on to pull-ups, which you can do even at home.
7-Week Program: Phase I[edit | edit code]
At this stage we will try to bring the number of repetitions performed to a number that corresponds to your goals. Reading this part of the book should be the best time to set realistic goals for yourself and choose a program that suits your needs. Fifty pull-ups in a row may be a worthy goal for some of you—but not necessarily for all. Many participants in our program find that Phase I helps them reach their fitness goals and gain enough training knowledge to stay in peak shape. Setting goals early in the program will help you focus on getting exactly what you need from it, and not lose your enthusiasm if you fall a little short of a specific number.
During Phase I, pay maximum attention to technique. The training load will progressively increase, and as you move forward, any existing negative tendencies will take root. Therefore, maintaining proper technique early on will serve you well as the repetitions increase.
Be sure to follow the instructions for hand position when performing repetitions. We will have to use different types of grip: straight (over/pronated), reverse (under/supinated), neutral, narrow, wide. (Instructions for performing all of these variations, with the exception of the reverse-grip pull-up, are outlined in the pull-up program. For a detailed description of the reverse-grip pull-up technique, see the section on exercises for pull-ups. Please read these instructions carefully before beginning the program .) Some gyms offer a wide variety of pull-up bars using different grip styles, but you can always purchase an inexpensive pull-up bar that you can install in your doorway at home.
The goal of Phase I of the 7-week program is to help you get up to 60 pull-ups per workout. In less than 50 days, you'll be able to reach an astonishing 20-plus reps! Once you complete Phase I, you can move on to Phase II and work your way all the way to the truly amazing peak of 50 pull-ups in one set.
Tips for increasing repetitions[edit | edit code]
As you begin to perform sets with higher reps, you will need to learn to use momentum to not stop at the top and bottom positions, but to continue the movement continuously throughout the entire set. The whole secret is that at the top and bottom points you need to make a slight movement - not a swing or a jerk with your legs, but something like a roll. Think of each pull-up as a piston moving in a motor: a controlled, smooth movement up and down, but with a lot of force!
If you need extra rest between sets, rest. The sets become significantly longer, so if you feel like you're stuck mid-set, jump to the floor and rest as long as you need before continuing. Demonstrating good technique is better than grinding out the last reps with terrible technique—and the prospect of injury.
Phase I
| Week 1 | Rest between sets - 60 s (longer if necessary) | ||||||
| Monday | Warm-up | 5 straight grip | 4 reverse grip | 5 neutral/close grip | 4 reverse grip | 3 straight grip | Stretching |
| Tuesday | Day of rest | ||||||
| Wednesday | Warm-up | 6 straight grip | 5 reverse grip | 5 neutral/close grip | 6 reverse grip | 4 straight grip | Stretching |
| Thursday | Day of rest | ||||||
| Friday | Warm-up | 5 straight grip | 6 reverse grip | 6 neutral/close grip | 5 reverse grip | 5 straight grip | Stretching |
| Saturday | Day of rest | ||||||
| Sunday | Day of rest | ||||||
| Week 2 | Rest between sets - 90 s (longer if necessary) | ||||||
| Monday | Warm-up | 6 straight grip | 5 reverse grip | 4 neutral/close grip | 6 reverse grip | 5 straight grip | Stretching |
| Tuesday | Day of rest | ||||||
| Wednesday | Warm-up | 8 straight grip | 5 reverse grip | 5 neutral/close grip | 4 reverse grip | 4 straight grip | Stretching |
| Thursday | Day of rest | ||||||
| Friday | Warm-up | 5 straight grip | 9 reverse grip | 5 neutral/close grip | 5 reverse grip | 5 straight grip | Stretching |
| Saturday | Day of rest | ||||||
| Sunday | Day of rest | ||||||
| Week 3 | Rest between sets - 90 s (longer if necessary) | ||||||
| Monday | Warm-up | 8 straight grip | 6 reverse grip | 5 neutral/close grip | 6 reverse grip | 2 wide grip | Stretching |
| Tuesday | Day of rest | ||||||
| Wednesday | Warm-up | 8 straight grip | 7 reverse grip | 6 neutral/close grip | 5 reverse grip | 2 wide grip | Stretching |
| Thursday | Day of rest | ||||||
| Friday | Warm-up | 10 straight grip | 6 reverse grip | 7 neutral/close grip | 8 reverse grip | 2 wide grip | Stretching |
| Saturday | Day of rest | ||||||
| Sunday | Day of rest | ||||||
| Week 4 | Rest between sets - 90 s (longer if necessary) | ||||||
| Monday | Warm-up | 8 straight grip | 10 reverse grip | 6 neutral/close grip | 6 reverse grip | 2 wide grip | Stretching |
| Tuesday | Day of rest | ||||||
| Wednesday | Warm-up | 11 straight grip | 6 reverse grip | 8 neutral/close grip | 6 reverse grip | 2 wide grip | Stretching |
| Thursday | Day of rest | ||||||
| Friday | Warm-up | 10 straight grip | 10 reverse grip | 10 neutral/close grip | 2 wide grip | Stretching | |
| Saturday | Day of rest | ||||||
| Sunday | Day of rest | ||||||
| Week 5 | Rest between sets - 90 s (longer if necessary) | ||||||
| Monday | Warm-up | 10 straight grip | 9 reverse grip | 9 straight grip | 7 reverse grip | 6 straight grip | Stretching |
| Tuesday | Day of rest | ||||||
| Wednesday | Warm-up | 11 straight grip | 10 reverse grip | 9 straight grip | 7 reverse grip | 5 straight grip | Stretching |
| Thursday | Day of rest | ||||||
| Friday | Warm-up | 14 straight grip | 12 reverse grip | 11 straight grip | 9 reverse grip | Stretching | |
| Saturday | Day of rest | ||||||
| Sunday | Day of rest | ||||||
| Week 6 | Rest between sets - 90 s (longer if necessary) | ||||||
| Monday | Warm-up | 11 straight grip | 12 reverse grip | 11 straight grip | 10 reverse grip | 10 straight grip | Stretching |
| Tuesday | Day of rest | ||||||
| Wednesday | Warm-up | 15 straight grip | 12 reverse grip | 10 straight grip | 9 reverse grip | 9 straight grip | Stretching |
| Thursday | Day of rest | ||||||
| Friday | Warm-up | 17 straight grip | 15 reverse grip | 12 straight grip | Stretching | ||
| Saturday | Day of rest | ||||||
| Sunday | Day of rest | ||||||
| Week 7 | Rest between sets - 90 s (longer if necessary) | ||||||
| Monday | Warm-up | 14 straight grip | 16 reverse grip | 10 straight grip | 10 reverse grip | 10 straight grip | Stretching |
| Tuesday | Day of rest | ||||||
| Wednesday | Warm-up | 15 straight grip | 15 reverse grip | 10 straight grip | 10 reverse grip | 10 straight grip | Stretching |
| Thursday | Day of rest | ||||||
| Friday | Warm-up | 14 straight grip | 13 reverse grip | 12 straight grip | 11 reverse grip | 10 straight grip | Stretching |
| Saturday | Day of rest | ||||||
| Sunday | Day of rest | ||||||
| Week 8 | Perform a Phase I control test | ||||||
| Note. Rest and recovery are essential to the success of your programs, so rest days should be included in your schedule. Also, don't forget to warm up and stretch on your training days! | |||||||
Phase I control test[edit | edit code]
One to three days of rest after completing the third training day of the seventh week, perform a Phase I control test - perform as many pull-ups as possible with good form, just as you did for the initial test. Before the test, you definitely need to have a good rest, saturate your body with water, thoroughly warm up, stretch, and have a positive attitude towards the workout - mentally see how you perform repetition after repetition without any visible effort, sweeping away all obstacles on the way to your cherished goal.
No matter how many pull-ups you manage to do during the Phase I control test, there can be no doubt that this figure will be much higher than the result you showed seven weeks ago. Some people pass these tests without problems, while others have serious difficulties with them. But if this is your first time completing Phase I of this program, then you've already set a few personal bests in pull-ups! You've reached milestones like 15 pull-ups in a row and 60 pull-ups in a workout, and should be very close to breaking the barrier of 20 pull-ups without a break!
Where to begin?
Methodology for starting to do pull-ups on the horizontal bar:
- You need to start by determining your level of physical fitness and previously acquired skills. You can start exercising both at home and in the gym.
- Most often, the question of training is asked by beginners who absolutely do not know how to perform this exercise. Therefore, it is worth considering the learning process from the initial level. At this stage, you need to prepare your body for a certain type of physical activity, in this case, doing pull-ups on the horizontal bar.
- To make the effort to lift the body to the bar, it is necessary to strengthen the muscles involved in this process. This will make learning go much faster. The easiest way to do this is by practicing push-ups. During them, similar muscle groups work, but it is much easier to perform. This way your shoulders and back will be trained.
- The seated lat pull-down exercise will be more effective. It simulates the work of muscles during pull-ups as much as possible and allows you not only to train, but also to understand the processes occurring in the body during the exercise.
Warm-up
Your arms will have to bear the weight of your entire body. This will place serious stress on the joints: shoulders, elbows and wrists. Beginners (and not only them) often complain of pain in their shoulders and hands after doing pull-ups.
Before climbing the horizontal bar, be sure to warm up.
We must ensure that our muscles and joints begin to receive more nutrition, so that the rate of metabolic processes in them increases, and we do not experience pain during exercise.
1. We begin the warm-up by bending the body to the sides. Don't round your back. Extend the arm on the opposite side of the tilt above your head. We stretch our hand, stretching the entire side of the body. We turn our heads and look at the hand. Repeat in the opposite direction. Then - in both directions several times.
2. Hands at chest level, we spread our arms to the sides: first, bend at the elbows (1-2), then straighten them out (3-4). Don't slouch, keep your head straight, don't tilt your chin. Next, we do the same exercise with turning the upper body to the right and left. When turning, we should feel the tension in the back muscles.
3. Wave your arms. At the same time: the right one draws half the circle up, the left one downwards. Repeat 40 times.
4. Elbow bends. We do it intensively, but not sharply. We start in front of the body, then spread our arms to the sides. We perform elbow bends with our arms spread to the side.
5. Rotate your hands, stretch your wrists and fingers.
After a 10-minute warm-up, you can start doing pull-ups.