According to research, muscles grow 5-15 percent faster after quality stretching. However, for some reason, this important step in developing a fit and healthy body after training is often overlooked. Many people mistakenly believe that stretching is exclusively a choreographic tool to be able to do the splits beautifully.
Stretching (translated from English - stretch, lengthen) is an important and necessary final set of exercises. Why stretching is needed after strength training and how to do it correctly will be discussed in detail below.
Why do you need stretching?
Stretching is a mandatory step after physical activity. It is recommended that everyone involved in various types of fitness do muscle stretching exercises at the end of the main workout. Why is this so important:
- Improves elasticity and mobility of joints.
- Blood circulation increases. As a result, muscle pain disappears after physical activity.
- Blood pressure is restored and heart rate decreases.
- Endorphins are produced, which give the body a feeling of harmony and satisfaction.
If you ignore this stage, you can provoke not only general discomfort in the body, but also injury. Therefore, it is better to use the professional support of an experienced trainer.
How to pull on a slack split?
If you did the splits, congratulations! And if you no longer experience pain and discomfort when sitting on a regular split, then I advise you not to stop there. Try to go into the minus - that is, sit on the sagging splits. To do this, take a platform, for example: a step or a sofa (if it’s at home).
Execution: Place your right foot on the platform, sit in a longitudinal split and relax under the pressure of your own weight. Then turn to the transverse, and then turn to the left leg to give a good stretch to the front muscles of the right leg. In the future, you can use 2 steps and raise the height of the platform. Stretching will be very effective if you ask a knowledgeable friend to stretch you. I wish you success!
How to do the longitudinal splits in the minus. How to do the splits quickly. Negative split
Igor July 11, 2019
Stretching rules
Stretching is always performed only after training. Before the main power load, the body and muscles need to be prepared and warmed up - this will be a warm-up, and after the session - in relaxation. Principles of stretching:
- All exercises must be performed statically, allocating at least 20–30 seconds to each element. The amplitude should be even, smooth, without hasty movements and strong pressure on the involved muscle. It is recommended to do the complex for 5-10 minutes at the end of each training to relieve muscle tension. Once a week it is useful to do long stretching - 20-30 minutes. Tasks should be performed alone to avoid injury to your partner.
- During the process, it is very important to monitor the correct breathing rhythm. You need to take a deep breath and stretch as you exhale. This will help make stretching more effective, improve blood circulation and enhance relaxation. When muscles are tense and tight, they are difficult to stretch. The more the body relaxes, the more flexible it becomes, and the less pain is felt.
- If some movements don’t work out right away and cause discomfort, you shouldn’t force them. Gradually the muscles will get used to it, and doing the exercises will become easier.
- While bending towards your feet, you should try to keep your back straight. You need to reach your hips with your stomach. If you can’t do it correctly, you can ask for a little pressure on your lower back. Otherwise, there is a risk of harming the spine.
Stretching not only helps to relax the muscles after strength training, it also frees up the tissue for further growth. Men who regularly perform stretching reduce the risk of salt deposits in joints and the occurrence of arthritis and arthrosis by three times.
Women, as a rule, come to the gym to lose weight and gain a beautiful figure. And it doesn’t matter whether the lady does bodybuilding or aerobics. Stretching is useful for girls - plasticity improves, stiffness and tightness go away, and the process of losing weight accelerates. Movements become graceful, light and graceful. Regular exercise improves coordination and, in case of injury, accelerates the skin regeneration process. Stretching also has a positive effect on the shape of the legs. During stretching, the thigh and calf muscles lengthen slightly and become slimmer.
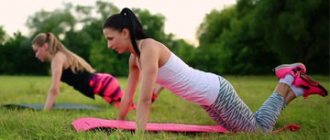
Leg stretching: benefits and features
Stretching will help improve your body flexibility. By doing it regularly, you will soon notice that all leg exercises are much easier for you. It also significantly increases the capabilities of your own body. Calorie consumption increases, despite the fact that in fact you save the body’s energy resources, and accordingly, you get less tired. With good stretching, the risks of destruction and disease of the ligaments and joints in the legs are significantly reduced.
Leg stretching at home is as follows:
- Static . These exercises are useful for both beginners and those who have been leading an active lifestyle for a long time. Their essence is that you need to fixate for some time in the position of maximum stretch, so that the ligaments and muscles have time to stretch and get used to this position.
- Dynamic stretching. It assumes that you will be stretching while constantly moving. May include various swings, rolls and other similar exercises. Typically, dynamic stretching is recommended only after a person has mastered static stretching.
It is important that stretching exercises for the leg muscles are performed correctly. Follow these guidelines:
- Train in a comfortable environment for you. You should completely relax and get the maximum benefit from the exercises.
- The muscles must be able to get used to the new state, so it is important not to rush and pay attention to static stretching. It is recommended to stay in one position for at least half a minute.
- You need to stretch warmed muscles - this prevents the risk of injury and helps increase the effectiveness of the exercises. Beforehand, you can jump, run, or do a light warm-up to improve blood circulation.
- There is no need to rush and chase quick results. You need to stretch gradually, regularly improving your results. If you overdo it, you can seriously damage your muscles and ligaments and cause, at a minimum, severe pain. Serious injury may also occur.
- Stretching should be done before the main workout and after it - then the muscles will best remember this state, and the effectiveness of other exercises will improve thanks to stretching.
- It is important to stretch regularly, otherwise during the break all previously achieved results may be reset.
- During classes, do not hold your breath - it should be smooth, measured, deep. At the starting position of each exercise, you need to inhale; the stretching itself is done while exhaling.
During the stretching process, sudden movements are not allowed. You need to stretch smoothly, while the muscles should be relaxed. No pain is allowed - only a slight pleasant burning sensation. If you feel them, it means the load is too heavy.
Technique for performing stretching by muscle group
After a forceful load on the body, short and light stretching will be a good prevention of pain and will help to competently complete the entire training process.
Neck and trapezius area
The main exercises for stretching are tilting the head back and forth, left and right.
The first thing you need to do is stand up straight. Slowly reach your chin to your chest to the best of your ability. As soon as you feel the limit, you need to carefully stretch even lower. Do the same back, trying to touch the back of your head with the back of your head. Place your right hand on your head and pull it towards your shoulder. Repeat on the left side.
After all four sides have been worked out, make circular movements with your head.
Back, lower back
Stand up straight. Breathing should be smooth. Bend the body in the chest area, then bend back as far as possible. Next, bring your shoulders together, stretch your arms forward and down. The chin should be moved in the same direction. Stretch and return to starting position.
In this exercise, you need to feel the tension in the muscles near your shoulder blades. If it is not there, then try to adjust the movements so that the sensation is created in this particular place.
Exercise "Cat". Get on all fours. Arch your back upward, your head should look down. Then bend down, head up. All movements must be done slowly and measuredly in order to stretch the muscles well.
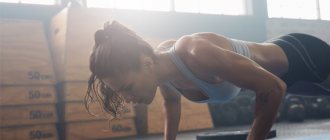
Breast
To stretch, you will need a wall bars or parallel bars. Place your hands on the bar, keeping your feet on the floor. Slowly lower yourself as far as your pectoral muscles allow. Perform the exercise smoothly, without haste. Stand in the lowest position for 30 seconds. Return to starting position.
The following exercise will help relieve muscle tension in the chest after a workout. Lie on your stomach, arms extended to the sides. Push up from the floor with your right hand, bending your right knee for balance as you turn to the left. At this moment, you need to feel a stretch in the chest muscle.
Abdominal muscles, abs
You can use the following techniques:
- Exercise with bends. To do this, you need to sit on a chair, put your hands on the back of your head, and lock your fingers. Bend to the right, try not to lift your buttocks and thighs. Fix in this position for 30 seconds. Repeat on the left side.
- Exercise on the floor. Lie on your stomach with your palms facing forward. Slowly rise up, leaning on your hands. Arch your back and tighten your buttocks for 30 seconds.
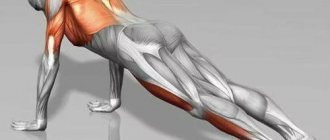
- Plank position. The feet are shoulder-width apart, palms under them. Try to push your pelvis up as much as possible, while also pulling your heels and chest toward the floor. Your knees should remain straight at all times.
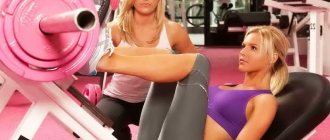
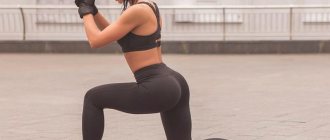
Legs - thighs, lower legs, buttocks
Exercises while lying on your back will help you stretch your muscles:
- First option. Lie on the floor, try to pull one leg bent at the knee to your chest, and leave the other straight. Thus, the gluteus maximus muscle is stretched.
- The second option is to lie on your back and alternately pull your legs to your chest, while trying not to lift your lower back off the floor.
An excellent stretching exercise is the splits. To avoid injury, it is important to ride it within your capabilities.
Other options:
- Side deep lunge to the side. Take a wide step so that one leg is bent at the knee at a right angle. If physical fitness allows, then try to sit closer to the heel. This exercise works well on the hip adductor muscle.
- Quadriceps strain. Get on your knees, sit on your heels, keep your back straight, then carefully lower yourself onto your elbows. If you feel severe discomfort while performing it, then it is better to postpone this position.
- Biceps hamstring strain. Sit on the floor, stretch your legs and fix them in a level position in front of you. Do not round your back. Place your palms around your shin or feet. Bend your torso forward, gradually increasing the stretch.
- Working out the gluteal muscle. Lie on your back. Bend both legs at the knees. Raise the left one a little, place the heel of the right one on it above the knee. Grasp the thigh of your left leg with your hands and pull it a little closer to the body, increasing the stretch of the gluteal muscle. Do the same on the other leg.
- Ankle work. You need to sit on the floor, bend one leg at the knee and gradually try to bend it at the ankle. Here it is important not just to rotate your foot, but to fixate in one state. When you change the position of your leg, different muscles will be stretched.
Arms and shoulders
Any vertical support is suitable for stretching (you can use a wall). Exercises:
- Stand with your right side, put your hand on the surface and lean on it. Make slow turns to the left. In this case, you need to feel the stretching of the muscles of the right shoulder and biceps. Fix in this position for 30 seconds. Repeat on the other half of the body.
- Raise your left arm up and bend it at the elbow. The right palm should be on the opposite shoulder behind the head. With your left hand, grab your right elbow and pull. Hold at the point of tension for 30 seconds.
It doesn’t matter whether a person works out in the gym or attends other fitness activities, such simple stretching exercises will relieve tension and help you relax. The emphasis should be on the muscle group that was most involved during the main workout.
Using various photos and videos on the Internet, you can choose a complex for yourself and perform it at home. However, to get the maximum effect, you need to work with a trainer. For example, start visiting the La Salute fitness club, where experienced instructors will help you perform exercises without the risk of unnecessary stress and injury.
Top 10 standing exercises for stretching the hamstrings
The hamstrings are stretched in two ways: statically and dynamically. In the first case, you need to stay in the poses for a while to keep the muscle tense. During dynamic work, a light, rhythmic tilt is performed in a small amplitude.
It is recommended to stretch the hamstrings without fanaticism in order to avoid damage. The hamstrings and hamstrings are very susceptible to injury, so you should never push them too hard. It is very important to stretch and warm up before training, so we recommend checking out:
- General warm-up before training for 5 minutes
- Top 30 warm-up exercises
- Ready warm-up before cardio and running
How long to do each exercise:
- 15-30 seconds per set of each exercise for easy, regular stretching
- 30-60 seconds per set of each exercise for noticeable improvement in stretching
- 30-60 seconds in 2-3 sets if you want to make significant progress in stretching in a short time (for example, do the splits faster)
It is enough to train 1-2 times a week for overall health, or 4-5 times a week if you want to improve stretching of the hamstrings and hamstrings in a short time.
Straight Leg Squat Bend
Take a normal stance, bring your right leg in front of you, placing it on the heel, and bend your left leg slightly at the knee. Bend forward until almost parallel to the floor. Feel the stretch in the back of your thigh. The lower you tilt your body, the greater the stretch in your leg muscles.
This simple exercise is ideal for stretching your hamstrings. It also has a beneficial effect on the development of muscle elasticity and firmness. Do the tilt gently and not sharply, so as not to injure the ligamentous apparatus. If you have a good stretch, then bend down to your exposed leg until your stomach touches.
Standing hamstring and calf stretch
Starting position - rest your two palms on the wall, take a step with one leg, keeping it straight. Bend the other one slightly at the knee. Press your feet into the surface of the floor. Redistribute the center of gravity to the left leg. Do the exercise on the other side.
The benefit of this hamstring stretch is to engage the calf muscle. Your calves work when walking and climbing stairs, but some extra stretching won't hurt. Important tips are given for the exercise, for example, to increase impact, you can pull your socks towards you. Dynamic version of the exercise – lift the heel of the outstretched leg, lower it back while maintaining muscle stretching.
Tilt with heel support
Stand up straight and tilt one straight leg with your heel onto a support stand (chair or stool), and straighten the other at the knee. Stretch your torso and try to touch the toes of your front leg with your hands. Use two options for each leg: static and dynamic.
The positive result consists of carefully working out the fibers of the hamstring muscles and stretching the hamstrings. You can leave your knees slightly bent. If flexibility is good, then while bending it is allowed to touch the body with the leg raised on the stand.
Bend over support with legs spread
First, stand straight at some distance from the wall, then take a step forward with your right foot and lean towards the wall. Press your palms against the support, but keep your arms straight and your back straight. Do not bend your knees, press your heels to the floor.
This exercise is useful because with regular exercise the risk of damage and injury to muscle fibers and ligaments is minimized. At the same time, the hamstrings are stretched. Stretching against a wall is especially recommended if you want to achieve the splits in a short time. If you bend lower, the hamstrings will become more tense.
You don't have to do this exercise against a wall; you can place your hands on your waist and concentrate on stretching your hamstrings.
Triangle pose
Place your feet wider than your shoulders and keep your body straight. Reach your right ankle with your right hand, turn your body into the same plane with your pelvis, and point your left arm, straightened at the elbow, upward with your fingers, look up. Hold the pose, then repeat on the other side.
The benefits of triangle pose include both gentle stretching of the hamstrings and buttocks and improved mobility of the hip joints. The shoulder girdle and latissimus dorsi muscles are warmed up. The feet should be placed at the distance that general plasticity allows.
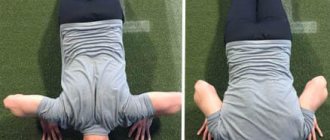
Standing Bend with Legs Spread
Starting position – spread your legs to the maximum distance, position as for a transverse half-split. Lean forward and place your palms slightly in front on the floor. Do not round your back, keep a slight arch in your lower back. Freeze in the accepted position, then straighten up and do another approach as necessary.
This exercise helps in stretching the hamstrings, inner thighs and gluteal muscles. Suitable for those who plan to master cross splits soon. Only regularly training people are allowed to enhance the effect, that is, stand not with the palms placed, but with the forearms pulled to the floor.
Stretch pose
First, take a standard stance, but place your feet close together. Exhale and begin to bend towards your knees, try to press your abs to your thighs. When bent, do not round your back. Stay in this position and try to relax. Then straighten up and stretch up. If necessary, repeat.
Stretching the femoral biceps and ligamentous complex is accompanied by relaxation in the cervical and lumbar regions. The spine is also stretched. If it is difficult to pull yourself to your feet, then a lightweight version is recommended. Straighten your back, and rest your forehead on your arms bent and clasped at the elbows.
Cross-legged stretch pose
This is a variation of the classic pose only with the feet crossed rather than planted and brought together. Starting position: stand straight, cross one leg over the other and place it side by side. Bend over, place your hands on the floor - it is not necessary to press against your hips.
The load, compared to the classic version, changes somewhat, but it is useful for working out the hamstrings. Adds elasticity and mobility. You don’t have to keep your back straight, but rather round it a little. It is recommended to do bends both with a delay in the adopted pose and with dynamics for variety.
High lunge with hands support
Starting position: stand with your feet shoulder-width apart. Step one leg forward to form a 90-degree angle at the knee, and step the other leg behind you. Place your palms on the floor on one side of the foot, place your body along the thigh, support your back without bending. Hold this position and then change legs.
The exercise improves the mobility of the pelvis and straightens its position, giving the hamstrings elasticity. A high forward lunge also strengthens the inguinal ligaments, quadriceps, and thoracic spine. These lunges are also used to stretch muscles before mastering the splits.
Side lunge
Take a classic stance, move your legs a decent distance from each other. Shift your body weight onto one leg and bend your body slightly forward. Straighten one leg, place the other at an angle with the knee, which should not protrude beyond the toe. Hold the side lunge position. Don't forget to repeat on both sides.
This hamstring stretch also works the adductors. You can go lower, touching your buttocks to your heel and resting your hands on the floor for fixation. Press the foot of your supporting leg firmly against the surface on which you are exercising.
What to do after stretching
Stretching after basic exercises requires a set of recovery procedures. It is imperative to adjust the water-salt balance. Replenish the deficiency of proteins and carbohydrates.
It is important to know that in order not to harm your health, you should never go out into the cold right away. While the muscles are very hot, you can get pinched under the influence of low temperatures.
If you feel emotional release after stretching, this is an indicator that all the exercises are being done correctly.
Content
- 1 Pelvic shift with one leg
- 2 Pelvic shift with two legs
- 3 Hamstrings on bent leg
- 4 Hamstrings on straight leg
- 5 Adductors (closing muscles) of the thigh
- 6 Hip abductors
- 7 Psoas muscle
- 8 Quadriceps muscle
- 9 Gluteal muscles
- 10 Piriformis muscles
- 11 External rotators of the thigh
- 12 Internal rotator muscles of the thigh
- 13 Medium rotator muscles of the thigh
- 14
A few exercises for beginners
You need to start stretching your legs with static exercises.
The simplest and most accessible of them are the following:
- To perform the exercise, you need to lie on your back, straighten your legs and raise them so that they are perpendicular to the floor. The arms remain straight along the body, palms down. Raised legs should be gradually spread apart as far as possible to avoid painful sensations. The knees do not bend. You need to remain in this position for 25-35 seconds. Perform 3 approaches.
- For the next exercise, you need to sit on the floor, placing your legs so that your knees are spread apart and your feet rest against each other. Next, you need to slowly press your palms on your knees so that they touch the floor. It is necessary to apply pressure slowly so as not to injure the ligaments. Perform 15-20 repetitions.
- Take a standing position, lunging with your right leg, leaving your left leg behind. The left leg is bent so that the knee is on the floor. You need to rest your hands on your right knee or floor. Bend your torso forward until you feel a feeling of tension in the thigh muscles, but pain should not occur in any other muscle groups. They remain in this position for 25-30 seconds, after which they perform the same actions, lunging with their left leg.
- You need to sit on the floor, spread your legs to the sides as far as possible, while keeping them straight. The torso is tilted forward until the muscles feel tense, remaining in the final position for 50-60 seconds. Perform 3 repetitions with a minute break.
- Take a standing position with your legs apart at shoulder level. Extend your arms, tilting your torso forward. Touch the floor with your palms or fingertips, remaining in this position for 30 seconds. If you cannot touch the floor with your hands, you need to bend down to the limit, while doing the exercise regularly.
- Remaining in a standing position, bring your legs together. Bend your torso forward, clasping your knees with your hands. It is necessary to bend to the maximum possible level, ideally the forehead and knees should touch each other. Remain in this position for 30 seconds, repeat 3 times.
External rotator muscles of the hip[edit | edit code]
External rotator muscles of the hip
What are you stretching:
Gluteus maximus and external rotators (obturator externus, gemellus inferior and superior, obturator internus, and piriformis)
What are you abbreviating:
Small muscles at the top of the buttocks (gluteus minimus), muscles that extend from the acetabulum to the top of the pelvis (tensor fascia lata), and muscles that attach from the front of the lower pelvis to the inner thighs at the mid-thigh (pectineus)
How many times to repeat:
10 per side
How long to hold:
2 seconds
Lie on your back and bend your legs so that your feet are flat on the surface you are lying on. Raise the foot of the leg you will be working with so that the thigh is at a 90° angle (knee pointing at 12 o'clock) and the bottom of the leg is parallel to the surface. Grab both ends of the rope to make a loop. Place the foot of the leg you will be working with in the loop. Tie the ends of the rope around your ankle on the inside of your leg and pull it under your leg so that you can grab the ends of the rope with the same hand as your leg. Place your other hand on your hip, or rather on your knee, to stabilize and assist with rotation. Keeping the bottom of your leg parallel to the surface, rotate your hip inward, bringing the bottom of your leg out with your heel first. You can use your hand with the rope to help a little at the very end of the movement.
One head it's good, but two better…
Assistant, let the athlete do everything himself and use the rope, but at the end help him a little. Place one hand on your knee, the other on your heel. Push a little and hold for 2 seconds. Use the hand on your hip to help rotate your hip so you don't dislocate your knee.
| Left-hand side | Right side | ||||
| Range | Position on the dial | Range of motion degree | Range | Position on the dial | Range of motion degree |
| Red range Too tight | 12.00-11.00 | 0°-30° | Red range | 12.00-1.00 | 0-30 |
| Yellow range Fine | 11.00-10.00 | 30-60° | Yellow range Fine | 1.00-2.00 | 30-60° |
| Green range Athlete's norm | 10.00-9.30 | 60°-75° | Green range Athlete's norm | 2.00-2.30 | 60°-75° |
| Blue range Hypermobility | 9.30-9.15 | 75-82,5° | Blue range Hypermobility | 2.30-2.45 | 75°-82,5 |
Gluteal muscles[edit | edit code]
What are you stretching:
Rotator lumbar, transverse femoral, piriformis and gluteal (gluteus maximus)
What are you abbreviating:
Abdominal muscles, anterior thigh muscles from top to bottom (hip flexors, including quadriceps)
How many times to repeat:
10 per side
How long to hold:
2 seconds
Lie on your back and stretch your legs. Turn the leg you won't be working on towards the middle of your body, with your toes facing inwards. This stabilizes the hips. Using your abdominal and hip flexor muscles, lift your bent knee toward your opposite shoulder without lifting your pelvis. Once the knee can be easily grasped, place your hand on the outside of the knee and gently pull. If you want to do a deeper stretch of the gluteus medius and piriformis muscles, you can further assist the leg by grasping the outside of the shin with the opposite hand and pressing the heel down as the knee approaches the shoulder. Be careful not to injure your knee.
One head it's good, but two better…
Assistant, let the athlete do everything himself, but at the end gently help him. Place your hand on your upper outer thigh and the other on your ankle. Pull slightly and hold for 2 seconds.
Note
. View from above. The head is at 3 o'clock.
| Range | Position on the dial | Range of motion degree |
| Red range Too tight | 9.00-12.00 | 0-90 |
| Yellow range Normal | 12.00-1.00 | 90-120 |
| Green range Athlete's norm | 1.00-2.00 | 120°-150 |
| Blue range Hypermobility | 2.00-3.00 | 150°-180° |
Adductors (closing muscles) of the thigh[edit | edit code]
What are you stretching:
Large muscles of the back of the thigh (hamstrings)
What are you abbreviating:
Anterior thigh muscles from top to bottom (hip flexors, including quadriceps)
How many times to repeat:
10 per side
How long to hold:
2 seconds
Lie on your back and stretch your legs. Grab both ends of the rope to form a loop. Place the foot of the leg you are going to work on in the loop and wrap the rope around the inside of your ankle so that the ends of the rope are on the outside. Secure the knee of this leg. Rotate your free leg slightly inward.
From the hip, using abductors, move the leg you are working away from your body with your heel facing forward. Pull the rope a little. Use the rope for a little help at the end of the stretch. Don't pull your leg into position or your groin will hurt. Perform 10 reps, then repeat, this time with your fingers facing forward.
One head it's good, but two better…
Helper, help your client hold the knee. Let him do all the work and use the rope, but give him a little help at the end. Place one hand on your inner thigh and the other on your heel. Pull slightly and hold for 2 seconds. As the joint opens, each subsequent stretch can be slightly deeper.
Note
. Starting position: Your feet are at the 6 o'clock position.
| Left-hand side | Right side | ||||
| Range | Position on the dial | Range of motion degree | Range | Position on the dial | Range of motion degree |
| Red range Too tight | 6.00-4.30 | 0°-45° | Red range Too tight | 6.00-7.30 | 0-45 |
| Yellow range Fine | 4.30-3.30 | 45-75* | Yellow range Fine | 7.30-8.30 | 45-75 |
| Green range Athlete's norm | 3.30-2.30 | 75-105 | Green range Athlete's norm | 8.30-9.30 | 75-105 |
| Blue range Hypermobility | 2.30-12.00 | 105-180° | Blue range Hypermobility | 9.30-12.00 | 105-180 |
Complicating the task
Knowing some important rules regarding leg stretching can significantly improve your stretching. This is necessary:
- do not miss classes and try to follow a certain training schedule;
- conduct classes more often in the evening, because the body stretches better in the evening, taking into account human biorhythms;
- always exercise in a good mood, because stress and depression block muscles, preventing better training;
- if necessary, use some devices (belts, pillows) to reduce pain and tension in the muscles when stretching.
Medium rotator muscles of the thigh[edit | edit code]
Hip rotator medius
What you are stretching:
The small muscles at the top of the buttocks (gluteus minimus), the muscles that extend from the acetabulum to the top of the pelvis (tensor fascia lata), and the muscles that attach from the front of the lower pelvis to the inner thighs at the mid-thigh (pectineus), the muscles of the inner thigh (gracilis, adductor magnus, adductor longus and adductor brevis), muscles of the groin/upper front of the thigh (iliopsoas), deep muscles on the inside of the pelvis attached near the head of the thigh (iliac muscles)
What are you abbreviating:
Gluteus maximus, gluteus medius and external rotators
How many times to repeat:
10 per side
How long to hold:
2 seconds
Note
. You can use a folded towel, placing it on your thigh under the ankle of the leg you are working on.
Sit on a chair with your back straight, or on any flat surface with your feet in front of you. The non-working leg is stretched and straightened. Take the foot of the leg you will be working on and place it on the thigh of the other leg, placing the ankle just above the knee. Tighten your thigh muscles and lower your knee as low as possible to the surface. Using your non-working leg as a support, gently press down on the knee with the hand on the same side, and with the other hand stabilize the stretch by grasping the foot.
One head it's good, but two better…
Assistant, with your help this exercise changes. The athlete lies on his back. Let him do all the work, but give him a little help at the end. Place one hand on the pelvic bone, and the other hand on the knee of the leg you are working with. Push a little and hold for 2 seconds. Hold the athlete with your hand on the pelvic bone to prevent him from standing up.
| Left-hand side | Right side | ||||
| Range | Position on the dial | Range of motion degree | Range | Position on the dial | Range of motion degree |
| Red range Too tight | 12.00-1.30 | 0-45 | Red range Too tight | 12.00-10.30 | 0-45 |
| Yellow range Normal | 1.30-2.30 | 45-75 | Yellow range Normal | 10.30-9.30 | 45-75 |
| Green range Athlete's norm | 2.30-3.00 | 75-90 | Green range Athlete's norm | 9.30-9.00 | 75-90 |
| Blue range Hypermobility | Reaches to the floor | Blue range Hypermobility | Reaches to the floor | ||
Hip abductors[edit | edit code]
What are you stretching:
Muscles of the outer thighs (gluteus medius, vastus lateralis, tensor fascia lata and iliotibial bandalis)
What are you abbreviating:
Muscles on the inside of the thighs (gracilis, major, long-term, short-term), pectineus and quadriceps
How many times to repeat:
10 per side
How long to hold:
2 seconds
Lie on your back with your legs extended. Take the rope at both ends, forming a loop. Place the foot of the leg you will be working on in the loop and wrap the rope around the outside of your ankle with the ends of the rope on the inside. Strengthen your knee. Rotate the second leg inward slightly and rotate the first leg slightly outward. (Eventually both feet will be pointing in the same direction.)
From the groin, using the adductors, bring the leg across the midline of the body, heel first, slightly above the leg you are not working. Pull the rope a little. Use the rope for a little help at the end of the stretch. Don't pull your leg into position or your hip will hurt. Remember not to bend your knee.
One head it's good, but two better…
Helper, help your client keep the knee and leg turned outward. Let the athlete do everything himself and use the rope, but at the end give him a little help. Place one hand on your outer thigh and the other on your heel. Pull slightly and hold for 2 seconds. As the joint opens, each subsequent stretch can be a little deeper, and the leg will go diagonally farther.
Note
. Starting position: Your feet are at the 6 o'clock position.
| Left-hand side | Right side | ||||
| Range | Position on the dial | Range of motion degree | Range | Position on the dial | Range of motion degree |
| Red range Too tight | 6.00-7.00 | 0-30° | Red range Too tight | 6.00-5.00 | 0-30 |
| Yellow range Fine | 7.00-7.30 | 30°-45° | Yellow range Fine | 5.00-4.30 | 30°-45“ |
| Green range Athlete's norm | 7.30-9.00 | 45°-90° | Green range Athlete's norm | 4.30-3.00 | 45-90° |
| Blue range Hypermobility | 9.00-9.15 | 90°-97,5° | Blue range Hypermobility | 3.00-2.45 | 90°-97,5° |
Internal rotator muscles of the thigh[edit | edit code]
Internal rotator muscles of the hip
What are you stretching:
Small muscles at the top of the buttocks (gluteus minimus), muscles that extend from the acetabulum to the top of the pelvis (tensor fascia lata), and muscles that attach from the front of the lower pelvis to the inner thighs at the mid-thigh (pectineus)
What are you abbreviating:
Gluteus maximus and external rotators (obturator externus, gemellus inferior and superior, obturator internus, and piriformis)
How many times to repeat:
10 per side
How long to hold:
2 seconds
Lie on your back and bend your legs so that your feet are flat on the surface you are lying on. Raise the foot of the leg you will be working with so that the thigh is at a 90° angle (knee pointing at 12 o'clock) and the bottom of the leg is parallel to the surface. Grab both ends of the rope to make a loop. Place the foot of the leg you will be working with in the loop. Tie the ends of the rope around the outside of your ankle and pull it under your leg so you can grab the ends of the rope with your opposite hand. Place your other hand on your hip, or rather on your knee, to stabilize and assist with rotation. Keeping the bottom of your leg parallel to the surface, rotate your hip outward, bringing the bottom of your leg in with your heel first. You can use your hand with the rope to help a little at the very end of the movement.
One head it's good, but two better…
Assistant, let the athlete do everything himself and use the rope, but at the end help him a little. Place one hand on your knee, the other on your heel. Push a little and hold for 2 seconds. Use the hand on your hip to help rotate your hip so you don't dislocate your knee.
| Left-hand side | Right side | ||||
| Range | Position on the dial | Range of motion degree | Range | Position on the dial | Range of motion degree |
| Red range Too tight | 6.00-7.00 | 0-30 | Red range Too tight | 12.00-1.00 | 0-30 |
| Yellow range Fine | 7.00-7.30 | 30-45 | Yellow range Fine | 1.00-2.00 | 30-45 |
| Green range Athlete's norm | 7.30-9.00 | 45°-90″ | Green range Athlete's norm | 2.00-2.30 | 45-90 |
| Blue range Hypermobility | 9.00-9.30 | 90-105 | Blue range Hypermobility | 2.30-2.45 | 90-105 |
Hamstrings on a bent leg[edit | edit code]
What are you stretching:
Large muscles of the back of the thigh, just above the knees (distal biceps femoris)
What are you abbreviating:
Anterior thigh muscles (quadriceps)
How many times to repeat:
10 per side
How long to hold:
2 seconds
Lie on your back. Bend both knees with your feet flat on the surface you are lying on. Grasp the rope at both ends to form a loop. Place the foot of the leg you will be stretching into the loop. Raise your leg until your thigh is perpendicular to the surface (knee at 12 o'clock).
Grasp the ends of the rope (to hold the loop) with one hand. Place your other hand on the upper thigh of the stretched leg to stabilize it. Gradually extend your leg by contracting your quadriceps muscles. This will cause your foot to lift towards the ceiling. The goal is to secure the knee so that the foot should be at 12 o'clock. You may need to lower the angle of your leg from the hip at first. Use the rope to gently assist at the end of the stretch. Don't force your leg into position or you will injure the back of your knee.
One head it's good, but two better…
Helper, help the client keep the hip still. Let the athlete do everything himself using the rope, but gently help him at the end. Place one hand on the front of your thigh, the other on your heel. Push a little and hold for 2 seconds. As the joint opens, each subsequent stretch can be a little deeper, and the upper thigh will be closer to the body.
| Range | Position on the dial | Range of motion degree |
| Red range Too tight | 9.00-12.00 | 0-90 |
| Yellow range Normal | 12.00-1.00 | 90-120 |
| Green range Athlete's norm | 1.00-2.00 | 120-150 |
| Blue range Hypermobility | 2.00-3.00 | 150-180 |