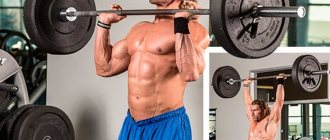
The barbell row to the chin is a basis recognized by many athletes for creating volume and shape of the shoulder girdle. And at the same time, this same exercise is a favorite for injuries to the ligaments and tendons of the rotator cuff. In this regard, the only more dangerous exercises are probably overhead presses or flyes with inadequate weight.
Do you need a front pull, what is its danger and what alternatives exist? This is what our article is about.
Lifting a barbell, dumbbells or block to the chin is a classic exercise that increases mass, gives strength, and “cuts through” the relief of the deltoids and trapezius. It can be used both as a main and as a “finisher”/auxiliary on shoulder and back training days.
The front pull is an excellent auxiliary tool for improving technique in such popular weightlifting disciplines as the clean and jerk.
Advantages
- Actively stimulates the mass and strength of the shoulder girdle.
- Allows you to controllably transfer the load vector between the delta bundles - middle/front.
- A simple movement technique that is accessible even to inexperienced athletes.
Flaws
- Increased trauma to the joints and ligaments of the shoulder, elbow, and wrists.
- It is difficult to “hit” the target muscle.
These disadvantages can be avoided if you regularly prioritize the development of the trajectory of movement and correctly select the weight of the projectile.
There is no need to rush and chase progression in training volumes. It is better to take less weight and focus as much as possible on the technique of performing the exercise.
The deadlift can be used by athletes of any skill level. For beginners, it is wiser to make the front pull the main one in training, or use it as a second number, adding it to basic movements like the bench press or military press. Recommended repetition range is 8-12 reps.
Experienced athletes most often use weighted pull-ups as an auxiliary exercise, performed at the end of a superset, or last in shoulder training. Here it plays the role of a pump, which comprehensively loads the shoulder girdle and fills the deltas with blood. Number of repetitions – 15-25 per set.
What muscles work
The vertical row of a barbell to the chin is a multi-joint exercise, the full cycle of which includes the work of several joints and muscle groups. By load level they can be arranged as follows:
- target – middle (lateral) deltoids, upper trapezoid;
- synergists – anterior/posterior deltoids, supraspinatus/infraspinatus muscles, brachialis, serratus anterior, biceps, triceps.
- stabilizers – bottom/middle trapezoidal, front serrated, press.
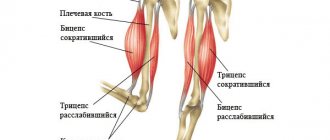
The main ones in the exercise are the middle bunch of deltas and the upper trapezius, the forearms and biceps help. The back and abs serve as stabilizers that hold the body together.
The figure shows which muscles work when pulling a barbell to the chin
Please note: the exercise puts significant stress on the forearms. They are naturally weaker than the deltoids and trapezius, so they “clog” first, limiting the full pumping of the target groups. The problem is solved by using a Z-bar, wrist straps/straps and varying the grip width.
Adviсe
Surely many of you want to master the correct barbell row. However, when starting classes, do not rush to load yourself with excessive weight.
- Tip 1. Develop your back muscles. If one side or another is unevenly developed, you risk getting the same improper development of all parts of your body, and in the worst case, you will have a deformed spine. That's why for two to three months, while working out in the gym, work with exercise machines.
- Tip 2. Develop a muscular corset to be able to work with a barbell and avoid the possibility of getting a hernia.
- Tip 3. Start with training with an empty bar, get used to the load gradually and gradually increase the weight.
- Tip 4. Strictly follow the execution technique. This will provide you with the desired effect and help you achieve your goal.
Execution technique
The barbell chin raise is a relatively simple exercise. There are not as many nuances here as, for example, in squats or bench press. However, you should not neglect technology. At a minimum, this will deprive the broaching of its effectiveness; at worst, it will lead to injury.
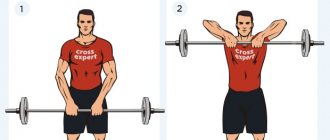
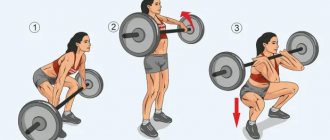
Execution order:
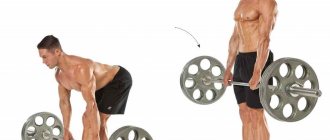
- Assemble the barbell and place it on the floor/rack/stands. Bend over and grab the bar from above, placing your hands slightly narrower than shoulder width. Bend your knees slightly, keeping your back straight.
- Straighten up with a smooth movement, take the starting position - the barbell is in your lowered hands, at your hips, elbows slightly bent, shoulders straightened and slightly lowered, arch in the lower back.
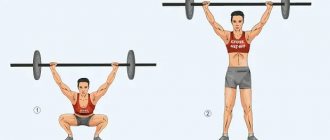
- As you inhale, keeping your body vertical, smoothly lift/stretch the projectile to chest/chin level. The bar moves as close to the body as possible, we try to raise our elbows higher than our forearms. Freeze for a couple of seconds at the top point.
- As you exhale, slowly lower the barbell to your hips to the starting position. Again we pause for a second. Repeat the exercise the intended number of times.
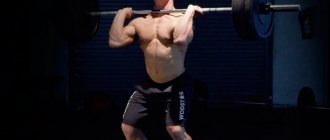
Barbell row to the chin.
Tilt angle
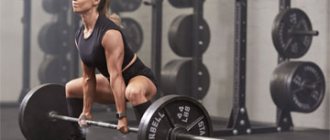
The emphasis on some back muscles can be changed by tilting the torso.
- At a thirty-degree tilt, almost all back muscles are involved;
- and when the tilt changes to forty-five or fifty degrees , the muscles located in the upper back receive the load, namely: the trapezius muscles, the posterior deltoid muscles, as well as the teres minor and major muscles. Of course, the latissimus dorsi and rhomboid muscles are also involved during this exercise, but they work to a lesser extent.
The optimal tilt angle is considered to be close to thirty degrees.
How to choose a working weight
How much to hang on the bar in this exercise is determined by the standard bodybuilding goal:
You need to perform a given number of repetitions in a set, with the condition that the last movement will be a failure or close to it.
In bar rows to the chest or chin, the working weight can vary depending on the number of repetitions in the approach. As a rule, work on mass and relief occurs in the range of 6-15 repetitions . The rule is simple: the heavier the projectile, the fewer repetitions in the approach, and vice versa.
Here's an example:
- Let's say you decide that you can do pull-ups with a barbell with a weight of 30 kg for 8 reps in a set.
- Collect a 15 kg apparatus (50% of the planned weight) and do a warm-up set or two of 8-12 reps.
- Add weights up to 30kg and perform as many reps as possible with perfect form.
- Let's say it happened 15 times. This means you can add 10%-15% to the weight on the bar (two weights of 2.5 kg each) and try again.
- If it doesn’t work out and you hit 6 reps, no big deal. Take off 10-15%, rest and do another set.
- If you are now able to complete 8-10 repetitions per set, congratulations, you have found the working weight.
Please note: standing barbell pull-ups are among the most dangerous exercises for shoulder health. The reason is that athletes overestimate their capabilities - too much weight of the equipment, lack of technique, cheating, uncontrolled movement (throw) of the barbell in the lowering phase, incorrectly chosen grip width and too increased amplitude.
Contraindications
As for contraindications. This is where people with disabilities come in. Also, those who have back injuries should consider other exercises. But if you want to use the bent-over barbell row for its effectiveness. Then consider lying down. It will help eliminate the lower back from work as much as possible. If it is not possible to do this option, then before doing bent-over barbell rows you should consult a doctor. And he will already make a verdict; maybe there is an opportunity to do it with a little weight. For everyone else, bent over barbell rows are a must!
Good luck to everyone in your training!
Exercise options
There are several ways to replace the basic chin-up row, which uses a barbell as the weight. What to choose in a particular case is decided by the athlete himself, depending on his goals and level of training.
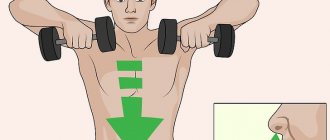
Dumbbell row
The safest, shoulder-friendly option. The bottom line is that when working with dumbbells, there is no rigid fixation of the hands, hence less load on the rotator cuff, injuries to which are the scourge of all gyms in the world.
On the other hand, the structure, torn by the absence of a bar, requires a more active inclusion of additional stabilizer muscles - trapezius, triceps, lats and serratus - to hold dumbbells, although it removes part of the load from the target group - deltas.
Traction in Smith
The opposite situation. Unlike deadlifts with dumbbells, working in Smith allows you to turn off the stabilizers and focus the load on the deltoid muscles. In addition, using the simulator makes it possible to take on more working weight without worrying about losing control over the technique.
Another advantage of Smith is the ability to do deadlifts with one arm. This technique is often used by professional bodybuilders to concentrate on local muscle groups that require isolated work.
Deadlift on a block machine
The value of the block simulator is the constant load on the shoulders, which does not stop from the beginning of the first phase - lifting to the chest, until the end of the second - lowering the weight to the hips.
As a rule, experienced athletes do not work on hypertrophy on a block simulator (in a low repetition range, with heavy weight), but they willingly use it to pump up their shoulders - “pumping”, in a shortened amplitude of 15-25 repetitions.
Clothes for barbell training
It is important to choose the right clothes. It is recommended to wear special overalls and gaiters, and additionally wrap your shins and hands with elastic bandages to provide additional protection and support.
Beginners need to wear a special belt, which will reduce the risk of spinal injury and hernia to a minimum.
When it comes to shoes, choose sneakers with rigid soles so you can stay on your feet. Leave the air sole for runners who, on the contrary, need a sole that can minimize pressure on the foot due to a high level of shock absorption.
Recommendations and possible errors
Raising the barbell to the chin seems simple, but when doing it, many gym goers make a number of common mistakes.
- Too much weight. A standard rookie mistake. Excessive weights prevent you from working technically, forcing the athlete to cheat, using inertia and connecting stabilizers. As a result, when lifting, the weight soars due to a push with the whole body: the body first leans forward too much, and at the end of the movement it falls back. It turns out that in the key phase the bar moves due to the movement in the lower back, and not due to the deltas and trapezius.
- Small amplitude. The prohibitive weight of the barbell or dumbbells does not allow you to work in the required amplitude, limiting the participation of the deltoid muscles in the final segment of the trajectory. Shoulder work simply loses its meaning, turning into a meaningless race for the number of repetitions.
- Dropped elbows. A common mistake is elbows at or below the hands. In this position, the main load falls on the forearm and biceps. An effective technique means that when lifting weights, your elbows are always above the axis of the bar. You need to pull not with your hands, they only hold the bar or handle, but with your shoulder, as much as possible, but without going beyond the comfort of the joints, raising your elbows up
Lifting the barbell to the chin: which muscles work with a narrow grip and which with a wide grip, this is the question most of all for beginners. If you bring your hands together on the bar narrower than your shoulders and try to pull your elbows forward, the lion's share of the load will go to the front bundle of deltoid muscles. In this case, you need to try to move the weight in the fullest possible amplitude - up to the chin.
On the contrary, if you use a wide grip - your hands are wider than your shoulders, and your elbows are directed to the sides, the load vector shifts to the middle beam. In this case, you have to work in a shortened amplitude, the bar rises to the chest or even lower, turning off the trapezius to the maximum.
Important: no matter what grip you use, select an adequate weight and be sure to do one or two warm-up approaches.
Deadlift for Beginners
It was already mentioned above in the article that not only basic exercises with iron, but any sport in general can cause injury. When visiting the gym for the first time, most beginners go to extremes. Some people immediately run to a dangerous exercise machine and perform the exercises incorrectly, harming their health, while others take up aerobic exercises or dumbbells and do not get off them for weeks, or even months. But the truth, as we know, is in the golden mean.
Once in the gym, it is best for a beginner to find a coach so that he can write out a program for him and estimate the possible starting weights based on his appearance. If there is none, and you cannot ask for advice, you should familiarize yourself with the correct technique from the appropriate sources. This also applies to deadlifts. It can be done by a beginner, but only with light weights or an empty bar. There is nothing wrong with this, since only the right technique can bring good results. Otherwise, you will only injure yourself.