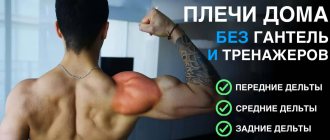
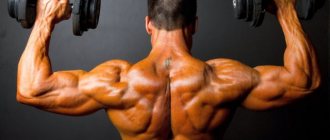
In this article, I will show you the most effective workout for building large, wide, strong deltoids and give a set of shoulder exercises at home that can be performed without dumbbells or exercise machines.
In order to pump up your shoulders while working out at home, you need to work out each bundle of deltoid muscles for maximum effect. Often, the anterior and middle deltoids become the target of training, while the posterior deltoids are usually neglected, which is not unacceptable, since one should strive to create a proportional, spherical shape. In a gym setting, working out each area is not so difficult, due to the availability of various exercise machines and equipment that is usually not available at home, which is the main obstacle when training shoulders at home. Therefore, we have selected the most effective shoulder exercises with your own weight without the use of dumbbells and exercise machines.
To pump up your shoulders at home without the use of additional equipment, you need to understand what functions each of the delta beams is responsible for in order to decide on a set of exercises for effective training without iron. Next we will consider:
- Set of exercises
- Correct technique for rapid progress
The Best Shoulder Exercises Without Dumbbells for Bodyweight Workouts
All movements are easy to perform even for beginners, and for more advanced ones we will show options for increasing complexity and increasing the load on the muscles for constant progress.
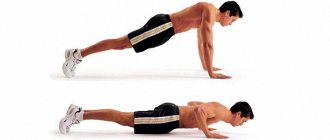
1: L-push-ups
The first exercise we use is the L push-up. It is aimed at working the front deltas. As you know, the main function of the anterior deltoid muscle is to raise your arms in front of you and above your head. And as you can see, this exercise is similar to the shoulder press, and can be an effective replacement for it, since the technique and movements follow approximately the same principles.
How to do L-push-ups correctly
Technique:
- Take a lying position
- Move your hands closer to your legs, while keeping your knees straight, until your body takes the shape of an inverted V
- Next, bend your elbows and lower your torso until your nose almost touches the floor.
- Tightening your shoulders, return to the starting position.
During execution, you need to keep your elbows pressed closer to your torso rather than spreading them out to the sides. Why? In this way, the main load is shifted to the shoulders, and a more natural and safe position of the shoulder joint is achieved.
If doing L-push-ups is too difficult, you can make it easier by resting your knees while doing the same steps described in the instructions above.
After some time, to maintain effectiveness, it is necessary to complicate the exercise.
One way to increase the load without weights is to elevate your legs. Then, gradually move your hands closer to your legs to make it more difficult. If you need to increase the load even more, you should raise your legs to an even higher platform.
Continue with this shoulder exercise, increasing the difficulty as you go, to make the fastest progress in shoulder development without any additional equipment.
2: Bodyweight Lateral Raises
The next exercise from the complex, which we will use to pump up our shoulders at home, is raising the arms to the sides, aimed at working the outer part of the deltoids, which visually makes the shoulders wider. This delta bundle is responsible for raising the arms to the sides. Due to the lack of access to any equipment, you will have to create additional load with your weight.
Procedure for performing the exercise:
- Using a towel, rest the outer part of your forearm on a door or smooth wall
- Take a small step away from the wall and lean on it
- Sliding your forearm along the wall, lift it, imitating spreading your arms to the sides
- Transfer the load from the forearm and, sliding along the wall, return to the starting position.
- Repeat
To make the exercise easier, you need to stand closer to the wall and not lean on the wall so much. Further, when there is enough strength, the distance to the wall should be increased to increase efficiency. The further the position is from the wall, the more load is focused on the shoulders. Another way to increase the load is to straighten your arm during the fly.
3: Rear Delt Pull
The next exercise we will use to train our shoulders at home will focus the load on the posterior deltoids. The function of the rear deltoid is to raise the arms behind the back. It is this part of the delta that gives the shoulders a spherical shape, which is exactly what this set of exercises is aimed at. This muscle group is the most problematic for training at home. However, this exercise, which has already been mentioned in other articles (comprehensive training for all muscles, training for the thoracic region and back), will help to work out this section of the shoulders.
Execution order:
- Wrap the blanket around your wrists, take a few steps from the door, lean back until tension appears in the blanket
- With your palms facing the floor, pull yourself up, extending your elbows as far back as possible
- Slowly return to starting position
- Repeat
When performing the exercise, you must keep your elbows at shoulder height. This is necessary in order to minimize the load on the latissimus dorsi muscles and focus it on the rear deltoids. To begin with, you can stand further away from the door to strengthen your shoulders and then gradually reduce the distance to it, while increasing the load.
How to pump your shoulders if you can't use the blanket version of the exercise? An alternative could be a doorway or corridor corners. Just grab the door frame and do the same steps, remembering to keep your elbows at shoulder level, and to make the exercise more difficult, move your legs forward, bringing your body closer to a horizontal position to better pump your shoulders.
4: Swing your arms back
We finish the workout by swinging our arms backwards. This exercise focuses on working the rear deltas.
This exercise again requires the use of a blanket. But this time you need to straighten your arms and point your palms inward towards each other.
Execution order
- Raise your torso, spreading your arms to the sides
- Hold in the upper position for a few seconds, tensing your rear deltoids.
- Return to starting position
- Repeat
Research has shown that palms facing inward adds an extra rotational motion that helps focus the load on the rear delts.
Why is this happening? Because this is one of the main functions of the rear deltoid, and it was precisely this movement that was missing in the previous exercises. To increase the load, as in previous exercises, you need to place your feet closer to the door.
Now let's look at what to do in a situation where you don't have the opportunity to use a blanket.
To perform an alternative version of the exercise you must:
- Lie on your stomach
- Stretch your arms behind your back and turn your arms so that your fingers point more to the ceiling
- Stay in this position for a few seconds, then return to the starting position and repeat.
This exercise effectively engages the fundamental motor functions of the posterior shoulder region, but is difficult to modify. To increase the load, you need to hold your arms in the upper position longer, and also take water bottles as additional weight.
Nutrition for strength training and sports nutrition
Shoulder exercises won't be effective if you don't recover enough. After all, your muscles grow during recovery. But what can give you a full recovery? First of all, it's nutrition. But, as you know, the nutrition of an athlete differs in many ways from the nutrition of an ordinary person . Eating for weight gain involves consuming more calories, as well as a better balance of nutrients (BJ).
A weight gain diet involves consuming approximately 1.5-2 grams of quality protein per kg of body weight. Naturally, it will be extremely difficult to get, say, 180 grams of protein, and a complete one, from food alone.
That is why sports supplements are included in an athlete’s diet, which are pure sources of essential elements (proteins, carbohydrates, amino acids, etc.).
The most popular supplements that will allow you to not only improve recovery, but also increase the effectiveness of your training are:
- Amino acids and protein are building materials for our muscles, protecting them from catabolism;
- Multivitamins and omega-3 – support immunity and protect the body from stress;
- Creatine – increases the energy reserves of muscle cells, helps increase strength and endurance;
- Pre-workout complex – provides additional motivation and energy for training.
Sports nutrition today can give you a lot of necessary supplements, with which your results will definitely go uphill!
Well, if you are not sure that you can choose a sports nutrition for yourself, then the creator of the project you are currently on can always help you FREE OF CHARGE:
For those who doubt the need to take sports nutrition, we recommend watching the video:
If you liked this video, we recommend subscribing to our YouTube channel!
Shoulder workout program at home
To summarize our version of how to pump up your shoulders at home, here’s what a workout might look like:
- L-push-ups: 4 sets
- Body weight lateral raises: 4 sets
- Rear Deltoid Rows (Blanket or Doorway Variations): 3 sets
- Swing your arms back (options with a blanket or doorway): 3 approaches
The entire complex can be completed in one workout. But I recommend dividing the workout into at least two days, for example, training the upper and lower body on different days, in order to better distribute the load and speed up recovery, which affects the rate of muscle growth.
There is an opinion that ideally it is necessary to perform 10-15 repetitions per approach, but you should not get hung up on this. For effective muscle growth, perform the maximum number of repetitions with the correct technique until the moment when there is strength left for 1-2 more reps. Once you reach 30 reps, you should use modified versions of the exercises to maintain maximum growth.
Cardio training for men over 40
Men over 40 who decide to start cardio training need to be attentive to their pulse and joints.
Children can afford to play catch without a heart rate monitor and tear their knees on the asphalt. But after forty years it is better not to do this.
A two-thousand-ruble monitor is an important attribute for a man after forty. A heart rate monitor in a physical education teacher’s home is like a thermometer in a sick person’s home. He must be!
A mature man needs a monitor in order to monitor his heart rate during training and slow down when the upper limit is exceeded, even if a woman who is 20 years younger is running past.
The second issue with cardio training for men after 40 is the musculoskeletal system.
Children learn to walk first, then run, and all this happens naturally.
After 30 years of a sedentary lifestyle, the body can still walk, although some have pain in the knees or lower back, but running can be not only painful, but also dangerous.
You should not choose situational types of cardio training, such as football, if you have not played catch-up for a long time.
Start with your usual walking, but not at a walking pace, as in the office or supermarket, but at a brisk pace, so that your heart rate rises to 170 minus your age.
If your heart rate does not rise from walking, you can switch to jogging at walking speed.
If jogging has raised your heart rate to 170 minus your age, then you don’t need to run faster - run longer.
The essence of cardio training for men after 40 years is not speed, but minutes.
Try to get at least 90 minutes of cardio jogging in a week, as long as it's at least 30 minutes per workout.
If 90 minutes seems like a manageable task, then add minutes of cardio according to the 10% rule until the body says: “enough”
Typically, for men over 40 with a full-time job, the body says “enough is enough” with between 90 and 180 minutes of cardio per week.
Anatomy
The basis of the shoulder girdle is the deltoid muscles. Where the deltoid muscle of the shoulder is located can be seen in the photo below. It includes three separate muscle bundles - anterior, middle and posterior. Each of the bundles is responsible for a specific direction of movement in the shoulder joint:
- the anterior bundle contracts when the arm is raised forward in front of the body and when it is turned inward;
- the middle beam does the bulk of the work when raising the arms through the sides;
- the posterior bundle is responsible for abducting the arm down and extending it backward.
The layout of the delta muscles is shown in the photo. Thanks to the complex structure of the delta, the arms in the shoulder joints are able to make intricate multi-plane movements. Other large joints in the human body do not have this degree of freedom.
How to warm up?
Warm-up should be carried out in several stages.
Stage #1: Stretch the Neck
As part of the first stage of the warm-up, the teenager will have to stretch the muscles of his neck. To do this, he needs to lower his chin to his chest. Stand in this position for at least ten and no more than fifteen seconds. Then, the teenager needs to throw his head back so that it is located at the back. He needs to stay in this position for ten to fifteen seconds. Each of the above movements must be repeated without fail. At least two or three times.
Next, the teenager needs to place the inside of the hand on his head. Above. With this hand, the teenager needs to lower his head to the left. As close to the shoulder as possible. Similarly, the muscle must be stretched for thirty seconds. After completing the exercise, the teenager needs to change sides. Tilt your head with your hand to the right. It is recommended to do this exercise several times.
As part of the third warm-up exercise, the teenager needs to fix his chin in the “flat” position. Turn your head to the left. And turn it in the direction in which it is directed. It's like stretching a muscle a little. You need to spend at least ten seconds on each side. The number of repetitions is three or four times.
Stage #2: Stretch your shoulders
At the next stage, the teenager will have to stretch his shoulders. Thus preparing them for training.
As part of the first exercise, the teenager should place his arms along his body. Then, he should begin to clench his fists. And unclench them. As quickly and intensely as possible. You need to do this exercise three to four times for each hand.
After this, the teenager needs to start rotating his fists. This should be done for three to five seconds. For each side.
Then, the teenager must do arm raises without fail. And rotate your elbows. This must be done for three to five seconds. For each side.
After the teenager has completed these steps, his shoulders will be sufficiently stretched. And he will be able to move on to doing exercises. Without fear of pulling muscles. Or that they won't be warmed up.
Advice from professionals
Bodybuilding gurus will give valuable recommendations to help you properly pump up your deltoids without visiting a fitness center.
Arthur Kratko, author of a video channel dedicated to bodybuilding
You can include only 3 exercises with dumbbells in your home complex, focusing on the number of repetitions. If you follow the technique, you should feel a slight burning sensation in your shoulders.
Igor Voitenko, fitness trainer
Push-ups are the best exercise for growing the delta. When performing it, it is important to avoid the following mistakes: fast pace, arching in the lower back, ignoring the shoulders in the starting position.
Igor Kovtun, bodybuilder
If you don’t have dumbbells at home, fitness techniques with expanders will help replace exercises with them. This equipment also creates good traction, which helps to work all parts of the deltoids.
Bench press in front of you while sitting in a smith position
The front bench press while seated in a smith position is the same exercise as the overhead bench press in a smith position. The only difference here is that the angle of the back of the bench is set as in the dumbbell press in front of you at the smallest inclination from the vertical (80-90 degrees), and the barbell press is performed in front of your head. The load in the exercise is focused on the front and middle deltas.
- It is better to perform the overhead bench press on a bench with a backrest in a Smith machine. The bench will allow you to fix your spine and relieve significant stress from it during exercise. The Smith machine isolates the auxiliary muscle groups and allows you to use only the shoulder muscles.
- First of all, set the position of the back of the bench at the least inclination from the vertical (80-90 degrees). Place the bench in the Smith machine so that the plane of movement of the apparatus is in front of the back of the bench and your head. Then place the bar in Smith at the height of your arms not being fully extended.
- The mechanics of performing the exercise is to raise/lower the barbell in front of your head in a vertical plane. At the top point, the arms are fully extended. At the bottom, the bar drops to the level of the chin/neck. To accurately track the mechanics of the exercise, you must perform the exercise in front of a mirror.
The exercise consists of 2 warm-up approaches and 3 working approaches. Warm-up approaches are done with light weights. The weight of the apparatus in the warm-up approaches gradually approaches the weight in the working approach, preparing the muscles and joints for maximum loads. Number of repetitions in warm-up and working approaches: 8-10.
For a visual representation of how to perform the exercise correctly, watch the video below:
Seated barbell press on a Smith machine.