Share:
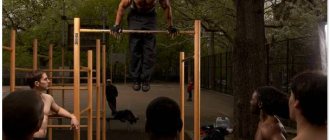
CrossFit is a discipline aimed at developing functional strength and endurance. Consequently, only here you can find a huge number of specific exercises from gymnastics and acrobatics. One of these exercises was the elbow stand.
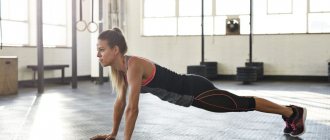
Plank
The elbow stand is often called a plank. All professional athletes can perform it, as well as those who do yoga and other types of physical exercise. Elbowstand is considered one of the main exercises for developing and strengthening the abdominals, back and core.
It is intended not only for these groups, but also has a beneficial effect on the upper shoulder girdle, strengthening this area.
During the exercise, a person may feel strong tension in the abs, back, joints and shoulders. At the same time, the static position allows you to pump up these groups without extra effort.
You can learn to do it even after giving birth, three to four months later, when other exercises are still prohibited. During an elbow stand, the following muscle groups work:
- delta - anterior and upper;
- rear delta;
- core muscles;
- abdominal muscles;
- gastrocnemius;
- quadriceps;
- buttocks.
The main load is placed on the abdominal muscles and back muscles, but many other areas are also involved during the exercise. Additionally, the load can be increased by using weights or other special devices during the exercise.
If you apply the pose daily, each time slightly increasing the time interval, you can achieve strong abs within a month of starting classes.
Features of making planks at home
This static exercise is not at all a relic of the Soviet past, as many young people may think, but an effective way to strengthen and tone most of the muscles of the entire body. Standing is one of the fundamental exercises in the following practices: yoga, Pilates, stretching. It must be performed by both beginning athletes and people losing weight, as well as professional athletes.
This exercise has one feature: you can perform the plank in any conditions, it does not require special skills, sports equipment, or outside help. The only thing you need is a flat surface on which to perform the stand, and there are no health contraindications. Thus, you can perform it at home at any time and any convenient number of times, without disturbing the residents of the house with loud sound.
Benefits of planks
One of the more complicated types of planks is the side plank.
What is the bar for? This stance is considered very effective, both during the period of active weight loss and for maintaining the tone of already strong muscles.
The peculiarity of the implementation is to work with your own weight in a lying position and maximum tension of many muscle groups at the same time.
Main effects of execution:
- improved blood circulation;
- acceleration of metabolic processes;
- increasing flexibility and hardening of the whole body;
- strengthening the following muscle groups: abs and the entire abdominal region, buttocks, thighs, shoulders.
The effectiveness of the plank will depend on the correct execution and duration of stay in the rack. The longer you can hold on in this position, the better your core muscles are strengthened, a muscle corset is formed, your buttocks, lower back, hips, calf muscles, back and arms are strengthened. Thus, a correctly executed plank makes the figure more prominent. Those losing weight often include it in a set of exercises for general strengthening of the body, gradually increasing the time spent standing.
Bright areas of the body are muscle groups that are maximally tense during the plank.
Regular planking guarantees the absence of back problems, discomfort during the working day and the prevention of the development of diseases associated with a sedentary lifestyle.
Contraindications
Before deciding to regularly perform plank stands, novice athletes and those losing weight need to find out who can and cannot do planks. Certain health problems can aggravate existing problems and cause harm to the entire body.
When should you not do a plank?
- During pregnancy - at any stage;
- After the birth of the child - the minimum period after birth is one to two months, start only with the permission of the doctor;
- The period after any operations and during the recovery period after injuries - consult a doctor;
- If you have any spinal injuries (pinched nerves, vertebral displacement, hernia, protrusion of intervertebral discs), a set of Pilates exercises may be suitable here, with the permission of a doctor.
How to learn to do a plank
It doesn't take long to learn how to stand on your elbows. This exercise is quite easy and in most cases even children can do it.
The plank can be not only horizontal, but also vertical. The elbow stand can be performed in different positions, but in order to learn how to do a vertical one, you must first learn to assume a horizontal body position.
The technique seems quite easy at first glance, but not everyone can learn and try to get into it the first time.
First, the person must take a lying position on the floor, then place the elbow joints under the shoulder joints and focus on them. The legs are positioned shoulder-width apart on half toes. After a person learns to maintain a standing position on the floor in a horizontal position, it will be possible to proceed directly to performing an elbow stand in a vertical position.
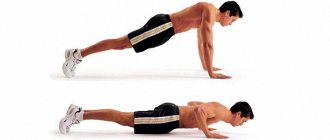
There are different types of plank:
- classical;
- on straight arms;
- with raised hand;
- with a raised leg;
- with two limbs raised at the same time;
- in a jump;
- with resistance;
- on fitball;
- lateral;
- varieties of lateral;
- inverted.
Each type can be combined with each other. In this case, various muscle groups will be additionally involved. You can supplement the bar with various weights, dumbbells and a body bar.
Gymnastic bridge: execution technique
First, let's look at the technique of performing a classic bridge, after which we will begin to describe the variation we are considering and learn how to make a bridge on the elbows.
Urdhva Dhanurasana
The bridge pose, also known in various variations as Chakrasana (Wheel Pose) and Urdhva Dhanurasana (Upward Facing Bow Pose), is also called the gymnastic bridge. Let's look at the main points of performing a classic bridge and various complications.
- Lie on your back.
- Bend your knees and place your heels closer to your pelvis, shoulder-width apart, with your shins perpendicular to the floor.
- Place your hands on both sides of your head, placing your hands with your fingers forward (in the direction of your feet) and the end phalanges under your shoulders.
- Leaning on your palms and feet, smoothly push your whole body up: first lift your pelvis, tensing your gluteal muscles and straightening your hip joints, and bend, raising your torso so that your crown rests on the floor.
- Activating your abdominal muscles to avoid compression of the lumbar vertebrae, straighten your elbows, contracting your triceps and opening your shoulders outward (as if you want to move your hands towards your feet, while keeping your palms still), and squeeze your shoulder blades together, opening your thoracic spine.
- Direct your gaze to the floor.
- To prevent your knees from spreading outward, rotate your hips slightly inward (by contracting your long adductor muscles) as if you were trying to bring your knees together.
- When performing the asana, pay attention that the shoulder blades are directed inward, the neck is completely relaxed, and there should be no tension in the lumbar region; the toes of the feet should not be turned outward.
- The weight is evenly distributed on both feet and hands.
- The deflection is distributed over all parts of the spine.
- Hold the position for as long as you feel comfortable in the asana.
- Breathe evenly and deeply.
- Exiting the asana should be done as smoothly and accurately as entering it: bend your elbows, point your chin to your chest, relax your lumbar spine, bend your knees and lower your back to the floor.
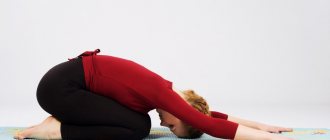
After performing the asana, you need to do compensatory exercises. For example, lie on your back for some time (for 5–10 breathing cycles), pressing your knees to your chest. This will help relieve tension in the spine and relax the back muscles. Since a bridge on the elbows represents an extension of the spine, it is necessary to compensate for it with flexion asanas, also performed from a supine position. In this case, Halasana, or Plow Pose, is ideal.
Halasana
As complications of the classic bridge pose, consider the following exercises.
- Deep bridge.
It is performed by reducing the distance between the feet and palms. Also, fully straightening your knees will further deepen the pose and allow the muscles in the front of your body to stretch further. - Swaying bridge.
Perform a bridge and make rocking movements back and forth several times. — Bridge push-ups with support on your palms and feet. Performed by bending and extending the arms at the elbows and legs at the knees. - Bridge near the wall.
This exercise is one of the variations of the bridge, which is done using a wall. It can also be considered as a complication, because the pose is entered from a standing position. You need to stand with your back to the wall at a short distance, then bend back until your palms (fingers down) touch the wall. Gradually move downwards with your arms, bending your knees, until your hands reach the floor. Exit the position by “walking” your hands in the opposite direction up the wall. And return to the starting standing position. - Eka Pada Urdhva Dhanurasana - Bow pose with one leg raised up.
- Eka Hasta Urdhva Dhanurasana - Bow pose with one arm raised up.
Eka Pada Urdhva Dhanurasana
Having examined in all its subtleties the technique of mastering the bridge in the classical version, let’s move on to studying how the bridge on the elbows is performed, how to do this asana correctly so that it is beneficial and does not lead to injuries in the lumbar region.
How to learn to do a bridge on your elbows correctly without straining your lower back? First of all, note that the gluteal muscles should be tense, since their contraction leads to relaxation of the large psoas muscles and promotes their safe extension. At the same time, you should avoid spreading your knees to the sides, which is a natural consequence of contraction of the gluteal muscles. In the backbend, focus on mobilizing the abdominal muscles (tighten your abs), this movement will also help protect the lower back by bringing the internal organs of the abdominal cavity and the lumbar spine closer together, thus reducing the likelihood of excessive arching of the spine, and the back will not receive excessive load in the lumbar region.
How to bridge on your elbows:
- Lie on your back.
- Bend your knees, placing your heels closer to your pelvis, placing them hip-width apart.
- Place your palms under your shoulders, elbows pointing up.
- Perform a bridge by pushing your pelvis up and gradually straightening your legs and arms and stretching your back.
- Bend your elbows slightly and touch the top of your head to the mat between your palms, keeping weight on both hands.
- Lower your right forearm to the mat first, then your left.
- Shift your weight to your elbows and lengthen your chest, lifting your head off the floor.
- The neck is relaxed.
- Step your feet slightly toward your hands.
- Press your feet into the floor, this will help activate the quadriceps and more fully feel the deflection in the thoracic region.
- Exit the asana as follows: join your hands in a wrist lock, press your chin to your chest and lower your head onto the mat, placing it on your hands so that the lock is under your neck. Rising up on the toes of your feet and continuing to hold the pose on your forearms, point your chin to your chest and smoothly lower your back and pelvis onto the mat.
When you feel comfortable in this position, you can try straightening your legs at the knees (first one, then the other). This will already be a transition to Dwi Pada Viparita Dandasana (Inverted Staff Pose supported by two legs).
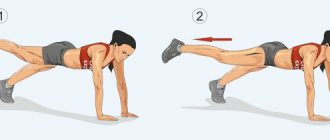
Classic elbow plank for strong abs: how to do it correctly
The classic plank can be performed in various ways. The easiest thing to learn is to stand on your elbows and legs in a certain position. To do this, you should focus on the floor on your elbow joints and toes, maintaining the position of your body for some time.
To begin with, you can try holding the plank for 30 seconds, then you will need to increase the interval as you strengthen your abs and back.
You can begin to alternate between lifting one arm and one leg, gradually changing positions and supporting the body weight with just two or three limbs.
Body position is a very important rule during the exercise. If a person has scoliosis, it will be difficult for him to take a perfectly straight position and learn, so you can ask your partner to adjust the position at first.
Plank duration
In an exercise like the plank, the main thing is regularity, not duration. During execution, it is very important to monitor the technique, otherwise there is no point in using the plank in your training.
Canadian scientists have long talked about how many times a day you definitely need to do the plank. Several approaches of 10-30 seconds are much more effective than a 5-10 minute plank once a day. In the first case, endurance is trained, and in the second, the muscles are simply clogged.
1 minute
It will be difficult for beginners to overcome even this time threshold. The plank makes your abs, legs, and arms shake. But even during this time, the muscles warm up, acquire tone, blood circulation improves, and metabolism accelerates. 1 minute of planking can burn 5 calories.
5 minutes
Planking burns 25 calories in 5 minutes. This time is enough for the muscles not only to warm up, but also to have time to start clenching. Beginners will be guaranteed strong and toned muscles.
10 minutes
10 minutes of planking burns 50 calories. The muscles become much more overstrained, especially in the arms and abs. Posture is strengthened. You can only perform such a long plank for a personal record. Short-term, but repeated approaches bring much more benefit. It is not recommended to stand in the plank for more than 10 minutes.
Optimal time
Everyone must choose the time independently, in accordance with the capabilities of the body. If it is easy for a person to stand in the plank for 1 minute, you can increase the number of approaches to 2-3 per day. Then replace the sets with one 5-minute plank.
If it is difficult to stand in the plank even for 1 minute, you need to start with 30 seconds, adding another 5-10 seconds every day.
The load is increased gradually so as not to damage the muscles and ligaments. You need to feel your comfort level. Tension should not develop into unbearable pain.
Monthly schedule
Those who find it easy to start with 20 seconds can set any time as their starting point. The main thing is to stick to the basic rules.
The essence of the graph is as follows:
- every 6th day of training is a day off, i.e. the bar is not met;
- the new time needs to be fixed so that the body gets used to this load; 2 to 3 days are allotted for this;
- first you should increase the time by 5-10 seconds, then you can increase the load by 30 seconds.
| Day | Seconds | Day | Seconds |
| 1 | 25 | 16 | 120 |
| 2 | 25 | 17 | 120 |
| 3 | 35 | 18 | rest |
| 4 | 35 | 19 | 150 |
| 5 | 40 | 20 | 150 |
| 6 | rest | 21 | 180 |
| 7 | 45 | 22 | 180 |
| 8 | 45 | 23 | 180 |
| 9 | 60 | 24 | rest |
| 10 | 60 | 25 | 210 |
| 11 | 90 | 26 | 210 |
| 12 | rest | 27 | 240 |
| 13 | 90 | 28 | 240 |
| 14 | 105 | 29 | 270 |
| 15 | 105 | 30 | 270 |
What muscles work
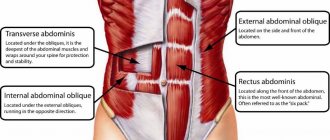
During a stand, a person uses almost all of his muscles. Mainly during the position, the muscles of the core, abs, deltas are involved - the upper, middle and lower calf muscles and back muscles.
The back muscles are completely strengthened, using both the upper and lower sections, including the lower back. The abs are also used during elbow stands, including the obliques. The arms hold the weight of the whole body, so they actively strengthen during exercise.
The legs bear a significant part of the load during the plank, so not only the calf muscles are involved, but also the muscles of the thighs and buttocks. By using the rack as often as possible, you can strengthen the buttocks area and make them more toned. In this case, you can change the position of your legs, making them wider or narrower, as well as alternately raising and lowering them. In this case, they will strengthen more actively. It is believed that the plank allows you to get rid of the initial manifestations of cellulite in a short period of time.
The benefits and harms of planks
What are the benefits of the plank exercise? Conventionally, the benefits of it can be divided into several components, such as benefits for the back, legs and abs. Let's talk in detail about each case in terms of the benefits and harms of the exercise.
Benefits for the back
Most people who lead a sedentary lifestyle suffer from back pain. The back is a vulnerable spot for both professional athletes and ordinary gym goers. The main reason for this phenomenon is weak core muscles. The benefit of the plank exercise for the back is to strengthen the muscle groups that are responsible for stabilizing our body. During the plank, large back muscles are worked out: rectus, latissimus, lumbar and neck muscles. This symmetrical load on the abs and back makes your posture correct and your stomach toned. By performing the plank exercise regularly, you can get rid of back pain, notice progress in strength exercises, and minimize the possibility of spinal injuries. The back bar will help prevent osteochondrosis.
Benefits for feet
Almost all leg muscles work in the plank. In various types of exercises, the gluteus medius and maximus muscles are under great tension, and the thigh and calf muscles work. By doing the plank regularly, you will notice that the leg muscles become stronger, more toned, the buttocks become more toned, and the legs become slimmer. The buttock bar has another positive effect - reducing cellulite, due to improved blood microcirculation in this area. When starting the exercise, you should take into account the great tension that falls on your legs.
Although the classic plank is performed in a static position and is gentle on the joints, in some cases, for example, with ankle problems, the exercise can be harmful.
For weight loss
Great news for those who want to lose weight. By doing the plank, you can quickly get rid of extra pounds. As you know, the weight loss effect is achieved in the case of a calorie deficit. That is, you need to spend more energy than you consume with food. By combining proper nutrition and plank exercise, you will significantly speed up your metabolism, which will lead to weight loss. Another benefit for those losing weight is that systematic exercise tightens the skin and makes it more elastic.
Correct elbow stand technique
Especially at first, when a person wants to learn, special attention should be paid to a perfectly straight back. You should learn to avoid arching your lower back so as not to harm your spine. If a person has problems with the spine, you should consult a doctor to give the go-ahead or prohibition to perform an inverted plank.
In order to stand on your elbows correctly, you need to have fairly strong arms and shoulder girdle. It is important to remember that the main impact is on the abs, back and upper shoulder girdle, so with weak limbs it will be difficult for a person to learn to hold his body in an inverted position for a long time. To do this, you should first strengthen your arms using a classic horizontal bar.
It is also important to perform the stance so that the toes are extended and the feet can be connected.
With this position, it will be easier to support your own body weight and you will be able to avoid unpleasant sensations. For a more aesthetic plank look, people try to keep their legs perfectly straight, but for a more simplified version, you can bend your legs and spread them to the sides. In this case, it will be even easier to maintain body weight.
Plank as a guarantee of health
During elbow stand training, a person will feel tension not only in the elbow joints, which are directly involved in the position, but also the muscles of the abdominals, core, back and arms are actively involved in the position.
The plank has a positive effect on the following factors:
- improves digestion;
- promotes fat burning in the abdomen and thighs;
- strengthens arms, back and abs;
- improves well-being;
- improves the circulation of positive energy and relieves blood stagnation.
The plank can be performed daily, each time gradually increasing the interval at which a person is able to hold the position. In this case, the result will be more effective.
Plank: contraindications
Like any physical exercise, planks and elbow stands have their contraindications. Among them:
- pregnancy and recovery period after childbirth;
- children under 3 years of age;
- diseases of the elbow joints;
- diseases of internal organs;
- oncological diseases;
- disorders in the vertebral discs;
- neck problems.
In addition, inverted elbow stands should be avoided during colds and viral diseases, otitis media, headaches and menstruation.
People who play sports often start trying to perform various tricks with their body. Those who practice yoga usually know how to perform a variety of types of handstands and headstands, as well as classic versions of the plank from the most basic. Standing in a plank allows you to get rid of many pathological conditions, and also significantly strengthens the abdominal press.
What does Shirshasana mean?
The Sanskrit name for headstand is Shirshasana (“Shirsha” translates as “head”). She is considered the queen of asanas, and there are many reasons for this. One of the great yogis of our time, Aengar, said that if you do not have enough time for a full practice, at least do inverted asanas. In terms of usefulness, they replace all yogic asanas.
But before we begin the story about the beneficial effects of Shirshasana, let's agree on this: mastering the exercise on your own is dangerous. This should only be done under the guidance of a competent instructor. And it may take more than one year before you start to succeed.
But if you are no longer new to yoga, and your body is accustomed to stress, you are well versed in asanas and do them confidently and correctly, watch our video lesson. In it we give the technique of performing the exercise, as well as those asanas that will let you down, help you do Shirshasana without fear and pain, easily and joyfully.