The “book” exercise is a gymnastic exercise. It is also used in the training of swimmers, weightlifters, track and field athletes and fitness specialists. It was used in Soviet shaping, and then was undeservedly sent to the dustbin of history as traumatic. In fact, it’s easy to learn how to make a “book” using good technique, and it won’t cause any problems. The movement is accessible to most people and will help you flatten your stomach, learn to work your legs and body in sync, and strengthen the front of your thighs.
Execution technique
Not only beginners in sports, but also experienced masters use this exercise to keep the abs and abdominal muscles in good shape. The “book” exercise technique has its own characteristics:
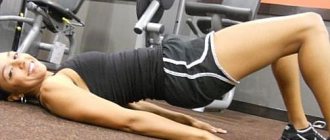
- Initial position – legs are completely straight, the person lies on his back. The hands are placed either behind the head, or the palms rest on the mat, while the elbows are slightly bent.
- When exhaling, you need to lift your body with your arms and straight legs up at the same time. This exercise is similar to closing a book. As you inhale, the body returns to its original position.
- For beginners, 3-4 approaches of 10 times per day are enough. Further, the task becomes more complicated up to 20-30 folds per approach.
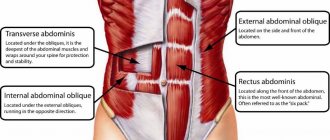
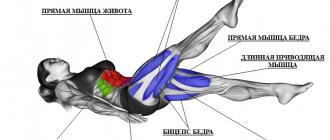
What muscles work
When performing a press book, the main work is performed by:
- Rectus abdominis muscle.
- Oblique abdominal muscle.
- Iliopsoas.
The work also involves the rectus femoris, adductors (long and short) and pectineus muscles.
Complex version of the “book”
Abdominal strengthening exercises can be performed using a complex or easier method. The complicated version is performed from a position lying on the mat, when the feet and entire body are fully lifted. At the same time, they lift their legs and torso off the floor, as if trying to reach their foreheads to their knees. The lower limbs, as well as the arms, are brought together and fully straightened. Then they return to their original position.
A set of exercises to help you master the handstand
Perform this complex 3-4 times a week, be sure to do a short joint warm-up before it. For training, you only need a mat.
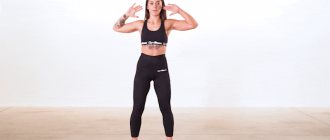
Warm-up exercises for hands
Stand up straight, stretch your arms forward. Forcefully clench your fingers into fists, then extend your fingers forward and spread them out. Perform this movement for one and a half to two minutes.
Stand up straight, stretch your arms forward. Maintaining the position of your arms, lower your hands, then lift them up, placing your palms forward. At the same time, try to spread your fingers to the sides. Perform this movement for one and a half to two minutes. Then fix your palms at the top point for 30-40 seconds.
Warm-up exercise for the shoulder girdle
Stand up straight, clench your hands into fists. Stretch your arms forward, slightly rounding your back and shoulder blades, then pull your hands towards you, while simultaneously leaning your chest forward. Take your arms back, spread them to the sides and extend them in front of you again. Move smoothly, breathe deeply and measuredly. This is one repetition. Do a maximum of these in one and a half to two minutes.
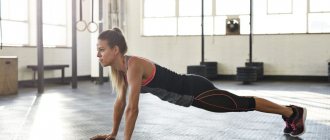
Straight arm plank
Stand straight, feet hip-width apart. Stretch your arms up, then gently bend over and touch your palms to the floor. Place your palms on the floor and jump your feet back, moving into a straight-arm plank. Actively work the muscles of your legs, arms, and abs. Press your palms completely to the floor, spreading your fingers as wide as possible. Stretch your heels back. Stay in this position for 40-50 seconds, breathing slowly and deeply.
Child's Pose
From the plank, push your pelvis back, bend your knees, place your shins on the floor, place your pelvis on your heels. Stretch your arms forward, place your forehead on the floor. Relax in this position for 5 breaths.
Repeat the plank-child pose combination 8-10 times.
Downward facing dog
From child's pose, move your pelvis forward, rest your palms on the floor, lift your pelvis up, going into downward-facing dog pose. Place your hands shoulder-width apart, press your palms completely to the floor, with your middle fingers pointing forward. Stretch your tailbone back. Stay in this position for 5-6 breaths.
Downward-facing dog with push-ups
Staying in downward-facing dog position, perform a push-up: bend your elbows, slightly spreading them out to the sides, and lower your body slightly lower to the floor. Then straighten your arms. Do not squeeze your neck with your shoulders, do not overextend your elbows. Do 10 of these push-ups.
Shoulder girdle stretching
From Downward Facing Dog, lower your knees to the floor, place your shins on the floor, and rest your pelvis on them. Place your hands together and extend them upward, turning your palms toward the ceiling. Then release your hands and stretch your arms out to the sides. Bend your elbows, lift your right elbow up, moving your palm towards your shoulder blades. Lower your left elbow down, also point your palm towards the shoulder blades, if possible, join the fingers of both hands into a lock. Feel the stretch in the muscles of your forearms and the sides of your body. Stretch your tailbone down, keep your back straight. Stay in this position for 10 breaths. Then change the position of your hands and hold the asana for another 10 inhalations and exhalations.
Side plank
Come into downward-facing dog pose. Then rotate your shoulders and feet, lean your pelvis forward, transfer maximum weight to your hands and move into a plank. Place your palms under your shoulders, stretch your feet back, do not bend at the lower back, work your abdominal muscles and the entire front surface of your body.
From this position, transfer your body weight to your right hand and turn your body to the left, stretch your left arm up. Place your feet one after the other on the floor. Make sure that your right palm is completely pressed to the floor. Do not squeeze your neck, actively work with the side surfaces of your body. Stay in this position for 7-8 breaths. Change the position of your arms and legs and do the same in the other direction.
Downward facing dog
From the side plank, go to the classic plank (place your palms under your shoulders). Then lift your pelvis up into downward-facing dog pose. Place your hands shoulder-width apart, press your palms completely to the floor, with your middle fingers pointing forward. Stretch your tailbone back. Stay in this position for 5-6 breaths.
Jumping from Downward Facing Dog
From classic downward-facing dog, transfer your body weight to your right foot, bend your left knee and pull it towards your stomach. Press your palms firmly to the floor, spreading your fingers to the sides. From this position, push off the floor with your right foot, transfer even more weight to your arms and shoulder muscles and try to “jump” up with your legs
The jump does not have to be high, it is important for you to feel the balance, to catch the balance, leaning on your hands. Perform 5 jumps with your right foot
Then change your body position and repeat the same with your left leg.
Wrist stretching
After jumping, drop to your knees and place your pelvis on your heels. Place your arms along your body, pressing your palms with the backs of your hands down on the floor. Lean your body forward, feeling the stretch in your wrists. Stay in this position for 6-7 breaths.
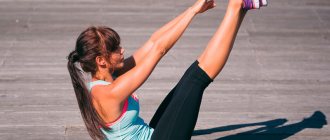
Bakasana
Stand straight with your feet together, bend your knees and squat. With your palms touch the floor on either side of your body and try to rise up onto your toes. Spread your knees to the sides. Place your hands in front of you, press your palms firmly to the floor. Lift your pelvis up (as if tilting), bend your elbows and knees slightly and spread them apart. Place your shins on top of your arms. Gradually transfer your body weight to your arms, lifting your feet off the floor (one at a time or both at the same time). Move your shoulders away from your ears, stretch your tailbone back, actively work your abs and arm muscles. Stay in this position for 4-5 breaths.
Come out of the asana and stretch your wrists.
Practice this program, gradually increasing the time you hold the asanas, develop additional skills that we wrote about above and one day you will be able to confidently stand on your hands.
Tips for doing it right
- When using such a simple but effective exercise for the abdominal muscles, it is important to tense exclusively all the abdominal muscles, and not the legs, back and arms themselves.
- In order for the abdominal muscles to tense more, you should not lower your arms and feet to the floor for several seconds, that is, immediately.
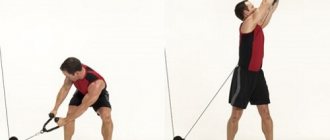
- To increase the effectiveness of the exercise, use dumbbells, which you put on your feet or take in your hands.
Saw plank
During this exercise, the core muscles (rectus and transverse abdominis, dorsi extensor, trapezius, biceps and pectoral muscles), buttocks and leg muscles (hips and calves) are involved in the work.
Performance. Get into a plank position with your forearms resting. The elbows should be positioned exactly under the shoulders, the stomach should be pulled in (the navel is pulled towards the tailbone), the back should be straight (there should be no arching in the lower back). In this position, swing with a small amplitude. When moving forward, your shoulders should be in front of your elbows, and when moving back, they should be behind your elbows. Make sure that your back and legs constantly form a straight line (without bending or, conversely, an arch in the lower back).
Do the exercise for one minute.
You can watch the full video with all the exercises:
Inaccuracies when performing the “book”
There are a number of errors that lead to a decrease in the effect of using the “book”:
- There is no need to bend your legs when lifting. They always remain straight.
- The effectiveness of training decreases if you round your back even a little when lifting your torso and all limbs. It should always remain straight.
- It is not advisable to abruptly return to the starting position. A smooth rise should be completed with a slow transition to the original position.
- A fast training pace will not bring much effect. It is better to work out muscle tissue slowly.
How to develop diction and clarity of speech with the help of training
The training was developed by Maria Savicheva, an expert in speech technique and voice production (more than 20 years of experience).
Suitable for people who:
- a quiet, expressionless, unconvincing voice;
- there is misunderstanding on the part of colleagues and relatives;
- difficulties with pronunciation, sluggish, unclear diction, sore throat, loss of voice;
- relationships with the opposite sex do not work out;
- no career growth;
- They don’t listen, they interrupt, they don’t give a chance to speak in company.
1,273 students were surveyed after classes. Of them:
- 100% have become more confident in themselves.
- 84% began to earn more.
- 100% strengthened leadership skills.
- 94% felt much sexier and more attractive.
- 88% no longer have stage fright.
This is 100% online learning. More than 7,000 participants have already completed it.
How the training works:
- First you will conduct a Voice and Speech analysis. Receive personal recommendations and additions to the course program.
- Follow video lessons and strictly follow the expert’s instructions.
- Interim analysis of voice and speech with program adjustments.
- Final voice analysis with an expert’s conclusion and further recommendations.
For 249 rubles. You can get a voice test right now. Then they will create an individual program for you depending on your results. The price of training will depend on this (3,500–26,900 rubles). You can pay immediately or in installments over 4 months.
The training time is approximately 1.5–2 months.
If you don't like the training, you can get your money back within 14 days.
You can also get access to a free trial lesson for 5 days.
Exercise “book”: various techniques (video)
The book exercise can be performed in different ways. How else to effectively pump up your abs at home, we’ll find out from the video.
You can do a “book” by alternately raising your legs. We’ll learn from the video how to do it correctly to support and pump up your abs.
The “book” exercise is an effective sports method to pump up the abs and strengthen flabby and stretched abdominal muscles, as well as the lower back. It is shown not only for beginners, but also for advanced athletes. The exercise does not require the use of exercise equipment and can be conveniently performed at home.
Disadvantages of this method to pump up your abs at home:
- Not suitable for beginners.
If you have never been involved in fitness, but have decided to fill this gap, then it is best to start with light complexes. This option is designed for people who have experience of physical activity, not 2, 3, 5 years ago, but who continue to lead an active lifestyle.
- It puts a lot of stress on the lower back and should not be performed by people with back problems.
If you have weak lower back muscles, it is better not to do the “book” exercise - the risk of “breaking” your back increases. If this is a common problem for modern office workers - intervertebral herniation - it is strictly contraindicated.
- Assumes good vestibular apparatus.
Without a sense of balance, you can fall on your side or backwards. You need to stay on your buttocks. If you get motion sickness in transport, or you stumble out of the blue, this means that you need to work on your body balance and strengthen your vestibular apparatus.
Or you can “don’t bother” and do simple abdominal exercises on a fitball.
Possible contraindications
Contraindications are based on the fact that if they are present, training can cause irreparable harm to the body. Therefore, be sure to take this factor into account.
What is prohibited:
- Intervertebral hernia. With this disease, you can develop various muscles, but not the abs through oblique crunches.
- Syndrome of lagging lumbar muscles. It occurs when an athlete is overly interested in just pumping up six-pack. The lower back suffers from this. To eliminate this condition, it is enough to undergo monthly therapy (hyperextension).
- Surgical intervention. This may be a condition after removal of the appendix or hernia.
- Stomach or duodenal ulcer.
- Tumors of a malignant and benign nature in the abdominal and pelvic organs.
Incline crunches are a high performance exercise that has many benefits. Do not forget about contraindications, otherwise you will harm the body. If you are afraid to do the exercise yourself for the first time, seek help from a professional trainer who will familiarize you with the technique.