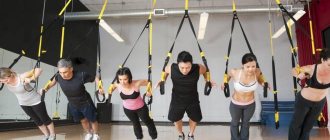
In the world of the fitness industry, the suspension training system, which uses special TRX loops, is gaining immense popularity among professional athletes and amateurs. They were developed by an American Navy SEAL commander and are very suitable for both strength training and injury rehabilitation.
TRX loops – what are they?
In almost every sports store you can find a TRX suspension trainer - a system of slings with handles connected to each other, fixed on any convenient vertical surface. The history of this fitness equipment is quite impressive:
- In 1997, Captain Randy Hetrick of the American Navy Seals special forces made special loops from parachute lines and his own jiu-jitsu belt, with which he trained in military field conditions.
- After retiring in 2001, he patented his invention, which he called the Travel Resistance X training loops, and developed his signature TRX®Suspension Trainer™ training system.
- In 2011, the method was purchased by the US Department of Defense for use in the training of specialized troops.
- However, Randy Hetrick does not stop there and creates a training course for fitness trainers, Rip training, and a rehabilitation program after injuries, Suspension training course. In 2015, he opened the TRX Academy.
What are TRX loops made of?
The design of TRX hinges is as simple and ergonomic as possible:
- The base is three rigid lines connected to each other in a Y-shape, reminiscent of parachute lines. At one end they can be attached to a horizontal bar, doorway, tree or any other surface.
- For the convenience of training in different conditions, TRX loops have extension inserts, carabiners and loops.
- The opposite ends of the straps are equipped with length adjusters, loops and handles, which you can either hold with your hands or secure your feet with.
What are TRX loops for?
Exercises on TRX loops have become so popular due to the fact that instead of weights, the athlete uses his own body weight, fixing his arms or legs in a suspended state. That is, the training turns out to be as natural as possible without unnecessary stress on the musculoskeletal system and joints. Each person can adjust the intensity and level of difficulty of the exercises individually by adjusting the length of the strap, body position or inclination angle, for example:
- An advanced athlete can perform complex push-ups on TRX loops while keeping the arms firmly at the desired width.
- During rehabilitation, a person fixes his legs in loops, which removes the load from the back and when doing push-ups, only the arms and chest work.
History of the creation of TRX loops
In the late 90s, the commander of one of the Navy SEAL units made loops from a kimono belt for training. With their help, he performed some strength exercises. Since then, having undergone more than 50 modifications, we are now training on the modern design of balancing loops.
TRX is also the name of the brand of the same name, which produces original hinges. They have become a household name in the fitness industry. Balancing loops are also produced by AeroSling, AeroSling Elite, Svetlus, zTrainer.
TRX hinges - pros and cons
Manufacturers position the TRX simulator as a budget alternative to the gym, describing in vivid colors the following advantages of the equipment:
- Convenience and compactness
. The hinges are easy and convenient to use both at home and outdoors. - Versatility
. This exercise machine can be used by people of any age and body weight, with any level of physical fitness. The brand produces a large number of training programs with loops from dance bodyflex to army strength training. - Rehabilitation properties
. Suspension training with a natural range of motion without additional weights with weights and dumbbells is suitable even for people with spinal ailments, as it relieves stress on the intervertebral discs. - Functionality
. When performing exercises with TRX loops, a person constantly maintains balance and engages all muscle groups, evenly strengthening the muscle corset.
The simulator has practically no disadvantages, we can only note:
- The need for free space within a radius of 3-4 m for ease of use of the simulator.
- Risk of injury and sprains if the exercise is performed incorrectly.
- Presence of counterfeits and low-quality equipment in some sports stores.
Door clamp for expander
After payment, we send each buyer a gift set (which is constantly replenished) from our partner trainers!
With us, you not only purchase a product, but also receive instructions on how to achieve your goals with it!
After all, our mission is to help our clients achieve their health and sports goals!
Wall mount for expander
The wall mount of the exercise machine consists of the so-called “Wall Clamp” and metal rings and allows you to most effectively fix the expander depending on the height of the practitioner and the goals of the exercises.
Step 1. Choose a place in the room that satisfies 2 basic requirements:
— sufficient space to perform exercises with an expander
-walls for mounting hooks must be concrete or brick
Step 2. Installation of rings.
To perform the basic exercises given on the site, it is enough to fix 3 ring screws in the wall, which are located as follows:
-at the level of an outstretched arm
The choice of screw length depends on the structure of the load-bearing walls, the presence of plaster and insulating materials.
For concrete walls, the screw thread diameter must be at least 8 mm and the thread length at least 50 mm . For weaker walls, choose a screw with a long threaded part.
The dimensions of the dowel (diameter and length) must correspond to the dimensions of the screw.
The diameter of the drilled hole must match the diameter of the dowel, and the depth of the hole must be ten millimeters greater than the length of the dowel.
For the best adhesion of the dowel to the base, the hole must be cleaned after drilling.
The screw must be screwed into the wall to the full length of the thread.
Step 3. Hook the snap hook onto the ring and thread an elastic tube or tubes through the loop.
The system is ready for use.
Door expander mount
Door fastening is carried out using the additional accessory “Door Latch”, which makes it possible to perform exercises in any room where there is a door.
There are 2 types of door clamp: “Door clamp for attaching elastic tubes in the middle” and “Door clamp for attaching elastic tubes to a carabiner”
Door clamp for fixing elastic tubes in the middle.
The retainer consists of a soft foam roller and a durable nylon loop into which an elastic tube is inserted. To ensure that the tubes do not fray over time and last as long as possible, a soft neoprene gasket is sewn to the loop.
Door clamp for attaching elastic tubes to a carabiner.
If you attach a tube to a door latch with a neoprene insert (see above) using a carabiner, then over time the soft insert will tear and the tubes threaded into the loop will begin to gradually wear out.
TRX loops – contraindications
Like any other fitness exercise, TRX loops for functional training also have contraindications for use. This list includes:
- Heart and vascular diseases, high blood pressure.
- Any infections and chronic ailments in the acute stage.
- Pathological conditions of the kidneys and liver.
- Epilepsy.
- Haemorrhoids.
- Condition after surgical interventions.
- Pregnancy.
- If you have injuries to the musculoskeletal system, you can only train under the personal supervision of an experienced trainer or rehabilitation doctor.
Who benefits from a ski expander?
Speaking about the benefits, it is necessary to mention several categories of people for whom this unit will be especially useful.
The equipment is useful for already experienced, accomplished athletes. In this case, the device can be used as a warm-up before main workouts, as insurance, to hone specific movements in swimming or skiing.
Note that the projectile will bring equal benefits to both men and women: in this regard, the device is versatile. Aerobic exercise in the fresh air, at a minimum, saturates the brain with oxygen and a person begins to think and remember faster. Regular exercises with an expander will also help:
- Work out the muscles;
- Strengthen joints;
- Make your spine healthier and stronger;
- Strengthen the heart muscle;
- Improve the health of the lungs and blood vessels.
The ski swimmer's expander is surprisingly well suited for overweight people. By using the exercise as an addition to walking, you can quickly get rid of unnecessary pounds.
Which TRX loops to choose?
Official manufacturers produce TRX fitness loops in several modifications, the correct choice of which determines the convenience and effectiveness of training. The following models are available on the market:
- The Home series for home use
uses lightweight materials that can withstand the weight of an athlete up to 180 kg. The price of the set is the lowest. - Models for Professional fitness clubs
are reinforced and can withstand loads of up to 220 kg, while they have specialized rubberized loops and handles with antiseptic impregnations that extend the life of the equipment. - The special army Tactical series
is equipped with convenient extension cords and a set of different mounts. In addition, it is made in non-marking khaki color.
TRX loop dimensions
There are functional TRX loops of different generations on sale, which differ in the type of fastenings, the ability to adjust foot fixation and some other parameters:
- The first and second generation hinges are very similar in design. The later version only has a main carabiner for attaching the stabilizing and closing loops.
- The third generation is distinguished by more reliable fittings with a greater margin of safety, ergonomics and a smooth latching system.
- The fourth version is distinguished by adjustable loop size to secure the feet, which allows you to practice without shoes.
Straight arm expander pull
STRAIGHT ARM EXPANDER PULL | description of the exercise
Starting position: Secure the expander using the clamp to the wall in the upper position and fasten the ends of the elastic tube or several tubes to the two handles. Stand facing the wall and grab the handles of the expander with an overhand grip. With your arms outstretched in front of you, move away from the wall to a distance of light tension on the elastic tubes. Bend your knees slightly and slightly, 15-30°, tilt your torso forward.
Performing the exercise: As you exhale, smoothly pull the handles of the expander towards your hips with straight arms. Take a break. As you inhale, smoothly return to the starting position.
Exercise Tips: Keep your arms almost straight (slightly bent at the elbows) throughout the set. The more you bend your arms, the more the main load shifts from the bottom of the lats to the top of them. Movement occurs exclusively at the shoulder joint. All other parts of the body are motionless. The back is straight. The chest is straightened. Use a relatively light load. Greater resistance causes the elbows to bend, which reduces the load on the latissimus muscles.
Recommended initial load: men - blue or blue + red tubes, women - red or red + green tube.
TRX hinges – rating
You can purchase TRX sports loops from the official distributor in the following modifications:
- Pro System loops
for professional athletes. The set is distinguished by the presence of several types of fasteners for fixing on different surfaces, specialized wristbands and extension cords. Cost – $208. - Tactical GYM
is a specialized tactical kit with two types of mounts: above the door and hanging, as well as a convenient backpack for carrying. Cost – $208. - Home
– equipment for practicing at home, which comes in two colors: yellow or pink. Cost – $173. - TRX Burn
is a model for beginner athletes in a signature color at an affordable price. Cost – $130.
Model overview
| Type | Short review |
| Single row | The simplest projectile, suitable for beginners, women and children. Consists of one row of elastic and handles. Cost 200-300 rubles. |
| Double | Option with reinforcement. Has two rows of elastic bands. For increased rigidity, the price can reach up to 600 rubles. |
| Triple | It has, accordingly, three rows of elastic bands. Quite difficult to handle, difficult to stretch, suitable for experienced skiers and athletes. |
| Small expander | The length of the rubber band varies from 1.5 to 2 meters. |
| Big | It has a long elastic band - from 2 to 3.6 meters. |
The simplest version of the device is a rubber band with handles at the ends. To increase resistance, there can be two, three and sometimes even more rubber bands. The more elastic bands, the correspondingly more difficult it is to stretch the expander, and the greater the load on the muscles.
An extended expander for a skier or swimmer with a maximum load of 20 kilograms. Cost 600 rubles.
It is clear that professional athletes train with reinforced expanders. And for beginners in the absence of sports training, the simplest single-row option is perfect.
Tips for choosing a ski expander
If you are just starting your “sports career”, you should not choose a ski expander with a double or triple elastic band. For beginners, the simplest single-row unit is best. Having mastered it, you can move on to enhanced options.
When buying a piece of equipment, hold it by the handles and try to perform the exercise several times. Check how comfortable it is for you to use it. If the expander has uncomfortable handles or elastic bands that cannot be stretched, it will be difficult to perform the exercises.
best posts For ski lovers, you can combine an expander with Nordic walking poles. After all, this walking was intended as summer training for skiers (more about the benefits).
It is better to choose a well-known sports brand - as a rule, such brands monitor quality and produce safe, comfortable and durable expanders.
How to attach TRX loops at home?
At home, you can fix the exercise machine on different surfaces:
- On the ceiling or wall using an anchor bolt with a ring
into which a special extension included in the kit is threaded, snapped into place with a carabiner. - to the horizontal bar
using the same extension cord included in the kit, which is wound onto the crossbar using several twists and secured with a carabiner. - TRX hinges
are attached to the door using a special door fastener, which is simply thrown over the door against the direction of its opening so that during deadlifting exercises the athlete does not accidentally push the door and get injured.
Methods for attaching a universal expander
How to choose the right clamp for a universal expander depending on the place where you will train.
Door striker
The door clamp is included by default in any set of universal expanders. It is the most popular because it is simple, quick and almost always possible to secure. Usually the door mount is used when training at home.
Wall clamp with carabiner
The wall mount is ideal for home and group training in the gym. It can be installed anywhere there is a solid brick or concrete wall. To install this clamp you will need 3 ring screws.
Strap-fixer
The fixing strap is suitable for attaching to a wall bars at home or in the gym, or to the horizontal bar bar.
Source
DIY TRX hinges
In a licensed store, TRX loops are not the cheapest trainer, the cost of which varies around $200. With this money, the athlete receives a high-quality kit along with a large number of video lessons of a wide variety of workouts. If you don’t want to overpay, you can make an analogue yourself. To do this you will need:
- Carbine.
- Construction tape 3 cm wide and 5 m long.
- Slings for securing cargo in trucks with a cam self-clamping stopper, 2.5 and 5 m long.
- Tube for electrical wiring.
- Needle and thread.
Work progress:
- From construction tape and wiring pipes, loops for arms and legs are sewn using a sewing machine according to the required dimensions, into which length adjusters are built in if necessary.
- The slings are fastened in a Y-shape and fixed to the surface with a carabiner.
- The necessary loops are attached to them.
Wall mount for expander
INSTALLATION AND OPTIONS FOR FIXING THE EXPANDER
Unlike traditional tubular expanders, where the expander is fixed only to the floor using the legs, the universal expander SMARTELASTIC
equipped with special devices -
clamps
, which make it possible to attach the expander to various objects (wall, door, crossbar, stand, etc.). This allows you to turn any place into a gym and significantly increase the number of exercises.
Wall mount for expander
Wall fixation of the expander includes screwing metal rings
and using the optional
Wall Mount
. Wall fixation allows you to most optimally select the height of the expander attachment depending on the height of the student and the goals of the exercises.
The wall holder is made of durable nylon tape and stitched with additional reinforced stitches for reliability. An aluminum carabiner is attached to one end of the clamp for attaching to metal rings. The other end is made in the form of a loop into which an elastic tube is inserted and bent in the middle. A soft neoprene insert is sewn to the loop to protect the tubes from chafing.
Installation of rings to the wall.
First, choose a place in the room that satisfies 2 basic requirements:
availability of sufficient space to perform exercises with an expander.
The walls for mounting the rings must be concrete or brick.
10 cm from the floor
at arm's length
To perform the basic exercises given on the site, it is enough to fix 3 ring screws in the wall, which are located as follows:
The choice of screw length depends on the structure of the load-bearing walls, the presence of plaster and insulating materials. For concrete walls, the screw thread diameter must be at least 8 mm and the thread length at least 50 mm . For weaker walls, choose a screw with a long threaded part. The dimensions of the dowel (diameter and length) must correspond to the dimensions of the screw. The diameter of the drilled hole must match the diameter of the dowel, and the depth of the hole must be 10 millimeters greater than the length of the dowel. For the best adhesion of the dowel to the base, the hole must be cleaned after drilling. The screw must be screwed into the wall to the full length of the thread.
Hook the snap hook onto the ring and thread an elastic tube or several tubes through the loop. The system is ready for use.
TRX loops - training
In order for TRX training to be successful and bring only benefits to the body, it is important to follow the following recommendations from the authors of the method:
- Before training, it is necessary to warm up all muscle groups, which should last about 10 minutes. This can be either a basic warm-up set of exercises or cardio exercise.
- You can exercise daily in the morning or evening, taking 1-2 breaks a week. The duration of each workout is 40-60 minutes.
- In this case, you can train both for time and for the number of approaches and repetitions.
- TRX loops are often used for home training, but for beginners it is better to conduct their first classes under the supervision of an experienced instructor, or carefully follow all the tips from the video tutorials that come with licensed equipment.
- To achieve your goals, it is important to follow a diet along with training. Moreover, hanging loops help both gain muscle mass along with a balanced diet, and reduce the percentage of body fat when cutting.
TRX loops – exercises
There are a large number of functional exercises on hanging loops, but 4 of them are included in the basic complex and are used by both professionals and beginners, who can later modernize and complicate them:
- Pull-ups in TRX loops
, which are performed by sagging on loops with a straight body position. The athlete pulls himself to the loops only with his hands, bringing his shoulder blades together as much as possible. The lower the machine goes, the more difficult it is to perform the exercise. - Push-ups in loops
are performed similarly to a standard exercise on the floor, but the workout can be complicated by the height of the loops and the placement of only one leg on the machine. - The TRX loop abs
can be fully worked by performing side turns. To do this, you need to grab the handles of the loops with straight hands and stretch your body into a straight inclined line. Pull your body in one direction or the other without bending your arms. - The glute bridge
helps pump up the buttocks and hamstrings. It is performed lying on the floor with the heels secured in the loops and a smooth lift of the pelvis without lifting the lower back from the floor.
TOP 10 best expanders
Resistance bands in the form of an elastic band
They are universal sports equipment and are mainly used in exercises where you need to sit or lie on one end of the elastic band.
- Bradex Sf 0196 is a premium band projectile that is suitable for advanced athletes. It can withstand a load of up to 54 kg, and the wide band will make classes as comfortable as possible.
- Torres Al0048 is an inexpensive latex expander. It is pleasant to the touch and allows you to conduct full-fledged training at home, replacing many narrowly targeted exercise equipment.
Tubular expander
A universal compact exercise machine that is suitable for working out all muscle groups. The greatest load can be achieved on the arm muscles. Externally, the projectile looks like a jump rope with handles.
- Atemi Att03 is a tubular projectile for toning different muscle groups. It is universal, suitable for people of any height and build.
- OneRun 495-4814 is an inexpensive, compact exercise machine that is easy to carry.
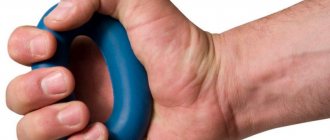
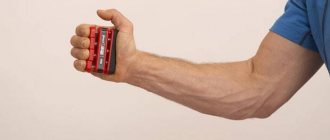
Carpal expander
In the shape of a ring - the most effective exercise machine for the arms. It helps work the muscles of the fingers, wrists and forearms, and also ensures a powerful grip.
- Bradex "Iron Grip" is the cheapest of the wrist projectiles presented in the rating. It securely fixes the hand and prevents injuries.
- Go Fit Gf-Gel-Med is a premium brush expander. It is designed not only for muscle development, but also perfectly relieves stress and fatigue after a hard day at work.
Chest expander
It consists of 2 handles connected to each other by a spring or several rubber bands. They pump the muscles of the back, chest, arms, and shoulders.
- Start Up Nt36011 is the best chest expander that combines an affordable price, the ability to adjust the load level and effective training for the muscles of the chest, back, and arms.
Skier's expander
It is an elastic band with handles at the ends. The load of the projectile depends on the number of elastic bands and their ability to stretch. Most often, these exercise machines are equipped with a hooking device for attaching to a crossbar or in a doorway.
- Indigo 3 cords is a cheap but high-quality training device for skiers, swimmers or boxers.
- HouseFit 69812 is a lightweight and durable model for skiers with low resistance. Exercises with it are an ideal warm-up option.
Butterfly-shaped expander
It is a small exercise machine. It consists of a base with a spring and two levers moved in different directions. The action of the projectile is based on the principle of elastic deformation and is suitable for working out various muscle groups.
- Lite Weights 0891LW is an effective butterfly expander. It is suitable for home workouts for all muscle groups and does not distract from watching your favorite TV series.
TRX hinges - analogues
TRX training loops are legally a registered trademark. However, many manufacturers of sports equipment have taken the path of creating their analogues, calling their creations functional loops, which differ from the original only in price and some components. For example:
- Functional hinges WORKOUT Suspension Training Home P1.
- MPS loops (analogue of the TRX simulator) for functional training.
- Functional training loops P3-1
Straight arm resistance band pull
STRAIGHT ARM EXPANDER PULL | description of the exercise
Starting position: Secure the expander using the clamp to the wall (door) in the upper position and fasten both ends of the elastic tube or several tubes to one handle. Stand with your side to the wall and grab the handle of the expander with an overhand grip with one hand. Extend your arm to the side and move away from the wall to a distance of light tension on the elastic tubes. Feet shoulder width apart. The body is straight. The chest is straightened.
Performing the exercise: As you exhale, smoothly pull the handle of the expander towards your thigh with a straight hand. Take a break. As you inhale, smoothly return to the starting position.
Exercise Tips: Keep your arm almost straight (slightly bent at the elbows) throughout the entire set. Use a relatively light load. Greater resistance provokes bending of the arms at the elbows, including the biceps, which reduces the load on the latissimus muscles.
Recommended initial load: men - red or red + green tubes, women - green tube.
Expander rows to the chest in a sitting position
EXPANDER PULL TO THE CHEST IN A SITTING POSITION | description of the exercise
Starting position: Secure the expander using the clamp to the wall in the upper position and fasten the ends of the elastic tube or several tubes to the two handles. Sit on the floor facing the wall and clasp the handles of the expander with an overhand grip. Bend your knees and place your feet firmly on the floor or wall (use athletic shoes). Tilt your torso back until the elastic tubes are stretched. Tighten your psoas muscles and maintain this body position until the end of the set.
Performing the exercise: As you exhale, gently pull the handles of the expander towards your chest, moving your elbows back and to the sides. When the handles of the expander are at shoulder level, pause and tighten your lats even more. Pull the expander exclusively using the muscles of your back and shoulders. As you inhale, smoothly return to the starting position.
Exercise Tips: The further back you move your elbows, the more your back muscles are activated. Maintain the natural curve of your spine throughout the exercise (your back is slightly arched in the lower back and your chest is straightened).
Recommended initial load: men - blue + red or blue + red tubes, women - red or red + green tube.
Expander rows to the chest in a standing position
EXPANDER PULL TO THE CHEST IN A STANDING POSITION | description of the exercise
Starting position: Fasten the expander with a clamp to the wall in a position at chest level and fasten the ends of an elastic tube or several tubes to two handles. Stand facing the wall and grab the handles of the expander with an overhand grip. Move away from the wall to a distance of light tension of the elastic tubes. Bend your knees. Straighten your back completely, straighten your chest.
Performing the exercise: As you exhale, gently pull the handles of the expander towards your chest, moving your elbows back and to the sides. When the handles of the expander are at shoulder level, pause and tighten your lats even more. Pull the expander exclusively using the muscles of your back and shoulders. As you inhale, smoothly return to the starting position.
Exercise Tips: The further back you move your elbows, the more your back muscles are activated. Maintain the natural curve of your spine throughout the exercise (your back is slightly arched in the lower back and your chest is straightened). Do not under any circumstances round your back or bend (or straighten) your lower back.
Recommended initial load: men - blue + red or blue + red tubes, women - red or red + green tube.
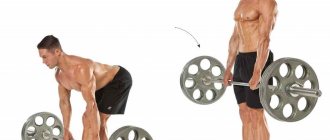
Expander pull to the belt
EXPANDER PULL TO THE BELT | description of the exercise
Starting position: Secure the expander using the clamp to the wall in the lower position and fasten the ends of the elastic tube or several tubes to the two handles. Stand facing the wall and grab the handles of the expander with an overhand grip. With your arms straight ahead, move away from the wall to a distance of light tension on the elastic tubes. Straighten your back, straighten your shoulders and chest.
Performing the exercise: As you exhale, pull the handles of the expander towards your belt with a powerful but smooth movement. Try to keep your elbows as close to your body as possible, pointing them straight back. As soon as your arms are in close proximity to your stomach, your elbows are pulled back as far as possible, take a short pause. As you inhale, smoothly return to the starting position.
Exercise Tips : Keep your back straight and maintain a slight arch in your lower back. Try to keep your torso virtually motionless during the pull. Deviations of the torso from the vertical position should be minimal. Pull the expander using your back muscles, not your lower back and biceps (this happens when you lean back, trying to help yourself with your whole body).
Recommended initial load: men - blue + red or blue + red tubes, women - red or red + green tube.
Expander pull down
EXPANDER PULL DOWN | description of the exercise
Starting position: Secure the expander using the clamp to the wall in the upper position and fasten the ends of the elastic tube or several tubes to two handles or straps. Stand facing the wall and grab the handles of the expander with an overhand grip. With your arms outstretched in front of you, move away from the wall to a distance of light tension on the elastic tubes. Get down on one knee, and place the other leg bent at a 90-degree angle in front and place your entire foot firmly on the floor (use sports shoes). Bend your torso forward so that your back, head, arms and elastic tubes of the expander are in the same plane.
Performing the exercise: As you exhale, gently pull the handles of the expander down with your hands, while your elbows move towards your body in an arc, bringing your shoulder blades together. As soon as your hands are at neck level, pause. As you inhale, smoothly return to the starting position.
Tips for the exercise: If during this exercise you feel primarily the work of your arms, this will be a signal that you are doing it incorrectly. Try to work your back muscles. You should feel the latissimus, rhomboid and trapezius muscles, its lower part. It’s better to first reduce the resistance by half and feel how the muscles for which this exercise exists work correctly, and then select your working resistance. At the top point, we straighten our elbows, but do not relax the shoulder girdle. Keep your back straight throughout the entire exercise.
Recommended initial load: men - black or blue tube, women - red tube.
Source