0
- home
- Society
Alena KATASHINSKAYA 11 February 2022 13:28 0
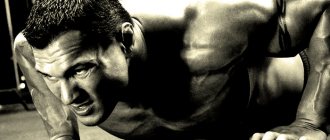
Photo: Photo: Greenhill.in.ua
The human spine consists of 24 movable bones - vertebrae, between which discs are placed that absorb shock. The vertebrae and discs are supported by ligaments and muscles that keep the back straight in three balanced curves. When one of the components begins to hurt or gets injured, back pain and problems will almost certainly follow.
To strengthen your muscles, a few exercises are enough; they will take little time to complete - 10-15 minutes a day, and the result will be obvious.
Warm-up
Important before each complex. Increases the flow of blood and oxygen to muscles, tendons and ligaments. You can also do a warm-up before starting heavy work. Warming up after finishing exercises is also useful.
Do all exercises in five approaches.
Stand straight, place your feet shoulder-width apart. Take two deep breaths in and out. Raise your shoulders up and down, then move your shoulders back and forth in circles.
Stretch your neck: make a circle with your head. First, lower your head down, turn to the right, back to the left and down again.
Engage your shoulders: begin circular movements of your arms, gradually increasing the range of motion.
Raise your arms at chest level and bend your elbows. Swing your arms to the sides. Return to original position. Turn your body to the right and open your arms again. Return to the starting position and turn to the left, swinging there.
The next exercises are pelvic rotation and walking in place.
At the end of the warm-up, take two deep breaths and exhale again.
Why is it important to maintain posture?
Ensuring that the back is always straight should be included in the list of basic manipulations performed by a person every day to maintain health. Walking with a straight back is like brushing your teeth, taking a shower, having quality sleep and eating a balanced diet. And if the first two points are still fulfilled by almost everyone, then the rest, including a straight back, are neglected.
But in order to function correctly, all organs in the body, every part of it, need normal nerves and intensive blood supply. Without good blood flow, there will be no nutrition for the cells, because it is the blood that carries nutrition and oxygen to the entire body. The vital activity of each individual cell depends on normal blood flow. And the nerves produce electrical impulses, without which the energy necessary to maintain the normal existence of tissues will not be generated.
It is important to take care of your posture so that blood circulation is not impaired
Important! The body, in conditions of lack of cellular nutrition and insufficient energy production, will begin to wear out quickly. Organs degenerate, and health will be replaced by numerous diseases, sometimes incurable.
How is normal blood flow maintained and proper blood supply provided? Surprisingly, this happens thanks to posture, that is, a straight back.
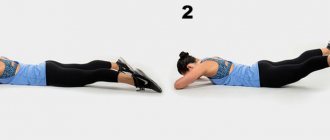
Cat
Get on your knees, place your hands on the floor. Place your knee joints under your hip joints and your legs hip-width apart. Imagine that you have webbing between your fingers. The middle finger should point straight forward. The arms were straightened and the hand, elbow and shoulder were on the same vertical line.
Pull in your stomach, tighten your buttocks, stretch your spine from your tailbone to the top of your head, and look down at the mat. Inhale, bending your back slightly, squeeze your shoulder blades together and move them down towards your pelvis. Look a little ahead in front of you.
As you exhale, pushing off the floor with your palms, round your entire back and stretch your shoulder blades and chest toward the ceiling, additionally twisting your pelvis toward you, as if you want to connect it to your forehead.
Repeat the movement 8-10 times.
Note
It is very important to understand that pelvic lift is actually nothing more than hip extension.
The exercises are performed at a good pace. You should do 5-6 approaches and 25-30 repetitions in each approach. Rest between approaches should not exceed 1 - 1.5 minutes. Compliance with the exercise technique and rest time between approaches is one of the key points of successful training.
Make sure your movements are calm and measured. Breathing should be even, without stopping.
Avoid arching your lower back. Do not bend your knees under any circumstances: point them directly at the ceiling. To do this, you can imagine that there are glasses of water on your kneecaps.
"Swimming"
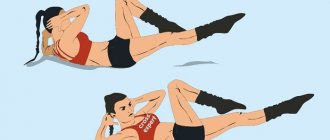
Lie on your stomach with your arms extended in front of you, palms down. Slightly lift your chest, arms and legs off the floor. Legs are straight, toes slightly pointed. Raise your right arm and left leg a little higher. Lower it. Raise your left arm and right leg. Return to the starting position.
Changing the position of the arms and legs is done slowly and smoothly. During the exercise, it is important to keep your stomach and buttocks tucked, and your spine stretched along its entire length.
The gaze should be directed to the floor. For each inhalation and exhalation you need to perform two changes of movement. Perform 10 such breathing cycles.
Variations of the gluteal bridge
Remember that the glute bridge, like any exercise, has some limitations. “The main contraindication is any chronic disease of the spine in the acute stage,” says Anastasia Simanova. “A hernia in the lower back may be a contraindication for the exercise,” agrees Asya Alexandrova, “however, with the correct technique, a bridge is possible in this case too. You can also name varicose veins (also relative and much depends on its degree), prolapse of internal organs, acute inflammatory processes in the body.”
Bodyweight glute bridge
This is the same classic bridge that we described at the beginning of the article: with emphasis on the heels and shoulder blades. To make it more difficult and increase the load, you can place your heels on a stand like a step platform. And a couple more tips:
- As you lift your pelvis, place all your weight on your heels, not your shoulders.
- At the top point, hold for a few seconds.
- Lower your pelvis slowly and carefully, do not “drop” it on the floor.
- If you do not complete the set, do not relax your buttocks completely, do not place your pelvis completely on the floor.
- In all repetitions, the amplitude of the lift should be the same and not decrease with each repetition.
- Optimal number of bridges: 6-12 repetitions, 1-3 sets.
Glute bridge with elastic band
You can use a rubber band to make it more challenging and add resistance.
- Place the elastic band on your hips so that it is between your knee and hip joint. Stretch the bottom edge down and press your heels to the floor.
- If you have a straight elastic band or fitness shock absorber, fold it several times. Like the ring one, drape it over your hips and press the free ends with your palms to the floor.
In both cases, the elastic band will create additional resistance to lifting the pelvis. The tighter the elastic is, the greater the load.
Glute bridge with barbell
This technique is suitable for more advanced levels. Often, the shoulder blades and shoulders are placed on a support, such as a bench press. This prevents the bar from sliding onto your chest and face.
“You need to place the bar on your hips, then position your feet perfectly,” warns Asya Alexandrova. - They should be positioned so that when the pelvis is at the top, the shins stand strictly vertical. The toes of the feet point slightly to the sides or stand straight. The feet are placed so wide that you can feel the muscles of the buttocks. It is enough to hover at the top for 1-2 seconds, the main thing at this moment is to squeeze the buttock area. Athletes call this skill peak muscle contraction. For best results, the last rep of the set should be completed by holding the weight for 3-10 seconds.” This way you can also use a dumbbell or a barbell plate. Like the bar, they are held with your hands during the exercise.
To relieve excess pressure on the groin area, you can place a bar pad (like on squats) or a folded towel. It is important to completely block—extend—the hip joint as much as possible at the moment of peak contraction. When this is impossible, and the angle in the pelvic area is insignificant, this indicates an excess of weight of the barbell or other burden.
“You can use a special exercise machine for the gluteal bridge with a barbell, if your gym is equipped with it,” says Anastasia Simanova, “Or a leg extension machine.” In the latter case, you need to lie with your shoulder blades on the seat, and place your pelvis under one of the bolsters, which is designed for lifting with your legs.
Glute bridge with one leg lift
This is the familiar bodyweight bridge, but one foot is not on the floor. This can be done in two ways:
Easier: cross the ankle of one leg over the knee of the other. Do the required number of repetitions and change legs.
More difficult: raising your pelvis, straighten one leg up.
This allows you to more powerfully load the buttocks one at a time. At the same time, if you do not have enough training to raise your pelvis high up, do not go to the bridge with one leg. In it, the elevation of the pelvis and a single line of the knee, hip and shoulder joints should be maintained in the same way as on two legs.
Glute bridge in TRX loops
A type of bridge with its own weight. It is quite difficult to perform, because the support under the heels is not a reliable floor, but hanging loops.
- Lower the loops as low as possible, at least below the knee.
- Lying on your back, place your feet in the loops.
- Raise your pelvis as with a regular bridge.
- Try to keep your shins vertical when lifting your pelvis.
- Don't let the loops roll back away from you.
Due to the instability of the loops, the load on the legs and deep core muscles increases.
Complement your sport with different types and enjoy high-quality buttock training.
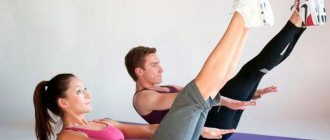
Shoulder bridge
Lie down on the floor. Bend your knees, keeping them together. Place your feet closer to your buttocks and press them firmly into the floor. Extend your arms along your body, palms down.
Relax your neck, shoulders, and lower back muscles while maintaining a neutral pelvic position. Take a breath. As you exhale, pull your belly toward your spine and slowly begin to lift your pelvis, first from the floor, then your sacrum, lower back, middle and upper back.
Repeat the exercise 10 times. In the upper position, straighten your entire body in one line along the following points - knees, iliacus and shoulders. Take a breath. As you exhale, slowly lower your spine to the floor.
Main working muscles[edit | edit code]
Back muscles that stabilize the spine
: erector spinae muscle (spinalis, longissimus and iliocostalis), semispinalis, group of deep spinal muscles.
Abdominal muscles that stabilize the spine
: rectus abdominis, external oblique, internal oblique, transverse abdominis.
Muscles that extend the leg at the hip joint
: gluteus maximus, posterior thigh muscles (semimembranosus and semitendinosus muscles, biceps femoris).
Muscles that flex the leg at the hip joint
: iliopsoas muscle, rectus femoris muscle, sartorius muscle, tensor fasciae lata, pectineus muscle.
Accessory muscles[edit | edit code]
Muscles that extend the leg at the knee joint
: quadriceps femoris muscle.
Muscles that perform plantar flexion of the foot at the ankle joint
: gastrocnemius muscle, soleus muscle.
Muscles that extend the arm at the shoulder joint
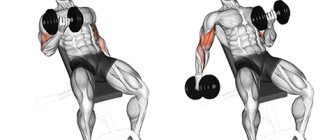
: latissimus dorsi, teres major, deltoid.
Muscles that adduct the shoulder blades
: trapezius muscle, rhomboid muscles.
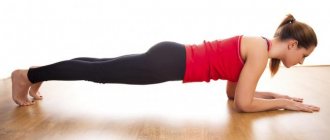
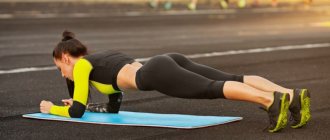
Side plank
A very effective exercise. Its difficulty lies in maintaining correct position and balance over a period of time, so we recommend it for those whose muscles are already in good tone.
Lie on your side, supporting yourself on your forearm. Legs together, parallel to the floor. The sock is pulled towards itself. Raise your pelvis off the floor, tensing your torso muscles and forming a straight line with your body. After 15 seconds, lower your hips and return to the starting position. Perform 5 approaches.
Notes[edit | edit code]
The shoulder bridge requires high stability of the pelvis, since it is suspended and rests on only one leg, while the other makes wide movements. In addition, the spine is slightly extended in the lower back, so it is necessary to pay special attention to the immobility of the pelvis at the moment of lowering the leg (this will be discussed in more detail in the analysis of the “Scissors” exercise). If you can achieve proper stability, the shoulder bridge will also provide a good stretch for the hamstrings and hip flexors.
Modifications[edit | edit code]
If you cannot achieve a stable pelvic position, try tilting it slightly back and limiting the range of motion of your legs.
Option[edit | edit code]
The shoulder bridge can be performed without support from the hands and by slightly tilting the pelvis back when lifting off the mat. The toes of the raised leg can be kept in place (dorsiflexion of the foot) to enhance the dynamic stretching of the hamstring muscles.
Contraindications
So, we have already said quite a lot about the benefits of the bridge, but what about the contraindications? Who is not recommended or should not do it at all? First of all, no matter what kind of bridge it is, it should not be done by those who have any diseases of the spine or gastrointestinal tract. This exercise puts a lot of stress on the back, and therefore on many vital organs. If you are susceptible to illness, then it is advisable not to take unnecessary risks.
It is not recommended to do a bridge for those who have headaches or blood pressure. Overloading the body may not have a very good effect on your head if it is often exposed to external influences.
The bridge is also contraindicated for pregnant girls, since it threatens the fetus with various problems. If you have a disease or previously injured joints, you should also not do a bridge. This can only worsen the situation and destroy the joints.
Some types of bridges can also harm the cervical spine if everything is not in order. Therefore, before performing this exercise, weigh the pros and cons and think it over carefully.
Summarizing
Immediately after starting to perform the gluteal bridge, you can notice an improvement not only in terms of changes in size and acquisition of a more attractive shape by the buttocks, but also in terms of general well-being. Jogging, simple and sports walking will become much more productive, and the exercises themselves will no longer bring difficulties, if there were any before.
Don't underestimate this exercise. It is, of course, aimed at improving the appearance of the buttocks, but it brings much greater benefits. The power of the blow and the height of the jump depend on the development and strength of this muscle group. And in order to achieve good results in any discipline that requires extension in the hip joint, the gluteal bridge cannot be neglected.
It should be done not only by women involved in professional or amateur sports, but also by men, using weights.