The exercise, bending the arms in a crossover, tightens and pumps the biceps, giving the middle a height (peak). Isolation exercise.
Machine curls , like no other exercise, “blow out” the middle of the biceps and give it a distinct “peak” shape.
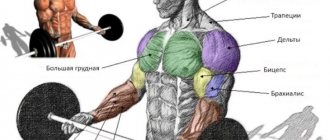
Your skill in the boxing ring (direct and side blows, blocks), on the ice field (any movements with a stick), on the tennis court (side blows with a racket on the ball), on the basketball court largely depends on the strength and coordinated work of the muscles that flex the arm. (throwing the ball from the side, receiving the ball), in the wrestling arena (grabbing the opponent, pulling the opponent towards you).
Crossover biceps curl - biceps exercise
What muscles work
When performed correctly, biceps curls are classified as isolating exercises, since only one pair of joints (the elbows) is involved in the work. The main burden falls on:
- Biceps (mostly short head).
- Brachial muscle.
- Brachioradialis muscle.
If an athlete feels tension in other muscles (for example, triceps or trapezius) when performing a cable curl while standing, this indicates incorrect technique or a lack of neuromuscular control in the target area.
Common Mistakes
Most technical errors in crossover bending are often made by inexperienced practitioners.
They try to do an isolation biceps exercise as a basic exercise. That is, they place extremely heavy weights and lift the weight with the strength of the whole body. In addition, in order to cope with heavy weight, the entire movement is performed at a jerky, fast pace.
This mode of performing an isolating exercise is a gross technical error.
Crossover curls are neither anatomically nor physiologically intended for setting strength records.
The essence of the movement is a targeted effect on the biceps, with all extraneous muscles turned off from the work. This is only possible when using a light weight and a slow, controlled pace of movement.
Another common mistake is incorrect elbow position . They are often lowered down significantly, and excessive lifting is less common.
To maximize the load on the biceps, the shoulder should be parallel to the floor.
It is easier to control the correct starting position of the hands with the help of a mirror, since fatigue accumulates towards the end of the execution and it is more difficult to maintain the technique.
Technique for performing biceps exercises in a crossover
You can give your biceps a distinct shape using a crossover. It is recommended that experienced athletes perform muscle pumping. This exercise will be useless for beginners, since during training the biceps only perfects its shape. A crossover is a universal exercise machine that can be used to train various muscle groups. Most often it is used to pump the biceps. Crossover biceps can be shaped in several ways, the most common exercises being biceps curls and standing biceps curls.
Benefits and disadvantages of exercise
The crossover biceps curl is a movement that has many different variations. It has a number of advantages and disadvantages compared to the classic barbell lift. Therefore, it is worth considering these exercises as complementary and not replacing each other.
The main advantages of curling your arms on a block:
- The ability to change the degree and focus of the load using different grips, handles, and performing with one or two hands.
- Helps to master the correct technique and ideal execution of the motor pattern.
- It creates tension even at the starting point due to the tension of the cable, because of this, the working muscles are constantly under load.
- Ideal for safe pumping, multi-repetition techniques, static dynamics and other techniques.
- Consistently increases the volume and strength of the biceps.
Disadvantages when working with the lower block:
- Poorly suited as a main “mass-building” exercise, inferior to working with free weights (dumbbells and barbells).
- The gym may not have a crossover (or the right handles).
Handle options
- Rope grip. Great for neutral grip lifts.
- Simple, short handle. Allows you to work with a pronating and supinating grip.
- D-shaped handle. Allows you to perform variations of lifts with one hand. Pronated and supinated grip.
If you want to keep your hands in a neutral position when performing a one-arm variation, you can grab the end of the rope without a grip.
Now that we have covered a few points, you can begin to master the technique of performing the exercise.
Reverse grip pull-ups
This exercise is not isolated: it loads not only the biceps, but also other muscles of the shoulders and back. Despite this, these pull-ups are very effective: according to ACE, they activate the biceps by 80%.
Grab the bar with a reverse grip, lower your shoulders, squeeze your shoulder blades together - this is the starting position. Pull yourself up so that your head is below the level of the horizontal bar, and then lower yourself to the starting position. Don't pull your chin up trying to reach the bar: your neck should remain straight.
Do 3-5 sets of 10 reps without weight. If you can't finish the last sets, then do them point-blank. If you can do 10 repetitions, then try weighting - a belt with a chain and a 5 kilogram weight plate. Perform 3-5 sets of weights at point-blank range.
Exercises
Let's look at the basic exercises for pumping up the biceps.
Basic
The only basic exercise for biceps is the pull-up on the horizontal bar with a narrow reverse grip. Despite the fact that the back is also involved in this movement, you can shift the emphasis to the biceps brachii muscle, without fully extending your elbows and concentrating on lifting by bending your arms.
Insulating
Due to the small volume, the easiest way to develop biceps is with a complex of predominantly isolation exercises. They all have similar techniques and differ only in the position of the hand and body. Therefore, we will consider them in groups.
How to increase efficiency
The main factors for increasing the efficiency of crossover arm curls are strict execution technique and correctly selected tempo of movement.
The optimal pace is considered to be 1-2-2 . This means that it takes one second to bend your arms. The peak contraction of the biceps is held for two seconds. The return to the starting position occurs slowly and under control, over two seconds.
In the starting position, keep your arms slightly bent. Following this rule maintains constant tension in the biceps and helps to work them even better.
Bending arms in a crossover from the upper block
The biceps curl on the upper block is a complex technique, so when working in this style it is recommended to use a light weight.
Technique:
- Place the D-handles into the upper blocks of the machine. Stand in the middle and grab them with your hands. Feet shoulder-width apart, back straight.
- Begin to bend your elbows, trying to bring your hands as close to your shoulders as possible.
- Pause briefly at the peak point and extend your arms until your elbows are straight.
- The biceps is always parallel to the floor.
- Also, when performing it, it is important to ensure that the elbows are directed to the sides (bringing the elbows together is a technical error).
Advantages:
- Increases volume and defines the shape of the biceps
- Thanks to the crossover cable, the load is maintained even at the peak point of movement
- Effective even when working with light weights
- Muscle group: Biceps
- Exercise type: Isolation
- Equipment: Block trainer
Exercise technique
- To begin, set the correct, equal weight on each side of the machine. Now adjust the height of the handles, making sure they are positioned above shoulder level
- Stand between the blocks, using an underhand grip (palms facing the ceiling) to grasp the handles. Arms are straightened and parallel to the floor, feet shoulder-width apart. The body is located in line with the handles. This will be the starting position
- As you exhale, slowly bend your arms until your forearms and biceps touch each other.
- As you inhale, return your hands to the starting position. The body is motionless throughout the exercise, only the forearms move
- Complete the recommended number of repetitions
Anatomy
The biceps is a muscle consisting of two heads that differ in length and strength, respectively, when the stronger head of the biceps can take the load, then it takes it. After all, it is completely incomprehensible to the body that you want to have beautiful big biceps; it tries to complete the task with the least energy expenditure. As a result, it becomes necessary to isolate the short and weak outer head of the biceps in order to achieve its hypertrophy. On the other hand, the biceps is generally a weak muscle, so when an athlete trains the biceps, he must isolate it, otherwise the muscles of the shoulder girdle will steal the entire load.
The problem during biceps training, and crossover curls in particular, is that only one joint takes on the entire load, which is offset by light weight, but due to the fact that only one muscle and one joint work, it is difficult for the athlete to progress the load . But it is the progression of the load that is the most important condition for hypertrophy of muscle fibers, so you should definitely increase the complexity of the load from workout to workout. If it is not possible to do this by increasing the weight on the bar without compromising the technique, then you should make the load more difficult by reducing the rest time between approaches, or increasing the repetitions in the approach, possibly the time under load, that is, performing the exercise more slowly.
Recommendations
- Technique and smooth execution without jerking in this movement are more priority than the weight of the projectile.
- Try to place the movement at the end of your workout, after heavy exercises like barbell curls.
- It is optimal to perform 10-12 repetitions per set (12 for each hand when performed alternately). Also, the exercise “responds” well to a multi-repetition training regimen, 12-20 repetitions.
- Try to do no more than 3-4 working sets of curls per week.
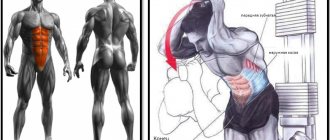
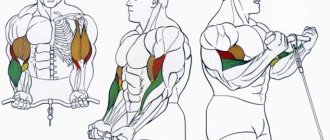
Extension of arms on a block: anatomy of movement
The triceps is the largest muscle in the arm. It consists of three bundles (heads):
- external (lateral);
- middle (medial);
- internal (long head of the triceps).
The muscle serves as an extensor of the elbow joint and is partially involved in adducting the arm.
Let's look at the structure of the hands visually in the picture below:
During the triceps extension in the crossover, the athlete works it in isolation.
This means that only one joint is involved in the exercise - the elbow, and the target load falls on one muscle. The elbow muscle acts as an assistant (synergist).
You can read more in my article about the anatomy of the hands.
Safety
Every exercise performed in CrossFit should always be at a moderate pace. There is no need to pull your arms too hard or suddenly release them after reaching the top point of the amplitude. This not only tires out your muscles, but also puts more strain on your shoulders and elbows.
To protect yourself from unnecessary strain, work with light weights. Please note that this exercise is not recommended for beginners. The biceps should receive a standard load for six months, after which the athlete can move on to pull-ups with a cross.
In no case should you forget about warming up. This is especially important in this exercise because the biceps need to be strengthened. Otherwise they may get injured. Lifting dumbbells or barbells can be used as a warm-up exercise.
Common mistakes
Moving the body while bending the arms. Indeed, this activity helps the athlete bend his arms under heavy weight, but why do this if part of the load will be directed to the back muscles? The lat curl is designed to develop the biceps, so reducing the load may make this exercise less effective.
Make unnecessary movements with your hands. This mistake primarily affects those athletes who perform this exercise for the first time. Under the influence of the ropes, the body begins to sway and the shoulder joints shift slightly. It is very important that they are immobilized in this place, as they can easily dislocate under the influence of weight.
Uneven performance. Most people have uneven development of their right and left arms, so they tend to pull the weight with their main hand and only slightly support with the other. This leads to the fact that the second hand begins to lag behind, and the main one, on the contrary, develops too much. To avoid this, it is recommended to loosen the main lever slightly.
Alternate shoulder pull-ups. Some athletes mistakenly believe that alternating shoulder pull-ups will help build better biceps. This is not entirely true, since the right hand (in right-handed athletes) will constantly pull harder and therefore develop better. In addition, performing the exercise in this way is fraught with curvature of the spine.
Crossover shoulder exercises
The crossover is a block exercise machine, the design of which allows you to perform a wide variety of exercises for all muscle groups. Thanks to its multifunctionality, the crossover has become widespread and can be found in almost any gym. This popularity, multifunctionality and ability to level out some of the technical flaws that beginners make when performing exercises with free weights forces us to touch in more detail on the topic of integrating this simulator into the training process. In this article we will talk about crossover exercises for the muscles of the shoulder girdle. Why shoulder exercises?
The importance of the shoulder girdle is difficult to overestimate! For men, the shoulders complete the silhouette of the upper body; for girls, the shoulders emphasize the fragility and femininity of the figure, while simultaneously helping to create the illusion of a “wasp waist.” For men, of course, the basis of the entire training process is high-intensity cycles, during which heavy basic exercises are used, etc., but, firstly, beginners must “pump up” for some time, and, secondly, after intense cycles so there is always a high-volume cycle, during which the athlete also... Can this be done with free weights? Yes, it is possible, but beginners do not have sufficiently developed technical skill for this, and more experienced athletes often experience injuries that force them to resort to tricks. But even if there are no obvious reasons, then for the sake of variety or for personal reasons you can integrate crossover shoulder exercises into your training without fear of losing its effectiveness.
Technique for performing lower block rows
Correct technique is a paramount rule and an axiom that cannot be violated under any circumstances. Compliance with technical features will not only increase the effectiveness of the exercise, but will also eliminate the likelihood of injury.
How to do lat pull-downs correctly? We will try to consider the execution technique, although in essence it is not complicated. It is enough to follow the tips and recommendations to make the exercise as effective as possible.
Technique for performing belt rows in a block simulator:
- Starting position: select the desired weight and handle. It's best to start with light weights to warm up. We rest our feet on the stops specially provided for this, bending them at the knees. The main task is to find a comfortable position. We grab the handle with the desired grip, straighten our back and shoulders, and maintain a natural arch in the lower back. The body must be perpendicular to the floor.
- As you exhale: pull the handle toward your belt, bring your shoulder blades together and straighten your shoulders, feeling the load in the latissimus muscles, not in your arms. To do this, we try to pull with our lats, bending our elbows. When the handle touches the belt, we linger for 1 second in this position, while the shoulder blades should be brought together as much as possible.
- As you inhale: release the weight back in a controlled and smooth movement so as not to hit the machine. We perform the required number of repetitions.
In the classical variation, the body should be stationary and positioned perpendicular to the floor. You can tilt your body with the weight, as Arnold liked to do, but it is important to keep your back straight. Let's take a closer look at this technique.
Why is it necessary to lean forward while lowering the weight, and then lean back again? This movement allows the latissimus muscles to contract better and also effectively activates the extensors. This allows you to improve your posture by engaging most of your back muscles.
Which option should you choose? It all depends on your preferences and wishes for emphasizing the load:
- If you only want to hit your lats, then your torso should remain motionless while performing seated rows.
- If you need to make your entire back work, then tilting is the right solution. By increasing the range of motion with it, you can perfectly stretch the muscle fibers. However, it is worth remembering that this variation increases the risk of injury to the lower back.
Benefits of Exercise
- Working in a crossover, we slightly shift the load vector from vertical to horizontal, so the delta will be in tension all the time, regardless of what phase of the exercise you are in, upper (lifting) or lower (lowering). For example, by doing DUMBBELL RAISES IN FRONT OF OURSELVES, we will not be able to achieve this.
- The ability to work with each hand in turn, which will eliminate the imbalance in the development of the deltoids. The oblique abdominal muscles are also additionally activated.
- Isolated training of the anterior deltas, which cannot be achieved in basic exercises.
- A simple technique that even beginner athletes can easily master, although doing crossover lifts will be less effective for them than for professionals.
- Improving the relief of the deltoid muscles. They will become more spherical and visually give our silhouette an athletic look, of course in combination with the latissimus muscles.
- There is no load on the spine, which makes the exercise as safe as possible.
Before we move on to mastering the technique of the exercise, we need to talk a little about some points, namely the grip option and the handles that can be used.
Grip options
- Pronated. With this grip, the palms face down. He is the most popular among athletes. If we consider it from the point of view of efficiency, then there are no questions here. This rotation of the shoulder allows you to maximally shorten and stretch the front leg. But when it comes to security, things are not so smooth. Indeed, in addition to the deltoids, the shoulder girdle includes the muscles of the rotator cuff, which are very easy to injure. And it is precisely the use of a pronated grip that is potentially dangerous for them. Why is this happening? It's simple, when we turn the forearm towards the thumb, the humerus also rotates. Due to this, the gap between the tubercle of the humerus and the acromion is reduced. And at the moment of lifting in front of you, they collide. At this moment, the supraspinatus muscles come under attack. If you plan to use this grip, then watch your own sensations. If you experience pain or discomfort, then it is better to take a closer look at the two lower options.
- Neutral. This grip is more anatomically comfortable, now the palms are turned towards each other. When performing lifts, we don’t have to worry about the problem described above. You can combine it with a pronated one; to do this, at the top point, simply turn your palms down.
- Supinated. It is anatomically comfortable. When the palms turn upward, the humerus remains in the same position. It is not recommended for beginner athletes, as due to poor neuromuscular connection, the upper part of the pectoral muscles can take on most of the load. Therefore, it is best to start mastering the exercise with a neutral grip.
Handle options
- Rope handle. Great for neutral grip lifts.
- Straight short handle. Allows you to work with a pronated and supinated grip.
- D-shaped handle. Allows you to perform one-handed lifts. The grip is pronated and supinated.
If you want your palms to remain in a neutral position when performing the one-handed variation, then grab the end of the cable without any handle.
Now that we have covered some points, we can begin to master the technique of the exercise.
Initial position:
- Lower the crossover block to its lowest position. Set the desired weight using a special blocker.
- Stand with your back to the crossover. Attach the handle to the carabiner. Use your chosen grip.
- Place your feet shoulder-width apart so that the cable passes between them.
- Take a few steps forward to tighten the cable.
- Keep your back straight, chest forward, shoulders down, arms slightly bent at the elbows and resting on your hips.
Performance:
- As you exhale, raise your arms up by contracting the anterior heads of the deltoid muscles.
- Raise until the handle reaches eye level.
- In the upper position, we take a short pause, giving the deltoid muscles the opportunity to work statically.
- Next, as you exhale, lower the handle down.
- Repeat for a specified number of times.
Description of the exercise
It can be performed both in a sitting and standing position. The squat is a more challenging variation because the biceps are worked from a lowered position. Elbows should remain in place. Your arms should be extended towards your ears. In general, proceed as shown in the picture.
Basic techniques:
- Elbows should be straight to the sides. If you bring them forward (which is tempting when your strength is running out), your chest comes into play.
- If you do this exercise sitting rather than standing, your shoulders will drop more in relation to the lift. This means that you will move your arms from side to side and up, and your biceps will contract more.
- While straightening your arms, if you want to stretch your biceps further, you can rotate your arm forward (or even downward). It is also recommended to straighten your arms completely.
This exercise can be performed with one hand. In this option, you can maintain balance by grabbing the opposite edge of the bar with your free hand.
Biceps curl from the lower block
Description:
- Face the car. Grasp the handle with both hands, palms facing up, and take a step back to tighten the cable slightly. Stand up straight, arms straight, body tense, elbows pressed to the body. Keep your arms down. Take a breath. This is the starting position.
- As you exhale, gently pull the handle up towards your chest. At the same time, the elbows remain motionless.
- Then lower the handle in a controlled manner to the starting position.
- Attach a W-shaped or straight clamp to the lower crossover block.
- When you reach the highest point, stop for a moment.
Biceps curl from the lower block with ropes
Description:
- Turn to face the machine. Grasp the ends of the rope with both hands, palms facing each other, and take a step back. Stand straight, body tense, elbows pressed to the body. Hands down. Take a breath. This is the starting position.
- As you exhale, gently pull the rope toward your chest while maintaining your grip position. The elbows remain motionless.
- Then lower the handle to its original position.
- Attach the rope handle to the lower crossover block.
- When you reach the highest point, stop for a moment.
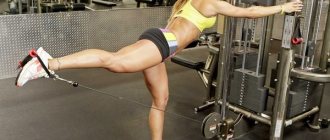
Biceps curl from overhead pulleys
Description:
- Stretch your arms, slightly bent at the elbows, and align them with the uprights of the cross.
- As you exhale, tighten your biceps and extend your arms towards you so that your palms are level with your temples. During the movement, the upper arms are parallel to the floor. The movement is performed only in the elbow joints.
- Slowly return to the starting position.
- Attach the D handles to the ropes running through the top blocks. Grab them with an overhand grip (palms facing up) and stand between the two transverse supports exactly in the middle. If the exercise is performed while sitting, place a bench between the supports and sit on it. The blocks should be located slightly above shoulder level.
- At the end point you can bend your wrists slightly. Wait a bit.
Curls with EZ-handle
The EZ grip cable curl is very similar to the Scott bench exercise. The main differences are:
- The load is heavier on the lower biceps.
- Due to the lack of triceps fixation and barbell position, more muscle fibers are involved in the work.
- You can perform this movement with a wide grip, which transfers some of the load to the long barbell.
Bending from the lower block with each hand separately
Performing this movement with one hand allows you to more accurately load the biceps and exclude other muscles from working. However, for the exercise to be effective, you must follow the basic rules:
Description:
- Always perform the same number of reps for each D-arm.
- Secure your body (hold the frame with your free hand) to eliminate inertia and sway.
- Perform the movement at a slow pace (raising your arm slightly faster than lowering it).