Published:
08.02.2018
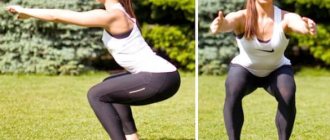
Deadlift from a stand - is used mainly as a specialized auxiliary exercise in powerlifting in order to eliminate the “bottlenecks” in the classical deadlift, in particular to practice the “breakdown” of the barbell from the platform and further improve the result in the competitive movement.
Elevated deadlifts belong to a class of basic exercises that involve a large array of muscles. The main working “units” in the movement are the quadriceps and (to a greater extent than in the standard deadlift) the spinal extensors.
Preparing for the exercise
Before performing the exercise, prepare your workplace - create a “pit effect”. As a height, use a special “pallet”, a step platform or weights from a barbell - it all depends on what “amplitude” of movement is needed (usually the height of the platform is from 3 to 10 cm).
Perform an approach with an empty bar and then another 3-4 warm-up approaches with increasing weight. Additionally, include stretching exercises for the thigh muscles in your preparation. When working with heavy weights, use a safety belt.
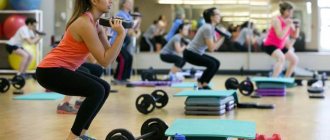
How to do barbell squats correctly: a guide
Squats
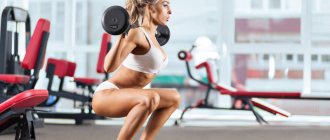
The squat is one of the hardest compound lifts of the big three, with the remaining two being the bench press and deadlift. Bodybuilders of all generations and all over the world consider all three exercises to be the cornerstone of building a beautiful, physically developed body (and not just legs), and in many sports disciplines, without working the leg muscles, an athlete will not be able to produce the maximum power that is required of him in competitions.
This is, without a doubt, one of the best exercises you can add to your training program, but at the same time, it is also one of the most technically challenging exercises that requires specialized training to develop impeccable, non-injurious technique, and in some cases and special equipment.
These introductions mean that you should focus as much as possible on mastering squat technique, especially if your goal is to move heavy weights. It's only after you've mastered squats and started lifting heavy weights that building core strength, endurance, muscle stretching, and joint conditioning will help you move better and stay injury-free.
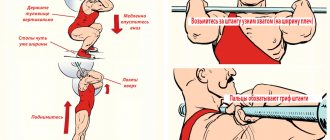
Preparation and grip
1Gai.Ru (translation) / artofmanliness.com
As the name suggests, unlike other squats, which place the barbell on your back in a high or low position, the front squat places the bar on the front of your body—across your front deltoids.
Ideally, you want to grip the barbell so that your front delts form a nice, solid “shelf.” All so that the bar can rest on it while you do the exercise.
Here's how to build this muscle shelf:
- Grasp the barbell with a narrow grip (shoulder-width apart). Grasp the bar with your thumbs.
- Get closer to the bar and extend your elbows forward. So much so that your shoulders are almost parallel to the floor. The higher your elbows, the stronger your muscle shelf will be, on which the barbell will rest.
- Stand up straight and remove the barbell from its hooks. Voila - you are in the starting position for a front squat. Or in the A-pillar position.
Types of Squats
Squats in their diversity are divided into several main options, the most popular of which are:
squats with a barbell on the shoulders ( back squat )
front squat _
basic squat without weights ( body weight squat );
split squat ( split squat );
squats with a safety bar squat
The topic of squats is a broad topic. If you take into account the branches in performance techniques and various nuances, you can write a whole book, and if you delve into the medical, anatomical and chemical nuances that occur in the muscles, you can even write a whole treatise. Therefore, today we will focus on analyzing only one group with two types of squats - squats with a barbell on the shoulders. Why did they come up with two types of this exercise, does it work out muscles (which ones) so well, and why is it advisable for all bodybuilders to do it?
Back squats have two main variations: low bar squat and high bar squat . The key difference between these two squat variations is the placement of the barbell.
As their names suggest, the “high squat” involves placing the barbell on the trapezius, which is the very top of the back, while the “low squat” involves placing the barbell on the rear deltoids. This shift in bar position results in significant differences in how the squat is performed and therefore requires different levels of muscle group activation.
We analyze weak points
Let's move on to the main part. Having understood the technique, you pay more attention to your weak points. Eg:
- If you have problems with the bar falling off the racks, pump up your shin and back
- As you descend and move through a 90-degree angle (hips parallel to the floor), the strength of your adductors, hamstrings, and lower back play an important role in the squat.
- If you can’t hold your back, pump up the pillars, that is, the longitudinal muscles of the back
- Presses the weight at the bottom point - work the quadriceps and lumbar region
- If you have problems in the middle of the movement, when the lift has already been completed, but it becomes difficult to return to the starting position, do specific exercises, which we will talk about later.
High bar squats
The most popular option among weightlifters and bodybuilders is the high bar squat. This type of squat is also the main type of squat after the bodyweight squat.
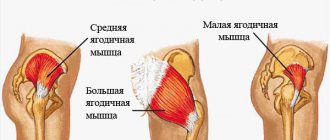
The bar is placed on the trapezius muscles, while the hands grip the bar, the back muscles contract to support the weight, at the same time and in parallel, the core muscles begin to contract to stop the body from falling forward. The athlete then simultaneously bends the knees and hips, transferring the weight to the quadriceps and glutes. The lifter, having reached the bottom point and maintaining the straight position of the back and legs set at the beginning, returns back, contracting the quadriceps muscles and buttocks.
Overall, this explanation of squat mechanics is just the basics of how to perform a squat. It's actually a little more complicated.
You have to consider foot position, foot angle, core stability, forward knee movement, etc.
The squat, once again, is an exercise that requires careful attention to technical execution; you are better off (in fact, obligated) to spend time mastering the technique before attempting to lift heavy weights. Once the technique has been established (under the supervision of a trainer or more experienced gym colleague, of course) and has become second nature, increasing the load being lifted should take priority.
Compared to the back squat, the high bar squat results in greater activation of the quadriceps muscle. It is also more taxing on the lower back as it has to work harder to maintain a more upright position.
The key difference between the two types of back squats is that by placing the bar on the trapezius muscles, the squat involves more forward movement of the knee. This basically means that the knee should move further in front of the leg, thus moving further away from the center of gravity.
This has several consequences:
First, more forward knee movement means it is easier to squat below parallel in a squat. The squat becomes deeper.
Secondly, the quadriceps are the primary muscles involved in this direct knee movement, so they are activated to a greater extent. Quadriceps are trained better.
One of the disadvantages is the greater load on the knees compared to squats with a low bar. The athlete must also have sufficient mobility in the ankle joint to successfully perform a squat.
Biomechanics of squats
From left to right: Back angle (back angle), Hip Angle (hip angle), Knee Angle (knee angle). Low Bar (bar is low) High Bar (bar is high)
In most cases, this results in athletes being able to lift less weight with a bar on their shoulders than when squatting with a bar on their rear deltoids.
see also
A less intense activity for those who hate burpees: emphasis on the arms
This nuance can be both a plus and a minus, depending on the goal. If you are a bodybuilder who wants to build and work the quadriceps muscle, or a weightlifter mastering the clean squat with a high bar position, this is technically ideal since it maximizes the activation of the quadriceps without transferring the maximum load to them, the disadvantage is obvious - if you want to lift heavy weights, you will have to position the barbell lower.
Main mistakes: poor mobility of the ankles and hips. If these issues are not addressed, proper body orientation for the squat cannot be achieved (NO WAY!) and the risk of injury increases. It is important to take the time to evaluate mobility issues and address them before attempting to progress with the squat.
Biomechanics of squats
Watch the position of your knees
Avoid unnecessary knee movement during the squat. Often during lifting they can fall inward. This can lead to joint overload and injury. And the more weight you add to the bar, the higher the likelihood over time.
When lifting, use the previous tip and keep your knees pointing out to the sides.
In general, if your knees are unstable, the problem is most likely weak leg muscles.
Pay more attention to the front, back and inner thighs.
Bending and extending the legs in a slow technique, as well as bringing the legs together in the simulator, are perfect.
Don't forget about bandaging. When the barbell in a squat becomes impressive, you should take care of the health of your knees in advance, because with a lot of weight a significant load falls on them.
Before heavy lifting, secure your knees with an elastic bandage or use special bandages.
Low bar squats
If you're a powerlifter, you probably don't need to be introduced to the low bar squat. In addition to the ability to lift more weight, the low bar squat is an excellent overall development exercise because it targets the glutes and back more than squats with the weight of the barbell on the shoulders.
The low bar squat places the athlete in a position that allows him to use as many of the large muscle groups of the body as possible. More muscles working leads to increased strength and the ability to lift more weight.
Performing a low bar squat
As you can see in the picture above, the bar is positioned much lower than the squat in the previous examples. The shoulders retract, causing the rear deltoid to create a shelf for the barbell to rest on. The general features and execution are similar to working with a high barbell, but the main difference is the working muscle groups that provide an increase in strength. The hips and entire back play a big role in lifting weights. The quads also have to work hard, but they no longer play such a dominant role.
The low bar squat is primarily a hip exercise. The hip adductors, abductors and glutes are the primary movers, followed by the quadriceps and back. The consensus among athletes and their coaches is that low bar squats distribute weight much more effectively, thus keeping joints alive and the athlete free from premature injury.
There is less forward knee movement and the quadriceps are not isolated to the same extent as in a high bar squat. The load on the knee joint is also significantly less.
Biomechanics of the squat
From left to right: Back angle (back angle), Hip Angle (hip angle), Knee Angle (knee angle). Low Bar (bar is low) High Bar (bar is high)
In squats with a low bar, the athlete’s stability and the work of the core muscles play a huge role. An increased forward or backward lean angle means that the downward force from the bar on the torso will be greater than in a high bar squat, thus resulting in an increased likelihood of falling forward and down.
Biomechanics of the squat
From left to right: Back angle (back angle), Hip Angle (hip angle), Knee Angle (knee angle). Low Bar (neck positioned low)
To counteract this problem, you need to support the position with the body, tensing most of the large muscle groups, maintain the position in space with the gluteal muscles and the back. Only by working simultaneously and together can the body remain in a given position, which is only to the advantage of the athlete, no matter how you look at it. This forward pressure is also one of the reasons why the glutes are activated to a greater extent during low bar squats.
Don't lean forward
Many practitioners, even before the start of the negative part of the amplitude, strongly tilt their body forward, moving their hips back.
In this case, having lowered yourself to the lowest point, your back is almost parallel to the floor, and the movement resembles bending over with a barbell.
A similar technique is practiced by some powerlifters to increase working weight. But firstly, this is fraught with loss of balance and the possibility of falling with the barbell upside down.
And secondly, this greatly strains the lower back, which can lead to spinal injury.
In the long term, this style of execution will not allow progress in the squat, because the lumbar region will sooner or later be overloaded, and the hips themselves will not receive proper attention.
Move your pelvis back only when moving down. Controlling your back position. The tilt of the body should be within 45 degrees.
Alternative grips
1Gai.Ru (translation) / artofmanliness.com
The standard front squat, where you wrap your thumbs around a barbell, requires a lot of wrist mobility. If you do not have such mobility, then keep several alternative methods of capture:
Remove a few fingers from the barbell. Try taking your pinky and ring fingers off the bar and hold it with your index, middle and thumb. The bar will be securely attached to the deltoid "shelf" so you don't have to use all your fingers to hold it in place.
Try a wider grip. If you have a short humerus and a long forearm, you will lack the wrist flexibility needed for a narrow grip. So try gripping the bar with a wider grip.
Use belts. If you have lifting straps, you can use them to grip the bar. Simply wrap them around the bar, grab them with your hands, and extend your elbows forward.
Try a cross grip. Another good option if you have trouble holding the bar in a front rack. Cross your arms and step under the bar. Place the barbell in the “dimple” between your thumbs and the rest of your palms. The bar should still rest predominantly on the front of your shoulders, with your thumbs holding it in place. Raise your elbows up so that your shoulders are parallel to the floor. And, of course, stand up straight.