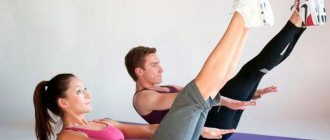
Sit-ups became popular again with the advent of CrossFit to the masses. However, in reality they have always been with us. Remember your school physical education lessons, where this movement was simply called “pumping up the abs.” In CrossFit complexes, sit-ups are performed at speed, which is why athletes often do not do them technically correctly. Many generally try to use the force of inertia and stand by supporting their backs in a special stand. But working your core muscles requires a different strategy.
Exercise technique
There are several types of abdominal sit-ups, the most common of which are: classic, using additional weights, V-sit-up (fold) and sit-up on an inclined bench. Let's talk in detail about the technique of performing each type of sitap.
Classic sit-up
It is this variety that interests us most, since most often in CrossFit complexes we perform the classic situp - its implementation does not require extreme mental concentration. The exercise is far from the most difficult, so it is easy for our brains to “switch” to it after performing another exercise. The classic sitap is performed as follows:
- Starting position: the athlete lies on his back, legs bent at the knees, arms straightened and lying above his head. The buttocks, lower back and upper back are pressed tightly to the floor. The feet are pressed firmly to the floor. If your feet start to lift off during the approach, try pressing your heels only into the floor and spreading your center of gravity like you would with a barbell squat.
- The athlete begins to move his body upward, exhaling at the same time. Our task is to rise using the force of the abdominal muscles, we try not to round our back, and try to reach our feet with our fingers. At the top point, the body should be located approximately at right angles to the floor.
- After touching your feet, smoothly begin to lower down while inhaling, making the movement quite quickly, but under control. Keep your arms straight above your head and touch them to the floor, then repeat the entire movement from the beginning.
Sitap with additional weights
This is a more advanced option for those athletes who can already perform the classic situp for a large number of repetitions without noticeable difficulties. It is most convenient to perform it with a disk or light dumbbells in outstretched arms. Of course, the weight of the weight should be moderate, do not try to set records in such exercises - you will not surprise anyone, but you can get an injury to the lumbar spine even if you follow the ideal technique and after a thorough warm-up
- Starting position: the athlete is positioned as in a classic situp, but holds the disc in straight arms approximately at the level of the lower chest.
- Simultaneously with lifting your torso, you need to push the disc up a little, accompanying this whole process with a powerful exhalation. At the highest point of the amplitude, the disc should be located above the head, and not in front of the chest, so the deltoid muscles, especially the anterior bundle, are also involved in the movement. In this case, the movement of the arms should not be of a pressing nature, we simply “direct” the disc upward, the triceps are not involved in the exercise, and the arms should not bend at the elbows.
- Smoothly lower your body down while at the same time returning the disc to chest level.
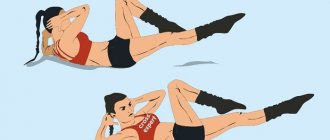
V-sitap (book)
Mihai Blanaru - stock.adobe.com
- The athlete lies down on the floor, the body is fully extended, arms are straight behind the head, all muscles are relaxed.
- You need to start doing a sit-up, while at the same time pulling your legs up, trying to reach your feet or the bottom of your shins with your hands. The movement is accompanied by exhalation. We try not to bend our legs at the knees, as this greatly simplifies the task.
- Begin to lower your body and legs down, feeling the stretch in your abdominal muscles. At the bottom point, a short pause is made, the body is fully straightened, as in the starting position.
Sit-up on an incline bench
Nicholas Piccillo - stock.adobe.com
- Starting position: the athlete sits on an inclined bench, clinging to the stops with his feet, his arms are straightened and laid back.
- We begin to move the body upward, contracting the abdominal muscles without bending the lower back. At the top point you should be positioned at right angles to the machine. As you move, move your hands forward slightly to touch your feet.
- Smoothly lower your body down until it touches the bench. Lower yourself completely, relax all your muscles, and perform one more repetition.
Main complex
"Sit-up" is included in the basic complex. The choice of execution option depends on the experience and skills of the athlete.
Classical
The exercise is performed according to the scheme, without deviating from the recommendations. The classic sit-up is suitable for beginners. The movement does not require any special skills. You can achieve results in a short time by regularly performing the required number of approaches.
Description step by step:
- Starting position: legs bent at the knees, feet resting on the floor, arms crossed over the chest, back pressed to the floor.
- From the starting position, take a semi-sitting position, with your back slightly rounded and your feet not lifted off the floor.
- During lifting, the abdominal muscles are tensed.
- At the final stage, they return to their original position.
To achieve maximum effect, you need to follow some rules. The exercise is best performed after preparing the body. Such preparation can be warm-up, stretching, basic leg raises with alternate use.
To avoid injuries, it is better to purchase a special sports mat made of foam material for your back. At the final stage, you should not suddenly fall onto your back. Movements should be smooth and thoughtful.
The abdominal muscles should remain tense throughout the entire session. One of the conditions for successfully including a sit-up in training is the frequency of repetitions. One approach will not be enough. The maximum number of repetitions is 30 per session.
With hands
The exercise is performed according to the traditional scheme with one difference. The arms are placed above the head when in the starting position lying down. Then, when performing the second part of the exercise, that is, squats, reach out to your feet with your hands and touch your heels with your fingers.
This difference helps simultaneously pump up the arm muscles, especially the deltoids and biceps. For many beginning athletes, using the arms helps them avoid losing count and keeping their back relaxed during the final stage.
The technique involves raising your arms together with your body and rounding your back while reaching your fingers to your feet. After returning to the starting position, the arms are again extended above the head, but do not touch the floor with the elbows.
The effort associated with arm movement increases the load on the abs and makes the movement more effective.
With weights
One of the most popular sit-up exercises, practiced by experienced athletes.
For weights, you can use both special sports equipment and objects that are at hand:
- sports disc;
- small dumbbells;
- small bottles of water.
When using the disc, you will have to hold the object with both hands and not spread your arms. If water bottles or dumbbells are used, the arms can be slightly spread to the sides. Every beginner or experienced athlete chooses the option that suits him best.
Description step by step:
- While lying on your back (starting position), hold the disc with both hands at chest level or hold dumbbells, spreading your arms slightly to the sides.
- As you exhale, squat down, lifting your body and pushing the weight forward. The movement with weights does not have the character of a press, but, as it were, provokes the stretching of the back and body upward.
- As you inhale, you return to a horizontal position, your arms take their starting position.
Coaches believe that in the initial stages it is best to use the disc as a sports equipment. It helps not to spread the arms too far to the sides and concentrates the athlete’s attention.
An important note when performing this exercise concerns returning to the starting position. In order not to provoke an injury, the final stage is performed smoothly and calmly, while the athlete’s attention should be focused on tensing the abdominal muscles and holding the apparatus in the correct position.
Book
Sit-up is an exercise that is based on tensing the abdominal muscles. A fold or book, as a variation of the classical method is called, simultaneously pumps not only the abs, but also the muscles of the arms, legs and back. To perform a fold, you must have endurance.
When lifting the body, you have to raise your legs. In addition, increasing the complexity of the exercise entails an increase in the list of errors that are made during execution.
When performing a fold, the load is concentrated around the lower part of the press. At the same time, the basic rule of the classic sit-up, which concerns the need to constantly maintain slight tension in the abdominal muscles, ceases to apply to the fold.
Due to the qualitatively different impact on the press, when returning to the starting position, it is necessary to completely relax the body. In addition, the starting position changes. When performing a fold, your legs do not need to rest on the floor, they should be fully extended.
Description step by step:
- Starting position: legs extended, back pressed to the floor, arms extended along the body.
- The body and legs are raised from the starting position at the same time. The task is to touch your feet and shins with your fingers. In this case, the legs should be as straight as possible at the knees.
- At the final stage, they return to the starting position, completely relax the body muscles and remain in this position for 2-3 seconds.
The fold or book is aimed at working out the lower part of the abs. This distinguishes the exercise from the classic sit-up, which targets the upper muscle. To perform a fold correctly, an athlete needs to feel his body well and maintain balance.
A common mistake when performing a fold is to shift the weight to one side. In this case, there is almost no effect from the exercise. The reason for adjusting the technique should be the absence of pain in the abdominal area after performing several approaches 10 times each.
Another option for performing the book is to raise the body to a point where behind the legs you can briefly touch the fingers of one hand with the fingers of the other hand. Women most often include this option in their workouts. The main condition for execution is maintaining balance in a half-sitting position with your legs raised up.
On an incline bench
This version of the classic sit-up is great for those who want to pump up their abs, but are limited for medical reasons. In addition, the exercise on an incline bench is practiced by experienced athletes whose goal is not to pump up the abs, but other, more complex tasks.
An inclined bench can be found in every training center; in addition, you can use a Roman chair.
The incline sit-up exercise is very similar to the traditional crunch, but there are significant differences in these exercises:
- when performing a sit-up on an inclined bench, the athlete returns to a position where the back is completely relaxed;
- when twisting, the body is turned at a slight angle; the back is not relaxed at the upper and lower points, which leads to the development of oblique muscles and strengthening of the lateral zones.
An incline bench makes sit-ups easier. The bench has special bolsters for the legs that secure the feet. Thus, the athlete only monitors the tension of the abdominal muscles, but is not distracted by the tension of the calf muscles to maintain the starting position.
Description step by step:
- Starting position: the feet are secured under special bolsters, the hands are placed on the back of the head, the back is pressed against the bench.
- The body is lifted from the starting position without rounding the back. At the top point of the exercise, the elbows try to touch the knees.
- Then they return to the bench, completely relaxing their arms and back.
According to many experts, this movement is dangerous for beginners who have not fully learned to control their body. If you deviate your body or create an incorrect amplitude, there is a high risk of injury to the spine or muscle strain.
What are the benefits of performing situps?
Plank exercise for men: benefits, how to do it, technique, frequency, reviews.
real before and after photos! When performing situps, the athlete loads the entire array of abdominal muscles, since the amplitude of movement here is quite large. The load falls on the rectus abdominis muscle (with an emphasis on the upper part), and the oblique abdominal muscles and spinal extensors are also statically tensed.
When I say hard, I mean really hard workouts. After several complexes containing situps, sometimes it is simply difficult to get up from the floor and restore your breathing, and pain in the abdominal muscles will remind you of this exercise for at least another couple of days, even if you have been training for several years.
What is crazy drying?
How to do a plank correctly? competent technique for performing effective exercises
This project was created for those who dream of gaining a slim, beautiful body, but at the same time lack motivation. The show is directed by Vasily Smolny, for whom this is both a job and a favorite thing, based on his personal experience.
An important component of losing weight while cutting fast is nutrition, which is based on the principles of a healthy lifestyle, and involves calculating proteins, fats and carbohydrates in a special way. Participants complete weight loss tasks for a month. Anyone who fails to cope with them may be thrown out of the project, and this is the main incentive for them. Each section is offered up to 25 different load programs and 4 types of nutrition. So every day will be
The show offers proper and balanced weight loss. Of course, not everyone can and is ready to become direct participants in the project, so many perform crazy drying tasks every day at home, and if all the rules are followed, they get excellent results.
Loads during crazy drying are not so simple, so you need to get examined and make sure that they are not contraindicated for you.
First week
Let's look at the crazy drying tasks for every day in the first week.
Each day includes four circuits of six exercises. Rest between circles should be one minute.
- 20 squats;
- 10 push-ups;
- 20 hyperextensions;
- 5 burpees;
- 25 sit-ups;
- plank – 1 minute.
On Monday, circuit training and a special task are performed - 700 squats. Of course, they need to be done not at once, but throughout the day.
On Tuesday, circuit training is supplemented with 300 push-ups, on Wednesday – 600 jumping lunges with alternating legs (300 on each leg), on Thursday – 200 burpees, on Friday – 1000 repetitions of the “climbing” exercise.
On Saturday there is no circuit training, but the project participants complete the take-off task - 1.5 minutes of burpees. Sunday is rest.
Second week
Let's move on to the tasks for each day of the second week of crazy drying.
On Monday, circuit training is done - 5 circles with a rest of 1 minute, which includes the following exercises:
- 15 push-ups;
- 20 jump squats;
- 50 jumping jack;
- 50 climbers;
Plus in the evening an additional task - 60 burpees without a break.
Tuesday
The first part is three circles with a minute break, including the following exercises:
- 10 burpees;
- 30 sit-ups;
- 20 squats.
The second part is five circles with a rest of 30 seconds, which include:
- 15 push-ups;
- 30 seconds plank.
The task for the evening is a high chair, Tabata 8 circles 30/30 (30 seconds activity, 30 seconds rest).
Wednesday
Part 1 – 5 circles with a minute break, including the following exercises:
- 20 jumping jack;
- 10 burpees;
- 10 jump squats.
Then rest for a minute and proceed to the second part. It will include six circles without rest with the following exercises:
- 30 seconds plank;
- 30 seconds high chair.
The task for the evening is 100 burpees.
Thursday
Five circles with a one-minute break, consisting of the following exercises:
- 15 push-ups;
- 20 squats;
- 10 triceps push-ups;
- 20 sit-ups;
- 50 climbers.
In the evening you need to do 10 minutes of planks, keeping it to 20 minutes in total.
Friday
Part 1: 5 circles with a one-minute rest from the following exercises:
- 40 jumping jack;
- plank -30 seconds.
This is followed by a two-minute rest and five one-minute circuits consisting of the following:
- 20 squats;
- 40 climbers.
Then rest for two minutes. The third part is 1 exercise, 4 circles, tata 30/30, burpee.
The task for the evening is 100 lunges for each leg.
Saturday
The challenge is 1 minute of the chair exercise and two minutes of burpees.
What is a crossfit program
CrossFit is a very intense, functional training that is based on functional movements that are constantly varied and performed at high intensity. CrossFit is based on the method of interval and circuit training.
Below is an example of an outdoor CrossFit training program that is performed with your own body weight and does not require additional equipment. This complex is intended only for girls, training your legs, buttocks and so that you are fit, dry, resilient and strong. With the help of the CrossFit program, we develop all 10 physical qualities of a person. The meaning of CrossFit is the rejection of specialization, a person must perform well all types of physical activity - weightlifting, weight training, cardio training (running, rowing, cycling), and you must also be dexterous, accurate, have good coordination, balance and endurance.
This complex will be without equipment, and it is aimed at training the cardio-respiratory system, training endurance, strength, speed, coordination and balance. We will combine cardio exercises - running with 10 repetitions of burpees. The burpee is an exercise we took from the military.
We use the circuit interval training method in CrossFit. We perform the exercises without rest (if you are prepared), if you are just at the beginning of your sports journey, then you can rest between exercises from 1 minute to 2 - 3 minutes. It is advisable to reduce your rest as you prepare.
We perform the exercises one after another, you cannot jump over exercises (perform the next exercise if you have not completed the previous one). We perform 1 intense circle.
Features and benefits of sitap exercise
Sit up (from the English “Sit up”) is an exercise to strengthen the abdominal muscles. In CrossFit, this exercise is often performed in the classic version, in which the body is fully lifted from the floor and ends with the palms touching the feet. The exercise not only strengthens the abdominal muscles, but also trains explosive strength, which CrossFitters need when performing a large number of exercises.
The exercise is quite simple technically, even a beginner can perform it. But there are also variations of sit-ups that complicate the technique and the load on the muscles of trained athletes. Depending on the chosen option, you can focus the load on the abdominal muscles and select a suitable load.
The exercise is often used in complexes aimed at developing endurance and speed, so sit-ups are combined with running or jumping rope for thirty seconds, and so on for 20-30 minutes. This aerobic exercise also helps burn fat, so the exercise can be used for weight loss.
Rules and features
The phrase “sit up” is literally translated from English as “sit down” and “rise.” CrossFit experts consider the sit-up to be on par with core abdominal strengthening exercises such as leg raises and abdominal crunches.
The sit-up is a classic exercise designed to strengthen and develop the rectus abdominis muscle. According to modern coaches, the exercise is part of the main set of standards that people become familiar with during school physical education lessons.
Sit-up exercise for abs
Regular implementation of the complex provides the following results:
- develops and dries the abdominal muscles;
- strengthens quadriceps;
- strengthens the back muscles involved in raising and lowering the body.
There are several options for implementing the complex. This is a classic approach that is performed according to the scheme, as well as alternative options with different hand positions and alternative body positions. In addition, sit-ups can be performed with weights.
This approach is not recommended for beginners, who are advised to move from standard complexes to more complex movements gradually.
People who want to pump up their abs, but experience discomfort when performing exercises from a position lying on the floor, can use an incline bench. In this case, the result will take longer to achieve, but this technique will relieve the back, which is especially important for those who have limited movements for medical reasons.
When performing the complex, different muscle groups work, but the main muscle involved remains the rectus abdominis muscle. The work includes oblique and transverse stabilizers, as well as quadriceps and back muscles. If there are weights, the deltoids and biceps of the arms are worked out.
Choose the best exercises
Say “pump up your abs,” and everyone immediately thinks about the fold, or Sit Up. Perhaps because they did it at school during physical education. This exercise really works the rectus abdominis and obliques, but there are more effective options.
The American Council on Exercise proved this in the American Council on Exercise (ACE)-sponsored Study Reveals Best and Worst Abdominal Exercises using electromyography (EMG). Using special sensors, the level of muscle activation was measured in participants performing popular abdominal exercises and found out which movements were the most effective.
Replace the tuck with these exercises, and you'll need to do fewer reps to fully engage your abs.
Bike
Lie on the floor on your back, put your hands behind your head, lift your legs off the floor. Pull your knee towards the opposite elbow, do not lower your feet to the floor until the end of the approach.
Captain's Chair Leg Raise
Photo: Alexander Starostin
Hang from the captain's chair or boxes and lower your shoulders. Pull your knees to your chest and tilt your pelvis back so that the person standing opposite can see your entire butt. Return to starting position and repeat. This movement will help pump up your lower abs properly.
If your gym does not have the necessary exercise machine and high boxes, you can do hanging knee raises to the horizontal bar.
Photo: Alexander Starostin
Crunches on a fitball
Lie with your back on the ball, bend your knees and place your feet on the floor. You can hold your hands in front of you, put them behind your head, or straighten them above your head.
To make the exercise really challenging and effective, push your pelvis up and squeeze your buttocks before starting. This way you will eliminate the movement of your hips, and the entire load will go to the abdominal muscles.
Crunches with legs raised
Lie on the floor on your back, raise your legs to a right angle at the hip joint, you can slightly bend your knees. Do not put pressure on your head with your hands, twist as you exhale, and do not lower your legs to the floor until the end of the exercise.
Lying reverse crunches
Lie on the floor on your back, place your hands under your pelvis. Tear it off the floor and put it back. Maintain tension in your abdominal muscles until the end of the exercise.
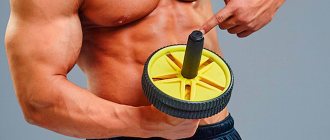
Rolling exercise
Probably the most popular option is the ab roller exercise. You can also work on special machines or using a regular barbell with weights.
Get on your knees, grab the handles of the roller, roll it forward and return to the starting position.
It is important not to bend your lower back during the exercise, keep your abs tense all the time and move only in the range that your muscles are capable of. When done correctly, this exercise is safe and extremely effective.
Pros and cons of the sitap technique
Regular practice of sitap will be rewarded with elastic, toned muscles of the abdomen, back and thighs. No bulky exercise equipment or expenses for purchasing a gym membership. The maximum that may be needed is a barbell, dumbbells or weights, and then only at advanced stages of training.
Remember: doing abs strengthens muscles, and does not get rid of fat deposits in problem areas.
However, despite all the positive aspects, the list of contraindications for performing any sitapa options is very long :
Pathologies in the functioning of the cardiovascular system, including hypertension, heart attacks, cerebrospinal circulation disorders.
Diseases and malformations of the musculoskeletal system, in which the spine and hip area deserve special attention.
Disease of the thoracic and abdominal organs, including destructive changes in the tissues of the lungs and digestive organs with the risk of intracavitary bleeding.
The period of postoperative and post-traumatic rehabilitation without prior consultation with a doctor.
So we answered the question “what is a sitap”. It is an important addition to a comprehensive exercise program. As part of CrossFit training, if you follow a proper diet and diet, this exercise will also help you lose weight.
Watch the technique in the video:
Sit-up is usually considered a CrossFit exercise, but in fact, we all did its classic version at school - it was a mandatory standard, and also for a while, performing as many repetitions as possible. CrossFit complex exercises (WOD) are performed quite impulsively, without focusing on the muscles, as with strength training. Let's look at the benefits of this type of exercise and its style, as well as how the sit-up can be adapted to strength training for relief and mass gain.
Why are they needed?
The sit-up is an exercise that helps make your abs sculpted and straight. As a rule, this movement is started when the body is already sufficiently trained and can cope with the loads. Raising and lowering the body from a horizontal position is associated with certain difficulties.
You can perform this exercise in the following cases:
- if desired, pump up your abdominal muscles;
- to get a sculpted abdominal area;
- to strengthen the back muscles;
- as one of the basic exercises that allows you to proceed to further, more complex complexes.
When performing the classic sit-up, which is the basis of other exercises, you must follow the general recommendations:
- while squatting and returning to the starting position, the back should remain straight;
- the head should remain in line with the line of the spine, tilting or tilting the head to the side is excluded;
- when performing alternative sit-up options, you must adhere to the rule of gradually increasing the load;
- when the body is raised, the feet are left pressed tightly to the floor;
- the average number of repetitions varies from 10 to 15 times, the number of approaches is 2 or 3.
In addition, it is important to follow the general rules that apply to any physical activity. You cannot start a set of exercises aimed at pumping up the abdominal muscles without first warming up or stretching.
You cannot start exercising earlier than 1-1.5 hours after eating. During classes, it is necessary to maintain a drinking regime.
Week schedule
Sit-up is an exercise that is included in daily workouts.
The lesson schedule is drawn up in advance with the trainer to take into account all the nuances.
| Day of the week | Number of exercises and approaches |
| Starting training – Monday | Starting classes with 10 sets |
| Tuesday | 2 reps x 10 sets |
| Wednesday | 3 reps x 10 sets |
| Thursday | 10 approaches |
| Rest – Friday | — |
| Saturday | 2 reps x 10 sets |
| Rest – Sunday | — |
In addition to sit-ups, the set of exercises should include techniques aimed at developing a variety of muscle groups. To move on to more complex variations of the classic sit-up, you need to learn to control your body and eliminate the possibility of losing balance.
Another schedule option involves combining different options for the sit-up exercise at the stage when the athlete is sufficiently prepared for the variable execution:
- 10 approaches according to the classic scheme with 2 repetitions.
- 10 approaches with weights, 10 approaches according to the classical scheme with 2 repetitions.
- 10 sets on an incline bench, 3 reps.
- Rest.
- 10 approaches according to the classical scheme with 3 repetitions.
- Rest.
- Rest.
As a rule, it is customary to alternate exercises of the classical type with other options for performing sit-ups. If an athlete trains on an incline bench, then he almost never returns to the classic version. Weights are used when, in addition to the load on the abs, they want to load the muscles of the arms.
Exercise every day
The rectus abdominis and oblique muscles are very durable and recover quickly. You can train your abs every day and reap only the benefits from it - beautiful abs and a strong core, which is necessary for good balance and impressive results in any difficult exercises.
Select one or two exercises from the list and perform them daily for three approaches with maximum tension. Alternate between different types to challenge your muscles in a new way and give them a stimulus to grow.
And don't forget to add movements that train the back extensors - hyperextensions or "Superman" on the floor. Strong abs combined with weak back extensors can ruin your posture.
Harm and contraindications to sitap exercise
The exercise technique involves speed and complete twisting of the torso, as well as full contact of the spine with the floor at the lowest point of the movement. This technique is potentially dangerous, since when jerking or suddenly falling down, the athlete can get injured or cause back pain. Therefore, those who are unprepared should not perform the exercise for a while, but on the contrary, work the muscles more consciously and concentratedly, paying more attention to technique.
Accordingly, all diseases, injuries, inflammations of internal organs, the spine and the muscles of the back and abdomen are contraindications for performing sit-ups. Of course, this exercise is also contraindicated for pregnant women.
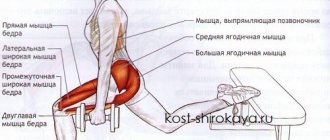
What muscles work
The exercise strengthens the rectus abdominis muscle, since it is this muscle that is subject to dynamic load; the external oblique muscles are auxiliary when lifting, as are the back extensors.
When performing sit-ups with weights, the deltoid muscles are additionally activated .
Common mistakes when doing the exercise
The most common mistakes that beginners make:
Initial training with increased loads. Beginners are strongly advised not to start performing the exercise with a large number of repetitions and approaches. The abs should strengthen and tone up. Excessive stress will lead to sprains and injuries to the back and pelvis. Sudden movements. Many beginners believe that the sharper the rise of the body, the stronger the abs will be strengthened. It's not like that at all. On the contrary, the chance of injuring the spine and pelvis increases by 30-40%. Movements should be smooth
All attention should be concentrated on the press
If you decide to take up the Sitap exercise, be sure to first visit a sports club to see for yourself how professional trainers do it correctly. You should begin performing various variations of the exercise only after the basic technique has been fully mastered and ceases to produce tangible results.
Contraindications and possible harm
The “Sit-up” exercise has absolute contraindications. This is due to both the characteristics of performance and health requirements.
You cannot exercise if you have the following conditions:
- presence of spinal injuries;
- inflammatory diseases of internal organs, especially for diseases such as ulcers, pancreatitis, cholecystitis;
- back muscle sprains and injuries
As a result of performing a set of exercises, the situation with injuries may worsen. Tension of the abdominal muscles in the presence of an ulcer often leads to exacerbation and development of pain.
Exercise 3. Corner / L-SIT
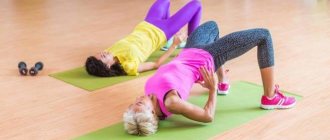
Like the bridge, the corner demonstrates the ideal balance of strength and mobility in the back and front of the body. This is an exercise that requires no equipment at all, but can still be a serious challenge. The corner works: the pecs, lats, abs, quadriceps and triceps, providing stretching for the back and thighs.
Start sitting on the floor with your arms flat, slightly wider than your pelvis. Then put your body weight on your palms, lift your legs off the floor parallel to it, so that your body visually resembles the letter L.
If you don't have the strength to do a full corner, starting with your knees close to your chest will make it much easier. Also, for beginners, support under the arms will help, for example, doing a corner on the uneven bars. You can make the exercise more difficult by raising your straight legs above parallel to the floor, so that your body follows the shape of the letter V.
Use it all together
Each movement has its own more complex or easier variations, you can combine them as you wish.
Here's a sample workout for a beginner with easy variations of five exercises. And don't forget about rest between workouts.
Bodyweight training for beginners:
- Single leg squats with support from behind. 2 sets of 10 repetitions on each leg;
- Not a full bridge. Two sets of 20 seconds;
- Corner with knees pressed to chest. Two sets of 20 seconds;
- Handstand with wall support. Two sets of 20 seconds;
- Australian pull-ups. 2 sets of 10 reps.
Advanced Bodyweight Workout:
- Single leg squats. 3 sets of 10 repetitions on each leg;
- Bridge. 3 sets of 30 seconds.
- Corner. 3 sets of 30 seconds.
- Handstand. 3 sets of 30 seconds.
- Pull-ups. 3 sets of 10 reps.
Original
Other articles by Al Kavadlo:
- How to Train for One-Arm Pull-Ups
Technique for performing the Sit-Up exercise
Naturally, miracles do not happen. It is impossible to solve any of your problems with a genie lamp or a letter to Santa Claus. However, the problem of excess weight can be solved efficiently, quickly and, of course, free of charge, with the help of a simple sit-up exercise. This article will discuss exactly this.
When performing a sieve exercise, the muscles of the upper abdominal area are primarily tensed. As with any other physical exercise, to achieve the desired result, you must perform this procedure correctly and regularly. If you do this occasionally from time to time, unfortunately, no effect will be achieved.
The sit-up is one of the main exercises that are part of CrossFit training. There are several types of it, which are based on the amount of load, as well as the number of muscles involved.
If the level of a person’s daily muscle activity tends to zero, in other words, if for a long time you have not performed any regular sports and crossfit exercises, then it is best to start with the classic version:
- Starting position: lying with your back on the floor. Legs should be bent at the knees and feet resting on the floor. Arms crossed on chest. This position, as much as possible, reduces the load on the back, as well as on the still weak abs.
- Lifting the upper body occurs due to the tension of all external and internal oblique abdominal muscles. The end point is the chest touching the knees. That is, in a sitting position on the buttocks.
- When your shoulder blades leave the floor, you need to point your arms forward and touch your feet with them.
- The breathing technique when performing sitap is no different from breathing when performing any other physical exercise. That is, lifting the body is accompanied by exhalation, returning to the starting position is accompanied by exhalation.
After each iteration of the sitap, it is necessary to provide a five-second relaxation. It is best to do this crossfit exercise until you feel slight fatigue, as well as slight pulling sensations in the abdomen. You should not do a large load right away; it is best to increase it gradually. This way you will get rid of possible overexertion, injuries, and muscle pain.
When to expect the effect
The sit-up is the basis of many CrossFit exercises. If you learn how to correctly perform the classic version of the sit-up, then mastering the auxiliary techniques will be much easier.
The final outcome of the training depends on how the technique is followed. During training, beginners make typical mistakes that keep them from getting perfect abs.
List of errors:
- Knee position. Changing the direction of the knees inward is strictly prohibited; they must be parallel to the feet, otherwise overload of the joints is possible.
- Incorrect position of the buttocks and pelvis. The main condition is complete pressing of the pelvis into the floor or bench. If you constantly change your position, the result will not be achieved.
- Head position. When throwing back or moving the head to the side, the athlete strains the neck, this often leads to stretching of the muscles of the cervical spine.
- Maintain proper breathing. All lifting movements are done while exhaling; descending must be done while inhaling. If you do not follow the basic rules of breathing, you can end up with a complete imbalance of all systems.
Sit-up abdominal exercise with a kettlebell
In addition to the listed mistakes, it is important to avoid using inappropriate shoes during exercise. You cannot play sports in open shoes or slippers with thin soles. Classes are carried out in sneakers for the reason that the sole of sports shoes provides reliable fixation of the feet during exercises.
The first results, provided that you practice regularly, appear within 2-3 weeks. By this time, the body gets used to the stress, the muscles adapt, and the pain goes away. First, the area being worked on becomes more elastic and dense, then the muscles tighten and gain definition.
Everyone who is just starting to engage in sit-ups in their training is faced with the fact that after a few weeks of noticeable progress, the results suddenly stop. This is a common occurrence that requires adjustment.
It is better to change the class schedule taking into account your own preferences. For mandatory performance, you should reserve those exercises that work best. There is no need to increase the number of repetitions or approaches, or deprive yourself of rest. This will get you nowhere.
The sit-up exercise is a classic technique that is used in any training. Correct execution leads to effective pumping of the upper and lower abdominal muscles. In addition, a sit-up with weights or an incline helps to work the back muscles, as well as the deltoid muscles in the arms.
Exercise options
Sitap with weights
Classic situps can be performed with weights, for example, a light weight plate. To do this, you need to hold the pancake at the edges above the chest with both hands.
As you exhale, it is important to rise up so that your hands gradually lift the pancake above your head as you twist. There is no need to bend your elbows
It is important to keep your arms with the weight in a vertical position at all times. And as you inhale while lowering, be sure to keep your arms vertical.
V-sitap or book
This option involves simultaneously lifting the torso and legs. In this case, a fold is performed in which the torso and arms rise upward from behind the head, and the legs straight at the knees rise towards. The hands at the top point tend to touch the feet. Then you need to smoothly lower your legs and back to the floor at the same time, placing your hands behind your head.
The exercise works the rectus abdominis muscle completely; if the classic exercise loads the upper part more, then the book also loads the lower part. The technique requires good balance and body control.
Sit-up on an incline bench
The exercise is performed on a special inclined bench or Roman chair. It is necessary to fix your feet under special bolsters, completely lower yourself onto your back, placing your hands behind your head.
Then it is important to lift your back off the bench, maintaining a vertical position of the spine. Without rounding your lower back
At the top point, you need to keep your back vertical, aiming your palms towards your feet. The reverse movement is also performed with a straight back; at the lowest point, you need to completely lay your spine on the bench and move your arms back.
In my opinion, this exercise is quite dangerous and contradicts the safety goals of spinal twists, which require rounding the back. When leaning back, the athlete may not calculate the angle and strength of the abdominal muscles and overextend the spine, thereby exposing it to a strong traumatic load. For safety reasons, it is better to perform regular crunches.
Tips and tricks for implementation
- Should not be performed on a full stomach.
- Despite the “explosive” nature of the exercise, the movements should not be too sudden.
- The number of lifts should increase gradually but constantly. After completing 10 lifts in one approach, you can take a two-minute rest break. In total, increase the number of approaches to three, and lifts to 30.
The exercise, although simple, requires a lot of tension, so there are many contraindications:
- Diseases of the cardiovascular system.
- Diseases of organs located in the abdominal cavity and chest.
- Previous spinal injuries and diseases.
- Rehabilitation after surgery and acute illnesses (flu, severe colds, etc.).
Add a comment Cancel reply
You must be logged in to post a comment.
How do I get my baby to sit up?
As soon as he holds his head up well, you can help encourage your baby to sit up in a few different ways:
Prop him up in an infant seat, stroller or your lap.
Sitting up with support in the stroller while you take a neighborhood walk is an especially good way to develop your baby's interest in sitting. As you walk, point out all the new things he can see from his upright position, from dogs and cars to passersby and other babies in strollers.
Give him something to hold onto — and a cushion to break any falls.
The more practice your baby gets sitting with help, the more likely he is to try sitting up on his own without a pillow or a grown-up's hands to support him. To steady his wobbly sense of balance, roll a ball and play catch while you're both sitting, or hold his hands and sing a song, gently swaying to the rhythm.
As he's learning to sit, keep him on a blanket or activity mat to cushion any tumbles, and sit close by so that you can catch him if he topples over backward.
Use toys as an incentive.
Try placing a toy in front of your baby's feet while he's sitting, and he may end up propping himself up on his hands as he plays with it. You can also place a toy near the top of his feet to get his attention. Then lift the toy up to his eye level. He'll reach for it while sitting up — and may even be able to stay seated on his own while he plays with the toy in his hands.
Cuban press with dumbbells
The history of this exercise is not connected with any one strongman, but in general with Cuban weightlifters of the middle of the last century. This press, in addition to working the anterior and middle deltoids, helps strengthen the muscles of the rotator cuff.
This is very important for the prevention of injuries to the shoulder joint, since it is the rotators of the shoulder and their ligaments that suffer most often (especially from overhead presses, we wrote about this here)
Execution order:
- Stand up straight with dumbbells in straight arms at your sides.
- The first phase of the movement is similar to a wide-grip barbell row - you need to raise the dumbbells to the side by raising your elbows until your upper arm is parallel to the floor. The middle deltoid bundle works predominantly.
- In the second phase, you need to rotate the shoulder joints 180 degrees so that the dumbbells are at head level, as in the starting position for the shoulder press. So this is where the rotator cuff muscles work.
- In the third phase, you need to do a classic dumbbell press up. The load goes to the front delta. By the way, this is the most effective shoulder press.
- Return to the starting position in reverse order.
getstrong.fit
There is an option to perform it while sitting, as well as with a barbell. However, in any case, you do not need to take too much weight here.
Conclusion: The Cuban press can be used at the end of a shoulder workout or with a light weight as a warm-up. It is an excellent prevention of injuries.
Author Ivan Tungusov
Project expert. Training experience - 12 years. A good theoretical basis on the training process and proper nutrition, which I am happy to put into practice. Need a recommendation? This is for me