Municipal autonomous educational institution
"Secondary school" p. Gruzino
Methodological development on physical culture
Teacher Lugovskaya Lyubov Vasilievna
“Training technique for flexion and extension exercises
hands in support lying on the floor"
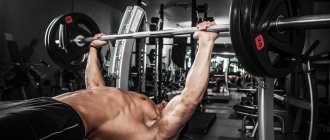
Bending and extending the arms while lying on the floor is one of the main strength tests of the upper shoulder girdle, and is also necessary for passing the GTO standards.
You must learn to perform this exercise right away correctly and without errors, since “relearning” is much more difficult than immediately developing a stable skill in performing this exercise.
Rules for performing the exercise “flexion and extension of the arms while lying on the floor”:
Initial position
: take a support position lying on the floor, arms shoulder-width apart, hands forward, elbows apart no more than 45 degrees; shoulders, torso and legs form a straight line. The feet rest on the floor without support.
Execution: student
, bending his arms, touches his chest to a foam cube 10-12 cm high; fixing the touch for 0.5 seconds. continues to perform the test.
Result
: the number of correctly performed flexions and extensions of the arms, recorded by the teacher (judge) in the starting position, is counted. A pause is allowed no more than 3 seconds.
Errors
: attempts are not counted if
1. the student touches the floor with his feet;
2. the student breaks the straight line - “shoulders - torso - legs”;
3. no fixation occurs for 0.5 seconds. from the starting position;
4. alternately straightening the arms;
5. there is no chest touching the cube;
6. The student spreads his elbows more than 45 degrees.
To successfully complete this exercise, regular and systematic practice is required. I recommend purposefully strengthening the desired muscle groups with the following exercises.
For students with poorly developed strength qualities, start with the most accessible options:
1.
Flexion and extension of the arms while standing on a windowsill (at home); table
(observing safety precautions); hanging crossbar (installed in a high position).
2.
Performing flexion and extension of the arms in support against a lower support: a chair, a gymnastic bench, a hanging crossbar installed in such a way that the student can take the starting position “lying support.”
3.
Performing the exercise in “lighter” conditions: flexion and extension of the arms while lying down with support on the knees (shins bent back, feet crossed), it is necessary to ensure that the torso and hips form a straight line; performing the exercise with your hands on the floor and your shins (or thighs) on a gymnastic bench, do not allow
"bending" of the body.
4.
Direct performance of flexion and extension of the arms in competitive conditions. From the starting position, lying on the floor. Watch how students bend their arms - you need to touch the foam cube with your chest.
5
. Performing the exercise in complicated conditions: bending and straightening the arms in support - hands on the floor, feet on a gymnastic bench, or on a sofa, chair (at home), performing the exercise with weights (additional weight) - a weighted vest, etc.; performing the “push-up” exercise on parallel bars while hanging, on cantilever bars (a special simulator that is part of many sports complexes).
6.
Performing the exercise with various positions of the hands: on the palms, on the “fists”, with support on the fingers; alternating hands - “fists”.
7
. Performing an exercise with additional elements: Clap after straightening and pushing with your hands from the support (it’s better to start with a higher one, and then gradually reduce the level of placing your hands). For example, you can start “claps” from a starting position standing against a wall, a table, a Swedish ladder, or a hanging bar. To successfully perform the “Push-up-clap” option, you need to push off intensively from the support and move your body from a lying position almost to a standing position. For students who do not have a sufficient level of speed and speed-strength data, THIS EXERCISE IS NOT RECOMMENDED. IN FROM The most difficult option is to perform 2 claps (at a more elevated support - hands on the support, feet on the floor). And performing a clap behind your back - alternating “push-ups” and clapping. This version of the exercise is available to the most prepared students who regularly attend classes at the Youth Sports School with appropriate strength training.
Main portals (built by editors)
reference Information
Documents • Laws • Notices • Document approvals • Contracts • Requests for proposals • Technical specifications • Development plans • Document management • Analytics • Events • Competitions • Results • City administrations • Orders • Contracts • Work execution • Protocols for consideration of applications • Auctions • Projects • Protocols • Budgetary organizations Municipalities • Districts • Education • Programs Reports
: • by references • Documentary base • Securities
Regulations
: • Financial documents
Resolutions
: • Categories by topic • Finance • cities of the Russian Federation • regions • by exact dates Regulations
Terms
: • Scientific terminology • Financial • Economic
Time
: • Dates • 2015 • 2016 Documents in the financial sector • in the investment sector • Financial documents - programs
How to do it: high bar hanging pull-up
The exercise is performed in gyms or open areas.
Each projectile must have:
- tables and chairs;
- a plate with the serial number of the projectile and the refereeing team;
- magnesia;
- sandpaper;
- cloth for wiping the neck of the crossbar;
- uneven-high benches (stepladder) for preparing the crossbar and allowing the participant to take the starting position;
- gymnastic mat under the crossbar to ensure the safety of participants.
Test technique
Pull-ups on a high bar are performed from the starting position: hanging with an overhand grip, hands shoulder-width apart, arms and legs straight, legs not touching the floor, feet together.
From a straight-arm hang with an overhand grip, you need to pull yourself up so that your chin is above the bar, lower yourself into a hang until your arms are fully straightened, and hold this position for 1 second.
The test is performed for the maximum number of times available to the participant.
The number of correctly performed pull-ups is counted, recorded by the judge’s count out loud.
Errors
Errors that result in the test not being counted:
- violation of the requirements for the starting position (incorrect grip of the hands, arms bent at the elbow joints and legs bent at the knee joints, legs crossed);
- violation of test technique;
- the chin of the person being tested is below the level of the bar;
- fixation of the initial position for less than 1 second;
- pulling up with jerks or using swinging legs (torso);
- clearly visible alternate (uneven) bending of the arms.
Education and science
Science
: Tests • Scientific and technological progress • Pedagogy • Work programs • Faculties • Methodological recommendations • School • Vocational education • Student motivation
Subjects
: Biology • Geography • Geology • History • Literature • Literary genres • Literary characters • Mathematics • Medicine • Music • Law • Housing Law • Land Law • Criminal Law • Codes • Psychology (Logic) • Russian Language • Sociology • Physics • Philology • Philosophy • Chemistry • Jurisprudence
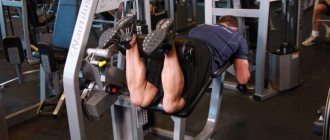
How to do it: bending and straightening your arms while lying on the floor
Testing is carried out in a gymnastics (sports) hall or on a universal sports ground. The testing area must be fenced off with tape so that no one interferes with the test taker in achieving the maximum result.
Bending and extension of the arms in a lying position is performed from the starting position: lying on the floor, arms shoulder-width apart, hands forward, elbows spread no more than 45 degrees relative to the body, shoulders, torso and legs form a straight line. The feet rest on the floor without support.
The number of correctly performed cycles consisting of flexion and extension of the arms, recorded by the judge’s counting out loud or using special devices (electronic contact platforms), is counted.
Bending your arms, you need to touch your chest to the floor or a contact platform 5 cm high, then, straightening your arms, return to the starting position and, having fixed it for 1 second, continue performing the test.
Errors
Errors that result in the test not being counted:
- violation of the requirements for the initial position;
- violation of test technique;
- violation of the straight line “shoulders - torso - legs”;
- lack of fixation for 1 second in the initial position;
- exceeding the permissible angle of elbow extension;
- multi-simultaneous extension of arms.
Business and finance
Business
: • Banks • Wealth and prosperity • Corruption • (Crime) • Marketing • Management • Investments • Securities: • Management • Open Joint Stock Companies • Projects • Documents • Securities - control • Securities - valuations • Bonds • Debts • Currency • Real estate • (Rent) • Professions • Work • Trade • Services • Finance • Insurance • Budget • Financial services • Loans • Companies • State enterprises • Economics • Macroeconomics • Microeconomics • Taxes • Audit Industry
:
• Metallurgy • Oil • Agriculture • Energy
Construction
• Architecture • Interior • Floors and ceilings • Construction process • Building materials • Thermal insulation • Exterior • Organization and production management
Photo blogs
Art
• Children's creativity • Paintings • Art • Congratulations • Film review • Musical world • Russian rock
World
• People of the world • The world around us • My homeland is the USSR • Nature Channel • Stones and minerals • Cooking, food • Construction and architecture • Under construction • Transport • Weapons • Military transport
beauty
• Fashion Pandia.ru • Girls and Girls
School
• Tests for the Unified State Exam • Solver books • Unified State Examination • 10th and 11th grades • Various textbooks • 4th grade • Russian language grades 5-9 • 5th grade • 6th grade • 7th grade • 8th grade
Wisdom
• Cliparts • Quotes
Author Directory (private accounts)
AutoAuto service • Auto parts • Products for auto • Auto repair centers • Auto accessories • auto parts for foreign cars • Body repair • Auto repair and maintenance • Car chassis repair • Auto chemicals • oils • technical centers • Gasoline engine repair • auto electrical repair • Automatic transmission repair • Tire fitting BusinessAutomation of business processes • Online stores • Construction • Telephone communications • Wholesale companies LeisureLeisure • Entertainment • Creativity • Catering • Restaurants • Bars • Cafes • Coffee shops • Night clubs • Literature TechnologiesAutomation of production processes • Internet • Internet providers • Communications • Information technologies • IT companies • WEB studios • Website promotion • Software sales • Switching equipment • IP telephony | InfrastructureCity • Authority • District administrations • Courts • Utilities • Teen clubs • Public organizations • City information sites The sciencePedagogy • Education • Schools • Training • Teachers GoodsTrading companies • Trade and service companies • Mobile phones • Accessories for mobile phones • Navigation equipment |
How to do: hanging pull-up while lying on a low bar
Pull-ups on a low bar are performed from the starting position: hanging face up with an overhand grip, hands shoulder-width apart, head, torso and legs in a straight line, feet together, heels can rest against a support up to 4 cm high.
The height of the crossbar bar for participants of stages I - IX is 90 cm along the upper edge.
In order to take the starting position, the participant approaches the bar, grabs the bar with an overhand grip, squats under the bar and, keeping his head straight, places his chin on the bar of the bar. Then, without straightening your arms and without lifting your chin from the bar, stepping forward, straightens so that your head, torso and legs form a straight line. The assistant referee places a support under the competitor’s feet. After this, the participant straightens his arms and takes the starting position.
From the starting position, the participant pulls himself up until his chin crosses the bar of the crossbar, returns to the starting position, fixing it for 1 second. and continues the test.
The number of correctly performed pull-ups is counted, recorded by the judge’s count out loud.
Errors
Errors that result in the test not being counted:
- violation of the requirements for the starting position (incorrect grip of the hands, arms bent at the elbow joints);
- violation of test technique:
- the pull-up is performed in violation of the straight line “head - torso - legs”;
- the test subject’s chin did not rise above the bar;
- clearly visible alternate (uneven) bending of the arms.
- lack of fixation for 1 second in the initial position.
Basic mistakes
Due to lack of experience and poor physical preparation, many beginners often make the following mistakes:
- Arched lower back.
- Multi-time extension of arms.
- No pause of 0.5 seconds at the top.
- Lack of a straight line “shoulders - torso - legs”.
What's wrong with mistakes? Firstly, push-ups performed with such critical errors are simply not counted when passing the standards. Secondly, they significantly reduce the effectiveness of the exercise if you have set yourself the goal of pumping up muscles.
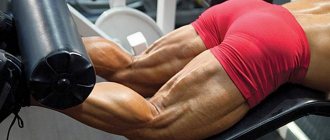
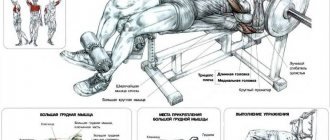
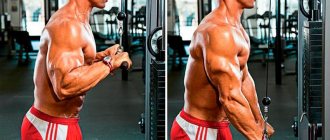
A very important detail: the position of your hands determines which muscle group will receive more load. With a wide stance, the pectoral muscles receive the main load, and with a narrow position, the triceps work more.
Features of the exercise
Wrist flexion is provided by small, deeply located muscles of the same name - wrist flexors. The antagonists are, respectively, extensors. Together they provide mobility of the hands, and with proper development, together with the brachioradialis muscle, they give the forearm a characteristic volume and relief. Also, when training the forearms with weights, the finger flexor muscles, which provide grip strength, are stressed.
In everyday life, we make quite a lot of movements with our hands, however, this is not enough for the level of muscle development required by an athlete.
Wrist flexions and extensions are performed with the maximum number of repetitions and approaches. You can use a special cabinet, stand, bench, or your own thighs as support. The weight should be light (the muscles are quite small). You can use:
- A barbell or an empty bar.
- Dumbbells. In this case, it will be more convenient to train the right and left hands in turn.
- An expander that can be secured near the floor.
- Any other weight that is at hand (for home training).
A contraindication to performing wrist flexion and extension is the presence of recent injuries in this area.
Basic and starting points
The main stance is a vertical position on one or both legs (Fig. 28).
Rice. 28
Legs apart - in this stance, the feet are positioned in the same way as in the main stance, but the legs are spaced a step apart (shoulder-width apart) (Fig. 29).
Rice. 29
Wide stance with legs apart - a stance in which the legs are spread wide apart; there should be additional instructions about the position of the hands, if they are not down.
Narrow legs apart - a stance in which the legs are spaced apart half as much as in the legs apart (Fig. 30).
Rice. thirty
Right leg stance - a stance in which the right leg is one step ahead of the left. This stand can be wide or narrow, which should be indicated (Fig. 31).
Rice. 31
A crossed (crossed) stand, in which one leg is crossed in front of the other and touches the knee of the supporting leg, the feet are parallel, at a distance of 10-15 cm. When named, the word “Front” is omitted, for example, a right crossed stand, if the right leg is in front of the left ( Fig.32).
Rice. 32
Closed stance – a stance in which the feet are closed (Fig. 33).
Rice. 33
Spread heel stance - a stance in which the toes are closed. And the heels are spread apart (Fig. 34).
Rice. 34
All of these racks can be performed on the toes, or one on the toes, another on the entire foot, as well as on the heels or one on the heel. In these cases, add the words to the main name of the stance - on the toes, on the heels, right (left) on the toe, right (left) on the heel.
When naming a stand on one leg, it is enough to indicate, for example: “Stand on the right.” Additionally, the position of the other leg, torso or arms is determined (bend the left arm forward, the left arm to the side, the right arm bent upward).
Stands with bent legs are called as follows:
Kneeling stand is a stand in which the knees, shins and toes rest on the floor (projectile) along their entire length, the toes are extended (Fig.), when performed from the main stance or from a closed stance by lowering, bending the legs, no instructions on the method of execution are required ( Fig. 35).
Rice. 35
Stand on the right (left) knee - with the usual method of execution, one leg is raised and, bending, moved back. At the same time, the other leg bends, lowering to the knee so that the thigh of the supporting leg and the shin of the other (located in front) are perpendicular to the floor (support) (Fig. 36). A different position of the legs or method of execution is indicated. For example: step right, stand on the left knee, hands behind the head (if it is performed in a step forward). The position of the hands, if they are not below, is indicated additionally. For example: left forward-upward, right side-to-back (or back-down).(1-35)
Rice. 36
Squat – position of the occupant in which the legs are bent (support on the toes), arms in any position (Fig. 37). Performed from the main stance by fully bending the legs. The position of the legs on the entire foot should be indicated additionally.
Rice. 37
There are:
Knee squat (oblique) - a squat in which the hips, torso and head are in one straight line. The position of the arms, if they are not along the body, should be indicated additionally. For example: arms forward (Fig. 38).
Rice. 38
Round squat (half squat) - squatting on your toes, knees together, torso bent forward, arms forward, head down (Fig. 39).
Rice. 39
Squat on the right (left) - a squat performed on one leg, the other raised forward, hands on the belt (Fig. 40-a), and a different position of the leg and arms is indicated additionally. When performed with hands grasping the ankle joint of the free leg, it is called “Squat on the left with a grab” (Fig. 40-b).
Rice. 40
Spring squat (spring) - a squat performed with additional springing movements after slight extension of the legs followed by full flexion.(1-37)
Lunge – performed by extending the leg in any direction while simultaneously bending it. The body remains vertical, the head is straight (Fig. 41).
Rice. 41
According to the direction of movement there are:
Lunge of the right (left) - putting the leg forward while simultaneously bending it so that the knee is at the level of the toe, and the foot of the other leg is slightly turned with the toe outward.
Lunge to the right (left) – moving the leg to the side. The feet maintain the position of the main stance.
Back lunge (or back-out, inward, etc.) – putting the leg back. if necessary, indicate the leg. For example, a lunge with the right back (Fig. 42). Additional guidance is needed for other areas. For example: left lunge to the right (or right-forward, etc.).
Rice. 42
Types of lunge:
Oblique lunge (oblique) - a lunge in which the torso is tilted to the side (forward or backward) in the direction of movement and forms a straight line with a straight leg. Usually the arms are raised up (Fig. 43). A different hand position is indicated additionally. Rice. 43
Lunge with a tilt - combining a lunge with a simultaneous tilt of the torso forward, arms crossed freely in front of the knee of the exposed leg. For example: lunge to the left (right) with a tilt (Fig. 44).
Rice. 44
Deep lunge - a lunge with maximum leg extension. The position of the arms and torso is indicated additionally. For example: deep lunge with the right, arms to the sides and back (Fig. 45). (1-38)
Rice. 45
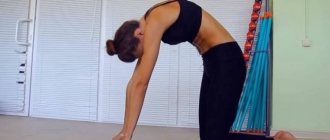
Bend – bending the body in any direction. When tilting your head, always add the word “heads”, such as tilting your head to the right.
There are:
Bend is a term used to define the bending of the body at the hip joints forward, backward, or sideways through a full range of motion. When performing forward, the direction indication can be omitted. For example: tilt (Fig. 46).
Rice. 46
Straight body tilt is a tilt in which the body maintains a straight position. For example, from a stand with your legs apart (forward) (Fig. 47-a) or from a stand on your knees - bend back with a straight torso.
Bend over - usually performed forward, arms to the sides, head raised (Fig. 47-b).
Anterior-downward tilt is a tilt in which the torso is tilted at an angle of 45° below the horizontal (Fig. 47-c).
Half -inclination is an inclination in which the body is tilted 45° above the horizontal (Fig. 47-d).
Rice. 47
Bend with grip - bend forward, in which the hands grab the ankle joints with pulling (the shins) from the outside (Fig. 48).
Rice. 48
Touching tilt - bending backwards, in which the hands touch the floor (Fig. 49). Can be performed with one hand touching the floor. In this case, indicate: tilt back, touching, for example: left.
Rice. 49
Spring bending is a normal forward bend, performed in several movements with incomplete straightening of the torso between bends.
Tilt in a wide stance - bending over, performed in a wide stance with legs apart, arms to the sides, looking forward (Fig. 50).
| Rice. 50 |
Relaxed tilt - a tilt in which the gymnast’s body, without tension, as if falling (due to gravity), bends forward or in another direction, which should be indicated additionally. For example: tilt relaxed to the left and forward. (1-40)
Tilt sequentially (sequential) - a tilt in which the torso bends by sequentially involving individual joints (the spine) in the movement. Performed in various directions.
To determine the extension of the body after bending, the term “straighten up” (straightening) has been established.
Squat is the position of the student (gymnast) sitting on the floor or on an apparatus with straight legs, hands touching the support or in some other position (Fig. 51).
Rice. 51
There are the following types of sedov:
Sitting legs apart is a sitting position with legs spread apart.
Sit at an angle - sitting position with legs raised forward, forming a right angle with the body (approximately), head straight (Fig. 52). Please indicate additional provisions. For example: sit at an angle, arms to the sides.
Rice. 52
Sit on the thigh - a squat in which the weight of the body is on the thigh of one leg; legs are usually bent. When performed on the floor, the arms are usually raised in opposite directions.
Bent squat – a squat in which the legs are raised to a vertical position (approximately).
Sit with a grab - the same, but the torso and head are tilted towards the legs, and the legs are pulled to the torso by the ankle joints, the head is lowered.
Sit on the heels - sit on both heels, the torso is vertical, hands are usually on the belt (Fig. 53). A different hand position is indicated additionally.
Rice. 53
| Rice. 54 |
Sit on the heels with an inclination - a similar squat, but the torso is tilted forward until the hands raised up touch the floor; when performing on one leg, it is necessary to indicate the leg on which the squat is performed and the position of the hands. For example: sitting on the right heel with a tilt, arms back, head down; or sitting on the right heel with support from the hand, left forward (Fig. 54). (1-49)
Varieties of lying position:
On the back – legs closed, straight, arms along the body. A different hand position is indicated.
On the stomach - bent arms touch the floor (support), closed straight legs lie freely.
Bent over - the body is bent as much as possible, arms up and out, legs and head raised (Fig. 55). A different position of the arms or one leg is indicated.
Rice. 55
On the chest with support from the knee - position with support on the chest and one knee; the other leg is laid back; arms are usually raised to the sides. A different position of the arms and non-supporting leg is indicated.
Right (left) side – position with support on one side. Usually the legs are closed, arms straight up. A different position of the legs and arms is indicated additionally. For example: lying on your left side with your forearm supported, your right arm to the side.
Ring – lying position with feet touching head (Fig. 56).
Rice. 56
Ring with opposite grip (Fig. 57).
Rice. 57
Supports are divided into simple ones - with support with only the hands and mixed - with additional support by any part of the body other than the hands (most often the legs).
Support is the position of the student (gymnast) supporting himself with only his hands.
There are:
Standing emphasis is a mixed emphasis, in which the gymnast’s body is closer to a vertical position, i.e., the angle is greater than 45° (relative to the supporting plane). A similar term denotes the bent position of the stop (Fig. 58); the word "Bent" can be omitted, since this position represents the only option.
Rice. 58
Lying support is a position in which the angle is less than 45° (Fig. 59).
Rice. 59
In relation to the support (floor or projectile), the stops can be:
From the front - when the practitioner faces the front side of the body towards the support. The term “Front” is usually omitted, but the term “Back” is always indicated when the gymnast turns his back to the support (Fig. 60).
Rice. 60
Sideways (right or left) - when leaning on one hand, the body is turned sideways to the support, the other hand is usually near the body, which does not require instructions (Fig. 61). A different position of the free hand is indicated.
Rice. 61
Support on the knees - the body is supported by the hands and knees. The toes are extended (Fig. 62).
Rice. 62
Emphasis on the right (left) knee - when naming, the supporting leg is indicated, the other is laid back.
The support on the knee is the same - supported by the right hand and right knee, or opposite - supported by the right hand and left knee.
Support on the knee sideways - the body is facing the support sideways (Fig. 63).
Rice. 63
Kneeling with a grip - an emphasis in which the non-supporting leg is grabbed by the toe with the free hand and bent at the knee.
Emphasis crouched - squat, knees together, hands resting near the toes outside, head straight (Fig. 64). When performed on one leg, indicate the name of the leg on which the squat is performed, as well as the position of the free leg. For example: crouching on the right, left behind on the toe; or left to the side on the toe.
Rice. 64
The emphasis lying on the hips is an emphasis in which the body is maximally arched (the hips touch the support or lie on it) (Fig. 65). When supporting with the forearms, the name is the support lying on the forearms and the support lying on the hips on the forearms.
Rice. 65
Support lying behind on the forearms (Fig. 66). If a similar position is performed while sitting, then it is called sitting on the forearms.
Rice. 66
Lying support in a ring (or right or left ring) – emphasis lying on the hips, when performed with incomplete amplitude, is called a half ring (when there is no contact). (1-51)
Balance is a position in which the student stands on one leg, leaning forward, the other leg is pulled back to full, arms to the sides (Fig. 67). Two words are enough to define this basic equilibrium. For example: balance on the right (left), since the position of the arms and the other leg goes without saying. Other positions of the arms and free leg are indicated. For example: balance on the right, bending the left back (“attitude”).
Balance with an inclination - the torso is tilted forward and downwards (at 45°), the hands are near the floor (Fig. - dotted line).
Rice. 67
Lateral balance - the performer is sideways to the support, the same hand is up, the other is behind the back (Fig. 68). A different position of the free leg and arms is indicated.
Rice. 68
Balance of the same name - the same hand as the supporting leg forward and upward, the other back.
The opposite equilibrium is shown in Fig. 69. A different position of the hands is indicated.
Rice. 69
Back balance – the performer faces his back to the support, arms to the sides. A different hand position is indicated.
Frontal balance - one leg raised to the side (or higher), arms to the sides (Fig. 70).
Frontal balance with grip is similar, but the leg raised to the side and up is held by the same hand, the other is held up and out (symmetrically).
Rice. 70
High balance (vertical) - the body is in a vertical position (or close to it), the free leg is laid back, the same arm is to the side, the other is forward or up (Fig. 71). can be performed on the toes, with the free leg bent and a different position of the arms, which is specifically indicated.
Rice. 71
Balance in a half ring - the leg bends back at the level of the head or higher, but without touching the head, arms up and out (Fig. 72). A different hand position is indicated.
Ring balance is a similar balance with the toe touching the head. Usually performed with the hand grasping the toe behind or above the head.
Rice. 72
Balance on the knee - performed with support from the knee (Fig. 73).
Back balance on the knee is similar, but with your back to the support.
Rice. 73
Balance on the elbow - the performer balances, leaning on the elbow (Fig. 74). When performing sideways, indicate “Lateral”.
Rice. 74
Cross-shaped balance - performed by moving the non-supporting leg to the side with the torso tilted forward; the same hand as the supporting leg to the side, the other forward (Fig. 75).
Rice. 75
Balance with a split - the leg is pulled back while simultaneously bending forward and grabbing (Fig. 76).
Most of the described balances can be performed both on the entire foot and on the toe. In the second case, it is necessary to additionally indicate “on the toe”. For example, high balance on the left toe, the right one is slightly bent back, the left arm to the side and back, the right half bent in front of you (the hand is at the level of the stomach), tilt the head back.
Rice. 76
Lateral balance on the right (left) arm is shown in Fig. 77. (1-53)
Rice. 77
Lead-up exercises
If it’s still difficult for you to bend and straighten your arms while lying down, then first you should practice the following lead-in exercises:
- Wall push-ups. Place your hands against the wall, then, bending your elbows, reach it with your chest. Straighten your arms and return to the original position. Several sets a day of 10 repetitions each will strengthen your muscles and help you move on to the next exercise.
- Knee push-ups. During this exercise, the same muscles work as when bending and extending your arms while lying down (chest and triceps), but since you almost completely exclude your legs from the work, the overall load is reduced significantly. Taking a prone position, transfer your weight to your knees and place your hands shoulder-width apart. The body must be kept in a straight position, and the abdominal muscles must be statically tense.
- Push-ups. The technique is practically no different from that described in the previous paragraph, the only difference is that in this position the knees are straightened and the emphasis is placed on the toes of the feet.
- Reverse push-ups from a bench. Stand with your back to the bench, and then rest your hands on it. As you inhale, lower your body down until a 90-degree angle is formed at your elbows. As you exhale, press it back to the starting position.
Execution technique
initial position :
- take an emphasis lying on the floor, straightened arms resting on the floor, shoulder-width apart, fingers forward;
- the head, shoulders, torso and legs form a straight line (the gaze should be directed forward - down);
- feet slightly apart, no more than shoulder width apart, toes resting on the floor without additional support;
On inhalation:
- from the starting position, bend your arms, head, body, legs form a straight line (do not move your elbows, more than 45 degrees);
- the distance between the chest and the floor is no more than 5 cm;
On the exhale:
- lift the body while maintaining a “straight line”;
- straighten your arms at the elbow joint and return to the starting position;
- It is forbidden to tear limbs from the support.