T-push-ups are an interesting variation of floor push-ups. When performing this exercise, you need to alternately lift one or the other hand off the floor, taking a special pose. T-push-ups are a complex exercise that develops the entire body with an emphasis on the chest muscles, triceps, and deltoids. The exercise perfectly trains the core muscles (abs, obliques, thigh muscles).
It is recommended to include such push-ups in training for general physical development (general physical development), martial arts, in classes to strengthen the back and improve posture.
https://youtu.be/2nSyoyCFViY
How to make push-ups easier
Those who are just starting to do push-ups may not be able to perform the classic (regular) type of push-ups on the first try. To simplify the task, you should first practice by using push-ups with emphasis on your knees. In this position, supporting your own body weight in your arms will be much easier. When the muscles get used to regular exercise and become sufficiently strong, you can move on to a more complex technique.
Gradually increase the number of repetitions, starting with 10-12 per set. Over time, perform more approaches (but not less than 3 initially). One of them should be worked with the usual technique, the rest - from the knees.
What are reverse grip pull-ups for?
When it comes to gaining muscle mass, sticking to simple programs and techniques is the best approach. You can do a lot of different movements, but for muscle growth and strength there is nothing better than basic compound exercises. Not to mention that if you work with heavy weights, then the number of approaches and repetitions per workout should be limited. At the very least, you need to understand that more is not better, but it can lead to problems associated with overtraining. 3-5 exercises per workout is a very good number to guide. And, if you base your workout on basic exercises, this is more than enough to stimulate growth. Whether you're training one body part per workout, doing a routine, or a full-body full-body workout, reverse grip pull-ups are something that shouldn't be neglected on days when you're training your back. There are several reasons for this.
One of the best exercises for the back
- Latissimus dorsi: 117 - 130%.
- Shoulder biceps: 78 – 96%.
- Infraspinatus muscles: 71 - 79%.
- Lower traps: 45 – 56%.
- Pectoralis major muscle: 44 - 57%.
- External oblique abdominal muscles: 31 - 35%.
- Back extensors: 39 - 41%.
As you can see, they are very similar.
Training the trunk muscles (core)
Most people have misconceptions about abdominal training. A popular assumption is that to work your core muscles and get six-pack abs, you need to do ab exercises. It's true that various crunches are actually quite good for the midsection (contrary to what some experts teach), but basic compound exercises like squats and deadlifts are much more effective. They require significant support from the entire torso (core). Reverse grip pull-ups are very similar in this regard. While the feet are not planted on the ground, the core muscles are needed to stabilize the body.
Biceps activation
Research has found that reverse pull-ups produce significantly greater biceps activation than straight pull-ups. This all happens due to the supinated position of the hands. Even when it is not possible to pump up big biceps, this is most likely due to excessive enthusiasm for lifting barbells or dumbbells for biceps. These are not bad exercises, but heavy compound exercises are clearly better. And of all the basic ones, it is reverse grip pull-ups that train the biceps.
Best bodyweight exercise
In home workouts, pull-ups with a forward and reverse grip should form the basis. The main reason why biceps don't grow is that they simply don't experience enough stimulation to trigger hypertrophy. This is the most common problem with bodyweight training. Many will argue that working out at home can be just as effective as working out at the gym. But in all honesty, we must admit that building decent muscles at home is much more difficult. Mainly: due to the lack of necessary equipment for heavy basic exercises. Such as squats, deadlifts, bench presses and military presses. Simply put, even the best bodyweight exercises only provide much benefit up to a certain point, and then they turn into endurance training due to too many repetitions. The only way to stimulate muscle hypertrophy is to push the sets to muscle failure. In this case, type 2 muscle fibers are actively activated. At the same time, even if you push up to muscle failure, it will not be as effective as a bench press on a horizontal or incline bench. Because you can always add weight to the apparatus. At the same time, pull-ups are very difficult to do. They also include type 2 fibers. Better yet, do them with weights.
Increased grip strength
Significantly activates the muscles that are responsible for this: the forearms, the muscles of the hands and fingers. There are few good exercises to develop them, such as the farmer's walk. But the reverse grip pull-up is truly one of the best.
Forearm workout
Most guys have underdeveloped forearms. This is mainly due to a small amount of pulling exercises, or they use weightlifting belts. Straps are pretty much essential when doing deadlifts and other barbell workouts. They are necessary in order to concentrate on the technique of performing the movement, and not on grip strength. But if you are trying to train your forearms, the straps will weaken the effect of the training.
How to do push-ups correctly: stages of the exercise
Initial position
While resting on your toes and palms at the same time, take a horizontal position. Align your body in a straight line, it should be strictly parallel to the floor. Place your hands shoulder-width apart under the shoulder joints, fingers pointing forward.
Lowering and lifting phase
While inhaling (slowly and under control), bend your elbows and lower your body until your chest touches the floor, push powerfully and return to the starting position, exhale, repeat. Make sure that at the “downward” moment of the movement your elbows are at the body, do not spread them to the sides, try to form an angle of 45 degrees with your shoulders to the body.
What muscles are developing?
Push-ups were practiced in ancient Europe
The only difference is that only athletes paid attention to strength training. They helped them win victories in the Olympic Games
Today, this exercise is becoming very popular in home workout complexes. After all, nothing helps to effectively strengthen the connective tissues and muscles of the shoulder girdle like daily push-ups. But many people don't spend enough time on this because they don't understand what muscles are being developed.
During the workout, 7 muscle groups take an active part:
Large pectoral muscles. They are located in the upper part of the body (thoracic region). The main purpose is the medial movement of the humerus. Rotation helps a person win in arm wrestling and not get injured if he loses. Also, adduction and abduction of the humerus allows you to easily lift heavy objects and move them in any direction without heavy loads. The result will take a long time, it all depends on physical fitness. At the end of the training course, a person will receive good chest relief. Triceps. Thanks to the good development of this area, it becomes easier for the user to straighten his arms under the influence of power loads, the arms look toned, and there is no sagging in the lower part of the forearm. The triceps are activated during standard push-ups, but professionals recommend using a close grip. From this, the muscle mass of the specified area increases in volume twice as quickly. Deltoid muscles. Create a beautiful contour of the shoulder girdle. The group consists of three beams, which are combined into one system: anterior, lateral and posterior. There is one drawback: if a person plans to develop only the deltoid muscles, then push-ups are not the best solution. Since out of all groups they are involved minimally. However, this does not mean that their development will drag on for months. The first formation will begin after 3 weeks of active training. Then their growth slows down, but does not stop. Thanks to this group of muscles, a person is able to rotate his arms in different directions, spending a minimum of energy. Serratus anterior muscles. They are located in the ribs on the side of the pectoral muscles. Thanks to them, a person is able to raise his arms forward. To develop, you will need to perform standard push-ups with your hands positioned at a level slightly wider than your shoulders. Biceps brachii muscles. The group is located in the front of the shoulders and, like other muscles, improves the rotation of the forearms, and also helps to bend or straighten the elbow under the influence of physical activity. The only drawback is that the biceps will not grow, only the strength that is needed during various work will increase. To form this group you will need to use auxiliary exercise equipment, plus organize proper nutrition
It is not necessary to eat protein; it is important to be smarter about purchasing foods high in protein. The rectus abdominis muscle is one of the largest in the entire body. Placed in the front of the abdomen
To develop, it is enough to perform traditional push-ups, while not forgetting about proper breathing. When lowering the body, inhale; when lifting, exhale slowly. Large gluteal muscles. Thanks to them, a person is able to hold his body in an upright position for a long time and not experience much stress.
Technique
Before performing, be sure to stretch your arm joints using swinging and rotating movements. A good warm-up will help prevent accidental injuries. Let's get started:
- Take your starting position: lower yourself into a classic push-up position.
- Tighten your abdominal muscles, slightly tighten your hips and buttocks, and straighten your back.
- With a deep breath, gently bend your arms and lower your sternum to the floor until it touches (if possible).
- Exhale and push your body out, but do not stop at the top, but raise one arm and turn your body 90°.
- Hold for 2-3 seconds, then smoothly lower to the starting position and repeat the push-up, turning in the other direction.
Recommendations:
- Avoid sagging in the lumbar region, keep your body extended in one line.
- When making a turn from a prone position, try to avoid sudden jerking movements, as they reduce overall efficiency.
- Control the negative phase (lowering). If you suddenly relax your arms, you may hit your face on the floor.
- Once in a swinging stance, keep your supporting arm fully extended.
- Complete the required amount of training. As a rule, this is 3-4 sets of 12-15 repetitions on each side.
Variations of the exercise
The following elements allow you to increase or decrease the load:
- T-push-ups with stands (3–4x12–15). Place your palms not on the floor, but on a platform (plyo box, high barbell). This will shift the load to the lower pectoral muscles. If you place the elevation not under your arms, but under your legs, the emphasis will be on the upper sternum. The technique in both cases will be similar to the classical one. By the way, if you rest your feet on a fitness ball, you will additionally work out the small muscles responsible for body balance.
- T-push-ups with dumbbells (3–4x12–15). Select small projectiles with flat edges. Take the starting position and do push-ups with a turn. Although the technique is similar to the classical one, due to the weights it allows you to better work out the abdominal muscles and arm muscles. By the way, instead of dumbbells, you can use a short ski expander. Attach the elastic band to your wrists using the cuffs and perform push-ups with a turn.
- T-push-ups with a plank (3–4x7–8). This version of the exercise is designed for high-quality training of the rectus and oblique abdominal muscles. The technique is standard, but with one addition: at the top point, freeze in the side plank position for 12–15 seconds and tighten your abdominal muscles. When performing, make sure that the body remains elongated in one line. The element can be complicated using dumbbells or a rubber expander.
- T-push-ups against the wall (3–4x15–20). The exercise is designed for beginner athletes and girls. The technique is simple: stand a meter from the wall, extend your arms, press your palms against a vertical surface and do smooth push-ups with turns. This method of execution strengthens the arms and chest, but practically does not involve the abdominal muscles. To increase the load on your shoulders, do the exercise with light dumbbells.
Example workout
Below is a sample of exercises at home and in the gym.
At home
It is possible to exercise at home, since training does not require special equipment.
Here is a set of exercises:
- Warm up. To avoid injury, perform warm-up exercises: swing your arms in a circle 10-20 times, raise your arms to the sides 10-20 times, move in a circle with your hands on your shoulders 10-20 times, and at the end, gently stretch your arms and shoulders.
- Shoulder push-ups – 4 to 15 – 30.
- Pushups. Hands shoulder-width apart, elbows close to the body: 4 sets of 6 – 15 push-ups.
- Corner push-ups - 4 sets of 6 - 15 times. Don't forget to adjust the height of the stand.
- Single leg push-ups – 3 x 6 – 12 reps.
- Hitch. At the end, swing your arms: in front of you, to the sides - 3 x 15 - 30 repetitions.
In the gym
When training in the gym, use additional equipment. For example, place your feet on a weight, bench, or ball. This will increase the load on your shoulders.
Also, do barbell squats before working your shoulders. The squat works more muscle groups than any other exercise. By doing it, you will trigger a surge in testosterone, which will have a positive effect on shoulder growth. Perform 3-4 sets of 10 repetitions with medium weight.
Here is a set of exercises:
- Warm up. To warm up, you will need a block trainer or elastic band. Bend your elbow at a right angle. Hold an elastic band or the handle of a block in your palm so that the axis of the load runs parallel to your forearm. Perform hand abduction and abduction - 4 sets of 15-20 repetitions for each arm.
- Shoulder push-ups - 4 sets of 6 - 15.
- Corner push-ups - 4 sets of 6 - 15 times.
- Vertical push-ups or t-push-ups – 4 x 6 – 15 reps.
- On one leg - 3 x 4 - 12 times.
- Hitch. Stretch your arms and deltoids in a butterfly machine or on a bench with dumbbells - 3 x 10-15. Use light weight.
Content
- The benefits of push-ups
- How to do push-ups correctly: step-by-step technique
- Breathing rules for push-ups
- Basic mistakes when performing push-ups
- Description of different variations of push-ups from the knees
- With hands resting on the bench
- With your feet resting on the bench
- With a narrow hand position
- With arms wide
- Circular
- Different names
- On one hand
- On fists
- On fingers
How to train yourself to do push-ups every day?
The army uses deep push-ups to make recruits stronger and more resilient. Soldiers must do push-ups every day. You, in turn, must train your body to do as many push-ups as you feel comfortable with: ten, twelve, twenty or forty, without exhausting your muscles. Get into the habit of doing push-ups at the same time every day and experience the benefits of this movement for yourself. For example, if you do only five times a day, in a month you will do 150, in a year 1800.
See also: how to increase the number of push-ups.
Challenge your limits and your body by simply increasing the number of push-ups over time. How to do it?
Plus one: increase the total number of push-ups per day by one. For example, on the first day of the month you do five, on the second day six, on the third day seven, and so on. At the end of the month there is an automatic reset and everything starts again. On the first day of the next month, do it again 5 times, etc.
Plus five : At the end of each month, you increase the total number of daily push-ups by five, that is, at the beginning of the second month you will have already performed 10 times.
Counting: Increase the total number of daily push-ups per day of the month. On the first day you do it five times, on the second you add 2 more times, on the third - three (total already 8). Continue until you reach the last day of the month, where you add the day of the month to the initial number you started with. At the end of the month, start over.
Countdown: Countdown is the exact opposite of the previous technique. You can comfortably do 5 push-ups, and there are 31 days in a month. You start by doing 5 + 31 = 36 times. On the second day you add 30 more to 5, on the third 29 and so on. On the last day of the month it will be only 5.
Up and Down: Add one each day of the week. On Monday - five, on Tuesday - six, on Wednesday - seven and so on until you reach Sunday. Then at the beginning of the week you start all over again and so on until the end of the month.
We make stops with our own hands
You can purchase equipment at any large sports store. Prices for stationary models start from 500 rubles, rotating stops are more expensive - from 2000 rubles. If you don't want to spend money, make the accessories yourself and train for your own pleasure.
- The easiest way is to stack several books in two identical piles. This option will allow you to increase or decrease the height of the stands at any time. Instead of books, you can use boards or bricks.
- The second method is a little more complicated. We purchase two plaster trowels (wooden or polyurethane). We cut out several identical pieces of board under the base and fasten them with self-tapping screws to the graters.
What nuances should be taken into account during classes?
Before you figure out how to do push-ups correctly, pay attention to a few simple rules that will help you achieve greater efficiency.
- Don't try to break world records on the first day of training. Eliminate unnecessary stress, especially if you are just starting to train. Remember - the main thing is not the quantity, but the quality of the exercises.
- Don't try to get results as quickly as possible. It is a mistake to think that you will be able to notice changes in one or two days. The training program should be made more difficult gradually. Ideally, you need to prepare for at least two weeks for the next level of load. Only when the muscles are completely strengthened and you can perform the required number of approaches as easily as possible, is it time to load the body harder.
- It is very important to strictly follow the breathing technique during training. You should lower as you inhale, and rise as you exhale.
Head up push-ups
A simplified method of push-ups. Available for beginners and experienced athletes. Choose a reliable support - determine the height yourself, depending on your own feelings. During work, the lower pectoral muscles develop.
Depending on the chosen support, they differ slightly.
Fitball: all muscle groups of the upper and middle body are involved in the work. When performing the exercise, the hands are far enough apart and the task of maintaining balance is simplified.
Medicine ball: in addition to strength training, it allows you to improve body control and muscle stability. When working, it is recommended to spread your feet to the side to maintain balance.
BOSU: When working, your hands should be placed on opposite sides of the bosu. Helps develop balance.
Bench: When performing the exercise, make sure to bend your wrist so as not to provoke injury and sprain.
Chair: allows you to increase the angle of inclination and regulate the degree of load on the muscles. The muscles of the upper chest work.
TPX loops: push-ups are popular due to the practicality of the machine. When performing the exercise, maximum load on the arms occurs, which contributes to the development of the triceps.
Technique: Lean on the emphasis. Feet together. Push-ups are performed as standard, with a delay in the lower position.
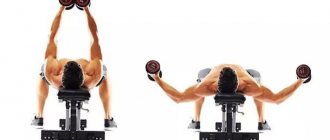
Execution technique
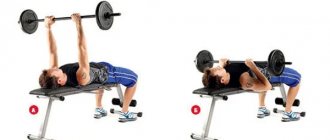
- Starting position in a lying position: dumbbells positioned wider than shoulder-width apart. The dumbbell handles are at an angle of approximately 45 degrees to the body.
- The downward movement is performed while inhaling. Task: go as low as possible in order to properly stretch the pectoral muscles. At the lowest point of the amplitude, you need to take a short pause, after which, straightening your arms at the elbow joints, exhale and return to the starting position.
- For better stabilization, your legs can be placed wide apart.
Options for lifting your torso
The most common version of the sitap is the classic one. It can be performed at home.
Classic body lift on the floor
Beginners are advised not to rush or make sudden movements.
- Take an emphasis lying on the floor face up.
- Bend the lower limbs at the knee joint.
- Place your feet on the floor. If necessary, support yourself against a heavy object, dumbbells or barbell.
- Close your hands at the back of your head.
- Raise the body as you exhale so that the body takes the shape of the letter V. The back remains straight, the feet are firmly adjacent to the floor surface.
- In a sitting position, you can touch your feet with your fingers.
- Return to the starting position while inhaling.
Option 1 - simpler
Place your arms crosswise on your chest. This allows you to relieve the spine during movement.
- The initial position corresponds to that in a simple classical sitap.
- Lifting the body is performed while exhaling.
- While inhaling, return to the starting position.
The optimal number of repetitions is 30, three times ten.
Option 2 - more complicated, with body rotation
With a cross-shaped rise. There are two options for lifting the body in this version. Both options are similar to the classic version, but each of them has its own distinctive features.
As a result of lifting the body, try to touch the opposite knee with your elbow. The arms are either folded crosswise on the chest or clasped at the back of the head.
Another execution option involves lifting the body and alternately touching the opposite knee with the elbow as it lifts.
Option 3 - as safe as possible for the lower back
To minimize the load on the lumbar spine, you need to perform the movement according to the classic pattern with your arms crossed over your chest. It is also necessary to place a bolster under the lumbar spine, or raise the lower limbs 90 degrees.
Thanks to the roller, the possibility of pinching nerve endings and blood vessels is eliminated.
With weights. Lie down on the floor. Knees bent. Hold the weight with both hands near your chest. Begin to lift your back off the floor and lift your torso. At the top of the movement, raise your arms with the disc above your head. As you move down, lower the weight back toward your chest.
Push-up technique
Today there are many variations of push-ups. We will analyze the main ones and tell you about the execution scheme.
Classic version of push-ups
The basis of all push-ups is the option when the hands are at medium width (slightly wider than the shoulders), and the feet are slightly narrower than the width of the pelvis. In this case, the load is distributed evenly.
Before moving on to more complex options, you need to master this one well.
You can place your palms as you wish - straight or turned inward
Technique:
- The starting position is a plank with arms outstretched, feet on toes, palms slightly wider than shoulders.
- From this position we place our feet comfortably. The wider their position, the easier it is to perform the exercise.
- The body and legs should be a straight line. A pelvis displaced up or down will be considered incorrect.
- We inhale and begin to lower ourselves, keeping the body position straight.
- You need to go low enough to stretch and load the muscles well. But it is not necessary to touch the floor with your chest.
- After this, as you exhale, push yourself up.
Don't rush to complicate the exercise. Its weight is enough to get a good workout in
Wide and narrow hand placement for muscle growth
The first and easiest way to change the exercise technique is to change the position of your hands. This will change the emphasis of the load. If you place your palms much wider than your shoulders, your chest will become more tense. If the palms are close to each other, then we will feel the triceps well.
Be careful, if your grip is too wide you can pull on your chest muscles.
Technique:
- The starting position is the same as for classic push-ups, however, the palms should be far from each other: perhaps at a distance equal to two shoulder widths.
- We spread our arms wide. In this case, it will be convenient to turn your fingers slightly inward, but you should be guided by your sensations.
- Inhaling, we lower ourselves, and exhaling, we return upward.
Lower yourself until your chest is stretched, but without feeling pain.
But the setting of the shoulders requires a more detailed consideration.
It is difficult to do push-ups in this way, and the narrower we place our hands, the more difficult it is to do it.
Some do push-ups with the so-called “diamond” grip, when the thumbs and index fingers of one hand touch the similar fingers of the other (photo). But in this case, the load on the elbow joints is quite strong, so if you are not an experienced athlete, it is better to avoid such exercises.
The most difficult hand placement can be considered a diamond grip.
- Standing at shoulder width is already considered sufficient.
Start with your hands shoulder-width apart or slightly narrower and gradually reduce the distance between your hands - We take a good breath and begin to go down. If in the other two options the elbows diverged freely to the sides, then in this case it is important to ensure that they go close to the body and look back.
- As you exhale, push yourself up.
Knee push-ups
What if you want to work your triceps or chest, but you can't do push-ups with a narrow or wide grip? In this case, you can make the exercise much easier if you perform it from your knees.
During push-ups from the knees, the load on the upper body is quite good, but the exercise becomes easier due to the exclusion of the leg and abdominal muscles
Technique:
- We get on our knees, placing our hands in any grip we need.
- The body and hips should be in a straight line, the ankles can be crossed.
- As you inhale, we lower ourselves down, and as we exhale, we push ourselves up.
Plyometric push-ups
As we have already said, push-ups not only work the muscles, but also improve the athlete’s strength, which allows them to achieve good results in the bench press. In this case, plyometrics will be most effective. In addition, it will increase the power and speed of the strike, which will be useful for athletes involved in combat sports.
What are plyometric exercises in general and plyometric push-ups in particular?
The essence of plyometrics is to perform explosive exercises with maximum speed or wide amplitude, sometimes both.
Practice doing push-ups from an elevated position, this will make the snatch easier.
As for push-ups, the exercise does not end with pushing yourself up in a positive phase; you need to lift your arms or all limbs off the floor. You can finish with a clap in front of you or behind your back. Even more experienced athletes, when making a jump, jump, for example, onto two supports standing next to each other.
- We get up to the starting position, place our hands with a medium grip, and feet approximately shoulder-width apart.
- We perform several incomplete push-ups, that is, without fully straightening our arms at the top point.
- Once you are ready, lower yourself down again and at the moment when you almost completely straighten your arms, you should tear your hands (and feet, if necessary) off the surface.
- The point is that you need to do it quickly, otherwise nothing will work.
- Help yourself with a good strong exhalation.
- If you can jump really high, you can do a clap. But first, just try to lift yourself off the floor.
The squeeze really needs to be strong and sharp to lift yourself off the floor.
Another important point - never land with your arms straight. The impact may be too strong for the elbow joint and you will be injured.
Watch one interesting variation of plyometric push-ups in the video.
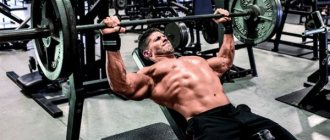
Weighted push-ups
If you want to not only improve your shape, but also increase muscle growth, then sooner or later training with your body weight will not be enough, and you will have to complicate the exercise.
They do this by adding weight; most often they use a barbell plate that can be placed on the back. But you can try other options - a weighted vest, a partner, or something else.
You will likely need a helper to place the weight on your back. Get into plank pose with your arms extended and have someone place a weight plate on your upper back ( do not place weights on your lower back! ). After this, we perform the exercise in accordance with the chosen technique and hand placement.
Start with a small additional weight - from 2 kg for girls, from 5 kg for men
How many push-ups should you do?
You can start with literally a few repetitions at a time. Is it only 5? Fine. Soon you will get 10, you just need to strive to constantly increase the number of repetitions. We will look at how this can be done further.
But if you are doing push-ups with the goal of increasing mass and using weights, then you should do push-ups 6 to 8 times, 4–5 approaches. After this, you can finish off with “idle” push-ups all the way.
Advantages and disadvantages
T-push-ups help strengthen your core, making it stronger and more mobile.
This exercise is useful for both aerobic and strength training. For example, in tennis, regularly performing such push-ups will help you make energetic and sharp body turns when hitting the racket.
In addition to developing muscle strength, the element has the following advantages:
- Correction of posture. By performing push-ups with body rotation, the athlete gets rid of stoop and slight curvature in the back (we are talking about prevention; if you have scoliosis, consult a doctor).
- Losing weight. The exercise simultaneously uses several large muscle groups, which helps reduce fat.
- Formation of sports terrain. T-push-ups help you gain beautifully defined muscles in your chest, shoulders, and arms.
- Development of pushing force in the “base”. The element allows you to improve the bench press, which is useful in bodybuilding and powerlifting.
The disadvantage of T-shaped push-ups is the inability to pump up bulky pectoral muscles. In order for muscles to grow, strength exercises with weights are necessary, for example, dumbbell bench presses.
The disadvantages of t-push-ups include some medical contraindications:
- injuries to the shoulder, elbow or wrist joints;
- late stages of pregnancy;
- recovery period after abdominal surgery.
Is there any way to speed up muscle growth?
Concluding the publication on the topic “how to pump up your shoulders with push-ups,” we will give some practical tips to speed up the results:
- Don't neglect strength training. Push-ups mean doing exercises with your own weight. Without weights, it is impossible to build muscle relief;
- Visit the gym at least 2 times a week - work out with barbells, dumbbells, and exercise machines;
- Consult with experienced trainers to help you create an effective training program for target muscles;
- Follow a sports diet rich in proteins, minerals and vitamins;
- Choose high-quality sports nutrition for yourself.
So, we have found out that shoulder push-ups alone cannot replace a full-fledged workout in the gym. However, they are very effective as an additional load, which will increase the athlete's endurance, strength and muscle elasticity. And without these factors, not a single lesson will be carried out efficiently and effectively.
Contraindications for push-ups
- Push-ups should not be done if you have chronic joint diseases - arthritis, arthrosis, bursitis - so as not to cause their exacerbations.
- For chronic diseases of the respiratory tract, heart and blood vessels.
- Since the axial load on the spine increases during the exercise, athletes with protrusions and hernias should include it in the training program only with the permission of the coach or sports doctor.
- People who are overweight should refrain from doing push-ups until their body weight normalizes - their joints will not be able to withstand such a load.
- For injured joints and muscle strains, you should also refrain from exercise until recovery.
Before starting training, it is recommended to be examined by a doctor.
Simplified types of push-ups for beginners
From my knees
If you are not yet trained enough to do them the standard way, try this simplified version. Place your weight on your knees, not your toes. Perform the push-up as you would normally, and when you can easily do a push-up on your knees, move on to the standard version.
At an angle
Perform push-ups on an incline. Push-ups become easier if you do them with your hands higher than your feet. Find any incline or place your hands on an exercise bench. Then you can do a simplified version of push-ups until you are trained enough to do regular push-ups.
Tips and tricks for beginners on how to avoid injury
To avoid injury, a beginner should follow 9 basic recommendations:
You need to lower your body down to such a level that the bend of your arms is 90%. Keep your elbows parallel, do not spread to the sides. Keep the rhythm
Slowly and smoothly during dips and dynamically in the starting position. The body should be close to the support and not lean forward or backward. When working with weights, it is important to use the appropriate weight. Do not spread your arms much wider than your shoulders. Movements when doing push-ups from a bench should be directed strictly up and down, and not diagonally. If discomfort or pain occurs in the elbows or shoulders, stop training. Exercises are energy-consuming and are recommended to be done at the beginning of classes. Otherwise, you may get injured.
Scheme of push-ups on the horizontal bar
The standard push-up pattern on the horizontal bar is recommended for mastering the exercise. Suitable for both beginners and advanced athletes.
| A week | 1 | 2 | 3 | 4 | 5 | 6 | 7 | 8 | 9 | 10 |
| Approach 1 | 3 | 4 | 5 | 6 | 7 | 8 | 9 | 10 | 11 | 12 |
| Approach 2 | 4 | 5 | 6 | 7 | 8 | 9 | 10 | 11 | 12 | 13 |
| Approach 3 | 4 | 5 | 6 | 7 | 8 | 9 | 10 | 11 | 12 | 13 |
| Approach 4 | 5 | 6 | 7 | 8 | 9 | 10 | 11 | 12 | 13 | 14 |
| Approach 5 | 5 | 6 | 7 | 8 | 9 | 10 | 11 | 12 | 13 | 15 |