The technique of performing exercises during sports not only determines the effectiveness of the training and the speed of achieving the goal set by the athlete, but also, if followed, reduces the risk of injury to a person.
The glute bridge, being one of the most effective exercises for working the lower body, also requires strict adherence to generally accepted technique. Otherwise, an incorrectly distributed load can provoke the formation of hernias, protrusions in the spine, and also cause sprains, tears in muscles, tendons or ligaments.
Features of the exercise
The glute bridge exercise involves lifting your buttocks off the floor from a lying position. The key word here is not “bridge,” which requires flexibility and plasticity, but “gluteal,” aimed at working the gluteal muscles.
Why "bridge"? Because the exercise is different from the usual raising of the pelvis above the floor. It's all about the shoulder joint. If he is on a hill and the pelvis rises to his level, then this will be a normal buttock lift. In the case when the shoulders lie on the floor when lifting the heel, we will be dealing with a gluteal bridge.
Thanks to the element, we not only improve the shape of the buttocks, but also develop the strength of the gluteal muscles. Having mastered the exercise and brought it to perfection, you can safely move on to more complex and intense elements to work the buttocks, which by that time will already be prepared for increased loads.
The glute bridge is suitable for both beginners and professionals. The variety of options for its implementation allows anyone to master the element. The exercise is accessible even to people with joint problems, the impact on which is minimal. The element is also useful for those who only want to tighten their buttocks, bypassing thigh extensions. The entire load when performing the exercise falls on the buttocks, and does not share it with the quadriceps, as, for example, in squats.
When to expect results
With regular exercise, the result will become obvious after 3-6 weeks Kegel Exercises: Treating Male Urinary Incontinence: problems with urinary incontinence will decrease or disappear altogether, and the quality of sex will significantly improve.
If you don't see results, most likely you are not training quite correctly. For example, you do not give the necessary load to the pelvic floor muscles, tensing your abs or buttocks instead.
Strip naked, stand in front of a mirror and tighten your Kegel muscles. If you do everything correctly, the scrotum will noticeably rise.
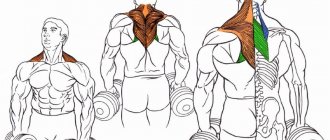
Gluteal bridge: what muscles work
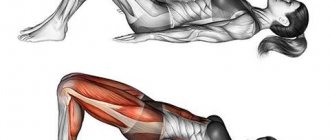
During the glute bridge exercise, the following muscles work:
- gluteal – large, medium and small;
- biceps femoris muscle;
- back and front surfaces of the thighs;
- core muscles;
- muscles - extensors of the spine;
- calf muscles.
Also, if the element is performed correctly, the abs work and there is a load on the back - you can even get rid of lower back pain.
Inclusion in the training plan
To harmoniously fit a new exercise into your training plan, you need to follow a few simple rules:
- thoroughly warm up your muscles and joints before training to avoid injury during sports;
- follow the technique of performing the “gluteal bridge” exercise - the muscles will work effectively only if all movements are done correctly;
- choose the load and complexity of the elements depending on the characteristics of your own body;
- increase the load, number of repetitions and approaches gradually;
- stretch at the end of your workout.
In gymnastics there are several exercises for stretching the gluteal muscles: pulling the knees to the chest from a standing or lying position, low lunges, standing fold, etc.
The glute bridge is a universal exercise suitable for training in any conditions. A correctly executed element will help strengthen the buttocks, legs, and abs. Thanks to regular training and following simple rules, you can quickly achieve the desired shape and develop muscle strength.
GLUTEAL BRIDGE. ANATOMICAL EXAMINATION.
Advantages and disadvantages
The glute bridge exercise has many benefits and has a number of benefits.
Advantages
- Deep work on the buttocks without putting excessive pressure on the lower spine, as is the case with squats.
- Strengthening the abdominal muscles.
- Improving blood circulation in the pelvic organs and, as a result, preventing gynecological diseases and problems. This is especially true for women.
- The ability to independently choose the load and work both with your own weight and with the use of weights and additional sports equipment.
- Ease of implementation - no special equipment or premises are needed. You can train at home at any convenient time.
- The element consumes a lot of calories, so it is indicated for weight loss and shaping the back of the body.
- During the training process, the muscle strength necessary for dynamic cardio training in the form of jumping and running is strengthened and increased.
- Minimal pressure on the knee joint, unlike squats.
Contraindications
The glute bridge is considered a safe exercise, so it is recommended for almost anyone. The only exceptions can be acute processes in the body, during which any physical activity is contraindicated.
Contraindications
The gluteal bridge, the technique of which must be explained to the athlete by a fitness trainer, can be dangerous to a person’s health.
The main contraindications for performing this exercise include:
- exacerbation of chronic diseases;
- acute inflammatory processes in the body, accompanied by an increase in the athlete’s body temperature;
- thrombosis;
- thrombophlebitis;
- recent surgical interventions (less than 6 months have passed since the operation);
- recent injuries, especially of the spine or lower extremities (at least 3-4 months must pass from the moment the athlete fully recovers from injury);
- hernias in the lumbar spine;
- heavy menstruation (additional stimulation of blood flow in the pelvis can provoke the opening of uterine bleeding);
- pregnancy;
- benign or malignant neoplasms in the pelvic area (stimulation of lymph flow and blood flow can lead to rapid growth of the tumor or its transition from benign to malignant);
- tendency towards hemophilia.
Execution technique
There are a lot of techniques for performing the gluteal bridge, which is why the element is good. From its classic version to modifications with weights. Let's start describing the techniques from simple to complex.
Classic glute bridge on the floor
The element is performed in a fairly natural way, so it is almost impossible to do anything wrong. Step by step it will look like this:
- We lie on our backs, pressing our lower back tightly, and bend our knees shoulder-width apart. We place our arms along the body, and firmly fix our feet on the floor.
- We inhale and raise our hips and back to a straight line with our shoulders, while squeezing our buttocks and tightening our abs.
- At the top point, we linger for a couple of seconds, and, exhaling and squeezing the buttocks even stronger, we return to the starting position. At the same time, we try not to touch the floor with our buttocks - we immediately begin the next ascent to the top.
- We repeat the exercise the required number of times. As a rule, 20-30 repetitions will be enough.
You can diversify the classic variation with two modifications:
- in the initial position, we keep the feet together, as a result, when the pelvis is raised, the knees will also be brought together;
- At the top point we bring our knees together and spread them apart.
In the last version, we will work not on dynamics, but on statics, which is also very effective. When the pelvis is raised above the floor, it is held at the peak of muscle contraction. As a result, we have a maximum effort to counteract the resistance of gravity. In addition, in this position, other muscle groups will also be involved in the work.
Single leg glute bridge
In this version, in the initial position on the floor, we fix not both legs, but one. We pull the second one up or place it on the knee of the supporting leg. As a result, we concentrate on one side of the body and alternately effectively work the gluteal muscles.
The further execution technique is similar to the classic version. The gluteal bridge on one leg can be diversified and strengthened with the following elements:
- In the case when the ankle of the second leg is located on the supporting knee, you can do lateral twists at the end of the exercise, also working on the abs.
- With your leg raised, you can swing it at the top point.
Glute bridge on a fitball
To strengthen both the classic version and the bridge on one leg, a fitball will help, using which we fix our legs not on the floor, but on the ball. As a result, the amplitude of the lift increases, which leads to an increase in load.
You can do another very effective exercise on a fitball - move from a bridge to a reverse plank. The execution technique will be as follows:
- In the starting position, place your legs bent at the knees on a fitball and your body on the floor.
- Raise your pelvis and back to a straight arc.
- We straighten our legs, rolling the ball forward with them. Hold the reverse plank for a couple of seconds.
- We return to the bridge.
- We accept the starting position.
Another variation of using a fitball is possible - we place the shoulder blades on it rather than the legs. In this case, we will raise the pelvis to a straight line with the shoulder blades. And at the lowest point, in order to reduce the load on the lower back, you need to touch the floor with your pelvis.
The gluteal bridge on a fitball is difficult because in addition to the main action - raising the butt, you need to maintain balance and concentrate on the ball. Stabilizing muscles are also included in the work.
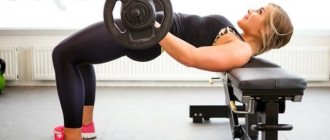
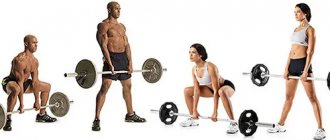
Glute bridge with barbell
For advanced athletes, a bodyweight glute bridge will be too small. A variety of weights, for example, a barbell, will help enhance the effect. The execution technique will be as follows:
- We take the starting position as in the classic version.
- We fix the barbell on the hip bend, grasping the exercise machine from above with our hands. Do not place her on her stomach under any circumstances!
- We lift our pelvis together with the barbell, hold at the top point for a couple of seconds and lower ourselves down.
We perform all actions slowly and carefully so as not to harm ourselves with the barbell. More experienced athletes can increase the load by lifting the barbell up at the bottom or, if possible, at the top.
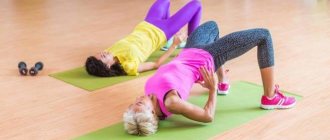
Glute bridge with elastic band
Another interesting option for weighting the gluteal bridge is an expander or elastic band. If the barbell is more suitable for men, then the elastic band will be quite appropriate for girls.
The gluteal bridge technique for women in this case will be as follows:
- The starting position is the same.
- We fix the ends of the double folded elastic band at the level of the hip bend on the floor. The elastic band itself will pass over the pelvis.
- When lifting the pelvis, the muscles will receive a different load at each moment of lifting. At the highest point, the resistance of the elastic band will be maximum, and the load will be stronger.
You can independently adjust the load by loosening or tightening the elastic band.
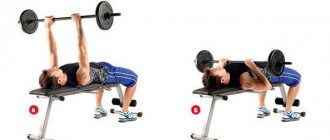
Glute bridge on a bench
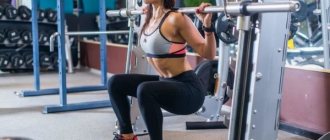
A bench is the same elevation as a fitball, which allows you to increase the range of motion and increase the load. Strengthening is possible in two ways:
- The shoulder part of the body is located on the bench. We bend our legs and firmly fix them on the floor. The back is straight without arching in the lower back. Exhale and push your buttocks up. Inhaling, we return to the starting position. The buttocks should always remain tense.
- The legs are bent at the knees on the bench. We press the body to the floor. As you inhale, raise your pelvis as high as possible and linger at the top point. As you exhale, we return to the starting position.
With an emphasis on the bench, you can also perform not only the classic version of the bridge, but also with emphasis on one leg or with the knees brought together.
How many reps does a glute bridge require?
The number of repetitions of the gluteal bridge depends on the complexity of the exercise. For example, the classic version can be given two approaches of thirty times. But a variation with weights or on a fitball will require fewer repetitions. Here it is better to concentrate on the execution technique and pursue quality rather than quantity.
It’s better to start with the classic version, gradually increasing the number of repetitions. Only after mastering an element should you move on to the next, more complex one.
Using weights
If all the previous options seemed too simple to you, you should perform a bridge for the buttocks with weights. This can be pancakes, dumbbells or any other load.
See also TOP 5 best exercises for the buttocks with dumbbells.
Technique:
- Starting position, both on the floor and on a hill, the knees are bent. We place weights in the pelvic area and be sure to hold them;
- We make an upward movement with the pelvis, freeze for a second;
- We return to the starting position.
It is better to start working with weights with 2-3 approaches of 10-12 times.
You will learn more about the glute bridge with a barbell in this video:
Be careful! Start with light weights and gradually increase the load. Do not overdo it, as this will be fraught with big health problems.
Tips for beginners
The glute bridge is not a basic exercise, so it is better to include it in a set of exercises. It will be most effective after squats and before abdominal exercises. In such a program, the load will be evenly distributed: first the legs work, then the buttocks and then the abdominal muscles.
Moreover, after squats, the buttocks are already warm enough and you can consolidate the effect with a bridge. In this case, the gluteal bridge will be especially effective in static positions, in which we fix the position at the top point for a few seconds or add knees together.
There are a number of recommendations that, if followed, will allow even a beginner to master the exercise technique and get the maximum benefit from it:
- Watch the placement of your feet. They should not be too close or, on the contrary, far from the body, otherwise the load will “go” to the quadriceps muscles. Find the optimal angle for you between the back of your thigh and shin.
- When pushing your pelvis up, try to move your body weight onto your heel, so the necessary muscles will be activated even more. Don't lift your feet off the floor. Try to raise your body as high as possible from the floor.
- Tension of all muscles: from the buttocks to the abs should accompany the exercise at all its stages. The meaning of the element is tension at the top point, but relaxation at the bottom is also unacceptable. Otherwise, there will be no tangible progress.
- Do not lift or lower mechanically; each movement must be controlled and associated with correct breathing: lifting - inhale, lowering - exhale.
- During the exercise, there should be no support on the neck, otherwise the nerve endings can be pinched.
- Remember: gradualism is your main ally. Increase the load gradually, do not bring the buttocks to the point of “exhaustion”.
And the main rule for absolutely any workout is that the training should always begin with a warm-up and end with stretching.
Common mistakes
When performing a bridge, many people make the following mistakes:
- long periods of rest when the body is at the lowest point;
- at the moment of lifting the pelvis, some may lift their heels off the surface;
- when performing the technique, it is important not to turn your head;
- sudden lowering of the pelvis;
- arching of the back.
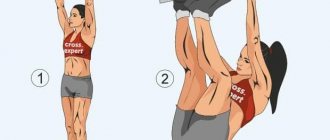
How else can you load the fifth point?
The glute bridge is not the only exercise for the buttocks. There are still a huge number of them, the implementation of which in combination with a bridge will allow you to achieve elastic and attractive buttocks.
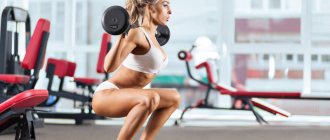
| Squats |
|
| Swing your legs |
|
| Lunges |
|
| Scissors and bicycle | Despite the fact that these elements are intended for the abdominal muscles, the buttocks also take a significant part here. |
Recommendations
- If possible, use the help of an assistant in this exercise; it is often difficult to place the apparatus on your hips on your own;
- The feet should not move around the perimeter of the floor; it is also better not to allow walking on the heels;
- The height of the bench is selected individually; if it does not fit, you should place pancakes under the legs;
- The barbell can be grasped in two ways: Feeding by two assistants by the edges if the weight is heavy;
- Independent hip roll