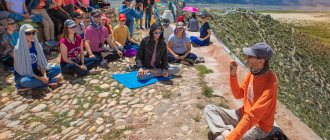
Problems you face
In many ways, home practice is more advanced:
- requires immobility;
- strong will;
- set challenges and solve them.
Many yogis who practice at home prefer to leave complex yoga asanas for group practice or one-on-one with a teacher.
Always, when working with new and difficult positions of yoga exercises at home, you should consider the level of your training and how safe it is for your health. It is correct to assess whether you need the support of an experienced teacher, taking into account your level of knowledge and physical fitness at this stage.
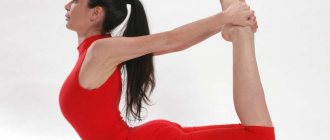
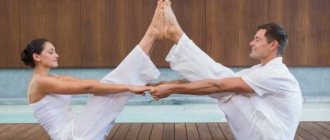
Taraksvasana (Scorpio on palms)
For the classical position you need to have an advanced level of skill. Achieving the highest degree of mastery is possible if you train regularly over several years. This asana requires that the body be supported with the help of the palms, the arms should be extended. The socks should touch the back of your head.
The described asana allows you to:
- strengthen the muscular system;
- open a channel along which the flow of energy will flow.
Pincha Mayurasana (Peacock on elbows)
Among the complex yoga poses, one can highlight a difficult exercise when you need to hold the body with your hands. In this case, the legs are stretched upward. The asana evokes the appearance of a peacock, which has spread its luxurious lush tail and embarked on a mysterious dance.
The classic version is characterized by relative ease of execution. A practitioner with more experience can perform the exercise. But performing Pinchi Mayurasana, when you need to rest only on your elbows, belongs to the highest level of skill and is achieved over the years. This complex yoga exercise is considered relaxing, providing an opportunity to rest.
Benefits of the position:
- Eliminates diseases associated with leg veins;
- Effectively regulates balance;
- Qualitatively stretches the spine.
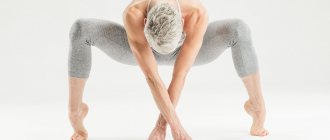
Kala Bhairavasana
Another name is the pose of a man destroying the Universe. To hold the body, use the arms and feet in the opposite position, extending the arms. The lower limb is brought into the area behind the back of the head.
The most difficult poses in yoga are characterized by the strength of their physical impact:
- Stretches the hips and tendons under the knees;
- Improves the functioning of the digestive tract;
- Strengthens the back and neck areas.
But for the described position, it is not the listed results that are considered to be of primary importance, but a reflection of the very militancy of the essence inherent in Shiva - to get rid of restrictions, to expand their usual framework.
Pranayama and meditation before bed
In addition to practicing asanas, we recommend paying special attention to breathing exercises and meditation before bed. These techniques allow you to calm the mind and body as productively as possible, bringing a person into a state of inner balance and calm.
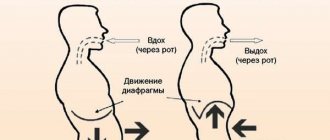
Ujjayi pranayama
The word "Ujjayi" is translated from Sanskrit as "winner". “Winner's Breath” is so called because it helps you triumphantly cope with stressful situations. At the same time, this pranayama is very simple to perform: you need to “pinch” the glottis (as when you talk in a whisper) and inhale slowly (for 4 counts) and slowly exhale (for 8 counts). By breathing in this way, you will very quickly relax and feel calm.
Nadi shodhana pranayama "alternate breathing"
Alternate breathing through the right and left nostril relieves anxiety and worries. Sit cross-legged on the mat with your back straight. In the palm of your right hand, you bend your index and middle fingers towards the center of the palm, and place your thumb and ring fingers, respectively, on both sides of the wings of your nose. Inhale through the right nostril, exhale through the left, then inhale through the left, exhale through the right. Breathe like this for a few minutes before you begin to meditate.
How often do you need to do yoga to make progress?
Vered is now raising three young daughters. Her acquaintance with yoga took place seven years ago, when the youngest girl was only four months old. Then the blogger decided to attend a yoga and Pilates class twice a week. According to the girl, after a year of training, she felt a certain connection with this practice and began to practice at home in order to better study herself and the capabilities of the body.
View this post on Instagram
Currently, Vered practices yoga for an hour and a half a day. The coach is sure that for progress it is imperative to exercise regularly and warm up thoroughly before each workout. But going to the gym and going on strict diets, according to the blogger, is not at all necessary if you want to become a yogi. After all, this practice is completely self-sufficient.
You can learn yoga throughout your life. We'll tell you where to start
Your yoga path: 5 asanas for beginners
Some tips for a difficult task
One of the most important elements that will help you learn and perform difficult poses is:
Perform sessions at appropriate frequency
They should not be too short or too long. If you practice yoga for some time, you will notice the stretching effect. But if there is a break for a month or even a week, the muscles will lose a little of their strength. This is especially true for people who do not have a special predisposition to sprains and after 25 years of age.
Break the pose into smaller parts
A complex asana consists of smaller, less complex asanas. As you begin to break each pose down into smaller “chunks,” it becomes more accessible and gives you the knowledge to adapt your body and body anatomy to the action.
Don't be afraid to perform consistently and regularly in positions that build intelligence, strength, and flexibility in the body. Over time, these positions may become "boring" and weak for you (triangle pose), but they should still be done because they deserve great respect and are the basis for the most difficult and advanced asanas in yoga.
Learn the secrets of the pose
The more you study these small elements that make up yoga for professionals, the more you will have an idea of how you can differentiate and effectively use them for another pose. If you are not sure what is happening in one or another asana, what muscle groups are involved, start weaving the path of self-education.
Don't forget about the teacher
Practicing at home doesn't mean you don't have a teacher to help the solo yogi. But everyone should find a mentor from whom they will learn, learn and grow with him. Someone who can be a resource for improving and maintaining the practice at home. Use your teacher time to continue to improve and refine the difficult positions that matter to you and build strength and confidence in the practice.
Shirsha padasana (Feet on the head)
This asana tends to have a maximum influence on the plasticity of the vertebrae. To hold the body, use your forearms and palms; you need to pull your toes towards the back of your head. Then the practitioner will not be able to correct the spinal deflection. To master a pose well, a yogi must perfectly feel his muscular system. His spine should move on its own.
Expected effect:
- influencing the genitals and excretory system;
- getting rid of chronic diseases, which ensures the flow of oxygen-rich blood.
A set of exercises for mastering complex yoga asanas
We asked Artem Chernyshov to compose and show us popular balance asanas on the hands that you can actually master at home.
How to build a lesson
- Start with joint warm-up and stretching. It is important to prepare the musculoskeletal system for stress.
- Perform asanas sequentially at your own rhythm. Some positions may be easier for you than others - this is normal.
- Watch the position of your hands: your palms should be pressed to the floor and slightly “spread out”.
- Finish the practice with savasana.
Do this program 3-4 times a week.
To complete the complex you only need a mat.
Bakasana
1-bakasana
Stand straight, feet hip-width apart. Lean your body forward, placing your palms on the floor (knees can be bent). Place your palms shoulder-width apart, “spreading” them as far as possible on the mat, with your fingers spread to the sides. Bend your knees more, transfer maximum body weight to your hands. Bend your elbows and place your shins over your shoulders, resting your feet on your triceps. Gradually “give” more and more weight to the arm muscles and raise your feet above the floor (one at a time). Stay in the asana for 3-10 seconds depending on your capabilities.
Parshva bakasana
2-parshva bakasana
Stand up straight with your feet together. Bend your knees, move your pelvis back, extend your arms above your head. Then fold your palms in namaste, bringing them together in front of your chest. Twist your body to the right, resting your left elbow on your right knee. Then lean your body forward and to the right, lower your palms to the floor, placing them slightly wider than shoulder width. Transfer your body weight to your hands (fingers spread, palms completely pressed to the mat). Keep your knees connected. Bend your elbows more. Gently shift your hips to your right shoulder, maintaining balance and increasing the twist of your body. If possible, gently lift your feet off the floor, pointing them back. Stay in the asana for 3-10 seconds depending on your capabilities. Then repeat the same thing in the other direction.
Eka pada bakasana
3-eka pada bakasana
Place your feet together and bend your knees slightly. Lean your body forward and place your palms on the floor. Place your palms slightly wider than your shoulders, “spreading” them across the mat. Shift your body weight to the toes of your feet and hands, lift your heels off the floor. Spread your knees slightly and rest them on your shoulders (or armpits). Raise your feet off the floor, bend your knees more (your stomach is almost pressed against your thighs). Keep your balance. Then point your feet to the left, while straightening your left leg and leaving your right leg bent. Watch the position of your neck and actively work your abdominal muscles. Hold this position for 3-10 seconds , then repeat the same in the other direction.
Eka pada kaundiniasana
4- eka pada kaundiniasana
Stand up straight with your feet together. Step back with your left foot and bend your right knee. Stretch your arms to the sides, perform Warrior I pose. Then lean your body forward, pressing your right side to your right thigh. Lower your right hand down and move it back, clasping your left wrist with your palm. In this position, straighten your right knee while continuing to press your right side toward your right thigh. Point your chest forward.
After 1-2 seconds, release your palms, move your body even lower, lower your palms to the floor slightly wider than your shoulders. Place your right hand to the right of your right foot (the right thigh rests on the right shoulder). Press your palms into the floor with your middle fingers pointing forward. Transfer your body weight to your hands. Extend your right leg forward (it rests on your right shoulder). Bend your elbows more, work with your abs, point your body slightly forward. Extend your left leg back, lifting your foot off the floor. Hold this position for 3-10 seconds , then repeat the same in the other direction.
Mayurasana
5-mayurasana
Sit on the floor with your shins flat on the floor. Spread your knees slightly to the sides. Place your hands on the floor (point your fingers toward you, place your wrists as close to each other as possible). Place your palms flat on the mat. Bend your elbows. Lean your body forward, placing your ribs on your shoulders. Lower your forehead to the floor. Actively work your abdominal muscles, transfer your body weight to your arms. Then, maintaining your balance, lift your forehead off the floor. Raise your legs above the floor one at a time. Hold this position for 3-10 seconds .
Leading exercise to the position of “Bhujapidasana”
6-leading to bhujapidasana
Stand straight, feet shoulder-width apart. Bend your body forward and down, bend your knees slightly. “Dive” with your body forward, between your legs. Use your palms to grab your ankles. Stay in this position for 10-15 seconds.
Bhujapidasana
7-bhujapidasana
Stand straight, feet shoulder-width apart. Bend your body forward and down, place your shoulders under your hips, place your palms on the floor, fingers apart. Bend your knees and elbows. Actively work your arm and abdominal muscles. Smoothly straighten your elbows, lift your feet above the floor and bring them together in front of you. Then lift your pelvis up, working more actively with your abs, stretch your feet forward. Stay in this position for 3-10 seconds . Don't slouch.
Ashtavakrasana
8-ashtavakrasana
Sit on the floor with your legs straight. Bend your right leg and lift it up, with your hands place your right shin on your right shoulder. Lower your right hand to the floor and place it at the level of the pelvis, press your palm to the mat, spreading your fingers to the sides. The right thigh presses against the right shoulder. Also lower your left palm to the floor, pressing it to the floor. Transfer your body weight to your arms and lift your pelvis off the floor. Working your leg and abdominal muscles, lift your left foot off the mat. With your knee bent, cross the ankles of both legs. Bend your legs more strongly at the hip joint, move your pelvis back and straighten both legs. By bending your elbows, direct your body forward and down until it is parallel to the floor. Hold this position for 3-10 seconds , then repeat the same in the other direction.
Try to perform these asanas in a version that is accessible to you. You may be able to hold the poses for just 1-2 seconds at first - this is normal. Keep practicing and strengthening your muscles, the fixation time will gradually increase.
Shavasana (Corpse)
Shavasana is considered a yoga pose for non-beginners. This is a position that all yoga masters know. A beginner may find this asana simple and easy to repeat. But this is not true at all. It takes years of practice to master this pose. The main difficulty of Shavasana is not the problem of physical execution. It’s not a problem to lie down on a flat surface and spread your upper and lower limbs slightly apart. The main thing is to completely relax your body and mind. The practicing yogi will need to feel how every part of the body relaxes. Only then is “mental real estate” achieved, which is not easy.
The effects of use are:
- Feeling of a powerful flow of energy;
- Relieving stressful feelings;
- Victory over insomnia and diseases of the nervous system.
- Ensuring normal blood flow.
Yoganidrasana (Yogic sleep)
It is necessary to reach a borderline state when a person is awake and asleep. It is important to do the exercise regularly. Only under this condition will it be possible to achieve a phenomenal effect on all organs and systems of the body. The body position characteristic of this asana is only seemingly confusing. Practice carried out systematically over the years will make it easy to achieve a state where, in a supine position, the soles of the feet are brought together behind the back of the head. It is important to press your back to a horizontal surface. Hands close behind in the lumbar region.
The ensured state when the spine is elongated allows the practitioner to achieve:
- Getting rid of chronic diseases associated with the back area;
- Restore the liver and kidneys, ensuring their full functionality without disease.
Lotus Pose (Padmasana)
Probably, the trademark of every yogi is the Lotus pose, and if you are serious about practicing yoga, then you definitely need to master it.
To easily sit in Padmasana, you need to have a flexible ankle and good stretching of the inner thigh.
This asana is often used for meditation, relaxation and self-knowledge. It is not for nothing that the lotus flower is its symbol. This amazing plant exists in three elements at the same time. Its roots cannot be seen, they go deep into the ground at the bottom of the reservoir, the stem and leaves are in the water, while the flower reaches towards the sun and “breathes” the air.
The magical properties of the lotus have been attributed to it since ancient times, where it was often a symbol of something divine, conscious and wise.
This is why many practitioners are so keen to sit in the Lotus position, but for a European person this usually causes difficulties, since in many Eastern cultures the cross-legged position has been used since childhood, while we get used to sitting on a chair. But with the proper desire, you can master it through regular training.
It is important not only to learn how to hold this asana for a long time, but also to relax in it
Technique:
- Sit with your legs extended in front of you.
- Keep your back straight, but not tense.
- Take the foot of your right foot and place it on top of the front of your left thigh.
- The left foot, accordingly, needs to be placed on the right thigh.
You may feel a stretch in your thighs or lower legs, but should not feel pain in your knee or other part of your body. As we remember, the main principle of yoga is non-violence, including towards one’s own body.
In preparation for Padmasana, Hero Pose (Virasana), Bound Angle Pose (Baddha Konasana), Head to Knee Pose (Janu Sirsasana) and Half Lotus Pose (Ardha Padmasana) can help - this is the closest asana, which does not require such a good stretch.
There are few contraindications for this asana, but if you have any problems with the knee or hip joints, or leg injuries, then it is better to avoid the Lotus pose.