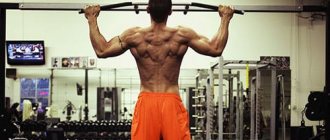
Pull-ups are a basic gymnastic exercise. Different variations primarily load the back or arms, but almost all of them build a muscle corset, increase strength, and strengthen ligaments. Movement is extremely beneficial for the spine, as it helps relieve the compression load from working with weights. Pull-ups can be performed by children from a very early age, and by those who are prohibited from applying compression load on the spine due to injury. The exercise became the basis for an entire sport – workout. There are a lot of variations. And fans insist that this is the most functional exercise.
How a pull-up can save a life
Imagine an ordinary day for a person. He rides the subway, raising his hands and grabbing the handrails. He lifts heavy objects from the top shelves and puts them back. Finally, he carries the shopping bags up the stairs and rocks the baby. What is this? All of these movements work your back. The stronger the back muscles, the fewer household injuries you can get. Strong muscles also protect against injuries from falls on ice and unstable surfaces.
Pull-ups help get rid of back pain, which is often considered a symptom of osteochondrosis. In fact, they are caused by muscle spasms and vertebral displacements, which provoke pinching of the nerve roots. Such pain occurs in people with weak, untrained muscles. Therefore, it is important to pull yourself up if the work is office and you need to spend more than 8 hours on it.
Of course, the skill of lifting your own weight with your hands can also help in extreme situations. Fires, floods, escape from criminals - all this is easier to survive if you can climb onto a stable support in a safe place.
In addition, it is also important for representatives of certain professions to catch up - we are talking about those who want to connect their lives with the fight against crime, fires, protecting people in extreme situations and medicine. Yes, strong arms and back are sometimes necessary to turn the patient over and place him on a stable surface to perform manipulations.
What muscles work
Pull-ups work not only the lats, but also the biceps, deltoids, and the core muscles as stabilizers.
In more detail it looks like this:
- The lats and biceps provide lifting of the body to the bar;
- The forearms stabilize the body while hanging;
- The oblique abdominal muscles and rectus muscle allow you to eliminate body sway and pull up effectively;
- Rounds and diamonds tighten as the body is pulled straight toward the bar;
- In this movement, both the middle and rear deltoid bundles work.
The load can be shifted if different types of grip are used when doing pull-ups. The width of the grip affects which muscles allow you to launch from a hang, and which muscles “reach” the body to the bar.
The most common types of pull-ups are:
- The most common pull-up “for the back and biceps” is with a medium grip, shoulder-width apart. In this case, the load is evenly distributed between the lats and arm muscles, and this option is recommended for beginners to perform their first pull-up.
- Narrow reverse or medium reverse grips are aimed at primarily developing the biceps. This variation of the movement helps strengthen the ligaments and tendons of the arms, and also improves the mobility of the shoulder joints. It is considered less safe for elbows, so it is not recommended for injuries.
- A wide grip helps develop the lat muscles. At the same time, the wide one behind the head works more on the “depth” of the back, and the classic one – on the width.
Less popular pull-up variations for more emphasis on the shoulders and biceps:
- A parallel grip, when the palms are aligned with each other and the fingers are facing each other, is used to pump up the arms and the “lower” lat band.
- A narrow straight grip allows you to work your deltoids too.
- Forward and reverse grip on one hand. This is the heaviest version of the pull-up. Used by sports professionals to increase the load. This is a pull-up variation that helps maximally strengthen the arm muscles and ligaments, but puts less stress on the back and more on the stabilizers.
But that's not all. Negative pull-ups are used to train beginners. They represent lifting the body to the bar in any way, and smoothly lowering it into a straight hang. When lowering, the muscles resist the force of gravity and are trained. Over time, those who do pull-ups in this style will be able to perform the exercise in the usual classical form.
Kipping pull-ups or using the force of inertia are the calling card of CrossFit. But in fact they were invented by gymnasts. It is not so much strength that is trained here, but general and local muscular endurance, as well as the cardiovascular system. Kipping pull-ups are an excellent replacement for cardio intervals. Besides. This movement teaches you to engage your core and legs.
Almost any type of pull-up can be made more difficult by using weights that are attached to your belt.
Pull-up technique on the horizontal bar. Do It Right!
Benefits of exercise
By regularly performing pull-ups on the bar, you will work a huge amount of the core muscles, improve your posture and strengthen your grip strength. In addition, the exercise involves hanging in an extended state at the lowest point of the amplitude. This creates excellent decompression of the vertebrae in the cervical and thoracic spine and serves as an excellent prevention of diseases of the musculoskeletal system.
By holding for a few seconds at the lowest point, you relieve hypertonicity from the spinal extensors and stretch the muscle fascia. Due to this, over time, the stoop disappears, the pressure between the vertebrae decreases and the mobility of the neck and shoulders improves.
Pull-up workout options
Different goals require different styles.
For general physical training
If we are simply talking about strengthening muscles and combating physical inactivity, 2-3 sets of 10-15 repetitions of pull-ups without weights are enough. You can perform the movement anywhere - even on the horizontal bar in the yard, or in a fashionable fitness club. The pull-up is a great exercise because it really works your back and arms, and it can be done by anyone.
What if it is not available due to not very developed physical qualities? It's worth trying negative pull-ups, or attaching a band to a pull-up bar and locking your legs in a shock absorber loop to help you pull yourself up. The same effect can be achieved if you perform the movement with the help of a partner.
For gaining muscle mass
You need to do pull-ups 8-12 times in 3-4 approaches. It is important to fully recover between approaches and perform the movement in full amplitude, however, “releasing” tension at the extreme point of the amplitude, at the bottom, is not recommended. A pull-up workout will be more effective if performed with a weight that makes performing the specified number of repetitions quite challenging.
Developing pure strength with pull-ups requires no more than 5-6 reps per set. In this case, significant weights are used, and extremely smooth, slow movements, without any kipping or swinging.
Execution technique
There are features in each pull-up variation. There is only one thing in common - you need to try to first bring the shoulder blades together, and only then bend the elbows.
Classic medium grip pull-up
This is a medium straight grip, that is, the palm in the hang is directed away from the face of the person performing the exercise. If the palm and fingers point forward towards the face, then this is a reverse grip.
This pull-up option is suitable for those who need to pass a test in a military or physical education institution; it develops the overall strength of the back muscles. For beginners, this pull-up has a lot of advantages - first of all, it develops the biceps and back in a balanced way.
The sequence of actions is as follows:
- You need to grab the bar with a straight medium grip shoulder-width apart, a slightly wider grip is allowed - 2-3 cm, but not narrower;
- They climb onto the high crossbar using a support or from a jump. The second option is not recommended for beginners, whose weak ligaments may not provide stability in the shoulder joint. Simply hang on a low bar with your knees bent;
- First you need to stabilize your shoulder blades and shoulders while hanging. To do this, you should stop swaying and bring your shoulder blades towards your spine so that your shoulders seem to “open” to the sides;
- After this, a pull-up is performed - the chest is pulled towards the bar, the elbows are bent and moved to the sides. The body is held at a slight angle to the crossbar;
- As soon as you touch the crossbar at the top, you should smoothly lower down;
- The work takes place in a controlled style, raising and lowering the body along an arched trajectory; a straight line can be drawn only if you take the athlete’s tailbone as a reference point. The shoulders arc every time the athlete pulls up and down
This version of pulling up requires control over the lowering too. If you constantly lower yourself into a “dead hang,” that is, fully extend your elbow and shoulder joints, the movement will be much more difficult. Beginners are not recommended to work from a “dead hang”; this is a variation for intermediate ones.
How to Learn to Do Pull-Ups - 5 SIMPLE STEPS (Pull-Ups on the Horizontal Bar for Beginners)
Wide grip pull-up technique
There is little difference here, except that it is almost impossible for a complete beginner to do this exercise right away without any preparation. The movement is anatomically more complex; the wider the shoulders and the shorter the arms, the more difficult it is.
The exercise is performed like this:
- Hanging on the horizontal bar is taken with a grip 5-10 cm wider than the shoulders, but it should be comfortable; if the athlete experiences pain at the start of the exercise, the grip is too wide;
- As you exhale, the shoulder blades are brought together to the spine, the chest seems to be pushed forward, the arms are bent at the elbows, and the chest is pulled up to the crossbar;
- As you inhale, smoothly return to the starting position;
- In the lower part of the amplitude, you cannot relax the body too much, so that the shoulders go to the ears. This will create unnecessary tension in the trapezius when performing the movement, and will not allow the back muscles to be pumped effectively.
In the professional literature, this exercise is also called a wide pronated grip pull-up.
Narrow reverse grip
Many trainers recommend starting with this variation for women and those who have a genetically weaker back.
The technique is like this:
- The hang is accepted with straight arms, palms shoulder-width apart, you should carefully stretch your arms up, grab onto the horizontal bar so that it lies in the middle of your palm, and not on your fingers;
- This exercise is the only variation where the first movement is bending at the elbow joint. As you exhale, you need to bend your elbows and bring your chest to the horizontal bar;
- The lowering is slow; a beginner also does not need to go into a “dead hang” with elbows inserted.
Important note: The narrow reverse grip is better for training the shoulder muscles, but is not recommended for those with rotator cuff problems. In case of shoulder injury, a medium straight grip is optimal, and only after rehabilitation.
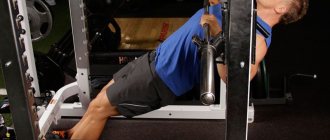
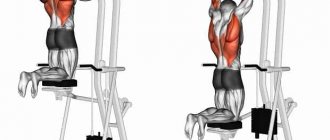
Pull-up on a horizontal ladder
This is not quite a pull-up in the classical sense of the word. The athlete's feet are on the floor. To perform this movement, you need to hang straight on the bar so that your back drops down and place your feet on the floor. Next, the back is brought out parallel to the crossbar, and the arms are perpendicular.
The exercise itself resembles a pull-up due to similar mechanics, but most of all it resembles a mid-block row to the belt. This movement develops the lats and prepares the athlete for a conventional pull-up.
“Australian” pull-ups are also done on ladders on the playground. Here it is important to hang so that your shoulders are at the level of the bars on which your arms are fixed, and your feet are secured so that the spine is in a plane parallel to the floor.
It is worth progressing towards a regular pull-up when you can perform the Australian pull-up for 15-20 repetitions.
Progression in pull-ups looks like this - Australian, negative repetitions, pull-ups with a rubber shock absorber, classic pull-ups.
GRIP DIFFERENCE IN PULL-UPS. 6 Types. BIOMECHANICS
Basics of proper breathing when doing pull-ups
It is very important to know how to breathe correctly when doing pull-ups on the horizontal bar. Thanks to the correct breathing technique, you will be able to get less tired during physical activity, in addition, your muscles, like the body as a whole, will receive a sufficient amount of oxygen. Breathing should be even and deep, you should not hold it.
For any type of physical activity, the general rule applies: the main effort is performed on exhalation, relaxation - on inhalation.
To understand how to breathe correctly when doing pull-ups, follow a certain algorithm that will help you adjust your breathing in the right way and make it easier to perform the exercise:
- Hang on the horizontal bar, bend your legs slightly at the knees and take them back.
- Squeeze your shoulder blades to the maximum point of tension while inhaling deeply through your nose.
- Slowly lift your body up while exhaling smoothly. It should continue until you reach the top peak point.
- Without fixing the body at the top point, begin to slowly descend, accompanying the descent with a smooth exhalation through the nose.
- Repeat the exercise again in the same sequence.
Anyone can learn to do pull-ups. To do this, you only need regular training and knowledge of some basic rules. We invite you to watch a video on how to properly do pull-ups on a horizontal bar, which will also help you master this exercise.
Problems of horizontal bar lovers
Pull-ups are a rather traumatic thing, especially if you haven’t done anything before. Beginners should choose rubber-coated platforms, or horizontal bars that are dug directly into the sandbox, so as not to be injured if they fall. And it is quite real, especially if there are problems with the grip and exorbitant ambitions that do not allow a person to stop training in time.
In addition, the practitioner should always have magnesium on hand to prevent slipping, calluses and damage to the skin.
Injuries
The main way to prevent injury is to normalize your relationship with your own ego. Stop trying to force jump jumps if you don't know how to do a pull-up yet. Do not perform exercises using the force of inertia if you do not yet have enough muscle strength. Try to do everything technically and complete tasks gradually.
Well, here are the classic recommendations - first warm up by lightly running around the site, then by rotating in all the main joints, after that by pulling the rubber to your chest with the shock absorber secured on top.
Calluses
The reason for their occurrence is not excessive work, or even sweaty palms. Usually, calluses plague those who really like to hang on their fingers, and even swing at the same time. From the very first training, learn to make a palm grip so that the body does not sway from side to side and does not perform pendulum movements. This will help get rid of callus problems. If your training volume is high and you are using weights, feel free to use straps. A good grip is great, but regular training without pain and calluses is even better.
In general, some “roughness” of the palms is the norm, and it only helps to stay on the horizontal bar.
Ligament pain
Here it is necessary to distinguish between inflammation of the ligaments and joints, which are dangerous to health, and muscle soreness. Soreness is a normal practice, and it cannot harm your training in any way. On the contrary, you should actively warm up on days that are not heavy training.
But if the ligaments and joints hurt at night, become inflamed, or seem to “tug” when you are at rest, it is better to consult a doctor to rule out health problems.
Falls from the horizontal bar
This is also normal practice; you need to learn to jump softly and onto the surface. But in fact, most often those who do not use magnesium and who have a weak grip fall from horizontal bars. The second category of athletes must simply develop their grip. If the metal of the crossbar is smooth and slippery, it is worth wrapping a medical plaster around the crossbar to ensure normal adhesion to the coating.
Train your core to learn how to do pull-ups faster
Core training should be a mandatory part of your pull-up program. By strengthening your midline muscles and learning to control them, you will gain more control over your body. A tight, collected body makes it easier to work the lats and biceps in pull-ups.
To do this, add just two exercises to your workout and gradually progress in them.
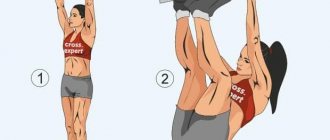
Core exercises #1. Raising your knees to your chest
This is a dynamic exercise that will simultaneously strengthen your grip and pump up your abs. When performing lifts, pay attention to your technique: deep grip, active shoulders, pointed toes. Avoid swinging your body, lower your legs slowly and under control.
Raising your knees to your chest
Recommendations and tips
Following these simple rules will help increase the effectiveness of your training:
- Don't start learning with kipping and butterfly. The beginner works smoothly and under control;
- Don't fool yourself by doing pull-ups with your arms round your back. Lightweight athletes can do this, but they don’t work their back;
- If all else fails, add auxiliary exercises for the biceps and back;
- Do not neglect the help of the belayer, there is nothing shameful in this, and it helps to avoid injuries due to falls;
- If you do strength training in the gym, do pull-ups once a week, if you just go to the horizontal bars - 2 times, alternating a day of pull-ups with a day of push-ups.
And remember that anyone can learn how to do pull-ups; this will help you avoid various problems with pain in the spine and help improve your physical condition.
It's BACK PULL-UPS, baby!
Two reasons why you can't do pull-ups
- Reason #1. You're too big. Maybe you're overweight, or maybe you're a heavyweight powerlifting champion. The physics is simple. In pull-ups, body weight is an additional burden for the muscles that are involved in the pull-up. And the greater the weight, the stronger they need to be to lift your body to the bar. Work on your diet, lose those extra pounds, and maybe you can do your first pull-ups without additional training.
- Reason #2. You're too weak. In this case, you will not get a centimeter closer to the cherished bar of the horizontal bar. You need a workout program for pull-ups. You must become stronger in the accessory exercises, increase the mass and strength of the working muscles before climbing the bar. Likewise, if you want to deadlift a 500kg barbell, it makes no sense to set that weight and try to lift it off the floor. You need to ease the exercises up to your current capabilities and train to improve those capabilities.
Determine your category, and forward to success!
Before you start training, set yourself the exercises that you can do. Then you need to determine the group and, accordingly, the exercise program, which is designed for two weeks. A month after the start of serious professional training, it is necessary to undergo testing again.
Your result: from 0 to 1
Your difficulties: you are not ready yet (can’t support your weight)
What will help: the best option for you is to do only the reverse part of the pull-ups: use a bench to help, place it just below the crossbar, help with your legs to do the pull-up. Give yourself a minute of rest after each set.
Train according to the schedule:
First training week: 3 sets of 5-6 repetitions of the exercise, lowering time 5-6 seconds
Second training week: 3 sets of 5-6 repetitions of the exercise, lowering time 5-6 seconds
Third training week: 2 sets of 5-6 repetitions of the exercise, lowering time 8-10 seconds
Fourth training week: 2 sets of 5-6 repetitions of the exercise, lowering time 8-10 seconds.
Your result: from 2 to 4
Your difficulties: less than necessary number of repetitions during training
What will help : first, reduce the number of repetitions of the exercise while increasing the number of approaches. Focus on the first repetitions of exercises, as they allow you to establish the “brain-muscle” connection.
Train according to the schedule:
First training week: 8 sets, 50 percent of the maximum number of reps performed for the best set, 1.5 minutes rest.
Second training week: 8 sets, 50 percent of the maximum number of reps performed for the best set, 1 minute rest.
Third training week: 8 approaches, maximum number of repetitions performed for the best approach, 1.5 minutes rest.
Fourth training week: 8 sets, maximum number of reps performed for the best set, 1 minute rest.
Your result: from 5 to 7
Your difficulties : you have strength, but not enough endurance
What will help : increase the number of repetitions of the exercise. For example, if you previously performed 3 sets of 6 repetitions, do 30 repetitions, regardless of the number of repetitions in each approach.
Train according to the schedule : do pull-ups as many times as possible, rest for 1 minute, do more pull-ups as many times as you can.