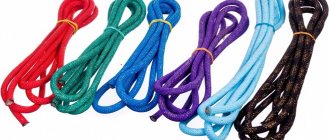
Bright and spectacular performances with the ribbon are the very part that no rhythmic gymnastics can do without. The fact is that if an athlete learns to skillfully handle this sports equipment, then even the most inconspicuous rhythmic gymnastics ribbon can make her performance unforgettable.
At the same time, it is possible to use a bright ribbon not only when entering the gym, but also when dancing at home.
Bright and spectacular performances with the ribbon are the very part that no rhythmic gymnastics can do without.
However, this equipment is ideal only for those girls who compete in professional competitions, but for training or performances in kindergarten, you should choose a ribbon that you can actually make yourself, just like sewing an inexpensive swimsuit.
Wand
The gymnastics ribbon can have a cylindrical or conical stick. They produce a structural element from plexiglass, plastic, and other lightweight materials. The stick is connected to the ribbon using a nylon pigtail or carabiner. Sticks are selected based on the length of the existing tape:
- for 6-meter products, sticks up to 55-60 cm in size are usually chosen;
- For 3-4 meter ribbons, sticks up to 50 cm long are used.
Balls
Balls used in rhythmic gymnastics, like other objects, have gone through a lot of changes. Initially, they were significantly smaller in size: slightly smaller than a tennis one. The gymnasts' manual dexterity and attentiveness helped them not to lose the apparatus and smoothly perform any, even the most complex movements.
Over time, the diameter of the ball increased, and subsequently regulations were adopted, in accordance with which the weight of the object was determined. Thanks to such changes, the ball can not only be tossed and thrown, but also rolled over the body, emphasizing the plasticity and flexibility of the gymnasts.
Sultans
How to easily, simply and beautifully make sultans for dancing, choreographic compositions, morning exercises and outdoor games with your own hands is described in the materials in this section.
To make these pompoms, various improvised or waste materials will be useful. For example, colored ribbons, New Year's tinsel and "rain", old markers, "T-shirt" bags from supermarkets. Step-by-step master classes on creating plumes are supplemented with visual photos. Here you can also find gymnastics complexes and scripts for dance compositions with sultans.
Complex design
If you try, you can make a gymnastics ribbon that will rotate freely relative to the stick. This wand is more difficult to use, but the tricks will be more beautiful.
- Take a plastic tube or the tube is made of tin.
- A plug is placed on one end, and a cap with a hole in the middle is placed on the other. The cap can be made from tin.
- A wire about eight centimeters long, bent in half, is inserted into the hole - hooks are made on one side to hold it in the cap, and a ring on the other. The burrs should not interfere with the free rotation of the ring.
- At the edge of the tape you need to make a tube into which a rope 14 centimeters long is inserted. The edges of the rope are sewn together.
- Now the rope ring is connected to the wire ring using a carabiner, possibly a fishing carabiner (they are intended for attaching a spoon to a fishing line).
How to choose the right wand
In order to become a champion, not only the length of the gymnastic ribbon must be correctly selected, but also the stick for it, so that a gymnast of any age will be comfortable.
If the length of the ribbon in rhythmic gymnastics is six meters, then the length of the stick for it should be no less than fifty-five or sixty centimeters.
The stick for the gymnastics ribbon must be well-chosen in size
In this case, the sasaki ribbon stick should be:
- fifty centimeters if the gymnastics ribbon was three or four meters;
- sixty centimeters, if the tape itself was six meters long;
- twenty-five or thirty centimeters if the ribbon is intended for children.
In addition to the fact that a stick for a gymnastics ribbon must be well-chosen in size, it can be one-color or two-color, lightweight or three-color, have a rubberized handle, or belong to a certain class (standard, junior).
For physical activity
In kindergarten, teachers often use various objects for physical education, which both focus attention and are a bright element of the classes.
Simple exercises with plumes can turn any physical education lesson into a holiday. When performing various tasks, children wave iridescent and rustling plumes, creating a great mood.
For kindergarten, bright crafts are indispensable. With its help, a child can turn into a magical fairy-tale character, which is indispensable when holding children's matinees. Using sultans, children have more fun, for example, calling Santa Claus with a big bag of gifts.
Or the same dance of snowflakes using plumes becomes magic - the rain rustles and shimmers, a great mood is guaranteed not only for children, but also for adults.
Such an easy-to-make craft as a sultan is very multifunctional; its use can be used in many areas.
DIY gymnastics ribbon
It is not always wise to spend money on buying ready-made sports equipment.
If desired, if funds and materials are available, a gymnastic ribbon can be made by hand. The first priority here is preparing the stick. A light plastic tube can serve as a good basis for making an element. The edges of one of its ends are rounded with a file, and the other side is equipped with a metal cap. A hole with a diameter of about 2-3 mm is made in the central part of the latter. Next, use a twig with a diameter of approximately 2 mm and a length of 70-80 mm. Its end is split to form antennae, which are inserted into the hole in the cap and bent in opposite directions. A ring is created at the second end of the rod, to which a rotary carabiner with a fixed ribbon is subsequently attached.
A piece of elastic material of arbitrary length can be used as a tape. If desired, it can be shortened based on personal convenience. It should be understood that the longer the tape, the more developed the technique for performing the exercises should be.
How to starch tape
Before starch, you should purchase the main component. Both potato starch and those made from corn kernels will do. But if the tape is light, then potato starch is preferable, since it has a bluish tint and does not leave a yellowish tint. In addition, the process of hardening and drying is somewhat faster than that of corn.
The tape is made from durable but very light fabric, so you will need a little starch. It is necessary to observe the proportion of the mixture: 1 tbsp. l. starch for 1 tbsp. water. It is advisable to take 3 tbsp for a six-meter tape. l. starch powder and 3 tbsp. water. The denser the tape fabric, the more starch you will need.
- The starching process begins with dissolving 3 tablespoons of starch in a small amount (one glass) of cold water.
- At this time, water (2 cups) is heated in a saucepan on the stove. Before it boils, dissolved starch is poured into a container with boiling water in a thin stream. Pour in carefully, in a thin stream, constantly stirring with a spoon, making circular movements along the sides of the pan. When the contents of the pan boil, reduce the heat to minimum and boil for 5-10 minutes. Stir constantly. During this time, the paste will acquire maximum transparency.
- One of the main conditions for high-quality starching of the tape is the absence of lumps in the paste. To improve the quality of the composition, after its preparation it is filtered through a strainer or gauze folded in several layers. If the composition is too thick, then dilute it with water at room temperature and stir thoroughly. Before starching, the tape must be thoroughly washed using detergent and then rinsed. You can starch a cloth that is damp, slightly wrung out, or completely dry.
- After preparing the mixture, the tape should be completely immersed in it. It is advisable to leave it to soak for a few minutes. The optimal time is 15-20 minutes. At this time, it should be stirred slightly so that the paste completely saturates the fabric. At the end of the set time (can be held for up to 20 minutes), the tape should be taken out and squeezed, passing between two fingers, to release the excess amount of fastening agent. Then hang to dry and iron through paper without using steam.
After this procedure, the starched fabric has an airtight, smooth film on the surface, enveloping the fabric in an even layer.
Other methods of starching
When buying starch, you can opt for an already diluted product or in the form of an aerosol. But the method using starch powder is more reliable and cheaper.
Starch the tape using a spray with a similar effect. It should be sprayed from a distance of 20-25 cm, having first studied the attached instructions. After drying, iron. The tape will acquire shine, smoothness and strength.
Liquid starch sold in retail chains cannot be boiled. Just pour it into a container and dip the tape into it. After 5-10 minutes, remove the tape, dry it, and then iron it.
Ribbons
The rhythmic gymnastics ribbon owes its appearance to the truly great ballerinas of the Mariinsky Theater. For performances, they used long scarves and stoles made of light fabrics to look even more elegant and graceful on stage. Gradually, these times became a thing of the past, and stoles were replaced by a much more interesting item - a ribbon. According to the rules of the performance, it cannot be in a static position, so lightweight materials are still used for its manufacture.
Features of this tape
Buying a ribbon for gymnastic exercises will not be a problem. Having ordered a product online, all you have to do is wait for the package to be delivered to your home. Firms specializing in the manufacture and sale of sports goods will ensure the purchase of tape made from high-quality fabric from both domestic and foreign manufacturers.
To make ribbons used in rhythmic gymnastics, satin is usually used. This is a rather soft fabric that cannot hold the required shape on its own. Starched tape does not wrinkle as intensively and is less susceptible to contamination.
Rhythmic gymnastics tape can only be washed in cold water without aggressive detergents.
In order for the ribbon to retain its properties and look beautiful at the most crucial moments of the competition, it must be properly cared for. The satin can be washed in 30-degree water using a washing machine in the “delicate” or “hand wash” mode. But even in this case, after 2-3 washes the tape loses some properties.
First of all, the tissue will lose strength, which will prevent the athlete from performing the exercises as required by the program. To prevent this from happening, the rhythmic gymnastics tape must be starched after each wash. In addition, it should be sprayed with an antistatic agent so that during movement it does not produce a static effect and does not stick to the carpet of the hall or to the athlete’s costume.
If there is a need to color the tape or apply a design, you can use acrylic paints or special markers for drawing on fabric. The dried tape is ironed through thin cotton fabric. Ironing is carried out at maximum temperature with steaming.
Rhythmic gymnastics ball
When choosing a ball for rhythmic gymnastics, you need to remember a few basic rules: The ball is rubber. Or made from synthetic materials that are as elastic as rubber.
Diameter - 18 - 20 cm, weight not less than 400 g, any color.
For children under 7 years of age and up to 130 cm in height, it is better to buy a junior ball with a diameter of 16 cm. Despite the fact that the child will grow, it will be possible to train with such a ball for another 2-3 years. Standard balls at this age are inconvenient to use and are too large for a child.
For older athletes (9-10 years old), gymnastic balls with a diameter of 18.5 cm intended for adults are optimal. In addition to the ball itself, each girl will need a pump to inflate the object and a case for storage and transportation. How it behaves: “Rolls away.” It is round and often difficult to catch. However, many gymnasts love it more than other objects - it is pleasant to hold in their hands.
How to make sultanas?
How to make sultanas from garbage bags?
Do-it-yourself sultanas for kindergarten are made from both small bags and large garbage bags. But bright garbage bags are easier to find in stores, and they will make the sultanas for kindergarten more magnificent. Therefore, we will tell you in more detail exactly how to make sultanas from garbage bags.
For one sultana you will need 40 garbage bags. With so many of them, you can make not just a balloon from bags, but a whole cheerleader pom-pom, big and fluffy. So, for two large plumes, you need 80 garbage bags.
The first step is to tear off all the bags from the roll and place 40 bags on top of each other. If you do not come across straight bags, as in the next photo, but bags with a rounded bottom, don’t be upset. From such bags you need to cut off the bottom edge and straighten them, then they will also turn into a regular rectangle.
The next step is to cut off the top edge of the bags. In our example, bags with puffs are used. We don't need these puffs; we carefully cut them off and send them to the tank.
Cutting puffs from bags into plumes for kindergarten
Next you need to cut off all the other sealed edges. To make the plumes from garbage bags soft and fluffy, we cut the garbage bags around the entire perimeter.
If you have a stapler on your farm, first fasten the bags together, so they will not move and it will be more convenient to work.
Cut off all sealed edges from the bags
Now you need to fold the blanks for the plumes from the bags in half. The folded edge should be placed on the opposite side of you.
Fold bags for sultanas in half
Let's start cutting the fringe. In our example , the stripes are about 2 cm thick. The thinner the stripes are, the more magnificent the plumes for kindergarten will be. It is better to use good and sharp scissors.
Cutting the fringe for the pompom
When the strips are cut, you need to roll the bags. Try to wrap them as tightly as possible.
We roll up the future dance sultana into a roll
All that remains is to wrap the handle with tape. Do not skimp on tape, try to secure everything well. Instead of tape, you can use electrical tape or adhesive tape, in short, any sticky tape that you have.
Wrap the handle with tape
All that remains is to fluff up the plumes well with your own hands. Just rub the fringe with your palms.
INTERESTING: To make the plumes from the bags very fluffy, spray them with antistatic spray for clothes. The packages will stop electrifying and sticking to each other.
Ready-made fluffy sultana from garbage bags
Pompoms from garbage bags: Video
Bunch of ribbons
Sultanas made from satin ribbons look beautiful. Ribbons can be plain or in different colors. It depends on what they are needed for. If a child dances the Kalinkui dance at a matinee, then they make red plumes, if the dance of sun rays, then they make yellow or bright orange ones. To make the product comfortable for the child to hold in his hands, before making the plumes with your own hands, you need to pick up a small round stick (from an old flag or cut off a tree branch; in extreme cases, you can always use a pencil).
To keep the bundle together, the ribbons can be sewn with thread or glued to tape around the stick. The holder is wrapped with colored tape. That's it, you can go to the holiday.
Making “rustles”
We separate 5 more packages from the package. We cut off the handles.
We take the first 10 bags with cut off handles. Cut off the bottom of the bags.
We bend them in half so that the fold is visible.
We open it and fasten the edges along the seam with clothespins to make it easier to cut later.
We begin to cut the strips from the edge to the middle, not cutting to the fold 1 cm. The thickness of the strips is 0.5 - 0.7 cm.
Having cut on one side, we begin to do the same on the other side of the packages.
We do the same with the next 10 packages. Then with five more.
Having cut and folded 25 bags, roll them up and tie the middle tightly with the handle of the bag.
Then we wrap it with tape several times for strength.
After that we start fluffing.
The results are wonderful “rustles”.
They can be called flowers, snowflakes, meteorites, etc.
Everything will depend on your imagination.
From one package you get 2 large “rustles”, 5 plumes or 10 snowballs.
Pompom on fingers
The second way to make a pompom is to wind the thread around your fingers. It differs in the speed of creation. So, we make a pompom from threads. The most important thing about this option is that you won’t need anything else besides threads.
To make it, you first need to wind the threads several times around the four fingers of your hand. After this, you need to tie a bunch of threads in the middle without removing them from your fingers.
The most inconvenient thing is that it is quite difficult to tightly tie the threads wound around your hand without anyone’s help. The pompom is ready!
Agree, it is very easy and fast, but we require the help of loved ones. Now you know a good way to quickly make a pompom.
Pompom using a chair
If you need to make a lot of pompoms quickly, then this option is for you. All you need is scissors, thread and a chair. How to make a pompom from yarn?
The essence of this method is that you first need to form a sausage from threads. Next, cut it in half.
This is done by going through the following steps:
- We take a chair. Gradually wrap it with threads.
- Carefully remove them and tie them with pieces of thread. Be sure to ensure that they are at the same distance.
- After this, we cut the threads in the empty spaces. This way you will have many identical pompoms.
- You can also wrap the threads around the chair and only then cut them. It's much more convenient.
Pompom on a fork
For this method you will only need thread, scissors and an ordinary dinner fork. This way you can make many small pompoms.
Take a fork and wind the threads around it. We rewind it in the middle. Next, you need to trim the threads along the edges and make the pompom fluffier. This is how you get such cute little products.
Felt plumes
Nowadays, needlewomen often use sheets of felt in their crafts. They have bright and rich colors. The material is convenient to work with. It can be cut, glued, stitched. Before you make felt sultanas with your own hands, you need to buy several sheets in sewing accessories stores.
Then the process is repeated according to the example of making paper plumes. If you need a bundle of cut ribbons to have a holder, then use plastic balloon sticks. It's convenient and they look beautiful. If the stick is long, you can cut it in half
Making a fur pompom
In order to make a fur pompom, you will need: fur, stuffing, a needle and thread, as well as scissors and ribbon. First you need to lay out the fur, then cut out a circle of fur from it, and sew the workpiece on the wrong side with large stitches. Then you need to prepare a small amount of filler and tie it with tape. After this, the prepared filler must be placed in the middle of the fur circle, and the tape should be placed outside. Then you need to pull the circle tightly and tie a knot. The ribbon is needed to sew or tie the pompom.
We use bags
You can make very lush plumes from plastic bags, for example, for an autumn matinee. It is in the fall in kindergarten that music workers often write the roles of rain and clouds into the script, especially in younger groups. For such dances you will have to make lush translucent buns. We will tell you further about how to make sultanas from bags with your own hands. First you need to purchase two packages of the simplest bags without a pattern, white and light blue.
If they have handles, they need to be cut off immediately without opening the packaging. Then, using scissors, cut into strips several bags (6-7) of blue color and the same number of white ones. But not completely. They leave a whole strip at the end, which, after cutting, will need to be twisted into a tight cylinder and tied with thread. Then we wrap the edge by which the child will hold the plume with white tape. If you place the bags so that the colors alternate, you will get a beautiful multi-colored bundle.
From the rain
A beautiful option for making sultans is to make it from rain (New Year's decoration). The scope for imagination with this method is also unlimited. You can use one-color rain, or multi-color. To make it, in addition to the rain, we will also need tape and sticks.
We fold the rain in half depending on the desired size of the plumes, and tie the fold with tape. To facilitate the task of gluing the rain to the stick, you can wrap the bend of the rain with tape, forming bunches.
Then we distribute these bundles evenly at the base of the stick and tie them very tightly with tape.
You can also decorate the stick. Wrap the rain under tape, foil or any ribbons.
Such a plume will lift your spirits; it can be used as an accessory for a carnival costume for a kindergarten. Magic fairy, Snow Maiden, Snow Queen - you can beat the sultan in any way you like.
Paper products
Next, we’ll look at how to make paper sultanas with your own hands. To do this, it is better to buy sets of tissue corrugated paper at office supply stores. They need to be unfolded and folded in half widthwise. If the paper is too large, then cut it yourself into rectangles of the required width. Before you make the plums with your own hands, you need to cut the “noodles” at the edges with scissors. You don't need to cut all the way through. Then we unfold the paper.
It should look exactly like in the photo. The unfolded strip of paper is rolled up and the middle is tied with thread. Then we connect both sides from below together, and tie another thread around the knot. It turns out to be a bun with a loop on top. Such a paper plume can be hung on a string by a loop to decorate a room for a holiday, or many plumes can be hung on a fishing line above the ceiling. You will get a beautiful multi-colored lush garland.
How to make a rain sultana on a stick?
It is this question that may unexpectedly and acutely arise on the eve of any holiday if you are the happy parent of a kindergarten-age child.
The sultanas are made from corrugated paper or polyethylene, from ribbons or from film from old video cassettes (who still has them) or from New Year's rain. For a child, it is better to make them on a stick, to firmly hold this attribute in the child’s hand.
To make a rain plume on a stick, we will need the following materials: We measure the length of the rain plume we need, rewind the rain bun with tape. Leave the tail the same length and cut it off.
We bend it in half - one bundle of rain for the plume is ready!
We make the required number of bunches; the splendor of the broom itself will depend on their number.
It is better to make several small bunches of 4-5 to distribute them evenly around the stick. This way the craft will look much neater.
If necessary, saw off the sticks to the required length.
the prepared tinsel bundles tightly with tape or attach them with hot glue to the tip of the stick with a broom in the opposite direction from it.
You can additionally secure everything together with tape on top, while trying to pull it tighter and lay the skeins tighter.
After you have checked that the rain holds firmly on the stick, you can slightly decorate the handle of the sultan itself.
You can cover it with foil, but it is better to wrap the foil on top with transparent tape. It looks, frankly, not very good. And since there is still a month of rehearsals ahead and I want to make it not only strong, but also beautiful, I decided to wrap the entire stick with the same rain using hot glue.
We wrap the rain not only around the stick, but also 1-2 turns on top, so that the stick is not visible, and the broom itself looks like a single whole.
Of course, the question may arise, why not wrap the stick with ribbons? Of course... But here I was not guided by my own imagination, everything depended on the assigned task of the educators of my miracle!
Here's a rain plum on a stick !
Learning to make an interesting option from plastic bags
In order to make plumes from bags, you also need to prepare scissors and tape. The more magnificent the pom-poms should be, the more bags you should take. You can make sultanas in several ways, which are very similar to each other. Some of them will require additional materials, which are indicated in the description.
In the first case, the bags need to be folded in half and secured at the fold with a stapler or paper clips. Then cut off the handles and the bottom of the bag, and then cut the strips, not reaching a little to the edge. For a fluffy pompom, you should make two such blanks. Make a handle from cardboard, rolling it into a tube and securing it with tape. Attach the first blank to it, gluing it with tape, and then attach the second blank just below in the same way. The handle itself can be covered with colored tape, which will add beauty to the craft. At the end of the work, you can put on a glove and fluff the cut strips:
In the second case, there is no need to fold the bag in half. You only need to cut off the handles and make strips towards the bottom, leaving about two-thirds of the bag uncut. There should always be two packages in use, located on top of each other. After the strips are cut, you need to fluff them, and then twist the bags with a whisk, forming a handle from the uncut edge. To prevent the product from unwinding, we fasten the handle along the entire length with tape. Work continues until the plume reaches the desired size. Each time, two bags are cut and wound on top of the previous ones. These plumes are perfect for dancing.
In the third case, the result will be excellent for a kindergarten, because the product will not be too fluffy and voluminous. Carefully cut off the bottom and handles of the bags, then fold the resulting rectangle in half, matching the bottom and top. In this case, cutting the strips will begin from the fold side. You should cut it approximately to the middle, then wrap the uncut part tightly around an unnecessary pencil or felt-tip pen without a rod. Secure the result with tape. We get an excellent children's plume, shown in the photo below. You can also involve children in making it.
Product from bags
Sometimes rustling bags themselves can interest children at a very young age. And if you also make a craft from the bags, then the child’s delight will know no bounds.
What you will need to create:
- packages;
- scotch;
- sticks (can be skewers for barbecue, for example, or pencils, felt-tip pens - whatever you want and is convenient to use);
- scissors.
Now we decide on the size of the future plumes and cut the bags into strips according to size. It is best to cut the bag, leaving the part on which the strips are attached untouched. We will wrap the sticks with this part of the package.
We apply the bags to the stick, trim them to the required size, then wrap the stick in the bag and wrap it tightly with tape.
Sultan goov! The stick can be decorated with colored tape, a bag of a different color or foil.
We make simple sultanas from corrugated paper with our own hands
To make pompoms from corrugated paper, you will also need tape, a pencil, a ruler, metal cutters, an iron and soft curlers. The tape must be thin and wide.
An iron will be needed to straighten the paper, as it is sold in rolls. The sheet must be cut in half lengthwise. If the entire roll will be used, it is better to do this without unrolling it. Fold the resulting sections on top of each other and secure them on one longitudinal edge; this can be done using needles and foam rubber. Step back 1.5-2 cm from the fixed edge and draw a line with a pencil as a guide. The paper must be cut into strips up to the marked line; the width of the strips may vary depending on the desired result.
For one plume, several layers of paper 10 cm wide are enough. The top and bottom layers must be glued with thin tape for strength. One curler is enough to create a pair of pompoms, so you need to cut it in half. To do this, we use metal cutters, because there is a wire inside the foam rubber. You need to remove it and secure the edge of the corrugated paper using the existing hook at the end of the wire:
Then wrap the paper tightly around it and secure with wide or narrow tape. The resulting blank must be inserted into the foam rubber, having first made a cross-shaped cut in order to “sink” the edge of the winding. The sultana is ready. It can be used, for example, for physical education.
We make pompoms from improvised tinsel with our own hands
Every home has tinsel, so let’s consider making sultanas from it. This pompom is perfect for any kindergarten party.
Required materials and tools:
- tinsel
- scissors
- scotch
- stapler
- wooden skewers
- foil
- glue gun
Step-by-step manufacturing instructions:
- We fold the tinsel in half several times, and tie the middle tightly with narrow tape. Trim the edges of the tinsel to separate them into separate strips. You can make several of these skeins.
- Using a glue gun, attach the bundle to the handle, and additionally secure the base with tape.
- The ends of the tinsel need to be secured with a stapler or hot glue so that they do not fluff up.
- Let's start designing the product. We wrap the handle and base of the plumes with foil, so they will look more elegant.
How to make plumes from corrugated paper?
The corrugated paper plumes are bright and rustling. Material for crafts can be found in handicraft stores and florist stores, because this is the same paper that is used to wrap flowers.
Corrugated paper for wrapping bouquets
In our master class, the plumes are made of corrugated paper in three colors, matching the color of the Russian flag. In addition to paper to make a pompom, you will need scissors and tape.
Materials for making sultanas with your own hands
We stack sheets of paper on top of each other, alternating colors. Please note that the width of the roll is enough to make two plumes at once.
Cutting strips
Let's start cutting strips. There is no need to cut the folds on the corrugated paper, just cut them with scissors. When the strips are cut on one side, cut the material into corrugated paper plumes in half.
Cut the sheets of paper in half lengthwise to make two plumes
We roll the paper fringe onto the plumes for kindergarten into a tube. Roll the roll more tightly.
Roll the paper into a tube
All that remains is to secure the handle with tape. If you want the plume to be on a stick, grease a wooden stick with glue and wrap it inside the roll.
Secure the handle with tape
All you have to do is fluff up the paper, and your cute little plumes will be ready!
Ready-made sultanas from wrapping paper
How to make plumes from threads for washcloths?
Sultanas from threads for washcloths are made using the same technology as. plumes made from thin rain These plumes for kindergarten are bright and durable.
Sultans of thread for washcloths
Bunch of ribbons
Sultanas made from satin ribbons look beautiful. Ribbons can be plain or in different colors. It depends on what they are needed for. If a child dances the Kalinkui dance at a matinee, then they make red plumes, if the dance of sun rays, then they make yellow or bright orange ones. To make the product comfortable for the child to hold in his hands, before making the plumes with your own hands, you need to pick up a small round stick (from an old flag or cut off a tree branch; in extreme cases, you can always use a pencil).
To keep the bundle together, the ribbons can be sewn with thread or glued to tape around the stick. The holder is wrapped with colored tape. That's it, you can go to the holiday.
Felt plumes
Nowadays, needlewomen often use sheets of felt in their crafts. They have bright and rich colors. The material is convenient to work with. It can be cut, glued, stitched. Before you make felt sultanas with your own hands, you need to buy several sheets in sewing accessories stores.
Then the process is repeated according to the example of making paper plumes. If you need a bundle of cut ribbons to have a holder, then use plastic balloon sticks. It's convenient and they look beautiful. If the stick is long, then it can be cut in half.
How to make sultanas from ribbons with your own hands?
Ribbon plumes also look very bright and elegant. They are suitable for a spectacular dance not only for the New Year, but also for any other holiday.
DIY ribbon sultans
Sultanas for kindergartens are often made from satin ribbons. But satin ribbons are a short-lived material; they often unravel. And they definitely need to process the edges.
If you are making plumes from satin ribbons, be sure to burn the edge with a lighter or candle. Otherwise the ribbons will unravel.
There is also a more suitable material for making do-it-yourself sultans for kindergarten. This is a rubberized non-woven fabric. It does not unravel at all and does not release threads. If you look hard enough, you can find children's raincoats and rain overalls made from this fabric in second-hand stores. It is thin, slightly rustling, looks like rubber, and does not unravel at all.
Fabric for ribbons
To make ribbon plumes, stack six sheets of rubberized fabric on top of each other, and then bend them in half. The edge where the fold is made will be the bottom of our plume.
Five centimeters from the bottom of our plume should be left uncut - this will be the handle of our plume. Take a felt-tip pen and a ruler and draw a line to which you want to cut the strips. After this, cut the fabric into strips 2 cm wide.
Cutting the fabric into strips
Now our sultanas for kindergarten need to be twisted into a tube. Try to roll the fabric as tightly as possible.
We twist the future pompom for dancing into a tube
Secure the handles of the ribbon plumes with tape. It is better to choose not stationery tape, but painter's tape, it holds better. For beauty, wrap the handles with ribbons from leftover fabric. Our ribbon sultanas are ready!
We secure the handles of the ribbon plumes with tape
Corrugated paper sultans
To make pompoms from corrugated paper, you will also need tape, a pencil, a ruler, metal cutters, an iron and soft curlers. The tape must be thin and wide.
An iron will be needed to straighten the paper, as it is sold in rolls. The sheet must be cut in half lengthwise. If the entire roll will be used, it is better to do this without unrolling it. Fold the resulting sections on top of each other and secure them on one longitudinal edge; this can be done using needles and foam rubber. Step back 1.5-2 cm from the fixed edge and draw a line with a pencil as a guide. The paper must be cut into strips up to the marked line; the width of the strips may vary depending on the desired result.
For one plume, several layers of paper 10 cm wide are enough. The top and bottom layers must be glued with thin tape for strength. One curler is enough to create a pair of pompoms, so you need to cut it in half. To do this, we use metal cutters, because there is a wire inside the foam rubber.
Then wrap the paper tightly around it and secure with wide or narrow tape. The resulting blank must be inserted into the foam rubber, having first made a cross-shaped cut in order to “sink” the edge of the winding. The sultana is ready. It can be used, for example, for physical education.
New Year's tinsel
Girls love to dress up as princesses, sorceresses and fairies for the holidays. For such a New Year's costume, we will advise how to make tinsel sultans with your own hands. Tinsel is silver-plated or gilded threads used to decorate a Christmas tree for the New Year. For a fairy, you can make a magic wand, decorated with a star and tinsel, collected in a plume.
Such an item does not require much pomp, like a regular plume. Here you can take only a few threads, but of greater length. Attach it to the edge of a long stick and decorate it, for example, with a colored cardboard star. When you wave your magic wand, the tinsel threads will fly beautifully into the air and sparkle in the light of the lights.