The rack can seem like a pretty difficult exercise, even if you've been training for a long time. Let's look at how to master handstands using a powerful method for mastering this impressive exercise that builds strength and coordination.
There is no doubt that this is one of the most impressive exercises that always grabs your attention whenever you come across it on your Instagram feed.
If you haven't done gymnastics since childhood, then doing a stand-up can be quite a challenge for you, especially if you use the wrong preparation methods. You may spend years and still not learn how to walk on your hands or even stand against a wall.
Contraindications
Training in an upside down position cannot be practiced in the following cases:
- damage to joints in the elbow, shoulder and wrist areas;
- diseases of the spine;
- increased intracranial pressure;
- disturbances in the functioning of the cardiovascular system;
- presence of inflammation;
- pregnancy, especially the 2nd and 3rd trimester;
- period of menstruation.
If you are unsure whether you can exercise, discuss contraindications with your doctor.
Proper reach into handstand
Safety precautions
Before learning how to do a handstand, prepare a training area. There should be no foreign objects near the wall and at a distance of 1.5-2 m so that you are not injured during a fall.
It is advisable not to lay anything on the floor - the palms touching a hard surface make the pose more stable. You can place a gymnastics mat or mats at a short distance from you - if you fall, this will soften the blow.
It’s great if there is a person nearby who will provide support if necessary. In addition, from the outside you can see the execution errors that he will point out to you.
Do not start learning with complex techniques, this is traumatic and ineffective.
If you feel dizzy during training, your eyes darken, stars appear and ringing in your ears, carefully lower yourself to the floor and lie down until your condition returns to normal. At first, this is considered normal, since the body is not accustomed to this position. After a few sessions you will no longer feel this.
Following the above rules will help you get only the benefits and not the harm from handstands.
What is a horizon?
For those who are not familiar with this element or came across the article by accident, I will immediately note that we are not talking about a sunset with a fiery sun on the seashore, but about a strength element that came from gymnastics, and today is often demonstrated in Workout. This is what the crooked version looks like with the legs apart:
Learning a new element. New video coming soon!
Posted by @alonedogmax Feb 9, 2022 at 10:39 PST
This is for a general understanding of the element. The element looks more impressive with the legs together, but this will require a huge amount of time to master, with everything in order.
Preparation: Build Strength and Endurance
We should also talk about the psychological mood. If you have heard information that it is impossible to learn at an adult age, without physical training or for any other reasons, do not believe it.
There are 4 main factors to achieve results:
- patience;
- force;
- endurance;
- sense of balance.
They need to be trained and developed daily.
Special attention should be paid to the feeling of fear of falling, which haunts many who decide to learn how to stand. It is especially familiar to people who have not previously engaged in physical activity.
A phobia can be easily overcome by trying to deliberately lose your balance a few times. This will help you understand how to fall correctly so as not to hurt yourself.
Assistive exercises
Before you start training, learn how to warm up your muscles. This will be facilitated by a standard warm-up:
- inhale-exhale;
- head turns;
- body bends;
- lunges to the side.
It is recommended to master several exercises that help keep your muscles toned. This way you will learn everything faster.
Training the plank Push-up exercise Performing pull-ups on the horizontal bar
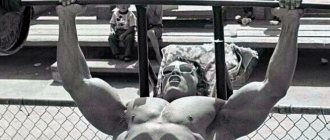
Push ups. Handstands place the main load on the shoulder and elbow joints. Therefore, it is important to train them for endurance. Holding in the lower position for half a minute will help enhance the effect of push-ups.
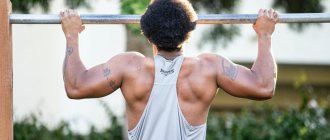
Pull-ups. Another effective way to strengthen your arm muscles. If you master the technique of performing this exercise, you will quickly learn how to do a handstand.
Plank. The pose affects all muscle groups and trains endurance. You need to start with 30-40 seconds, gradually increasing the duration.
Making a bridge
Crow Pose
Bridge. This pose develops flexibility and a sense of balance. You can get into it from a lying, sitting or standing position. Start with an easier option, and as you become more proficient, move on to the more difficult one.
Crow. This exercise trains the shoulder muscle groups and teaches how to properly distribute weight to maintain balance.
Example of a workout to prepare for the horizon
Option 1
- Warm-up
- Step by step, in a circular motion, stretch the joints of your hands: wrist, elbow and shoulder. Start with a small amplitude, gradually increasing it. Minimum 8 laps.
- Tilt your head back and forth and from side to side 8 times.
- Body: tilts left and right, circular movements of the body 20 times.
- Downward bends in different combinations 10 – 20.
- Tilt down, exit by jumping up 20.
- Boxing with your hands 30 times to start, then gradually increase.
- Stretch your delts. Press your right shoulder to your chest with your left hand and switch hands. Stretch time according to sensations.
- Pull-ups on the horizontal bar from 5 times.
- Push ups
- With your hands at your waist, feet on the floor, start from 5 and work your way up to 20 times for 3 sets.
- Feet against the wall, start from 5 and increase to 20 times in 3 sets.
- Exercises with weights
Lifting a dumbbell of 4 kg or more or a barbell (for those who are trained) in front of you with straight arms, palms down. You can alternate hands with dumbbells. Be careful with the barbell, do half as much, gradually increase from 10 to 30 with dumbbells 3-4 sets.
- Statics. Hold the dumbbells at chest level and waist level for as long as you can, up to 30 seconds for advanced exercises.
- Plank
- On straight arms 10-60 sec.
- Lateral on a straight arm 10-60 sec.
- Hitch
Stretching the muscles involved in the training, breathing exercises.
After a month of training in this mode, we add exercises for statics and balance.
Option 2
- Warm up as in the first option.
- Push ups.
With hands at the waist, feet on the floor, from 7 to 20 times, 3-4 approaches.
- Float or frog
For the first month of practice, do the exercises with emphasis on the triceps, try to maintain balance for as long as possible.
- With straight arms, maintain balance as long as possible.
- Horizon with movable support.
- It is best to perform on a mat or with a pillow, balancing for as long as possible.
- Horizontal leg lift. Arms should be straight. At each break, try to fix the planche. From 5 times until clear fixation.
- Hitch.
- Stretching the muscles involved in the training, breathing exercises.
For the first month, I recommend building muscle mass and doing a couple of static exercises - option No. 1. One day training, two days rest.
Starting from the second month, alternate loads: Monday, Thursday - option No. 1, Wednesday, Saturday - option No. 2.
After achieving results, training must be continued. Finish each of them with a ready-made horizon and increase the time of pure execution of the element.
How to learn to stand on your hands: stages
You shouldn’t immediately throw yourself into the pool and try to stand up without support. Consistency in following the steps described below will help you achieve your goal.
Stand at support
First you need to learn how to do a handstand against a wall. This will allow you to feel how to correctly position your body parts to optimally distribute the load.
Stand facing the wall at a distance of 50 cm and gradually, leaning your toes against the wall, lift your body up so that your shoulders, pelvis and heels are on the same line perpendicular to the ground. Pull your stomach in and press your palms into the floor as hard as possible.
Handstand on a support
This is difficult to do, and you won’t learn it the first time. But we must not despair. A few tries and you will see the world upside down.
When you manage to take the desired position, fix your body for a few seconds. The interval should be gradually increased - the optimal time is 1 minute.
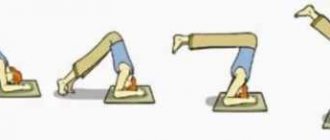
If this is still difficult for you, try adding the following steps:
- headstand;
- forearm stand;
- handstand.
In this way, you will learn to first stand with your hands covering most of the surface, narrowing it over time.
Walking
When you feel confident in the support, move on to the next stage.
It's called walking from side to side against a wall on your hands. To perform this, you should begin to move your palms at a distance of 10-15 cm to the left, trying to maintain a straight line of the body.
If you lose your balance, increase the distance between your feet. Don't forget to press your palms into the floor.
After taking a few steps to the side, return to the starting position in the same way. By walking along the support, you train endurance and learn to balance on your hands.
Shoulder touching
Once you have mastered the first two skills, move on to the next one. To perform it, stand upside down against a wall and tilt your body slightly to the side, making sure that your legs remain perpendicular to the floor.
Lift your palm from the floor and reach towards your shoulder, trying to touch it. It may not work out the first time, so there is no need to rush at this stage.
When you feel free to touch your shoulders in a handstand, hold the pose for a few seconds, gradually increasing the time to 1 minute.
Shoulder Touch in Handstand
Touching your shoulders will teach you to feel your balance, making it easier for you to stand without support.
Don't give up on wall-based exercises even if you've already mastered free-space handstands. This basic lesson will help keep your body in good shape and be ready for more complex workouts.
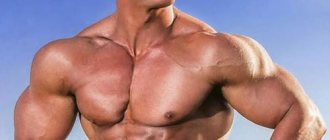
What muscles work
When performing the horizon, you will be actively involved:
- Shoulder muscles: mainly the anterior and middle deltas.
- Triceps.
- Teres minor and major muscles.
- Most of the muscles of the back and abdomen.
- Pectoral muscle group.
The gluteal and thigh muscles also receive loads, because they keep the legs horizontal.
Without support
Once you have mastered the wall exercises to develop balance, all that remains is to learn the basic technique. To do this, leaning upside down on the wall, take a small step forward with your hands. Make sure your shoulders are in line with your pelvis.
Lift one leg off the wall while maintaining balance. When you achieve stability, remove the other leg. Balance will help maintain proper load distribution. Most of the work should be done by the arm muscles.
How to do a handstand
Once you are comfortable doing a vertical wallstand, try free standing.
To learn how to take a pose, you need to first throw one leg up, and then the other, using swings:
- Get into a standing position.
- Extend one leg forward.
- Quickly step onto it, simultaneously tilting your body forward and lifting your other leg.
- Make sure it is parallel to your body.
- Forcefully swing the leg that is on the floor so that it stands next to the other.
- Don't overdo it to avoid a back flip.
- Look head forward, not down.
Now you can lower one leg, then the other and stand on the floor.
In order to understand how to properly stand on your hands, you need to ensure that your body is level, from head to heels. It should resemble a stretched string.
Correct positions
A straight stance is more difficult, a curved one is easier. To maintain balance at first, you can tuck or spread your legs.
Athletes recommend immediately training with straight legs. In the future, this will help you quickly master exercises such as walking or standing on one palm.
The correct position of the handstand determines whether it will benefit or, conversely, harm the body.
Pose "Candle"
If keeping your body in an extended position is difficult, try starting with an easier option.
The “candle” allows you to bend your knees and place them above head level. In this case, the center of gravity shifts, making it easier to learn to maintain balance.
It is safer to land on the floor from this pose. The exercise trains a sense of control over the body.
Pose "Candle"
Exit from the pose
In order not to harm yourself, you need to get back on your feet correctly after performing the exercise. There are several ways to do this.
Exit back - lower one leg to the floor in front of you, then the other.
Exiting the stance to the side is effective if you feel yourself starting to fall onto your back. Turn your body in the direction it led and try to lower one leg first, then the other.
Coming forward involves performing a somersault. Bow your head and press your chin to your neck. Lean back and lower your shoulders to the floor. Round your back and roll it across the floor. Ideally, you should get back to your feet after the somersault.
This trick is quite dangerous, so learn to do it on a gym mat.
Complication
Once you are confident in practicing free handstands, try to vary your workouts. Start with what you like best, gradually mastering other skills.
Walking
At first, it is better to train near a support or call an assistant. To learn to walk, do a handstand against a wall.
Then, leaning on the surface with your toes, raise your legs above your head and fix the pose. When you feel that you have control of your body, lift one leg off the wall, then the other.
Find your balance and move one palm forward slightly. Make sure that the body is one straight line.
Take a few steps and carefully stand on your feet. You should start the exercise with no more than 2-3 steps, gradually increasing their number.
Bars
Another option for how to do a handstand is an exercise on the uneven bars. Holding the machine with your palms will make it easier for you to maintain stability than if you lean on the floor.
Pirouette
This parallel bars exercise involves turning around its axis. To perform it you need a perfect sense of balance.
You need to move your palms one by one from one support to another to get a full turn. At the end of the exercise, stabilize the position and only then leave the pose.
Planche
The technique of performing the exercise is reminiscent of the “Plank” pose, with the difference that you should rely not on the floor, but on the bars.
The key to success in performing Planche is strong arm muscles. From the pose of standing upside down on supports, slowly lower your body so that the body remains motionless except for the shoulder joint. When finished you should be parallel to the ground.
The exercise will be completed successfully if you gradually shift the center of gravity forward.
When you learn how to do it, try lifting your body up from a horizontal pose.
The benefits of such a handstand will be doubled, since it involves all muscle groups in the body.
On 1 hand
A one-arm stand helps train the vestibular apparatus. It is quite difficult to perform - it requires a lot of endurance and patience.
Raising one arm up, the load on the other doubles, so it is important to do the exercise slowly and with maximum concentration.
Pushups
Another type of exercise that requires trained muscles of the shoulder joint. To maintain balance during this exercise, tilt your legs slightly forward, bend your knees and cross your calf muscles.
If handstand push-ups seem impossible for you, don’t give up on your desire. Practice shows that perseverance and regularity of practice certainly bears fruit.
Handstand push-ups
Errors
Beginners who don't know how to learn handstands will face a number of common mistakes.
Extend your arms over a long distance. This shifts the center of gravity and makes it difficult to maintain balance. Ideally, your palms should be shoulder-width apart.
Arms bent at the elbows. In this case, the main load falls on the elbow joint, which is likely to lead to injury. Your arms should be perfectly straight.
The body is tilted back and is behind the shoulders. You will never maintain your balance in this position. Try to keep your body straight. If you cannot control yourself, ask an assistant about it.
Bent spine. Another reason for your falls during your first workouts. Spread your shoulder blades and straighten your back.
By understanding how to avoid the most common mistakes, you will learn how to perform the exercise faster.
Advice from professionals
To learn handstand faster, follow these tips:
- lean on your fingers;
- learn to do push-ups;
- find balance and hold for a few seconds;
- practice stand-up entries;
- do not neglect help;
- systematize your classes;
- train with your face and back to the wall;
- get rid of fear.
Anyone can master the handstand, even without physical training. Its implementation has a beneficial effect on brain function, strengthens muscles and relieves problems with the spine. To achieve a positive result, patience and endurance are required.
The stance will make your core very strong.
In order to stand upside down and stay in this position for a long time, you will need to put a lot of strength into your arms, shoulders and upper back. Usually, the hands of beginners in this business begin to shake after just a few seconds of being in the rack.
To gain strength, start doing the exercise gradually - with three approaches of 5-10 seconds near the wall. You can also make the stance more difficult by trying to stand for a full minute twice. If you practice regularly, you will soon notice that your core has become much stronger and more resilient.