Execution technique
Step 1:
Lie on the floor, placing a folded blanket under your shoulders to protect your neck if necessary. Bend your knees, pull your feet as close to your sit bones as possible (you can use your hands to pull your feet as close to your pelvis as possible).
Feet parallel to each other, toes pointing straight ahead. Hands lie on the floor along the body, palms down.
Step 2:
Exhale and, pushing your tailbone towards your pubis, lift your pelvis up. Keep your hips and knees parallel to each other . Feel the stretch forward across the entire front of your thighs. Lift your pelvis up until your thighs are parallel to the floor.
Step 3:
Leaning on your shoulders, place your hands under your buttocks and clasp your palms together, stretch your arms further towards your feet. Don't strain your neck - the weight should be on your shoulders. Having strengthened your arms, expand your shoulder blades and try to lift up the space between them and at the base of your neck.
Step 4:
Stay in the pose for 30 seconds to 1 minute.
Physiology of orgasm2
It's all about female physiology. The fact is that in fact, absolutely one organ is responsible for absolutely all female orgasms - the clitoris. In fact, it is much larger than people are used to thinking about it, and consists of not only the part that can be seen and that is easiest to touch.
This is just the head of the clitoris, covered by the clitoral hood (the female analogue of the foreskin in men). The rest of the clitoris - its "legs" - are located inside, on either side of the vagina, and visually resemble a bunch of four bananas. Scientists have recently become accustomed to calling this organ the clitorovaginal system.
And in fact, any sexual manipulation with her genitals that is pleasant to a woman affects the clitoris. During penetrative sex, the legs of the clitoris are stimulated, during clitoral stimulation, oral sex or using a vibrator, its head is stimulated, and even with anal penetration, the inside of the clitoris is also stimulated, simply through the muscular septum inside the anus. And yes, the G-spot is also part of the clitorovaginal system.
Despite all of the above, the head of the clitoris is still the most sensitive part of it. It is most convenient to stimulate; stimulation can be made more varied (it is much easier, for example, to caress the head of the clitoris orally than inside, purely physiologically).
And it is usually the most sensitive part of the clitoris and the easiest way for a girl to achieve orgasm. It is more difficult to achieve it with penetrative contacts, because the inner part of the clitorovaginal system is usually a little less sensitive, difficult to access, plus there are physiological restrictions from the man: often the man comes faster than the woman begins to enjoy stimulation of the inner part of the clitoris.
Therefore, vaginal orgasms are not as common as clitoral orgasms (although, given the above, the terms “clitoral”, “vaginal” and “anal” orgasm should be abolished, since in fact they are all clitoral).
However, it is quite possible to get an orgasm from penetrative sex, and specifically from sex with a live penis (and not with a toy or fingers). This is why the bridge technique was developed.
Adjustment of asanas / control points
- when bending, push both the tailbone and shoulder blades up. Imagine that your shoulder blades are a pair of arms lifting your chest up.
- open your chest by moving your shoulders outward (stretch them to the sides and twist them inward);
- do not strain your buttocks , arch by pushing your tailbone up;
- do not spread your knees to the sides, but also do not connect them together - your hips and knees should be strictly parallel to each other;
- if you feel discomfort in your knees when stretching upward, stop at the height at which you feel comfortable, do not allow pain ;
- When entering the asana, do not turn your head to avoid neck injuries .
Notes on practice
- When you support your body on your shoulders, do not use excessive force to move your shoulders away from your ears, because this can lead to a strain in the neck muscles, which is very unpleasant and takes a long time to resolve.
- Instead, move the top of your shoulders slightly toward your ears, while moving the inside of your shoulder blades away from your spine.
- To deepen the pose, in the final position, lift your heels off the floor, standing on your toes; pull your tailbone up, a little closer to your pubis. Now, maintaining this position, lower your heels to the floor, stretching them.
- If you find it difficult to perform the pose according to the technique described above, try supporting the pelvis with your hands in the final position, placing your elbows on the floor.
Benefit
- expands the thoracic spine;
- stretches the neck and spine;
- stimulates the abdominal organs, lungs and thyroid gland;
- tones the legs: relieves fatigue and heaviness in the legs;
- improves digestion;
- helps relieve menopausal symptoms;
- relieves menstrual discomfort, practiced instead of inverted poses and backbends;
- relieves back pain, headaches;
- calms the mind, helps relieve stress and improves mood;
- reduces anxiety, fatigue;
- indicated for the treatment of asthma, high blood pressure, osteoporosis and sinusitis.
Related poses
As a preparation for the Setu Bandhasana pose, the following are suitable: cobra pose, Urdhva Mukha Svanasana, hero pose.
After the bridge pose, you can perform: Bhujangasana, birch tree pose (Sarvangasana), upward-facing dog pose (Urdhva Mukha Svanasana) and wheel pose (Urdhva Dhanurasana).
Variations
- Light version
For beginners, the arms and shoulder girdle may be weakened, so when entering the asana there may be a feeling that the shoulders are giving way. At this moment, it is very important not to try to pull them too far away from your ears - otherwise you may overtighten and injure your neck. Instead, it's better to raise your shoulders slightly toward your ears and focus on pushing your shoulder blades and spine up toward the ceiling.
- Complicated version — Eka Pada Setu Bandha Sarvangasana (bridge pose with leg raised up)
Perform Setu Bandha Sarvangasana. As you exhale, pull your right leg towards your body and, keeping the weight on the remaining points of support (left foot, shoulders), extend your leg up perpendicular to the floor. Hold the pose for 30 seconds, then exhale and return your leg to the starting position. Repeat the asana with your left leg for the same period of time.
Why is this necessary?i
Firstly, this is sometimes used in sex therapy to improve the sex life of partners, since men are often offended that a woman does not experience an orgasm from penetrative sex - they say, it means she doesn’t love him that much in this case.
In fact, this is pure physiology. If a man puts pressure on a girl in this regard, it’s worth thinking about whether the girl needs a man who can’t even read a couple of articles on the Internet and understand how the female orgasm works, and that it has absolutely nothing to do with romance and the level of love for a partner .
On the other hand, girls themselves often experience complexes: they say, I’m some kind of “fake” woman if I don’t experience a vaginal orgasm, or maybe a vaginal orgasm is much brighter and stronger than a clitoral one, and am I depriving myself of this? What if something is wrong with me?
Secondly, this is a good way to learn new things in bed, learn to give yourself and your partner more pleasure of different types, master new techniques, discover new sexual sensations, and better establish communication between partners in the sexual aspect.
ZONE – G (POINT – G).
The existence of this zone was first officially announced by gynecologist Ernest Grafenberg in the 40s. This is a section of the lower third of the anterior vaginal wall at a depth of approximately 3-5 cm from the entrance to the vagina (depending on individual characteristics). It has the shape of a pea (bean), increases when stimulated (becomes like a small lump) and has high sexual sensitivity. Second only to the clitoris in sensitivity, it is believed that tactile receptors (Meiener's corpuscles) that respond to touch are located here. The rest of the vaginal mucosa has practically no sensitive nerve endings capable of responding to the actions of the penis during sexual intercourse. Rhythmic pressure (stimulation) in the G-zone causes a powerful orgasm.
Exercise "orgasm reflex"
The “orgasm reflex” exercise removes emotional blocks and helps get rid of tension in the body. Thanks to regular practice, a woman becomes more flexible, relaxed and sensitive, due to which the likelihood of getting an orgasm during sex increases. Prepare for the exercise: wear comfortable clothes and leave your feet bare. The room temperature should be comfortable.
Stages
The practice includes 5 successive stages:
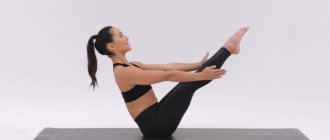
- First stage: Lie on your back.
- Place your fists under your heels or place your palms along your body.
- Lift your pelvis up. Ideally, when performing the exercise, the pubis should be the highest point of your body.
- Pull your pelvis up for 15 minutes. If your legs begin to vibrate slightly, do not be alarmed, this is normal.
- If your palms were under your heels, remove them from there and spread them to the sides.
- Without changing your position, begin tossing your pelvis from bottom to top and back. Imagine that there is a rubber ball underneath, with which you push off the floor.
- Lower your pelvis to the floor.
- Relax completely.
Video: “orgasm reflex” exercise technique
Orgasm from fantasy.
Yes, some women and men are able to achieve orgasm simply from fantasy; basically, this happens in your sleep. These are the so-called polylutions or female orgasms within sleep. There is no physical impact on your genitals. Therefore, technically this orgasm is available to everyone, the only question is whether it is available when you are awake.
When I was 18, I lived in Dubna and worked in Moscow. I had a wonderful two-hour trip there to Moscow by train and back by train to Dubna. And I often caught such things. You are 18 years old, you are fantasizing in your head, of course you can’t touch yourself, this is a train, a public place, but the vibration from the train, for example, was enough for me. These are frequently described situations. Women also have horses and bicycles. Horses not in the sense of bestiality, but in the sense of riding them and during this he can step on. And yes, some women love to ride motorcycles, some may experience this while driving, when driving a car, there is also vibration.
Vagina workouts
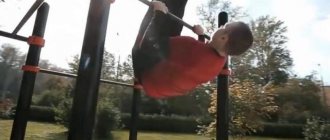
- Vaginal gadgets (cones, exercise machines, fitness trackers). Women can insert these special medical weights into the vagina and hold them in place by contracting the pelvic muscles.
- Biofeedback. For women, the doctor will insert a pressure sensor into the rectum or vagina. As you contract and relax your pelvic floor muscles, the monitor measures activity during the procedure.
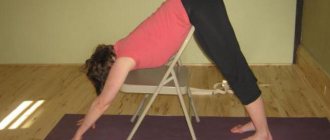
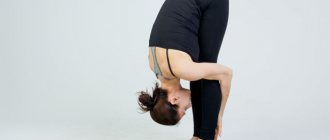
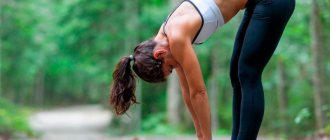
- Frog pose. This practice will make you more flexible during lovemaking. This is a powerful leg extension that stretches the inner thighs, groins, and overall hips. The frog position (see photo above) also relieves stress, which can be a real neutralizer of the desire for any intimate activity in bed.
- Manual therapy. An excellent procedure for maintaining tone and training the vaginal muscles is gynecological massage (manual, medical). Carrying out regular preventive courses of massage of the pelvic organs, including the uterus and ovaries (in the absence of contraindications), 10-15 sessions 2 times a year, especially in combination with physiotherapy, will certainly be beneficial to women's health.
Photos of exercises for the vagina
Contraindications
The bridge pose should be avoided if the following contraindications exist:
- heart problems
- back injuries
- injured wrists
- high or too low blood pressure
- headache.
For any diseases of the back and neck area, before starting to practice the asana, you should consult a doctor.
In this case, it is recommended to perform the exercise under the supervision of a yoga specialist.
How to do Bridge Pose: detailed instructions
When starting to master Urdhva Dhanurasana - a difficult pose - you need to follow the “golden rule” of yoga. Each workout is a certain challenge, but under no circumstances should you overexert yourself and endure pain. This is especially true when working with deflections. The best deflection is not the deepest. You must remember at all times that no part of your spine should bend at an angle - there should be no angles at all. The entire spine is a smooth arched line. And if you are trying to go deeper, you cannot lose this smooth line. As soon as you feel that your back is breaking, pain appears, immediately get out of the situation. Back pain is a warning. And you shouldn’t hope that if you don’t pay attention to it and constantly overstrain your back, the pain will go away.
Preparing the back for Urdhva Dhanurasana
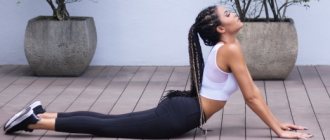
Before we talk about Urdhva Dhanurasana itself, it is important to describe some asanas that will help you master it faster and safer. A strong back is very important for any backbend, so in order to successfully master Urdhva Dhanurasana, it would be good to pay some attention to strengthening the back muscles that will protect your spine. Shalabhasana, Chaturanga Dandasana, and long-term hold of Utkatasana will help you with this. To better feel some of the fundamental moments for this pose - stretching the lower back, opening the thoracic spine - in the complex of asanas performed before Urdhva Dhanurasana, I recommend including Setu Bandhasana and Viparita Karani.
Getting into Bridge Pose
We start from a supine position. Bend your knees, place your feet near your pelvis. You can grab your ankles with your hands; if this is difficult, pull them along your body with your palms down. Exhale and lift your pelvis up. First of all, we adjust the position of the feet. They are on the same line parallel to each other. Despite the fact that many people find it easier to point their socks to the side, this ease is only apparent. This position does not allow you to properly stretch your lower back, which can lead to injury. All four corners of the soles are adjacent to the floor. Next is the position of the knees.
For many, they will initially fall apart to the sides. To prevent this from happening, try to wrap the outer lateral surfaces of your thighs inward, and relax the inner surfaces as much as possible. Many people try to force their knees together; this can lead to strain and sprain. Correct leg work is a key point in mastering this pose if you want to protect your back during backbends. Very often, back problems arise due to the fact that exercisers turn their hips too much. Try to move your buttocks as far as possible from the lumbar region towards the knees. The hamstrings need to be pulled towards the buttocks, the backs of the thighs should be relaxed and stretched.
Then, to make it easier to get into the main asana later, you can perform Setu Bandhasana. As you inhale, lift your pelvis up, pulling your tailbone toward the ceiling. We clasp our palms behind our backs and carefully, one by one, pick up our shoulders, bringing the shoulder blades together, push the solar plexus area and the center of the chest upward, the sternum will approach the chin, but make sure that the neck is not pinched and it is comfortable to breathe. To further open the shoulders, smoothly move them back and down. The neck is relaxed, we do not strain the stomach. We fix the position for several breathing cycles. Then we unlock the lock, bend our elbows and place our palms under the pelvis (not on the lower back), fingers looking either at the buttocks or to the sides. Now you can once again correct the position, try to bring your elbows and shoulder blades closer. We help ourselves with our feet, our feet push off the floor, stretching the sacral region even more.
We begin to smoothly straighten our legs at the knees. Support on your heels, pull your toes towards you (if the soles remain on the floor, it will be more difficult for you to open your lower back). At the same time, we pull the sacrum back with our palms, pulling the spine out of the pelvis (a very important movement). Shoulders should not come off the floor. If this does happen, and if you feel a kink or pain in your lower back, bend your knees more. It is not at all necessary to straighten them at all costs. Don't tense your gluteal muscles. We fix the position again. After that, carefully bend your knees. We adjust the position of the feet again and, with an exhalation, raise the right leg up. We pull the toe towards ourselves, tighten the kneecap, the leg is completely straight, its back surface is extended. We push the heel into the ceiling. The lower foot pushes off the floor, with our palms we continue to pull the tailbone back away from us. Due to all these actions, the pelvic region opens and stretches even more. We repeat the same on the other leg. And at the end - the full version of Viparita-karani. Raise both legs up, feet together, toes pointing towards you. The pelvis lies relaxed on the palms; if you have inflexible and weak wrists, you can tilt your legs more towards your head, but gradually, we try to achieve a right angle between the legs and the floor. The buttocks and feet should ideally be on the same line. Coming out of the position, we smoothly bend our legs at the knees and lower them one by one to the floor behind our backs.
Let's move on to the hands. We place our palms so that they are under the shoulder joints, fingers pointing to the legs. Try to evenly distribute your body weight over the entire surface of your palms (many people try to put too much pressure on the outer ribs of their palms), with your elbows clearly looking up. Now, we turn our attention to breathing, track several inhalations and exhalations, on the next exhalation we push with our feet and palms, raise our torso and place the top of our head on the floor. You can’t overload your head; you should put most of your weight into the floor through your palms. If necessary, adjust the position of the feet so that they are strictly under the knees, hip-width apart. Elbows are shoulder-width apart, palms strictly under the shoulder joints. You can “play” with the position of your palms so that your body weight is evenly distributed between the outer and inner surfaces of your wrists. Then try to remove the shoulders from the neck. When your wrists are in line with your elbows, begin pushing your forearms toward your knees. This movement will allow you to correctly align your shoulder position. While still lying on your back, move them back and down in a circular motion and pull your upper back and shoulder blades towards your head. This movement will open up your chest. Immediately begin to stretch your back, pull your buttocks towards your knees, try to monitor and control this movement constantly.
As you rise up, push well and evenly from the floor with your feet and hands. Before you go up, remember your breathing. It should be even and smooth. We track several breathing cycles; as we exhale, we push off the floor and lift our pelvis up. We remember how to position the legs, pelvis, gluteal muscles, and arms. It is very important that your elbows do not move further apart than shoulder width. If this happens, you won't be able to use your arms properly and may tighten your wrists, elbows, and shoulders. It's normal if you can't straighten your arms all the way at first. Just keep pushing your pelvis up. Until your arms are fully straightened, you should not push your torso forward, otherwise you will tighten your back too much and block your shoulder girdle. Of course, the ideal position in Urdhva Dhanurasana is when the wrists, elbows and shoulders are in line. But this position is achieved by opening the shoulders, chest and stretching the back, and not by pulling the arms out of the shoulder joints. Therefore, if you do not have enough flexibility yet, do not push your chest towards the wall, but push it up towards the ceiling.
In some schools of yoga, it is believed that it is impossible to push the chest forward at all, since this pinches the back. However, if you do the pose with ease, this movement will help open the chest even more. Many people, especially girls with a good arch, take this recommendation too literally - they push their torso forward very hard, fall onto their palms, or begin to sway back and forth. We always need to remember, when we do this, we cannot load only the arms, completely removing the load from the legs, in this case you will actually stop controlling the work of the hips and buttocks, stretch your back and, as a result, there is a risk of blocking the lumbar region. The movement itself should be very smooth, literally by a few millimeters. There is no need to move your feet away from your body, trying at all costs to stretch your legs. Monitor the sensations in your back and shoulder joints, take care of your elbows. I remind you once again that the entire spine should bend without kinks along a smooth, arched line. There should be no feeling of kinks or pain anywhere. All parts of the spine should be stretched as much as possible and removed from each other. To stretch the lower back, push the pelvis up, pulling the lumbar region out of the pelvis. Opening the chest and shoulder regions, we move the torso forward (I repeat, this movement should be very smooth and almost imperceptible, occurring only when the pose ceases to present any difficulties). We push the solar plexus area and the center of the chest up and forward. The neck is relaxed and the head hangs down freely. Don't forget to breathe. You should try to stretch and relax the entire front part of your body as much as possible. The stomach, ribs and chest are relaxed. The entire front part of the body is gently extended in an arc (another common mistake is to break this line by pushing the ribs forward).
From a standing position
When you learn to stand in Urdhva Dhanurasana relaxed and with even breathing, it’s time to learn to come into the asana from a standing position. The main thing for successfully mastering such an exercise is to bend well in the thoracic region; the position of the legs is of great importance. To begin with, you can lean on the wall. We stand at a distance of about half a meter from the wall (it is quite approximate, it all depends on your proportions). Feet hip-width apart, hips slightly turned inward, knees facing forward. Place your palms together in namaste. If you immediately start pushing your pelvis forward, then, again, your back may suffer. Instead, you begin to pull your hips up, relax your buttocks, move the front half of the pelvis away from the hips, then do the same with the chest - pull it up from the pelvis. When the whole body is well stretched, you can gradually go into a deflection, starting from the upper body. In a circular motion we move our shoulders back and down, at the same time we begin to push our collarbones up, feel how the lower part of the shoulder blades begins to rise towards the ceiling. Continue to move back gradually, as if wrapping your torso around a large drum. The head goes back, we look at the wall and smoothly lower our palms onto it. You shouldn’t wring your neck, pull your chin towards the ceiling. Now, you can stretch your arms back and put them on the wall. We continue to stretch the torso up and back along the entire length, pressing with our hands on the wall. We fix this situation for some time. When you decide to get out of the position, try to simultaneously push off the wall with the same force with your palms. Always remember to maintain proper leg position and extension. Don’t rush to move on; you can go lower when you do this option with ease. Walking towards the floor, smoothly move your hands along the wall. If you feel that it is too early to go further, you can stop at any intermediate position. Just try to keep your palms at the same distance from the floor. Everything else is exactly the same as in a regular bridge. When your palms fall to the floor, we fix the position for a while, then, moving our hands along the wall, we rise up in the same way.
Once you learn to lower yourself down with the help of a wall, you can do without it. We start in the same way as at the wall. As soon as you see the floor, extend your arms, try to make them an extension of your torso. With your body weight in your shins, bend your knees slightly and gently lower your palms to the floor. If you are falling down uncontrollably, it is too early for you to enter the asana without support from the wall. Getting up from Urdhva Dhanurasana is quite difficult. And I don’t recommend doing this without very good preparation, a strong back, legs and arms, and good arching. You need to rise smoothly, with a slight push, without twisting your back. You cannot lift your palms off the floor one at a time, even if you have a strong, well-developed body, this can lead to injury. After Urdhva Dhanurasana, perform compensating poses: Paschimottanasana, some twisting pose, Mayurasana is a good compensation.
Take your time, act wisely and thoughtfully.
Maria Vorobyova is a professional hatha yoga teacher: www.mv-yoga.com
Photo: sprinklesandsavasana / instagram.com
Author