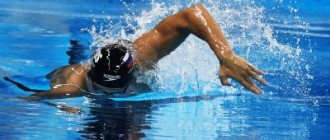
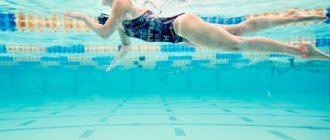
Crawl is a type of swimming in which the movements of the legs resemble the work of scissors, and the arms swing along the body , making smooth strokes.
This style is divided into several subtypes: lying on the back and face down. This article will talk about learning to swim on your chest.
What you need to learn breast swimming
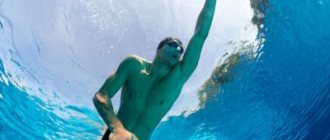
To move most effectively in the water, your face should almost always be in the water. Therefore, for swimming you will need goggles and a cap.
You can also use a mask with a snorkel to keep your head in the same position at all times. This will allow you to concentrate on your movements and control your body better.
It is very important to move smoothly and not make excessive efforts. It is best to breathe deeply and evenly. By mastering this simple technique, a swimmer can move through the water at high speed.
It is recommended to study at least 3 times a week. Then you will be able to achieve high results in this technique.
We believe that you can master the crawl at any age and become a confident swimmer!
Catalog of all video courses from 1250 rubles...
You receive the course immediately after payment. You will automatically receive a link to video lessons and training manuals.
If you have any difficulties placing or paying for your order, please contact
- by mail
- by phone, Telegram, WhatsApp, Viber +7 931 105 48 10
You will receive any advice regarding your order.
If you don’t want to deal with the registration and payment procedures, I will help you. Write or call me at the contacts above.
Warm up before swimming
In order for crawl swimming lessons to be successful and as comfortable as possible, before class it is very important to do a warm-up , which serves two purposes at once.
Firstly, with its help you warm up the muscles that will work in swimming.
Secondly, you are stretching, which will allow you to swim more efficiently in the future.
Here are some simple exercises:
- Stretch your neck. Tilt your head in different directions.
- Stretch your arms out to the sides and begin to rotate your forearms in and out.
- Place your feet shoulder-width apart and lean forward. Stretch your hands towards the floor without bending your knees .
- Get into a squat position and extend one leg forward. Lean your body and arms towards her.
- Do a leg stretch - sit on the floor and stretch forward with your legs straight, or do a similar exercise while standing.
- Take your hands in a “lock” behind your back (arms should be straight) and raise them in this position.
The same warm-up is also suitable for breaststroke swimming (you can read about the relationship between crawl and breaststroke swimming methods in our separate article).
An excellent warm-up before swimming is also shown in this video:
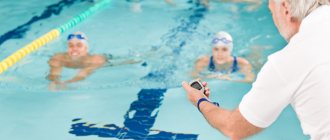
Swim many kilometers in the pool
After mastering the technique, you need to train endurance. To do this you will have to swim through many pools. It’s better to start with 100 m without stopping and work your way up to 1000 m. Then you need to try to bring the distance to the width of the body of water you want to swim across.
Anna Poleykina
Swimming coach, active participant in the Masters movement
The swimming distance on the Bosphorus is 6.5 km, across Lake Balaton – 5.2 km. On the Volga there are distances of 1, 3 and 5 km.
Beginners need to start small in order to gain experience of participating in large competitions and not leave the race, losing self-confidence and motivation.
It is harder to swim in open water due to currents, waves, and different water density than in a pool
Sports competitions are a serious test for the body and a great risk to health. If something happens, with the Athlete policy you can receive payment for treatment and rehabilitation.
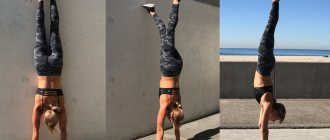
How can an adult float on his own?
First you need to learn how to keep your body on the water. It is very important to hold your head correctly, namely face down . If you throw it high up, your legs will drop and your muscles will become overstrained. Thus, you will not be able to swim far.
Lie down on the water and relax as much as possible, feel how your body itself floats on the water and floats to the surface. Practice holding your breath while remaining on the water.
There are special exercises that help you learn to stay on the surface, control your body and better feel the water - “star” and “float”.
Star
Get into the water up to your waist and stretch your arms out in front of you. Take a deep breath and stop breathing. Then slowly lean forward and lie face down on the water .
Your body should float to the surface, then spread your limbs to the sides. That is, the pose of a starfish is obtained.
Try to relax and stay on the water until you run out of air in your lungs. After this, stand up, catch your breath and repeat the exercise. Do this until you can lie calmly and happily in the water.
Float
Get into the pool up to your chest, take a deep breath and stop breathing. Sit down and plunge into the water, clasping your knees with your hands. Tuck yourself together and rest your chin on your chest as you begin to float to the surface. Maintain your position for as long as possible so that your body does not begin to sink back under the water.
At the end of the “Float” exercise, gradually begin to exhale into the water.
Even people with hydrophobia come to water sports
Many people are afraid of open water. At sea, in a river or lake, they swim along the shore. But you can cope with hydrophobia, and on your own. This will be relatively easier to do than dealing with the fear of heights.
Dealing with the fear of open water depends on what exactly the person is afraid of and how much. It happens that the fear of water is too strong, then only long-term therapy will help to cope. But sometimes a trainer can help overcome hydrophobia.
Anna Poleykina
Swimming coach, active participant in the Masters movement
When I started working as a trainer, I was amazed at how many people were afraid of water.
In the most difficult cases, I go down into the water with my client and help him cope with hydrophobia.
A psychologist can help you cope with hydrophobia. With the Telemedicine policy, you can get expert advice online at any convenient time.
Sliding - an exercise for beginners
To learn how to swim crawl correctly, you must first of all be able to glide through the water. Go into it up to your chest, take a deep breath and stop breathing. Sit down and plunge into the water, as in the “Float” exercise. Make a strong push with your legs from the bottom and take a lying position. Once you push off, continue to glide through the water. The face should be lowered into the water.
Bring your hands together at the top in a straight position, with your head between them. Take a deep breath, stop breathing and, pushing off from the bottom, stretch out on the water.
If you are working out in a pool, then push from the side and slide, as shown in the illustration:
You can also see this clearly in this video:
Once you are able to slide a sufficient distance, it is time for the next stage.
Crawl – two hits or six
The principle of the six-beat crawl is that the downward movement of the left leg occurs simultaneously with the immersion of the right hand in the water and, accordingly, vice versa.
It makes sense to try the two-impact crawl technique for swimmers who have significant experience. It differs in that two strokes of the upper limbs are correlated with two kicks.
These techniques are used for swimming at different distances. The two-beat crawl, for example, over long distances allows you to save energy and not get tired for as long as possible. If speed is needed during a short swim, then the six-stroke style is more suitable,
You can learn to swim crawl in a pool, any open body of water with standing water or a river with a small current.
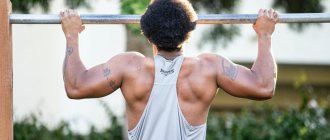
Footwork training
The legs should move up and down alternately, with the toes pulled away from you. Leg movements should come from the hip, not the knee. As you increase speed, bend your legs a little more. When swinging your legs, your big toes should be close to each other, and the vertical distance between your toes should be about 40 centimeters.
If you do everything correctly, then only your heels will peek out of the water.
For one hand stroke there are about three kicks. If your legs are strong, then you can swim quickly. The legs should not strain too much, then the movements will be easy. Put more force into the downward movements of your legs, and relax your leg when going up.
In general, footwork looks like this:
Footwork exercises
Main article: Exercises for water crawl (section “Leg training”)
To start practicing, you will need a swimming board, and you can also use fins and weights.
At the very beginning of training, you can act as follows:
- Lie down on the water and rest your hands on the side of the pool. Start working with your feet, creating small splashes.
- Swim with fins to feel the range of motion in your legs. You won't be able to make strong swings with fins.
- Lie down on the board and stretch your arms forward, your legs should not sink. Create small splashes. The face should be immersed in the water; lift it only to inhale.
- Use leg weights to build strength. Half a kilogram for each leg is enough.
For other exercises to learn how to use your legs, read our separate article.
Basic moments
Crawl is a type of swimming on the stomach, in which the arms alternately make strokes along the body, and the legs imitate the movement of scissors.
When swimming crawl, the muscles of the chest and arms are most involved. The abdominal muscles should be tense because swimming will help those who want to remove excess belly fat.
In order for movements in water to be as effective as possible, your face must be immersed in water almost all the time, so you cannot do without glasses. Or you can use a mask with a snorkel so as not to raise your head at all and focus on the correct position of your body.
The main rule: movements in the water should be smooth. The effort should not be excessive, and breathing should remain deep and even.
Body position
Before you start swimming crawl, you must get into the starting position. The variation is considered ideal when the body is stretched over a flat belt, and its bottom is slightly immersed in water. If you keep your entire body above the water, you will need a lot of energy. For this reason, experienced swimmers recommend submerging it in about 20 cm of water for comfortable swimming.
Swimming style means that the swimmer's body is constantly rotating. This means that most of the time he is not on his stomach, but for six months. These turns are quite easy because the camera body follows what the hand makes. As a result, the tilt of the body is directed towards the limb underwater.
For correct posture, the face is almost always in the water. The object's body must be positioned horizontally, this guarantees high speed. Don't try to have fun, your eyes should be down and when you're heading towards the edge of the pool, not the ceiling.
The principle of leg movement
For practical leg movements, use a board or an air mattress. You should place your hands on the surface of the accessory with your hands and work only with your feet. During inhalation, the head rises correctly out of the water, and when exhaling, it is under water.
The swimmer's legs rotate up and down, rhythmically flexing and extending the hips, knees and ankles. The movement comes not from the knee, but from the foot. If one leg is in a very high position and the other in a very low position, the distance between them should not exceed 40 cm. The legs are extended and pointing inward.
For each hand stroke, 2-3 kicks are performed. The stronger your legs, the faster you swim. At the same time, the legs are not limited by tension: they must only move at all joints. Maximum force should be directed downwards, the lifting leg should release the right leg.
The legs move from the hip, not the knee. But as the leg speed increases, the knees bend a little more. The distance between the toes along the vertical axis does not exceed 40 cm, and the large horizontal toes have practical toes that touch each other.
Hand work - main phases step by step
During swimming, the arm hits almost continuously, which is the main “engine” - in particular, thanks to the athlete, it achieves excellent acceleration. For this reason, scanning is sometimes called swinging.
While one hand strikes, the other at this point alternately moves along the surface of the water and the like.
The whole process can be divided into 5 stages, as shown in this figure:
- Water capture . The hand bends slightly, as if you want to take water.
- Push (shoulder adduction) . The arm hits, passes under the body and is held by the pelvis towards the end of the movement - the elbows rise strongly. Important: The shoulders do the best they can when they move, the forearms and palms come last (mostly due to process flow and direction control).
- Hand coming out of the water . Remove the elbow first and then the hand. The hand itself is relaxed at this moment.
- Carrying . We bring our hand to a relaxed state and then lower it into the water.
- Nesting . Gently bend your arm at the elbow and anchor it to the water, trying to move it.
To learn these movements, you can swim with only one working hand, the other at this point in the starting position - forward position. It is not possible to achieve high speeds in this version, but this method is necessary to improve the pool. This is discussed in more detail in our article on rabbit swimming exercises.
The more your hands grab the water and the more they push each other, the higher the speed. To achieve this, the palm must be rotated so that the giant finger is submerged first. A high elbow level should also be guaranteed for an excellent shot. The forearm in the water moves along the body, while the other hand is close to the surface at this point. The arm also comes out of the water at a larger elbow position.
If your arm is in the highest position, do not tense your shoulders. Do not hit the water with full force, the movement of the object should be smooth, and the immersion of the hand should be free from popping and unnecessary splashing.
Special swimming paddles can help you master the correct stroke technique. But don't swim with your paddles more than a quarter of the time during your workout to avoid errors in your stroke technique.
Breath
Proper breathing allows you to supply your muscles with the oxygen they need to do your job and get the job done.
If you want to inhale during the first shot, it is recommended to turn your face towards the shoulder that is moving above the water. In this case, the entire body is rotated manually. The appearance should not be too high to avoid excessive strain on the neck.
It is recommended to inhale through your mouth and gently exhale into the water through your mouth and nose. Exhale inhales for 1 to 3 cycles of movement.
Head position
Freestyle swimming breathing technique is just as important as any type of repetitive physical activity. Breathe at a constant pace. Try to hold your breath while swimming, inhale and exhale quickly. You may hear "3 breaths" or "5 breaths" in the pool.
This means that every third or fifth beat is inhaled. We talk more about breathing in the article “How to Breathe While Swimming”, and we want to immediately emphasize how to keep your head crawling, because this also depends on the speed and comfort of breathing.
The position of the head in all phases of the stroke should be natural. The natural position of the head is when you stand or sit straight and your head is flat. In other words, the cervical vertebrae are not flexed in relation to the chest. This position can be modeled as follows.
- Stand with your back to the wall.
- Press your pelvis, waist, shoulders and back of your head against the wall so that you look straight ahead.
- Raise your straight arm to ear level.
Your position will be appropriate and suitable at the end of the rush phase and before the capture phase.
To inhale, you need to lean slightly to the side during the catch phase and lean heavily on your back. While inhaling, do not turn your head around your neck, but breathe while turning your body.
During all other stages of swimming, try to keep your head straight without bending your neck. From time to time you can lift your head forward, looking at possible obstacles that may arise. Swimmers, even in open water, when it is appropriate to look around and get their bearings, lift their heads out of the water using their bodies, without bending their necks.
A beginner who has mastered the technique of breathing, footwork and hand work can begin to work on the position of the head in the water.
Learning to work with your hands correctly
There is only one answer to the question of how to learn to swim fast with crawl - you need competent hand work!
Let's look at it step by step:
- The initial stage is the entry of the hand into the water. First, the palm is immersed in the water, and then the rest of the limb. When the arm dives, it needs to be extended in front of you, while the swimmer strives for it with his whole body.
- The second stage is the supporting and main part of the stroke. A person bends his arm at the elbow so that an obtuse angle is formed between the shoulder and forearm. The stroke occurs when the limb is bent at the elbow and a right angle is formed. The arm is straightened before the stage of removing it from the water.
- The third stage is moving the straight arm towards the swimmer’s body. The important point here is the position of the shoulder. It appears out of the water very first, in front of the forearm and palm. The final stage is to raise the bent arm upward to repeat the entire cycle again. The main thing is that the elbow is facing the ceiling when the hand rises above the water.
The work of the hands is also discussed in more detail in our article on stroke technique.
Hand exercises
Main article: Exercises for water crawl (section “Arm training”)
To perform the exercises you will need a swimming board and hand paddles.
Swimming with paddles
- Place the paddles on your palms and float. This exercise is useful for those who do not lift their elbows out of the water. You also train the muscles involved in the stroke.
- Clench your hands into fists and swim crawl. Try to make strokes using the inside of your forearm. This technique teaches you to feel the water better. You will feel the difference in pressure on your hands.
- Perform 3 strokes in a row with one hand and then with the other. When changing hands, move your body to its side.
- Swim with a board. Hold the board with one hand and stroke with the other. Then switch hands.
- Watch these and other exercises from this video:
Cultivation - advanced level
Main article: How to swim crawl faster
After you have mastered all the basic elements, at some point you will stop developing - and then the question will arise about further improving the crawl technique .
Here you will need to contact a trainer or film yourself on video (which can also be shown to the trainer, at least via the Internet remotely) and then work on correcting the shortcomings. Read our article about what points you should especially pay attention to.
Freestyle breathing training
The swimmer will be able to make the correct movements if he breathes correctly. First of all, it must be rhythmic.
The swimmer inhales through his mouth when, during the stroke, his chest turns sideways - in the direction of the hand that is rowing.
Then he lowers his head down and releases air . While swimming, do not look forward, direct your gaze downward. When you turn your head, look at the edge of the pool, but not up.
When the swimmer inhales from the right side, his left arm is positioned in front in an extended position. The right arm is placed along the back of the body, and the right shoulder protrudes slightly out of the water. The face is turned to the right, the gaze is directed back. By analogy for inhalation on the left side.
For beginners, you can inhale with every second stroke. It is best if the head turns on both sides.
You can read more about freestyle breathing here.
Breathing exercises
- Lie on your stomach and place your palms on the bottom of the pool. Choose a shallow place for this or hold on to the side. Raise your body and legs to the top edge of the water. Inhale and plunge your head into the water. Hold the air and count to 10, then return to the starting position. You can practice holding your breath in water.
- Place your feet shoulder-width apart and rest your palms on your knees. Immerse either side of your face in the water with one cheek. Practice breathing underwater by inhaling, turning your head, and exhaling. Algorithm of actions: inhale, turn your head, immerse it in water, exhale. Repeat several times.
Set the stroke
The stroke should be S-shaped. Only the coach can set it.
Anna Poleykina
Swimming coach, active participant in the Masters movement
Some people believe that you can put your phone on the bottom of the pool and then watch the trajectory of your hand. But this will not give a complete understanding.
In open water swims we swim “on our hands”. The legs have large muscles that require a lot of energy. When we swim on our feet, we get tired faster and our breathing becomes difficult.
A set of activities on land
Main article: Dry crawl exercises
Circular movements with hands
Beginners can start by performing a set of simple exercises:
- Stand up and spread your arms to your sides, palms facing back. Make circular movements with your hands and forearms. In this case, the elbows should remain in the same position . The movements are reminiscent of swimming on your back.
- Sit down and lean on your forearms. Stretch your legs and begin to make alternating movements with them towards you, raising and lowering them. The same movement technique is used in swimming.
- Stand up and lean forward. Place one hand on your knee and extend the other in front of you. Swing your arms one at a time, as if you were swimming on your stomach.
- Place your feet shoulder-width apart. Bend over and extend one arm in front of you, the other back. Turn your face in the direction of the hand behind your thigh, look at it and take a breath. Then start moving your arms in a crawl style while exhaling.
We also recommend doing the dry crawl exercises described in our article.
As you can see, the front crawl swimming technique, the teaching method for which is described above, is quite accessible and anyone can master it if desired. You just need to learn how to stay on the surface of the water and breathe correctly. Having mastered these nuances, you will truly enjoy the process. Good luck with your studies!
Turning technique
When swimming crawl, a turn is carried out in two ways:
- pushing off with your feet and hands from the side with a turn;
- doing a somersault underwater.
Rotate from side
The hand should rise to the wall and touch, then bend at the knee, at which point the other hand should make a sweeping motion, helping to move the body to the side. At the same time, the legs are folded over the knees so that the knees can be pushed and rotated.
Turn in the direction of the other helping hand. After pressing, it is recommended to take the starting position and continue moving backwards.
Somersault
This method is more complex. In this embodiment, the head must not be lowered after the impact, and the puncture must be made with the hands pressed. If the knees bend, the knees are pulled towards the chest, where it is desirable to roll over. When your head is looking at the ceiling, you need to straighten your legs and push to the side.
After the shock, you should stay under water for some time, rising to the surface. In this case, the shoulders are suspended or extended along the body. You can lower your chest immediately after the slide or at water level.
The point is that you should put it aside to avoid damaging it because you may get injured. To prevent water from getting into your nose during a somersault, air must come out of your nose slowly.