Training with an expander band is one of the most accessible sports options at home or on the street. Although such elastic bands cannot replace strength exercises with dumbbells, their advantage lies in their compactness. In addition, they perfectly develop muscle strength and help create a proportional body.
Having a set of fitness bands and harnesses of various load levels, you can easily carry out a full workout for all large muscles. Below in the material you will find a set of functional exercises with elastic bands for men on the back, chest, legs, abs and arm muscles.
Content
- 1 Exercises with rubber bands 1.1 Preparing for training with bands
- 4.1 Squats with an expander
Why you should get a sports harness
In conclusion, I would like to tell you a few more words about this sports device. Don't neglect them . If you want to improve your body , but do not intend to spend a lot of time and money on it, then a rubber tourniquet is exactly what you need.
Firstly, it costs about 500 rubles. Secondly, training with it will not take you much time. After just a few weeks of training, your friends and acquaintances will wonder when you managed to acquire such an athletic body. The main thing is regularity of classes. And then the result will not take long to arrive! I wish you success!
vote
Article rating
Exercises with rubber bands[edit | edit code]
| Source: Fitness for Beginners . Manual, 3rd ed. Author: Liz Neporent, 2017 |
For training and strengthening muscles at home, rubber bands or tourniquets
.
power expanders
(pieces of rubber of different shapes with handles) and
elastic tubes or power cables
(round and hollow inside) are also used for exercises today By the way, the latter were originally used in hospitals for surgical operations. Of course, these devices cannot provide a load similar to free weights or power machines. However, they can significantly increase the strength and tone of your muscles, and also help maintain physical fitness. In this article, we will introduce you to the most useful exercises with resistance bands and bands, as well as tips for using them safely. At the same time, although the photos accompanying each exercise show only tourniquets and expanders, rubber tubes and hoses are quite suitable instead.
Resistance bands are especially useful if you want to continue developing your strength while traveling. It is unlikely that you will be able to easily carry a set of chrome dumbbells with you in your suitcase. On the one hand, this is difficult and inconvenient, but on the other, it is terribly unpleasant to hear how the metal detector at the airport reacts to them. It is much better to take light and comfortable sports equipment with you: elastic bands and expanders. Even if you usually stay in hotels with a gym, you will still benefit from bringing your own portable “weights” with you. Even the fitness centers of the most luxurious hotels do not always have everything you need. It’s worth taking a rubber band with you every time on the road, which makes it easy to stay in shape, regardless of the time of day or situation.
Try to only use tourniquets specifically designed for sports training. As a rule, they are not that expensive. In general, the price of these products depends on the level of their resistance (the stiffer the harness, the more expensive). If you are allergic to latex, then tourniquets and expanders without it are available for sale.
If you want to show off your acquaintances, it is better to buy an expander with plastic or metal handles. Handles usually make it easier to hold the ends of the resistance band in one or both hands. Resistance bands with handles can be especially useful for exercises such as biceps curls, described later in this chapter. However, they are completely impractical for exercises like leg abduction, which require tying a tourniquet into a ring. (Some manufacturers, however, make resistance bands in the shape of a circle or a figure of eight, which work well for these exercises.) In general, since bands and resistance bands are quite cheap, we recommend purchasing several of them. By the way, the shorter and/or thicker the tourniquet, the harder it is usually to stretch it and the more force you need to apply for this. Today you can find elastic sports equipment on sale in a variety of shapes:
- round;
- curly and eight-pointed;
- flat and wide;
- hollow (resembling surgical tubes).
To make harnesses and expanders more comfortable to hold in your hands, it is better to wear gloves for strength exercises when working with them.
- Shoulder expanders
- Rubber expanders
- Elastic bands
Preparing for training with tourniquets[edit | edit code]
Which harnesses or expanders are best suited for performing certain exercises? To determine this, first try experimenting with different shapes, sizes and levels of hardness. It is worth buying harnesses with a length of at least 120-150 cm, which allows you to expand your training capabilities. You can always fold such a tourniquet several times to increase muscle resistance. Also try to keep all the harnesses within reach so that after you start training you don’t waste time looking for them under the sofa. It’s good, by the way, to store them all in one place, like a box or basket in the corner of the room.
Well, you are almost ready to start training with rubber equipment. All that remains is to take into account a few simple tips.
- Before each approach, make sure that the tourniquet is securely fastened in the right place.
One day, Liz, as a coach, was demonstrating to the group deadlifts with a tourniquet, and suddenly the tourniquet slipped out from under her leg and slapped her painfully in the face. It wasn't great at all! Of course, Liz was not at a loss. She immediately told the group that this was an example of how not to use a tourniquet. She then calmly continued to explain the various dangers of mishandling the tourniquet. She would have forgotten that incident if 20 minutes later the tourniquet had not slipped out from under her leg again and slapped her in the face when she was demonstrating another exercise.
- If to perform a movement you need to hold one end of the tourniquet in each hand (and it does not have handles), wrap these ends loosely around your hands. The tourniquet can even dangle a little so that when it is stretched, the rubber does not squeeze your fingers, blocking the flow of blood in them.
- If to perform an exercise you need to step on the tourniquet with both feet together, place them first on the center of the tourniquet. Then step one of them to the side so that there is a distance of about 15 cm between your feet. This stand will not allow the tourniquet to slip out at the most inopportune moment.
As you perform exercises, tourniquets and expanders are constantly stretched, compressed, stretched again, and compressed again. It is clear that they cannot serve forever, and they need to be changed from time to time. The following tips will help you keep track of the condition of your harnesses, determining when to throw out old ones and buy new ones.
- Examine the harnesses frequently for holes, abrasions, and tears by holding them up to the light. If you find even the slightest break, change the tourniquet immediately. After all, it can burst at any moment and give you a painful slap, causing it to spring back.
- Here's another point to remember. If you frequently use a flat tourniquet that comes into contact with sweaty skin, periodically rinse it in clean water, dry it, and store it in a bag of baby powder. Just remember to shake off the powder before your next tourniquet workout.
It won't be difficult at all to incorporate your favorite band exercises into your regular strength training routine. If you plan to study while traveling, master them in advance so that you don’t waste time later trying to figure out all the intricacies. As with other strength exercises, do 8 to 15 reps per set and at least one set per muscle group. (We'll talk about which muscles each band exercise strengthens later in this article.) Once you can easily complete all 15 repetitions, make the task more difficult by using a shorter or stiffer band.
What it is?
This is not know-how: the rubber expander has long been in service with rehabilitation specialists, who use it to restore athletes after injuries. A modern sports harness is a flat or round piece of multi-layer latex with or without handles at the ends, which allows you to diversify your workouts and make them more effective. In one of the variations, the simulator is also used for swimming.
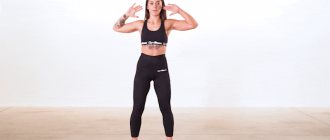
Warm-up with an elastic band[edit | edit code]
Source: “Cross-training”
Author:
instructor O.B. Derval, 2016
Do the exercises one after another. Do 2-3 sets, taking 30 seconds to 1 minute rest
- 10 jumping jacks with leg extensions
- 20 vertical arm swings in the lateral plane
- 10 lateral tape pulls with two hands, alternating sides
- 5 exercises in a sitting position + jumping jack
- 3 sets, 30 second recovery
- Jumping with legs spread, vertical swings of arms in the lateral plane
- Lateral band pulls with two hands with alternating sides, exercises in a sitting position + jumping jack
Benefits of training
By limiting the movement of blood with tourniquets, you can get the following advantages:
♦ IMPROVING REHABILITATION. If the muscles are damaged, then in this way, by pumping blood into the problem area, the restoration of their previous performance is accelerated;
♦ REDUCE THE LOAD ON JOINTS. Since the weight is taken mainly 20-30% of the one-rep maximum, the weight on bone tissue is reduced significantly, which can greatly help those who suffer from joint pain and cannot use heavy weights;
♦ REDUCING THE TRAINING TIME INTERVAL. The duration is 30-40 minutes, which is beneficial for those who have a lack of free time.
Some believe that by training in this way, an additional portion of growth hormone is released into the body. This information is not 100% confirmed, but it is worth noting this point.
Side steps with a rubber band[edit | edit code]
Source:
“Bodybuilding.
Book trainer" .
Editor:
Oksana Usoltseva
Ed.
: Eksmo 2013
Inventory
: rubber band.
Core muscles
: buttocks.
Additional muscles
: abductors.
Level of training
: advanced.
Resistance bands and resistance bands are good for developing muscle strength and recovering from injury because they replicate the mechanism of stretching and contracting muscle fibers.
Step 1
. Tie the tape around your legs just below the knees.
Step 2
. Take a step to the side a few centimeters.
Step 3
. Repeat on the other side.
The number of repetitions depends on your preparation.
Why do you need an elastic band for stretching: benefits
Fitness bands are great for stretching for a number of reasons:
- The compactness of the product and ease of use reduce the likelihood of injury to a minimum due to the uniform distribution of the load over the area of the body involved in stretching.
- They allow you to add variety to your usual exercises , master a more complex level and work more thoroughly on a specific area.
- Elastic bands make it possible to regulate the load level and easily vary it, choosing the optimal one.
- In many exercises, in addition to strengthening the muscles, the rubber band helps to thoroughly work out the ligaments , increasing the level of stretching.
Squats with rubber bands on legs[edit | edit code]
Inventory
: rubber band.
Core muscles
: quadriceps.
Additional muscles
: buttocks, hamstrings.
Level of training
: advanced, professional.
Band training helps restore injured muscles. By the way, you can train this way at home and at work during your lunch break.
Step 1
. Tie the tape around your legs just below the knees.
Step 2
. Squat down until your thighs are parallel to the floor. During the squat, the knees move slightly to the sides, stretching the band, which creates additional stress.
Step 3
. Return to the starting position.
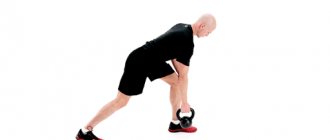
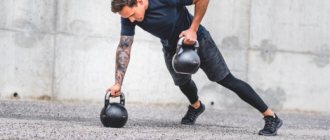
Squats with an expander[edit | edit code]
| Source: Fitness for Beginners . Manual, 3rd ed. Author: Liz Neporent, 2017 |
In this case, the expander makes squats more difficult, acting as free weights (replacing dumbbells). This exercise strengthens the buttocks, quadriceps and biceps femoris muscles. However, be careful with it if you often experience lower back, hip, or knee pain.
Preparing for the approach.
Take the handle of the resistance band in each hand and step on its center, placing your feet hip-width apart and keeping your hands at your sides. Straighten your back, roll your shoulders and pull your stomach in (photo A in Fig. 1).
Exercise.
Lower your body back and down, as if sitting on a chair. Bend your knees and lower yourself as low as possible without leaning your upper body forward more than a few centimeters. Never go below the point where your thighs are parallel to the floor, and don't let your knees extend beyond your toes. When you feel your upper body hanging too much over your hips, straighten up, pushing through your heels and being careful not to lock your knees. Throughout the exercise, keep your shoulders relaxed, your head raised, and your gaze directed straight ahead (Photo B in Fig. 1).
Leg abduction with tourniquet[edit | edit code]
What muscles work?
This exercise develops the gluteal muscles much better than many special exercise machines installed in gyms. But just be careful with it if you have lower back problems.
Preparing for the approach.
Take a piece of rope about 30 cm long, tie it into a ring and put it on the insteps of both legs. Then lower yourself to the floor so that you are resting only on your knees and elbows. Press the instep of your left shoulder to the floor and draw in your stomach (photo A in Fig. 2).
Exercise.
Bend your right knee and lift your leg until your knee is level with your buttocks. Then slowly lower your leg back to the floor, being careful not to let the tourniquet come off. Between repetitions, your right knee should almost touch the floor, but not all the way. Do the same number of repetitions for each leg (photo B in Fig. 2).
Lifting the outer thigh, with a tourniquet[edit | edit code]
What muscles work?
This exercise is specifically aimed at developing the muscles of the outer thighs. Remember to pull your stomach in to protect your lower back from injury.
Preparing for the approach.
Take a piece of gymnastic rope (30 to 60 cm long) and tie it into a ring. Lie on the floor on your left side with your legs extended a few centimeters forward. Bend your knees and rest your head comfortably on your outstretched left arm. Pull the rope ring around your thighs just above your knees. Bend your right arm and place your palm on the floor in front of your chest for support. Make sure your right thigh is directly above your left, and draw your stomach in to prevent your back from arching (Photo A in Figure 3).
Exercise.
Keeping your knees slightly bent, lift your right leg until your foot is level with your shoulder. Hold this for a while and then lower your leg back to the starting position. The tourniquet must remain taut at all times (photo B in Fig. 3). When finished, turn over to the other side and do the same number of repetitions for your left leg.
Toe press with expander[edit | edit code]
What muscles work?
This exercise is aimed mainly at developing the calf muscles. As a bonus, it also strengthens your calves, upper back, and biceps, especially if you keep the band taut the entire time, moving your toes in and out of you.
Preparing for the approach.
Sit on the floor, holding the handle of an expander or one end of a flat tourniquet in each hand at waist level. Stretch your legs straight out in front of you and wrap a resistance band or tourniquet around the instep of your right leg. Bend your right knee slightly and lift it up, keeping it suspended. Sit up straight and, if desired, bend your left knee, placing your foot on the floor. The main thing is not to hunch your back (photo A in Fig. 4).
Exercise.
Pull the expander or tourniquet, turning the toe of your right foot towards you. Hold this for a while, and then, continuing to pull the tourniquet, straighten your foot. After this, pull your toe as far forward as you can. After completing the entire approach, do the same number of repetitions for the left leg (photo B in Fig. 4).
Lat row with expander[edit | edit code]
What muscles work?
This exercise is very similar to deadlifts, which you may already be used to doing on a special machine. Like the power machine version, it works primarily the upper back muscles, but also works the shoulders and biceps.
Be especially careful and strictly follow the recommendations for working techniques if you often experience discomfort in your neck.
Preparing for the approach.
Sit on a chair or stand up straight with your feet hip-width apart and holding one end of a folded resistance band or resistance band in each hand. Raise your arms above your head so that your left palm faces you and your right palm faces forward. In this case, the elbows should be slightly bent. Straighten your back, pull in your stomach and relax your knees (photo A in Fig. 5).
Exercise.
Keeping your left arm in one position at all times, bend your right elbow down and to the side, as if you were about to shoot upward from a bow. Without bending your wrists, pull the tourniquet until your hand is level with your shoulder and your elbow points down. Then slowly straighten your right arm and return to the starting position. After completing the set, change position and do the same number of repetitions for the left hand (photo B in Fig. 5).
Push-ups with a tourniquet[edit | edit code]
What muscles work?
In this case, the tourniquet makes push-ups more difficult because, in addition to lifting your body weight, you also have to overcome the resistance of the rubber. This exercise is good for strengthening the chest, shoulders, triceps and abdominal muscles.
You may want to skip this version of push-ups if you often experience discomfort in your lower back, neck, or elbows.
Preparing for the approach.
For this exercise, you will need a tourniquet at least 90 cm long. Take one end of it in each hand, passing the tourniquet behind your upper back. Lie face down on the floor, bend your elbows and place your knees and palms on the floor, placing the latter slightly in front of your shoulders. Press the ends of the tourniquet into the floor with your hands, bend your knees and cross your ankles. Tilt your forehead towards the floor and draw in your stomach so that your back does not sag during the exercise (photo A in Fig. 6).
Exercise.
Straighten your arms and push up from the floor. (The tourniquet should be taut.) Then slowly bend your elbows and lower your body back down until your elbows are just above your shoulders. Whether your chest will touch the floor depends on the length of your arms and the size of your chest itself (photo B in Fig. 6).
Shoulder press with a tourniquet with one hand[edit | edit code]
What muscles work?
This exercise focuses on strengthening the shoulders, but also works the triceps.
Be especially attentive to the technique if you have long had problems with the lower back or neck.
Preparing for the approach.
Take a long piece of rope and step on one end with both feet, hip-width apart. Take the other end of the tourniquet in your right hand, palm facing forward, and place your left hand on your thigh. Raise your right arm to shoulder height, bending your elbow slightly so that your upper arm is parallel to the floor and your palm remains facing forward. Keeping your head exactly centered between your shoulders, draw your stomach in and relax your knees (Photo A in Fig. 7).
Exercise.
Straighten your right arm overhead and then slowly bend it back. In this case, the elbow may drop slightly below the shoulder, but no more. Having completely completed the approach with your right hand, do the same number of repetitions for your left (photo B in Fig. 7).
Rotation of hands with a tourniquet outward[edit | edit code]
What muscles work?
This exercise strengthens the rotator cuff muscles.
Preparing for the approach.
Tie a tourniquet or expander to a fixed object. Stand with your side to it and take one end of the tourniquet in the opposite hand, turning your palm towards you. Bend your elbow 90° and press it toward your side. Place your other hand on your thigh (Photo A in Fig. 8).
Exercise.
Keeping your elbow in the same position at all times, move your forearm and hand to the side to increase the tension of the tourniquet. Then slowly return them back to their original position (photo B in Fig. 8).
Rotation of hands with a tourniquet inward[edit | edit code]
What muscles work?
This exercise also strengthens the rotator cuff muscles, helping to prevent injury.
Preparing for the approach.
Turn 180° and take the end of the tourniquet or expander in the other hand, closest to the place where it is tied. Position your arms exactly as you would for external rotation (Photo B in Figure 8).
Exercise.
Pull the tourniquet towards you to increase its tension, and then slowly move your forearm back to the side, returning to the starting position (photo D in Fig. 8).
Simultaneous bending of the arms with an expander[edit | edit code]
What muscles work?
This exercise is a great imitation of a barbell curl and is primarily aimed at strengthening the biceps.
BE careful if you are prone to elbow injuries.
Preparing for the approach.
Take one end of a resistance band or resistance band in each hand and step on the center with both feet, hip-width apart. Straighten your arms at the sides of your body with your palms facing down. Stand up straight, pulling your stomach in and relaxing your knees (photo A in Fig. 9).
Exercise.
Bend your elbows and lift both hands up until they are directly in front of your shoulders. But don't let your elbows move forward as you bend your arms. At the top point of the movement, the expander or tourniquet should be taut. Then slowly lower your arms back, straightening them completely (photo B in Fig. 9).
Extension of the arms back with a tourniquet[edit | edit code]
What muscles work?
As you may have already guessed, this exercise is aimed at strengthening the triceps. They have to be trained specifically, since in everyday life there are not so many opportunities for their development.
Try to make this exercise as easy as possible if you have been experiencing discomfort in your elbows for a long time.
Preparing for the approach.
With your feet hip-width apart, take one end of a short tourniquet in your left hand and place your left palm on the front of your right shoulder. Take the other end of the tourniquet in your right hand, turning your palm towards you. Bend your right elbow so that it is at waist level, pointing behind your back. You can bend your hips slightly if you find this position more comfortable, but keep your stomach pulled in and your knees relaxed at all times (Photo A in Fig. 10).
Exercise.
Keeping your elbow in one position, straighten your right arm behind you so that the tourniquet becomes taut. But do not straighten your arm completely and do not allow your elbow to lock into the joint. Then bend your elbow again so that your hand moves back toward your waist. After completing the entire set, change position to work the left triceps in the same way (photo B in Fig. 10).
How to choose the right one
Which tourniquet to use depends directly on your goals and current physical fitness. If you decide to make your home workouts a little more challenging, a rubber band will suit you well, with which you can exercise just as productively as with a branded elastic band.
If you are going to exercise in the gym, consult with a trainer before purchasing professional equipment. Branded harnesses are available in different colors, lengths and elasticity. When choosing a projectile, pay attention to the numbers indicated on it: the first will mean the minimum, and the second will mean the maximum force that needs to be applied to stretch the rubber.
Working out the middle part of the back
At home, the body often does not have enough stress on the back.
Exercises with a tourniquet fill this gap:
- It is necessary to fix the rubber at the level of the knees (the leg of heavy furniture or a radiator). Stand up straight, bend your knees slightly, tighten your abdominal muscles. Pull both ends of the expander toward you, bending your elbows and bringing them closer to your body by bringing your shoulder blades together. Keep your back straight, shoulders back;
- The vertical pull of the expander increases the width of the back: you need to throw the middle part of the expander over the door so that both ends hang down. Grab them with your hands and pull them down to your chest, trying to arch your back and bring your shoulder blades together;
- The horizontal pull of the expander is performed while sitting, and the loop is also fixed at the lowest point - behind a radiator or furniture leg. You need to sit down and rest your feet next to the place where the loop is attached. Pull the ends of the expander toward you, bringing your shoulder blades together and moving your shoulders back.
Perform three approaches 10-20 times until the muscles burn. If the load is easy, you need to increase the resistance.
Wrestling harness - application in fitness training: read on the website Zozhno.ru
Testing of ZOZHNO wrestling harnesses by a trainer at the TDM FIT personal training studio
This is our first publication in a question-answer format, where all the information that the specialist kindly shared with us is conveyed verbatim. Here you will find not only useful information, but also the personal opinion of the trainer. And the debut of our new question-answer column was kindly agreed to be shared with us by fitness trainer Anton Galushko.
Anton Galushko is 37 years old. In sports since 8 years old. Experience as a personal fitness and bodybuilding trainer for 16 years.
CCM in bodybuilding.
Champion of the Central Federal District 2022 in the Bodybuilding category up to 100 kg, winner of the Moscow Bodybuilding Cup 2022, finalist of the Russian Cup 2022, 5th place at the Arnold Classic Europe 2018, 3rd place at the Moscow Championship 2022, absolute champion of the Vladimir Region 2022, 2- 1st place at the International Nordic Cup 2022 tournament, 1st place at the Mister Tula 2022 Bodybuilding Championship.
Sports dancing - category B. Multiple winner of city and regional competitions.
Combat Jiu-Jitsu (based on Combat Sambo) - blue belt. 2nd place at the Moscow Championship.
I approach my goal with attention. I consider the main task to be achieving results without causing harm to health.
The Zozhno.ru online store provided two types of boxing harnesses for testing: rubber ZOZHNO, BJC 12 mm and rubber ZOZHNO BJR 12 mm. It took the trainer 2.5 hours to familiarize himself with the equipment, determine its quality, functionality and use it in training. During this time, Anton managed to test the equipment personally and use it in personal fitness training.