Content
- The benefits of push-ups
- How to do push-ups correctly: step-by-step technique
- Breathing rules for push-ups
- Basic mistakes when performing push-ups
- Description of different variations of push-ups from the knees
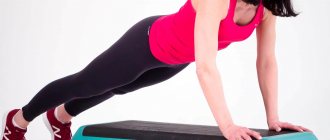
- With hands resting on the bench
- With your feet resting on the bench
- With a narrow hand position
- With arms wide
- Circular
- Different names
- On one hand
- On fists
- On fingers
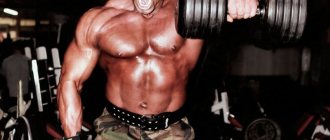
The benefits of push-ups
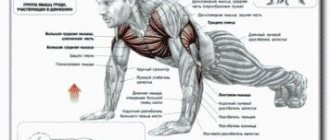
Push-ups develop strength and stimulate the growth of muscle mass in the shoulder girdle, which is why they are included in the training plan of weightlifters, powerlifters and bodybuilders. The exercise increases endurance, helps to increase the speed of impact, and therefore is included in the training of martial artists.
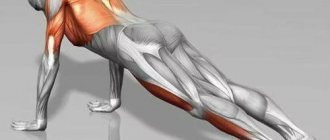
With the correct technique for performing push-ups, almost all muscle groups are involved:
- large pecs;
- anterior serrated;
- triceps and biceps;
- elbows;
- intercostal;
- deltoid;
- abdominals and back;
- gluteus maximus;
- calf.
Significance
Push-ups are a closed-chain exercise that improves shoulder proprioception, strengthens the shoulder girdle muscles, and thereby increases shoulder stability. Therefore, this exercise can be used for rehabilitation of the shoulder joint. Push-ups activate the above muscles to a greater extent than push-ups on a flat surface.
Push-ups work many other muscles in our body, which increases the activity of the cardiorespiratory system. Therefore, they can be used as a simple and quick way to assess a person's functional capabilities. A study by Justin Yang et al. (2015) found that participants who could perform more than 40 push-ups had a lower risk of cardiovascular disease than those who could do fewer than 10 push-ups.
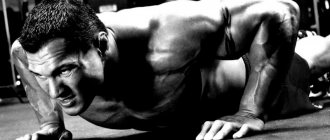
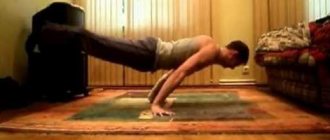
How to do push-ups correctly: step-by-step technique
- Take a prone position (lie face down on the floor, place your hands slightly wider than your shoulders). Give your body the correct position for push-ups - a straight line shape. The shoulders should be slightly higher than the level of the pelvis. The head should look towards the floor.
- Palms are on the vertical of the shoulders, parallel to each other, the direction of the fingers is parallel to the body. The correct positioning of the hands for classic push-ups is shoulder-width apart or slightly wider.
- Arms are bent, elbows pointing out to the sides at an angle of 45 degrees from the body, fingers pointing forward
- The position of the feet is not fundamental: they can be brought together or apart.
- Gently bend your elbows, slowly lower yourself down, and then rise back up.
- The lowest point is when the right angle between the biceps and forearm is reached. The chest touches the floor.
- In the upper position, the arms are not fully straightened so as not to block the elbow joint. Pause at the top point.
- To increase the effectiveness of the exercise and prevent traumatic axial load on the spine, tighten your abdominal muscles.
Sorry, your browser does not support video viewing.
Pro Tips
According to professional bodybuilders, in order to pump up the shoulder muscles, you need to combine basic elements with isolated ones. You need to start with classic push-ups, exercises with light weights, gradually increasing the load.
Warm up before class to avoid injury. All movements must be careful, slow, and performed by tensing the arm muscles. It is enough to conduct 2-3 classes per week for 45-60 minutes.
Breathing rules for push-ups
Inhale as you move down. Move up while exhaling. If you're having trouble maintaining a normal breathing rhythm, you're probably doing push-ups too fast. Reduce the speed of the exercise, move more smoothly, stopping at the top point of the amplitude.
The second reason for shortness of breath during push-ups is smoking. After getting rid of a bad habit, breathing during training returns to normal.
Incorrect breathing technique during push-ups often contributes to increased blood and intracranial pressure.
Basic mistakes when performing push-ups
Not only beginners, but also experienced athletes often do push-ups incorrectly. Not only do they not train effectively, but they also increase the risk of injury.
Back arching significantly increases the axial load on the spine and can cause injury. If it is difficult for you to keep your back strictly straight during push-ups, first pump up your spinal extensors and abdominal muscles.
Putting your arms too wide or pushing your elbows out to the sides
greatly increases the load on the elbow and shoulder joints and ligaments and can provoke injury.
Incomplete range of motion
. The correct position of the hands when pushing up from the floor is when at the lowest point they are bent at an angle of 90°.
Otherwise, the exercise is not effective. If this is difficult for you due to insufficient physical training, experts recommend doing either a lighter version of push-ups, or temporarily replacing the exercise with another.
Do not lift your pelvis higher than your shoulders and do not round your cervical spine.
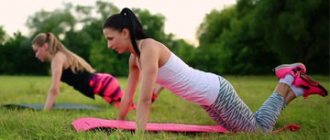
Description of different variations of push-ups
Push-ups with different hand positions allow you to shift the emphasis to different muscle groups.
From my knees
A lighter version of the classic exercise. Suitable for beginners. Protects the lumbar spine from overexertion and injury.
The starting position is the same as in the classic exercise, only your knees are on the floor (do not lift your shins up, otherwise your back will bend in the lower back). The body is elongated in a straight line from the knees to the top of the head. The pelvis does not rise.
The technique is similar to the classic one.
With hands resting on the bench
A lighter version of the classic exercise. Suitable for beginners. Helps work the lower pectoral muscles.
The starting position is the same as in the classic exercise, only the palms rest on a bench 40-60 cm high. The body is extended in a straight line from the knees to the top of the head. The pelvis does not rise.
The technique is similar to the classic one.
With your feet resting on the bench
Helps work the upper pectoral muscles.
The starting position is the same as in the classic exercise, only the feet rest on a bench 40-60 cm high. The body is extended in a straight line from the knees to the top of the head. The pelvis does not rise.
The technique is similar to the classic one.
With a narrow hand position
For a thorough workout of the triceps.
The starting position is similar to the classic one, only with your palms waist-width apart. Feet hip-width apart.
Technique: while inhaling, bend your arms to a right angle, move your elbows back and press your forearms to your body. As you exhale, return to the starting position.
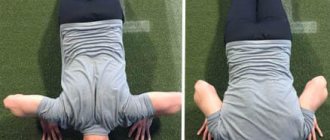
With arms wide
For a thorough workout of the pectoral muscles.
The starting position is similar to the classic one, only the palms are 2 times wider than the shoulders and turned outward.
Execution technique: while inhaling, bend your arms to a right angle. As you exhale, return to the starting position.
Circular
For a thorough workout of the back and abdominal muscles, increased load on the triceps, deltoids and pectoral muscles.
The starting position is the same as in the classic version.
Execution technique: while inhaling, bend your arms, moving the load to one of them. As you exhale, return to the starting position. Repeat with shifting the load to the other arm.
Different names
For alternately working the pectoral muscles and triceps.
The starting position is similar to the classic one, only the right hand is moved to the side and the left is back.
Execution technique: while inhaling, bend your arms and touch your chest to the floor. Return to the starting position. Repeat, changing the position of your hands.
On one hand
To increase workload.
Starting position - emphasis on the feet and one hand. The width of the feet is slightly wider than the shoulders. The second hand is behind the back.
Execution technique: while inhaling, bend your arm to a right angle. As you exhale, return to the starting position. Change your supporting hand and repeat the exercise.
On fists
For staging strikes in martial arts. Strengthens the articular-ligamentous apparatus of the hand, stabilizes and hardens the striking surface of the fists. Reduces pain sensitivity, develops endurance and muscle strength. Trains balance. Allows you to work in increased amplitude.
Starting position: lying on the floor. The emphasis of the fists is on the index and middle fingers, partially on the ring finger. You can rest your toes against the wall to prevent slipping. At the initial stages, it is possible to focus on the knees, use mats, rugs and other soft surfaces.
Execution technique: while exhaling, forcefully push yourself upward. In the upper position, the body is extended in a straight line. As you inhale, return to the starting position.
On fingers
For a thorough study of the ligaments and muscles of the forearms, hands and fingers. Helps perform strong grips and painful holds. Useful for people who work at a keyboard.
Starting position - arms straight, emphasis on fingers (depending on the level of training - all 5 or less). At the initial stages, emphasis on the knees is possible.
Execution technique: while inhaling, bend your arms, lower yourself down, touch your chest to the floor. As you inhale, return to the starting position.
Exercises to pump up the deltoid muscles
If you plan to exercise at home, then focus on push-ups and dumbbell exercises. Perform different variations of fitness elements to maximally load your muscles.
To pump up the front part of the delta, swing your arms forward; to strengthen the middle segment of the muscle, spread them; for the back, move your arms in an inclined position.
Do the heavier elements first and finish with the less difficult ones. This order is due to the fact that by the end of the lesson the athlete’s physical strength is depleted.
With dumbbells
Weight training quickly helps strengthen your shoulder muscles. It is recommended to purchase collapsible dumbbells to work the muscles from different angles.
Important! Classes should consist of basic as well as isolated exercises. The former involve many muscle groups, while the latter only load the deltas.
Start your training with the basic elements:
- Dumbbell press (seated or standing). Helps strengthen the anterior and middle deltoids, triceps, pectoral and back muscles. Hands with dumbbells on your shoulders, smoothly lift them to the maximum. Point your palms forward and rest on your feet.
- Lifting dumbbells to the chin. Suitable for shaping deltas, trapezius, triceps. Stand with your hands holding the apparatus along your body, your knuckles facing forward. Slowly lift the dumbbells and spread your elbows. Try not to move your shoulders.
Then you can move on to isolating movements:
- Dumbbell fly. Forms the middle section of the delta. Stretch your arms with the apparatus along your body, turn your finger bones to the sides, and bend your elbows slightly. Slowly move the projectiles to the sides (above the shoulders). Back straight, shoulder blades together. You also need to lower your arms smoothly in order to tense the muscles as much as possible. Then, without delay, begin the lift again. If pain appears in your shoulder, then turn your wrist back a little, while fixing your elbows.
- Swing your arms forward with dumbbells. Suitable for the anterior deltoids. Hold the apparatus with your knuckles facing back and slowly raise your limbs in front of you, moving only your shoulders. Make sure that your elbows and torso do not move.
- Bent-over dumbbell flyes. Helps strengthen the posterior deltoid segment. You can simply tilt your torso or lean on a bench, fitball, or stool. The back muscles should be relaxed, and the limbs should be raised and lowered slowly. The dumbbells should be held with your palms facing inward. You need to lower your shoulders, bend your elbows slightly, and raise your arms slightly higher than your back.
Important! When performing isolated movements, it is recommended to use lighter weights than during basic training.
To speed up weight loss and make your muscles sculpted faster, you can include the following elements in your training complex:
- Circular movements of the arms in the shoulders with weight. Spread your arms with the apparatus, bend your elbows, first lift your hands up, and then lower them down by tensing your shoulder muscles.
- Y-lifts. Turn your hands with the apparatus, palms forward, lift them, gradually turning them at an angle of 45°.
- Hand rotations. Spread your limbs with light dumbbells to the sides, and then perform circular movements with your arms. Move first forward and then back.
These exercises for pumping up muscles will help increase muscle tone and accelerate its growth.
Push-up program from scratch for beginners
We present a working scheme that helps you reach 100 repetitions per set from one repetition per set. The program is designed for 12 weeks. In the first weeks, the body does not experience heavy stress. This allows beginners to strengthen their muscles. Pause between sets for 1 to 3 minutes. Pauses between sets of 1-2 minutes are necessary to normalize breathing and restore ATP reserves in muscle cells. This push-up program also promotes muscle growth.
The main thing is to perform the presses efficiently, and not quickly. If you cannot complete an exercise, give yourself a break of 1-2 days and do it again. If you do more than one push-up, start with as many push-ups as you can do.
| Mon | Tue | Wed | Thu | Fri | Sat | Sun | |
| Week 1 | 5×1 | 5×1 | Break | 4×2 | 4×2 | Break | 4×3 |
| Week 2 | 5×2 | 5×2 | Break | 4×3 | 4×3 | Break | 4×4 |
| Week 3 | 4×5 | 4×6 | 4×6 | Break | 3×8 | 3×9 | 3×10 |
| Week 4 | Break | 2×12 | Break | 3×10 | Break | 4×8 | Break |
| Week 5 | 2×15 | 2×16 | Break | 3×15 | 3×15 | Break | 4×10 |
| Week 6 | 2×20 | 2×22 | Break | 3×20 | 3×20 | Break | 2×25 |
| Week 7 | 4×18 | 4×20 | Break | 2×38 | 2×40 | Break | 3×30 |
| Week 8 | Break | 3×55 | Break | 4×30 | Break | 5×25 | Break |
| Week 9 | 2×45 | 3×45 | Break | 2×50 | 3×50 | Break | 2×60 |
| Week 10 | 3×55 | 4×50 | Break | 3×60 | Break | 2×65 | 3×65 |
| Week 11 | 2×70 | 4×65 | 2×80 | Break | 2×80 | 3×75 | 2×85 |
| Week 12 | Break | 2×90 | Break | 2×95 | Break | 3×90 | 1×100 |
In three months you will be able to do 100 push-ups in one set. After this, you can move on to more complex programs, or keep yourself in shape by going through the exercises of the last two weeks again.
Effective workout
To make your shoulders massive and sculpted, you need to train 3 times a week. Classes should be high-intensity, it is recommended to use the maximum weight, taking into account the weight category and physical fitness. The training must include at least 1 basic element and several isolated ones.
Program for pumping deltoid muscles
- Day 1:
- warm-up: rotate your shoulders, elbows, swing your arms, tilt your body, squat for 10-15 minutes;
- standing dumbbell press;
- swing dumbbells forward;
- weighted leg push-ups;
- dumbbell fly.
- Day 2:
- warm-up;
- lifting dumbbells to the chin;
- push-ups with legs on a hill;
- bent over dumbbell fly;
- lifting dumbbells forward.
- Day 3:
- warm-up;
- seated dumbbell press;
- push-ups in the shape of the letter “L”;
- Inclined dumbbell raises;
- shoulder rotation with weight.
Each element must be repeated 10-15 times three times.
This complex is suitable for beginners and experienced athletes; you can increase the load with the help of dumbbells and weights. During training, all parts of the deltoid muscle work, which helps to increase their mass. After 4-8 weeks you will notice results.
Contraindications for push-ups
- Push-ups should not be done if you have chronic joint diseases - arthritis, arthrosis, bursitis - so as not to cause their exacerbations.
- For chronic diseases of the respiratory tract, heart and blood vessels.
- Since the axial load on the spine increases during the exercise, athletes with protrusions and hernias should include it in the training program only with the permission of the coach or sports doctor.
- People who are overweight should refrain from doing push-ups until their body weight normalizes - their joints will not be able to withstand such a load.
- For injured joints and muscle strains, you should also refrain from exercise until recovery.
Before starting training, it is recommended to be examined by a doctor.