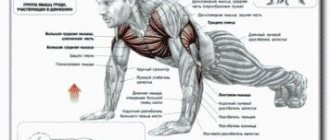
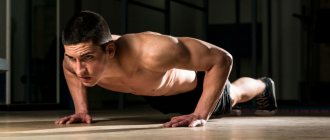
This article is dedicated to such a great exercise as push-ups. This exercise is multi-joint and therefore basic. The movement mainly involves the triceps and chest muscles. Also, but to a lesser extent, the deltoid muscles, forearms, and indeed the entire shoulder girdle as a whole receive stress. The muscles of the legs and abs experience static load due to holding the body in a horizontal position.
A feature of push-ups, in addition to the ease of execution and the absence of the need to visit the gym, is the so-called “flexible setting”, which allows, by changing the position of the arms and body, to emphasize the load either on the triceps or on the chest, as well as on individual bundles of the pectoral muscles. After all, the fibers of the chest muscles are arranged in a fan-shaped manner and to pump them all up, one exercise will not be enough, but various types of push-ups can easily solve this problem.
Content:
- Push-ups (classic version).
- Push-ups with wide arms.
- Push-ups with legs thrown back onto the bench.
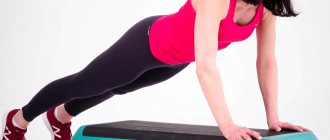
- Bench push-ups.
- Push-ups with narrow arms.
- Knee push-ups.
- Push-ups with emphasis on one leg.
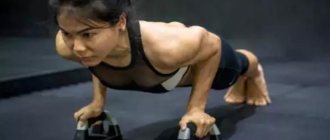
- Push-ups with emphasis on dumbbells.
- Jumping push-ups.
- Jumping push-ups.
- Push-ups with hands on benches.
- Kettlebell push-ups.
- One-arm push-ups.
What muscles are used during vertical push-ups?
Unlike classic push-ups, head-down push-ups involve almost all the muscles of the body, since the athlete needs to constantly maintain balance, and the target muscle group is not the chest, but the shoulders , which are affected by the weight of the whole body.
In a sense, upside down hand push-ups can be compared to a standing military barbell press.
Jumping push-ups
A fairly complex exercise designed for people who already know how to do classic push-ups at least 30 times. This type of push-up is aimed at developing the athlete’s explosive strength. By performing jumps, the load on the pectoral muscles increases significantly and the exercise becomes more intense. It can be performed either with or without throwing your legs over the bench, the load will be distributed accordingly - to the upper or middle sections of the chest.
In this version of the exercise, the triceps also receive a significant load. To reduce it, you need to do push-ups with jumps only from the floor, leaving the width of your arms unchanged, as shown in the previous exercise.
Benefits of push-ups exercise
Before we get to the detailed instructions, let's figure out what kind of exercise this is and what the benefits of this technique are, what muscles it works.
Push-ups without legs (another name is planche or horizontal push-ups) are push-ups during which the emphasis is placed only on the shoulder girdle and arms, while the legs are in the air at an angle of 90° from the floor line. The legs can be placed to the side (in a split or half-split) - this will be a simplified version. Or you can leave them together, which is only accessible to a person with experience in performing the exercise.
The workout pumps up several muscle groups at once:
- breast;
- triceps;
- dorsal, deltoid, leg muscles;
- biceps;
- abdominal Press.
In a word, the technique allows you to work out the whole body well. In addition to all of the above, the benefits of training are manifested in the fact that it allows you to normalize weight and at the same time achieve an increase in muscle mass. It is also worth adding that the exercise is equally useful for both men and women: the difference is only in the dosage.
Teaching methods
In order to understand how to learn to do push-ups without legs, it is enough to clearly imagine the intermediate stages that will allow you to bring your body to a horizontal position. There are two approaches here.
- Gradually increase the complexity of push-ups from regular triceps to horizontal ones. Mastering hand balancing occurs gradually as the exercise becomes more complex.
- Initial training in balancing on hands with legs tucked to the body, spread to the sides and extended horizontally. Further training in push-ups in each of the mastered positions.
You can choose any of the above methods or combine them. The ultimate goal, one way or another, is the same.
Method one
With this approach, you gradually increase the difficulty of the push-ups, eventually reaching the horizon.
So, the stages look like this.
- The first step is to learn how to do triceps push-ups, gradually moving your hands closer to your waist. The hands are placed shoulder-width apart, the fingers point forward, and the elbows are pressed against the body. If your hands are not flexible enough for this position, turn your fingers out to the sides. These push-ups need to be completed at least 20 times in three sets.
- At the second stage, you already begin to raise your legs, while leaning against the wall. You touch the wall a little with your feet, protecting yourself from lowering your feet to the floor. During push-ups, take small sliding steps up and down the wall. Gradually try to reduce touching the wall to a minimum. Bring the number of such push-ups to 20, as in the previous case.
- The third stage is push-ups without support, legs apart. When your legs are not connected together, but slightly apart, maintaining balance is much easier. At the same stage, you learn to reach the horizon not from a lying position, but from a squatting position, with your arms on the sides of your body. To do this, while squatting, you transfer your body weight to your arms and straighten your legs back and to the sides. Your muscles are already sufficiently prepared for this movement in the previous stages; you just need to develop coordination. Learn to get into a horizontal position and do push-ups this way 3 sets of 5 times.
- The final is the same as in the previous stage, only now you connect your legs together. These are the same horizontal push-ups you were originally aiming for. Congratulations, you have reached a new level of body control! Perform 3 sets of 5 times.
Method two
This method involves first learning to support your body weight on your arms alone, without using your legs. After mastering this skill, you begin to perform push-ups without legs in a tucked position. And then you extend your legs back and learn to hold your body and push up horizontally.
- The first stage is balancing on your hands. Squat down with your hands on either side of you. Transferring your weight to your hands, gradually lift your pelvis. Try to stand in this position for as long as possible (as long as you can). After practicing maintaining balance, try doing push-ups in this position. Increase the number of push-ups to 20.
- At the second stage, from a squatting position, learn to raise your pelvis higher and extend your legs to the sides. Stay in this position for as long as possible. Then start doing push-ups with your legs apart.
- The third stage involves getting out of a sitting position immediately into the horizon with your legs together. Once you have mastered your balance, start training push-ups. Bring the exercise to 5 repetitions in three approaches. You have achieved your goal, reap your sports laurels!
Legless push-ups for advanced athletes
Home > Workouts > Workouts at home > Legless push-ups for advanced athletes
Author: admin / Date: 2015-11-18 / Category: Home workouts
Hello friends! Push-ups are a common exercise in all types of training. But its diversity is simply amazing. And it’s hard to figure out which types are needed for what. Today we’ll talk about how to do push-ups without legs: I’ll provide you with detailed instructions.
Guys, do you want to bring your body into ideal shape and achieve the standard of the ancient standard of beauty with sculpted muscles and powerfully developed muscles? There is nothing better than the well-known and most effective exercise of all - push-ups!
To achieve amazing results in a short time, you should pay attention to such a variety of push-ups as push-ups without legs. My tutorial will tell you what it is and how to perform the exercise.
Burpee push-ups
This exercise involves performing several movements in different positions in one cycle.
You need to stand up straight and then sit down so that your palms touch the floor covering. Your knees should be pressed towards your chest. Using a jump, do a plank, and then push-ups in their characteristic position. Next, you again need to pull your legs to your chest, jump and stand in the starting position.
60 second workout
Do as many reps as you can. Write down your result and repeat or improve it next time.
Advanced burpee
Do one bounce push-up and then one rep. Next, you should increase one repetition at a time until fatigue sets in. Next time try to improve your result.
Exercises with a partner
Do burpees with a partner. First you do the exercise, and then your partner. Next, you do exercise 2, and your partner does 2. You need to increase the number of repetitions until one of you gets the hang of it.
Contraindications for implementation
As we already said at the beginning of the article, push-ups from the floor without legs are an extremely technically difficult exercise that will not forgive the trainee a single flaw. Therefore, for the unprepared, this variation is a strict taboo.
It is not even recommended to try to avoid injury.
The exercise requires considerable strength and good coordination. After all, in the process of doing it, you can fall and injure yourself.
Or the joints and ligaments will not withstand it and then it will take an extremely long time to recover. Horizontal push-ups are contraindicated in the following cases:
- Lack of strength, flexibility and coordination to lift your own weight.
- Injuries to the elbows, wrists or shoulders. Even if there have been any injuries before, it is better to consult with experienced specialists on this issue before performing it. Since a high level of stress can negatively affect even old injuries.
- Problems with the spine - various pathologies in the form of kyphosis, scoliosis, etc.
- High blood pressure and other health pathologies.
If you have any diseases, it is better to consult with a competent specialist in this matter so as not to harm yourself.
Bench push-up program
Such things are rarely needed for sports. Typically, “push-up-anything programs” are used by individuals hoping to gain muscle mass through just bodyweight exercises.
In fact, this is not the most optimal way to increase training. Performing exercises with body weight for 50-100 repetitions means improving muscle endurance. This may be useful, perhaps, in CrossFit, but not in life, martial arts, or, especially, in strength training.
The principle of creating such a program is quite simple. You need to linearly increase the number of repetitions, training push-ups twice a week:
- On bench press (chest) day, the movement is performed in a relatively hypertrophic mode, in 5 sets of 8-12 repetitions. Between approaches, rest for 90 seconds; it is worth increasing either the weight of the weight, if the goal is truly hypertrophy, or the number of repetitions, if a person is training for CrossFit or similar disciplines.
- On the day of deadlift or back training, perform 2 sets of 20 repetitions in a pump style, and also try to increase the number of repetitions;
- If we are talking about a complete beginner, he starts with using only the first option and trains once a week, on the remaining days without performing any triceps exercises
Pros and cons of the exercise
Vertical push-ups, as mentioned above, have a comprehensive effect on the athlete’s entire body, so they will be useful for representatives of any strength and acrobatic sports. Among the main advantages of this exercise are:
- Powerful, rounded shoulders, since the main load falls on them;
- Strong, functional triceps. Yes, functional ones, because in this exercise they not only push the athlete’s body upward, but also play a vital role in maintaining balance;
- Well-rounded core muscles. Like the triceps, the core muscles help control the position of the athlete’s body in space, constantly being under an unusual load for the body.
However, due to the difficulty of performing, handstand push-ups also have several disadvantages:
- Load on the vestibular apparatus. People who have any problems with it need to approach this exercise with caution;
- Increased load on the elbow joints and shoulders;
- Risk of injury if you are unable to control your body in space.
With clap
These push-ups are very difficult, and even dangerous, because if you don’t have time to do the clap, you can hit your face on the floor. In principle, these are ordinary push-ups, which are complicated by an additional element - “clap”. This is where their complexity lies, because in order to perform a clap, you need to throw your torso as high as possible with a sharp springing movement, pushing off the floor with your hands, then make a clap and, having managed to put your hands up, land on the floor. If the first repetition of this exercise is not difficult to do, then with each subsequent repetition it becomes more and more difficult.
Take a leaning position with your arms outstretched. For a powerful “push” with your hands, you need to lower yourself to the lowest point of the amplitude and sharply push off from the floor as hard as possible.
The next element is cotton. It should be done at chest level and put your hands towards the floor as quickly as possible.
In this exercise, it is very important not to straighten your arms at the elbow joints after clapping. This is very important, since when you “fall” down, a shock is created that falls on the joints.
The exercise involves all the muscles that are involved in the work when performing the classic version. Due to the jerking technique, which an athlete cannot do without when performing push-ups with clap, explosive strength develops.
And also read: Plyometric push-ups: options → Push-ups from the floor with weights → Push-ups with dumbbells: technique and options →
Variations of vertical push-ups
Vertical push-ups are a challenging exercise in themselves and do not require any modifications. Therefore, the only option to complicate it is to change the position of the legs. Depending on whether the legs are spread apart or not, the position of the center of gravity changes , thereby changing the degree of load on the arms and shoulders.
You can also use special push-up supports. In this case, in addition to the muscles listed earlier, the forearms and wrist joints will receive additional load.
Handstand push-ups are a great, albeit technically challenging exercise that can take your training to a whole new level.
Lead-up exercises
Obviously, even an experienced athlete is unlikely to be able to perform at least 1-2 push-ups while standing on his hands the first time. Therefore, it is necessary to gradually approach this exercise, having completed several lead-in exercises before doing so.
Simplified push-ups upside down
Here we are essentially talking about classic push-ups, in which the legs are on some elevation (bench, chair, edge of the sofa, etc.). In this version of push-ups, the load falls more on the upper segment of the pectoral muscles and the anterior deltoids. This exercise is often found among gym goers and street athletes.
Push-ups "House"
“House” is a push-up in which the person’s torso forms not a straight line, but an angle of approximately 90 degrees.
It is necessary to perform 3-4 sets of 15-20 repetitions.
House push-ups from a hill
A more complex version of the “House”, in which the torso also forms an angle of 90 degrees, but the legs, unlike the previous exercise, are not located on the floor, but on a hill (pedestal, chair).
It is recommended to gradually increase the height of the support.
To make this exercise even more effective, the stand can be replaced with loops or rope, thereby depriving the body of solid support. This will help you learn to control your body in space.
You need to perform 3-4 sets of 12-15 repetitions.
Army press
It was previously said that vertical push-ups are similar in their biomechanics to the military press, so it is logical to use this exercise in preparation for handstand push-ups.
It is necessary to perform 3-4 sets of 15-20 repetitions, using not too much weight on the barbell.
Handstand push-ups against the wall
The final exercise prepares the athlete for vertical push-ups. In this exercise, the wall acts as the only support, that is, the torso is already in a vertical position.
The degree of difficulty of this exercise is regulated by the distance from the hands to the wall: the closer the hands are to the wall, the more difficult it is to maintain balance and perform push-ups.
Despite the fact that this is only a preliminary exercise, when performing it, it is recommended to resort to the help of a partner who will insure the athlete. There are often cases when an athlete loses his balance and falls unsuccessfully, getting injured.
Simplified types of push-ups for beginners
From my knees
If you are not yet trained enough to do them the standard way, try this simplified version. Place your weight on your knees, not your toes. Perform the push-up as you would normally, and when you can easily do a push-up on your knees, move on to the standard version.
At an angle
Perform push-ups on an incline. Push-ups become easier if you do them with your hands higher than your feet. Find any incline or place your hands on an exercise bench. Then you can do a simplified version of push-ups until you are trained enough to do regular push-ups.