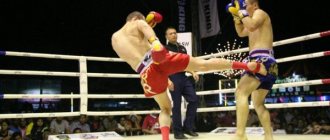
The high kick is one of the most powerful and effective kicks in any form of martial arts. It brought many victories to those who managed to carry it out correctly, and defeats to those who did not have time to deviate. The technique is good both in the ring and in a regular street fight. It is used along with the frontal strike, but is more effective.
Fact: Holly Holm (UFC) won 2 of her last 3 fights with spectacular high kicks. The famous Ronda Rousey and Beth Correia fell victims.
To deliver a strong high kick, you need to take your usual fighting stance and punch the lower third of your shin into the opponent’s ear so that the foot hits not directly on the surface of the head, but somewhat further - behind it. Achieving this result is possible through long-term training on simulators or with sparring partners. Beginners are advised to work only with projectiles to avoid severe injury and death.
Types of side kicks in Muay Thai
The techniques vary in height:
- Low kick is applied on the inner or outer side of the thigh;
- Middle kick is performed on the ribs or liver;
- High kicks are thrown to the chest, neck or head.
All of them are characterized by the fact that they are applied with the shin, and not with the foot. While performing the technique, the athlete simultaneously turns the body. The force of a blow involves muscle strength, body weight and inertia of movement, so the correct execution of blows requires certain physical preparation.
To master side kicks, coaches recommend starting with learning the middle kick and then moving on to the low kick. The high kick is the most difficult to perform and is the last to be practiced.
When training any shot, it is very important to start with a warm-up.
Warming up and warming up
You cannot immediately move on to the main part of the workout without preparing your muscles and joints for this. The mandatory set of exercises consists of three stages:
- Warm up the muscles for at least 15-20 minutes. Exercise usually begins with intense jogging or jumping rope. Then they move on to exercises for rotation of the limbs and torso, bending, squats, push-ups and jumping.
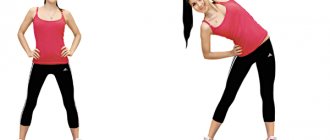
- Stretching is combined with a warm-up, but for kicking training it is especially important to devote more time to it. Some exercises can be performed on the floor, some in motion.
- Breathing is at the core of any sport. You should inhale with your entire chest and exhale sharply, tensing your abdominal muscles. You need to constantly monitor your breathing - both in training and in battle.
Kickboxing
Head kicking is usually found in the full contact version of this discipline. Here the following blows are most often used:
- Circular: mawashi-geri, attack in a semi-circle.
- Direct: may-geri, front assault.
- To the side: yop-chagi, sokuto-geri.
- Push back from a turn.
There are other kicks in kickboxing. With their perfect mastery, you can achieve a quick victory. Their list is as follows:
- Reverse roundabout in a turn.
- "Axe". Another well-known name is ex-kick.
- Variation of step 1 without reversal. The front leg is used for execution.
Kickboxers, who have the highest skill, perform these attacks while jumping. Although in practice these techniques are used extremely rarely. Usually they make do with versions of mawashi.
Stretching exercises
In a sitting position, you need to spread your legs wide and lean forward with your whole body, leaning as close to the floor as possible. The legs should not bend. Then you should bend your knees, bring your feet together and move them as close to your pelvis as possible. Following this, the knees are pressed forcefully with the hands to the floor.
With one leg bent at the knee, you need to pull your foot as close to your buttock as possible. The other leg should be on the floor. Then, without bending the second leg, you need to try to reach your knee with your head. After stretching on the floor, you can return to dynamic exercises. The moving stretch consists of swinging the legs in height.
Features of side impacts. Safety precautions
These technical actions can be performed from either leg. Therefore, the decision of which leg will be the supporting leg and which will strike depends on personal skills and preferences.
As mentioned above, the shin is involved in side impacts. This is a fundamentally important point, because beginners often kick with their feet. This mistake can result in broken fingers, sprained ankles and sprained ligaments.
If your shin hurts during training, you should take time to strengthen the periosteum - “fill your shin.” This is done by long and monotonous blows against the projectiles until the pain disappears. It is important to be careful not to damage the bone.
In order for the kick to become impeccable in terms of technique, you need to learn to hone your balance and quickly turn the foot of the supporting leg following the movement of the body.
A simple exercise that will help you develop a natural posture for practicing your strike:
- Find stable support.
- One leg should be closer to the support and point the toe towards it.
- Holding onto the support, grab the other leg by the shin closer to the knee.
- Carefully move the bent leg forward, then back, gradually increasing the amplitude and speed of movement.
- Change legs.
Having a sparring partner is not the most critical moment for training. However, an experienced partner will point out mistakes and help you quickly master the striking technique.
Stuffing your leg
Why is this being done? First of all, in order to avoid injury.
It is best to stuff the leg slightly above the instep, about 10 cm. This is the place that is most susceptible to injury.
As for the shin, it should also be stuffed in order to weaken the nerve receptors and reduce pain. With good padding, your lower leg will become virtually insensitive to pain. But this does not mean that the blows will be less traumatic.
Another reason to stuff the entire shin is for blows to the stomach or ribs. In this case, there will be a significant load on the lower leg.
Exercises:
Here are the different options for stuffing the leg for a low kick:
Practicing side impacts. Middle kick
This technique is a little more difficult to perform than the low kick, because it is applied to the torso in the ribs area and requires a decent stretch. But in order to practice all three, it is optimal to start with the middle kick. If a person has very little experience in martial arts, it is highly recommended to train on a machine.
Middle kick technique
After warming up and stretching, you need to take a fighting stance.
- The striking leg bends at the knee and rises forward.
- The body faces straight.
- The supporting leg is rotated to the same position as in the balance exercise - at a right angle relative to the body.
- The torso may lean back slightly.
- Simultaneously with the movement of the supporting leg, the second leg begins to move, delivering a blow.
- The leg is fully straightened and raised to the level of the pelvis. The inner side of the thigh is directed towards the floor. The muscles of the thigh and lower leg are as tense as possible. The arms are bent and protect the head. The body is slightly tilted back. The toe of the supporting leg looks straight or slightly backward.
Upon completion of the strike, you need to make a reverse movement to return to the fighting stance.
Use of kicks to the head in martial arts
As a rule, in title fights of various types of martial arts, athletes mostly try to use sharp blows. This, in turn, allows you to strike sharply with an instant move of the leg to the side. This choice is due to the fact that these techniques significantly reduce the likelihood of being “caught” by your opponent. As a result, the enemy does not get a chance to seize the initiative and cannot use the situation to his advantage.
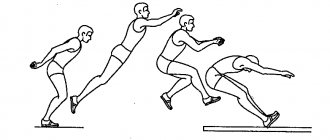
The use of a kick attack as an element of a demonstration fight technique in public is also extremely rare. However, if you have a chance to observe them, you will notice that athletes use techniques based on long jumps. This allows you to quickly change the course of events and, if implemented correctly, instantly defeat your opponent.
low kick
The strike is easy to learn, but very effective in battle. Apply to the knee, inner or outer thigh. It is performed as a diversionary maneuver for the enemy in order to carry out a serious attack or gain time. A strike repeated several times can incapacitate an opponent and give a tactical advantage. A quickly executed low kick is especially insidious, since even experienced fighters cannot always notice it.
Types of low kick
Low kicks differ in where they hit:
- external low kick aimed at the outer thigh, knee or calf muscle;
- internal low kick to the inner thigh, knee joint or ankle.
By method of application:
- ascending low kick, the easiest to master (the leg rises and strikes);
- horizontal low kick. The shin and thigh of the striking leg are thrown forward with a slight turn on the supporting leg;
- a downward low kick, when the leg is first brought forward and then lowered onto the opponent’s limb. In this case, the movement of the leg is accompanied by a rotation of the body.
In general, all low kicks are easy to learn.
Classic low kick technique
The classic low kick is performed like this:
- in a fighting stance, the supporting leg should be directed towards the enemy;
- the striking leg rises to hip height;
- the supporting leg turns with the inside of the foot towards the opponent;
- at the same time, the body rotates, and the second leg quickly straightens to strike;
- arms should be bent at the elbows and protect the head;
With an upward low kick, the supporting leg stands motionless, the body is also not involved; when horizontal, the supporting leg rotates the heel inward quite a bit.
How to train a kick?
Water-filled bags are very suitable for low kick training. They are installed on the floor. Hanging bags are sometimes used, but they are not always convenient.
READ ALSO: The highest peak on earth: geographical coordinates of Mount Everest
If you use a hanging punching bag, you'll have to work on agility as well as strength when training. On the one hand, a boxing bag is less convenient, but on the other hand, it perfectly hones technique. In addition, such a bag is very profitable, as it is not expensive.
Another option is a boxing dummy, which is very convenient from an anatomical point of view, but it is only suitable for practicing downward low kicks and manual techniques.
In order for your low kick to be correct, technical and powerful, an integrated approach is very important:
High kick
The high kick is one of the hardest and most dangerous blows in Thai boxing, which is applied to the chest, neck, and head. Most often, he knocks out the opponent, and without proper preparation, injures the athlete himself. The consequences of an incorrect high kick can lead to disability and death. Therefore, before using this technique in the ring, all movements must be perfected to the point of automaticity.
Safe high kick practice
Before training the technique, you need to rotate the supporting leg, turn the body and move the pelvis until these movements become natural. For a high kick, the leg rises to the level of the head, so you need to have deep stretching of the hip muscles and ligaments, up to the ability to do the splits.
You should start practicing the strike on projectiles so as not to harm yourself and your partner. You can move on to sparring only after your movements become confident. Beginners can only train under the guidance of an experienced athlete. You should not try to master the high kick in a few hours or days. The more time you spend working on it, the better.
High kick technique
The step-by-step procedure for performing a high kick is as follows:
- Taking a fighting stance, make a sharp push with your striking leg.
- The leg, fully bent at the knee, rises up.
- The body leans back almost parallel to the floor. The heel of the supporting leg turns inward, shifting the body so as to look towards the opponent.
- The bent knee of the striking leg is directed upward, the body is tilted.
- The knee quickly straightens, throwing the shin towards the opponent's chest, neck or head. All thigh and calf muscles are extremely tense.
- The strike is accompanied by a slight inward rotation of the supporting foot (approximately 45 degrees).
- For good stability, the supporting leg should be slightly bent.
- After the strike with a complete turn around its axis, the combat stance is again assumed.
In addition to the option of performing a high kick from a stationary fighting stance, it is implemented with a jump or step, depending on the skills of the athlete.
Practicing strikes yourself
There are situations when you don’t have enough time to visit the gym, or you want to practice at home. It is best to practice kicks on rubber, attaching one end to the leg and the other to the floor or other well-fixed support. The striking technique is the same as described above. To consolidate the movements, you need at least 30 repetitions in 5 approaches on each leg. An alternative to rubber is weights of no more than 2 kg, which are attached to the leg. The number of approaches is no more than three, with a maximum of 50 repetitions. Otherwise, there is a risk of damaging your joints.
After training on rubber or with weights, switch to a heavy bag or pads to work on the speed of the impact. You can practice punches only on a bag, but in this case you need to be very careful about the correct movements and position of your legs. For side kicks, a Thai bag is great because it is longer and heavier than usual, so it doesn’t swing as much.
When training side kicks, you should never strive for quick results. The secret to an effective and spectacular technique lies in patience and regular, methodical training.


