Whether a child loves sports and physical education or not, he will certainly not refuse to master a gymnastic trick. Moreover, learning how to do a “wheel” is not as difficult as it seems, and the exercise looks very impressive. The main obstacle is fear, which fetters the muscles and makes the body cringe and sit down at the most inopportune moment. To overcome it, you need to encourage the little trickster and increase his flexibility. We invite you to learn all the intricacies of the exercise and a few secrets in order to achieve perfect performance step by step.
What is this exercise and why do it?
As with any exercise, the wheel has a number of advantages that make it worth mastering this element. It’s worth learning how to make a wheel from scratch because of:
- Positive effect on coordination and balance.
- Uniform strengthening of all body muscles, joints and ligaments.
- Vestibular apparatus training.
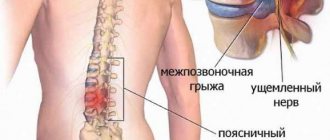
- Increases flexibility and mobility, improves spinal health by strengthening the back extensors and deep muscles.
It is worth understanding that doing a gymnastic wheel in everyday life is not always relevant, since this element relates to specialized movements. However, it is a simple and effective movement that will be useful for both demonstrating fitness and strengthening muscles.
Age to start training
You can learn how to do a “wheel” at almost any age. There are no strict age limits. If the child shows interest, you can start training at 4 years old. It is at this age that the first enrollment in gymnastics groups occurs.
How to determine that a child is ready to learn to do a “wheel”?
Before starting gymnastics, it is recommended to check the condition of the heart, lungs and musculoskeletal system with the help of specialists.
As for the general requirements, it is important that the child has fairly good coordination. Some children are able to master a trick at 3–4 years old, but more often the age of physiological readiness occurs at 5–6 years old.
Before you start training, try inviting your child to do a stand against the wall (safety and holding). If the baby copes with the task and does not fall in the first seconds, then you can start learning.
What muscles work
When performing the exercise, almost all muscles of the body are involved. Some work as stabilizers, given the inertial nature of the movement. The main burden falls on:
- Shoulders.
- Hands.
- Erector spinae muscles.
- Oblique and rectus abdominis muscles.
- Hips.
- Calf muscles.
How to teach a child to make a wheel at home
The wheel involves turning the body 360° in a vertical plane using the legs and arms.
Wheel spin
Correct execution of the exercise helps:
- strengthening muscles;
- increasing tone, strength, flexibility and tightening of the abdominal muscles, back and limbs;
- improved coordination;
- strengthening the vestibular apparatus.
Lead-up exercises
The only way to master the element as quickly as possible is to perform lead-in exercises for the wheel. The main ones include:
- Handstand with feet on a pedestal is an entry-level exercise that helps keep your body weight on your arms and shoulders.
- Swallow on one leg with a transition to both hands (from the swallow, take support with your hands on the floor with a straight back).
- Push-ups upside down against a wall - in fact, this movement helps to master the main and most difficult phase of the wheel - the transition from a standing position to your hands and fixing the body in an upside-down position. At first, the wall serves as a good barrier and helps dampen inertia.
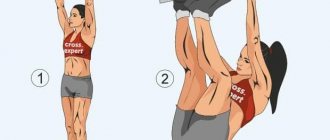
- Throwing your legs in the air while placing your hands on the floor. The movement helps bring the athlete past the sticking point, where inertia will drive the body forward.
- Training the wheel itself.
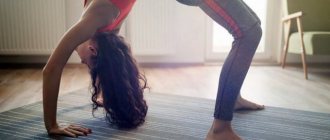
Increase your flexibility
From the first day of preparation, complement your training with hip mobility exercises. To do this, do the following exercises every day.
Stretch on the floor
Sit on the floor and spread your legs straight out to the sides as far as mobility allows. Then lean forward, trying to touch your stomach to the floor.
Fix the extreme position and try to relax. Breathe deeply and hold the pose for 90–120 seconds. You can sway gently, deepening the stretch.
Deep lunges
Take a deep lunge forward and place your hands on the floor. Straighten your back and knee behind your standing leg and rock, deepening the stretch. Stay in this position for 90–120 seconds, then switch legs and repeat.
Once you've strengthened your shoulders, overcome your fear of using your hands, and increased your flexibility, it's time to move on to the building exercises. But first you need to warm up well.
Exercise wheel technique
The classic version of performing an element in gymnastics looks like this:
- To begin, imagine a straight line on the floor along which the movement will be performed.
- Place your leading leg forward and raise your arms up. It is important not to stand sideways along the line, and turn your body slightly to the side, this will increase stability.
- Transfer your body weight to your front (leading leg), tilt your body down while lifting your back leg off the floor.
- Place both hands on the floor. Once your body weight is in your palms, lift your leading leg off the floor. Push off with your toes to increase momentum.
- Move your legs over the top, and then transfer your support to them again. First, the foot that was behind in the starting position touches the floor.
Preparation
Before you start training, you should prepare. You must first prepare the place where you will train - it is very important that there is enough space, preferably a room without furniture and with a high ceiling, there should be no mirrors or glass nearby. Of course, a gym with mats would be a great option, but this is not possible for everyone.
You will also need free space against the wall. Clothes should not be too tight, but not too loose - no hoods. Leggings and a fitted tank or T-shirt are ideal. Shoes should also be comfortable, and take into account the surface of the floor so that it is not slippery.
Variation of the wheel forward exercise
A more complex option. Suitable only for those who have learned how to do a side wheel. It puts much more strain on the lower back, so additional training may be required to strengthen the area and prevent the risk of injury.
Technique:
- Stand straight, feet shoulder-width apart, arms raised up.
- Begin to bend your knees slightly while moving your body and arms forward.
- Make a sharp push with your toes while straightening your legs. Jump forward so as to give your body inertia and transfer the support to your hands.
- After fixing your palms to the floor, move your legs over the top. Gradually bend your back, forming an arch like a bridge exercise.
- Land your heels softly on the floor, then push hard with your arms to rise to a straight position.
The most dangerous moments with this technique are arching in the lower back and landing of the heels on the floor in the final phase. They require careful development.
How to Avoid Injury
Many people are afraid to do the cartwheel because of the risk of injuring the child. These concerns are valid and steps should be taken to reduce this risk. We recommend paying attention to the following:
- performing acrobatic exercises is contraindicated for children with any injuries, cardiac disorders, brain diseases, or acute diseases;
- choose the location of your classes wisely, eliminate the possibility of collisions with objects and walls, or a strong blow when falling to the floor;
- the wheel can only be done by a physically developed child who regularly plays sports, take time to prepare and do exercises;
- soberly assess whether the child is able to master the technique of the element; you should not teach a child under 5 years old;
- Insure the child until he confidently performs the exercise;
- fear can prevent you from performing a coup correctly, talk about it, make sure your child is confident in himself;
- If you are not confident in your own abilities, do not start self-study, it is better to consult a specialist.
Exercise wheel on one arm
The wheel on one hand is considered to be the most difficult option. This is due to the fact that a colossal load falls on the arm and shoulder. At the same time, the remaining muscles are also more heavily loaded, since due to the need to maintain the body position while leaning on 1 arm, more stabilizing muscles are involved in the work.
Technique:
- Stand sideways so that you do a cartwheel to your left. Raise your right hand.
- Raise your left leg and turn it so that your knee points straight to the side.
- Push off sharply with your right foot. Shift your weight to your left leg while simultaneously lifting your right leg and tilting your body (with a straight back) and arm closer to the floor.
- Transfer your weight to your hand. After fixing your palm on the floor, use inertia to move your legs to the other side.
- Try to place the foot of your right foot on the floor as softly as possible, taking support from it. After this, place your left leg and straighten up.
This is the most inertial technique, since in the absence of one support you have to push off harder with your legs to transfer the body and legs.
Possible dangers
Acrobatics (and the “wheel” is an acrobatic element) is a traumatic activity. If safety precautions are not followed, sprains, injuries and bruises may occur.
Under no circumstances should you learn to spin a “wheel” outside on the asphalt or lawn in a park. This is fraught with bruises and injuries. Even if the surface seems soft enough, there may be shards of glass, nails or other dangerous objects in the ground or grass. If a child falls with his full weight on such an object, he may be injured.
The most suitable place for the gymnastic exercise “wheel” is a gym with mats. If you decide to exercise at home, you need to free up space (at least 3 m by 4 m). And also choose a room with linoleum, carpet or laminate, but not tiles, to avoid injury if you fall.
Warm-up
Warm-up should be given great attention. You won’t be able to just wave your hands and start learning right away. Warm-up should include a set of exercises that must be performed correctly. All muscles of the body need to be warmed up as much as possible. The joints should not crack. Be sure to warm up the muscles of the arms, legs, back and neck. The neck generally needs to be given special attention. Experts recommend performing several exercises to warm it up. When falling from an upside down stance, you are subject to significant deformation. Indicators of an effective warm-up are a noticeable increase in speed and a feeling of a surge of warmth in all
What we have
Overall, the wheel for beginners, if you followed the recommendations, should turn out well. It remains to work with the small details that I talked about: pull your toes, straighten your legs to the maximum. If you leave an imaginary straight line, you can “draw” it for yourself with tape each time. Once it works, remove the tape.
By the way, my advice to you: learn to do wheels on both sides at the same time, and neither will lag behind the other.
For beginners, what I have described will be enough. And that's all for me. If the material was useful to you or seemed interesting, then share it with your friends on social media. networks (a kind of like to my work) and subscribe to blog updates. I look forward to your comments, gymnasts.
Preparatory process
Before teaching a child to do a cartwheel, it is worth assessing his general physical fitness. Children are naturally flexible, which allows them to perform complex acrobatic performances. But if the child has practically not engaged in physical education, then initially the muscles should be strengthened and their elasticity developed.
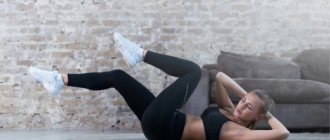
The children's preparatory program includes:
- Push ups. You need to lie on your stomach, resting on your palms and soles. Next, you should methodically bend and straighten your arms at the elbows until they stop, keeping your back straight. Perform 5-15 repetitions.
- Lifting dumbbells. Taking the weights in your hands, straighten your back and stand with your feet shoulder-width apart. Place your arms along the body, bend at the elbow joints, bringing them closer to the chest. Perform 10-20 repetitions.
- Running with knee lifts or shin hooks.
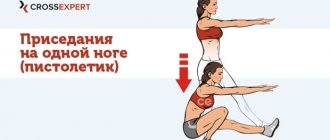
- Shallow squats with a flat back.
- Squats with wide legs (plie), spreading them 30-40 cm, turning your toes out, slowly squat.
- Swing with a straight leg while sitting on a chair.
- To understand how to make a wheel, gymnastics for children should include exercises to develop flexibility. You need to stand with your back straight and your feet wider than shoulder-width apart. Take turns bending your right and left legs without bending your knees.
- To practice balance, you need to stand up straight and look at a point in front of you. You need to spin around its axis 2-3 times in one direction, and then the same amount in the other direction.
Note! Before performing these exercises, you need to choose a free place, a wide area without sharp corners, as well as the right clothes that do not restrict movement.
Complex of morning exercises for the first junior group
Good coordination
Psychological preparation
Moral preparedness is one of the important conditions for success. Children may be afraid on a subconscious level that they will not succeed, but you can help them cope with this. There are many fears: fear of pain, shock and fear of disappointing your coach by performing the movements incorrectly.
Important! The baby should feel supported and know that he will be supported if he falls. This needs to be said and repeated 2-3 times.
Pedagogical features:
- the coach's voice should be calm and confident;
- in case of failure, you need to interrupt the lesson by taking a break for 5 minutes;
- Upon completion of the exercise, the child should be praised, and in case of mistakes, encouraged.
Before the lesson, to make it easier for your child to understand how to learn how to make a wheel, you can watch a video with examples of implementation.