Greetings, dear readers! The “Bridge” exercise is familiar to us all from school physical education lessons. But few people would think of doing it now, as an adult. But in vain! After all, such activity is as useful as possible, and its benefits are not limited to the flexibility of the spine. Last time we talked about the bridge from a lying position, and now we will answer the question: how to learn to do a bridge from a standing position?
The standing bridge is not easy, but it can be mastered at any age if you do it right! From this article you will learn what a “classic bridge” is and all about the useful aspects of this activity. You will also learn how to prepare for this difficult exercise and understand how to avoid dangerous mistakes. Finally, follow the instructions to learn how to do a standing bridge safely!
What is a standing bridge?
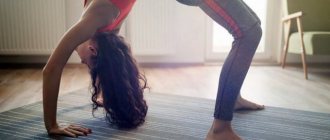
Standing on your feet, you raise your arms up and begin to slowly lean back, arching your back. The movement ends when your palms touch the floor behind you. In the final position, you lean on your legs and arms at the same time, and your back is arched. In this case, the chest and stomach look up. From the side, this position of the body resembles a bridge.
In fact, this pose is the opposite of the one we all maintain throughout the day. For example, when we work at the computer, make our back round, stoop and spread our shoulder blades. But this is not only the main value of such a bridge! Indeed, in the process of performing the exercise, the spinal extensors, adductor and gluteal muscles are strengthened. That is, everything you need for perfect posture and back health! You will find detailed information about the benefits of the bridge further in this article.
How to stand on the bridge if you have spinal diseases?
“In this case, you definitely need to undergo an examination and understand what exercises you can do and what you cannot do,” says Alexey Babin. Any bridge cannot be done if it causes pain in the back. It is also prohibited for cerebellar disorders, hypertension, osteoporosis, during pregnancy, in the postoperative period, and for acute inflammatory diseases.
Benefits of standing bridge exercise
The benefits of activity are enormous, and they don't stop with the benefits for your back. The useful aspects are numerous, here we list the main ones for you:
- deep muscles that we usually don’t use are activated
- the muscles of the shoulders, abdomen, and pectoral muscles are effectively stretched, which leads to the relief of spasms;
- pain in the lower back, back is eliminated;
- your figure improves and it becomes much easier to maintain correct posture;
- the mobility of the shoulder joints increases;
- the wrists and hips are strengthened, as well as the thoracic part of the spine;
- the body becomes stronger and more resilient,
- overall flexibility and dexterity increases;
- the risk of injuries, both sports and domestic, is minimized;
- due to the expansion of the chest, the volume of the lungs increases;
- during the bridge process, the head is directed downwards, due to this the vestibular apparatus is trained;
- blood flows to the brain, its activity increases, and the condition of the brain vessels also improves;
- by performing the activity, a strong corset of muscles is created that supports the spine, it serves as a prevention of displacement of the vertebrae and vertebral hernias;
- a variety of ailments and problems are prevented, including prolapse of internal organs;
- the trainee’s buttocks acquire an attractive shape;
- the abdominal muscles work, the stomach decreases and takes on relief;
- trains the hamstrings and relieves knee pain;
- a beautiful body contour is formed, feedback from trainees confirms this.
As you know, the distance between the vertebrae decreases with age, and a person even becomes shorter.
The bridge exercise, especially from a standing position, helps prevent the processes of narrowing of the intervertebral interval and age-related subsidence of the vertebrae.
There are 2 reasons for this:
- Firstly, the muscular corset that supports the spinal column and holds the vertebrae in weight is strengthened.
- Secondly, the spine itself is stretched, especially its cartilage joints and intervertebral discs.
As a result, the trainee reverses the aging of the body.
In addition, if you learn how to do a standing bridge and practice it, you are guaranteed to avoid the common problem of pinched nerves between vertebrae, even in old age. This means extending not only your life, but also your active, pain-free existence.
Additional equipment for the back
To gently stretch the spine, there is a special simulator - a back bridge. The device not only stretches, but also massages the back muscles. It works in several levels, allowing you to gradually increase the stretch. The good thing about a back bridge massager is that you don’t need to do any exercises, you just need to lie down on it, and the exercise machine will do all the work itself.
Performing a bridge will help strengthen the main central muscles and, as a result, improve the overall condition of the body. After strengthening these groups, it is much easier to do other exercises, since the core supports the whole body. It is quite possible to be healthy and fit, without gyms and personal trainers!
Standing bridge exercise and lead-up exercises
If you are not an expert in sports activities and exercises, then under no circumstances should you attempt to make this bridge right away, “in a hurry.” With an insufficiently strengthened back, with weak muscles, this is dangerous: you can break your neck, hit your head on the floor, dislocate your wrist, or injure your back.
Therefore, before you begin this type of bridge, carefully prepare your body and muscles for it. As a thorough preparation, perform the following exercises for 3-4 weeks:
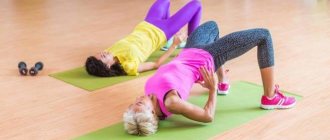
- Shoulder bridge or glute bridge. To do it correctly, lie on your back, bend your legs at the knee joints, and place your feet firmly on the floor. Hands lie along the body. Next, as you inhale, lift your pelvis up, leaning on the area of your shoulder blades and feet. Stay in the top position for a few seconds, then slowly lower down. Do 2 sets of 10 reps first. After a week, increase the number of sets and repetitions. Work your way up to 50 reps in three sets.
- Reverse plank. To do it correctly, sit on the floor with your legs straight. Place your palms on the surface on either side of your pelvis. Point your fingers towards you. Keep your back perfectly straight. Now lift your pelvis off the floor as much as possible until your body and legs are stretched out in one straight line. Rest on your heels and keep your knees together. Do not throw your head back, but keep it in line with your body. Hold for a few seconds, then slowly lower down. Rest and do it all again.
- The prone bridge also serves as an excellent preparation for its difficult version. Rise into a backbend from the floor, trying not to strain your neck, arching your back and straightening your limbs. We strongly recommend that you study the bridge technique from a prone position at the link.
Adviсe
- Do not raise your hips too high, as this can damage your spine. While continuing to work on your abdominals, do not arch your back too much.
- If you have discomfort in your knee or difficulty bending your legs at an angle of 90 degrees, you can start by moving your legs further.
- If you can’t raise your hips to the desired level, a few centimeters from the floor is enough. This will help the muscles start working. As you continue to practice, after some time you will be able to rise higher.
How to learn to do a bridge from a standing position?
If you feel that you have prepared thoroughly and have been doing the lead-in activities for 3-4 weeks, it’s time to start the main activity. You should start with a warm-up, it is necessary to warm up the muscles. Warm-up can be the most banal thing. Consist of swinging limbs, jumping, bending, squatting, running in place. Well-warmed muscles minimize the risk of injury and impairment.
So, if you want to learn how to do a bridge from a standing position, then you need to practice doing it with the help of a wall. It will not be superfluous to have the help of an acquaintance or friend who will back you up at first.
Gymnastic bridge standing against the wall technique
After warming up, start doing a bridge, but first with the help of a wall, preferably a Swedish wall. Here are step-by-step instructions on how to do it at home:
- Stand at a distance of about a meter or a little more from the wall; the wall should not be slippery and your palms should not be sweaty. Place your feet at the width of your shoulder joints or even a little wider. Raise your arms straight up.
- Now arch your back until your palms touch the wall. It is important to tilt your head back so that your gaze follows your palms, without overtaking or lagging behind. Do not bend your knees, only your back works.
- Lean against the wall (in the wall bars you can grab a bar) and hold, then try to return to a standing position on your own. Already at this stage, your body will become increasingly accustomed to an unusual position that you never find yourself in in everyday life.
- Next, leaning against the wall, walk with your palms down, carefully and slowly, moving literally a few centimeters, lower and lower. Then stomp your palms up and push off the wall, returning to your starting position.
- Move down until you reach the floor and until your body becomes a real bridge.
- Consolidate your gains day after day by moving up the wall faster and more confidently. Hold the final position for a few seconds.
- In the future, you will only lightly touch the wall and in a few steps lower it to the floor and just as quickly return. The distance between you and the wall in the initial position will be less than a meter.
- The wall will only play the role of a safety net and your fingers will only pass next to it, gradually lowering to the floor. In this case, your bridge will be a regular arc.
How to stand on a standing bridge for beginners?
Once you can make such a bridge from the wall easily, start making a regular bridge. At first, it makes sense to have an assistant next to you to back you up.
Here are the main stages:
- You need to stand in the same position as in the previous version, facing the person who is insuring you, hands up.
- Begin to slowly, carefully bend back, while the belayer should support your back. Remember to look at your palms and straight knees!
- Bend back until you can rest your hands on the floor.
- Rise up, also using support using your back muscles, or slowly lower yourself to a lying position.
How to learn how to do a bridge from a standing position at home video:
Main nuances
Despite the simplicity of performing the gluteal bridge, this exercise has its own characteristics that allow you to increase efficiency:
- To increase efficiency and do deeper work, carry out actions from a support. By leaning on a stand or bench, you will be able to lower your pelvis lower. Consequently, it will take more effort to lift it with your buttocks and, as a result, you will be able to achieve results in a shorter time;
- Breathing technique must be observed (lifting while inhaling, lowering while exhaling);
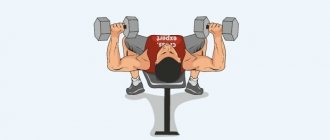
- When using additional weight, the load must be calculated correctly. The weight should be such that you can easily perform up to 10 repetitions with it for each of 2-3 approaches.
As for calculating weights, experienced trainers have developed more or less approximate indicators. They depend on the athlete’s level of training and his gender:
- girls are allowed to do 2-3 approaches with 10-20 repetitions in each and a weight of up to 500 g;
- guys can perform the same 2-3 sets of 10-20 repetitions with weights up to 10 kg.
In addition, during the exercise, especially for beginners, it is necessary to avoid mistakes:
- At the maximum point, emphasis should not be placed on the heel. This will reduce the load on the gluteal muscles.
- There is no fixation when raising the pelvis.
- Too close or too far a position of the lower extremities prevents the gluteal muscles from functioning fully.
- Sudden relaxation at the bottom will become an obstacle to progress.
- Weighting without preparation will lead to injury.
Important safety rules and common beginner mistakes
This type of bridge cannot be considered a completely safe activity. Therefore, it is better to realize in advance the possible mistakes of beginners. Here are the basic rules that will allow you to learn how to do a standing bridge safely and with pleasure:
- prepare carefully for the bridge, do not try to force events;
- Make sure that your feet do not slip during the process; to avoid injury, wear sneakers;
- when leaning back, to feel confident, watch your gaze; it should not lead or lag behind your hands;
- keep your knees straight as you begin your backward movement;
- the first few times, be sure to use the help of someone insuring you;
- each time in the final position of the limb, try to straighten more and more and reduce the distance between the arms and legs;
- breathe deeply and evenly, calmly.
How to learn to do a bridge from a standing position? Now you, our readers, can answer this question in detail and correctly! Please tell us in the comments if you know how to make a bridge? What type? Are you planning to study using our tips? Thank you in advance for your comments, likes, and subscriptions to this channel. See you in the next article!