The beauty of the body is not only developed muscles, but also plasticity, therefore, in addition to strength training, it is very important to pay attention to stretching exercises and the development of flexibility. One of the best such exercises is the bridge. This stance is a kind of test for spinal flexibility and coordination. Learning to perform it is not easy, but in the process of training, the level of plasticity that is necessary for the beauty and harmonious development of the body is achieved. Let's look at how to stand on the bridge, even if at first it seems like an impossible task. By including special exercises in the training complex, you can master the most difficult version of this stance, simultaneously developing the flexibility of the spine and improving the quality of the muscles.
Having pumped up your muscles, you can look impressive in static conditions, but if the joints are not flexible, the muscles are “wooden,” then your movements will not have the ease and plasticity inherent in a harmoniously developed body. The most attractive look are athletes who combine power with flexibility and ease of movement. The bridge exercise will help you achieve the necessary flexibility and dynamism of your figure and acquire excellent posture.
Benefits of exercise
The benefits of bridge exercises are not limited to the positive effect on appearance. This stance has powerful healing potential.
Famous oriental healers of antiquity believed that the health and longevity of a person depended on the condition of the spine. Their correctness is confirmed by Indian yogis who practice exercises, most of which are aimed specifically at developing flexibility and strengthening the spinal column.
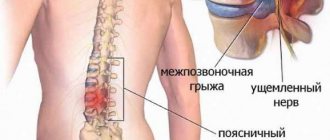
Backbends develop spine flexibility and strengthen the deep back muscles. The cartilage tissue of the vertebral discs receives the necessary substances not from the blood, but from the synovial fluid. Active movements of the vertebrae are necessary for its influx. Due to the low mobility of the spinal column, its cartilage does not receive enough nutrition, and degenerative changes in cartilage tissue begin at a young age.
Bending backwards causes the intervertebral discs to compress and stretch, acting like an internal massage. As a result, an influx of synovial fluid is ensured, and the vertebrae are actively supplied with necessary substances. As a result, metabolic processes in cartilage tissue are accelerated and regeneration processes are launched.
A strong and healthy spine is especially important during strength training, because this type of load is very traumatic. Including the bridge in the training program of athletes and bodybuilders serves as an excellent prevention of back injuries.
In addition to the beneficial effect on the spine, regularly standing on a bridge helps expand the chest, increase lung capacity, and stretch the abdominal muscles. Due to the unusual position of the head, the vestibular apparatus and cerebral vessels are trained, which serves as the prevention of cerebral circulatory disorders.
The benefits of this exercise cannot be overestimated. In addition, being able to easily stand on a bridge from a standing position and rise from it, you can attract admiring glances in the gym, which improves your mood and motivation.
Common Mistakes
The first and most common mistake when performing a trick is that people walk onto the “bridge” with their backs and shoulders. And you need to do this only with your hands. This happens most likely due to the fear of falling. There is no need to be afraid. After all, your muscles are well warmed up and ready to perform such a difficult trick. A soft mat will protect you in case of a fall. The second mistake people make when trying to learn how to do a bridge and trying to do it themselves is performing the trick with their backs, without distributing the load on their arms. The result is a lopsided and unstable bridge. The correct thing to do is to lean on your hands while doing this.
Preparatory exercises
Attempting to make a bridge without proper preparation can end not only in failure, but also in injury. When performing this stance, sufficient flexibility of the spine, strength of certain muscle groups and coordination of movements are required. Therefore, it is necessary to master the stance gradually, systematically performing special exercises, moving from simple to complex.
Let's look at the lead-up exercises to get on the bridge. Include them in your training program, and you will be able to master even the most difficult version of this stance.
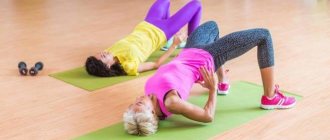
Gluteal bridge
This simple exercise will help strengthen the muscles of the legs, lower back and buttocks.
Lying on your back, you need to place your legs bent at the knees slightly wider than your shoulders. Hands lie relaxed on the floor. Raise your pelvis as high as possible, arching your lower back and squeezing your buttocks. At the same time, lean on your feet and shoulders, do not lift your head off the floor, your neck must be relaxed, otherwise injuries are possible. At the top point, hold for 1-2 seconds and lower your pelvis. Gradually increase the number of repetitions and approaches. When you can do 3 sets of 15-20 times, move on to the next stage of the training process.
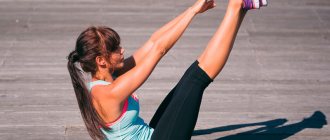
Reverse plank
This exercise strengthens the muscles of the arms, back, and abs. It is performed from a sitting position.
Legs lie on the floor, straightened and spread slightly wider than shoulders. The palms rest on the floor slightly behind the body. Raise your pelvis and align your torso and legs in a straight line. At the same time, do not bend your neck, do not lower your head, look ahead. If you can’t get into this position, you can initially bend your knees a little. Stay in this pose for a few seconds. Achieve 3 sets of 10-15 reps.
Bridge with support
After practicing the two previous exercises, you will sufficiently strengthen the necessary muscle groups, and you can try to stand in a bridge from a support. A fitball is suitable as a support; in the absence of one, you can use an ottoman or a low bench.
Sit on the floor with your back to the support, then, leaning on your feet and palms, move your middle back onto the support. Place your hands behind your head and place your palms on the floor, fingers pointing towards your shoulders. Legs bent at the knees are spread slightly wider than shoulders. The neck is relaxed, the head is down. Extend your arms and legs at the same time, lifting yourself off the support and bending. Try to straighten your arms and legs as much as possible and stay in this position.
When this stance is already easy to achieve, you can already master the bridge exercise from a lying position.
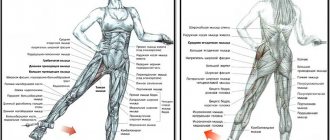
Work on the relief
To achieve relief and separation of deltas, the following postulates must be observed:
- use of average weights (from 50 to 70% of the maximum);
- number of repetitions in a series from 10 to 12;
- the use of super series, when two exercises are performed at once during a series without rest between them;
- The duration of rest between series is no more than 90 seconds.
A typical delta workout for relief looks like this:
- Bench press in front of you. In 4 series we perform from 10 to 12 repetitions, with an interval of 90 seconds between series.
- Dumbbell lateral raises while standing and bent over raises (super series). In 4 super series, we perform 10 repetitions of each exercise, with an interval of 60 seconds between super series.
- Swing dumbbells in front of you. In 4 series we perform 12 repetitions, with an interval of 50 seconds between series.
- Lifting the dumbbell towards a reclining position. In 4 series, we perform 10 repetitions without rest (one side of the body rests while pumping the other).
Classic bridge
Having learned to easily stand on the bridge from a support, you can move on to practicing the stand from a lying position.
Starting position: lying on your back, feet near your buttocks, shoulder-width apart, hands resting on the floor with palms on both sides of your head, fingers pointing toward your shoulders. Using your arms and legs, push your body up and, bending your back, try to straighten your limbs. After you get into the bridge position, freeze in this position and then return to the starting position. Practice the rack until you achieve 15 reps in each of two sets.
The correct technique for performing the bridge exercise must meet the following conditions:
- The deflection in the back is maximum, the body should take the shape of an arc.
- Arms should be straight, palms placed under the head.
- The pelvis should be raised as much as possible and above the level of the head and shoulders.
- You should strive to straighten your legs; a slight bend in the knees is allowed.
- Breathing is even and deep, and should not be interrupted.
What is this element for?
In general, the flip does not resemble any of the elements known in the gymnastics program - somersault, float, cartwheel. To perform it, you need to do a headstand one by one, with your legs spread horizontally, almost in a split, then make a bridge, and only then turn over. Despite the rather childish exercise, you need to have good gymnastic training and acrobatic skills, the body must be flexible and physically prepared. Acrobatics is a very spectacular part of the gymnastics discipline. Various elements and complex exercises can be done both statically and in musical dance. They show very interesting performances at competitions; this is a difficult sport.
Bridge from a standing position
The ability to stand on the bridge from a standing position looks even more impressive. It will take a little more time to learn how to do a standing bridge, but your diligence will be rewarded by adding this acrobatic element to your arsenal.
To work out a bridge from a vertical post, you will need a free section of the wall. Stand with your back to him at a distance of a couple of steps. Raise your arms up, bend back a little and rest your palms on the wall so that your fingers point down. Move your hands down the wall while arching your back and lowering your head. In this case, you can bend your knees slightly. Reach the highest possible level, and, moving your hands up, return to the starting position.
Perform this exercise for 8 repetitions in two sets each workout, trying to go lower each time. When you can easily reach the floor and climb up the wall from this position, you can try to make a bridge from a standing position without the help of the wall.
Start practicing this stance only when you have learned to confidently do it against the wall. You need to stand up straight, place your feet slightly wider than your shoulders. Raise your bent arms above your head and arch your back while bending your knees and moving your pelvis forward to maintain balance. The gaze is directed back. You need to bend over as much as possible and see where your palms “land.” If the maximum deflection has been reached, but the floor is still far away, then ask someone to secure you by grabbing you around the waist. With your hands on the floor, straighten your legs and arms and maintain your balance. You can stand up from the bridge by raising one arm and turning over to the side.
When you learn to confidently stand up from a vertical position and can easily repeat this exercise without losing your balance, you can move on to the final stage of training, which will help you master the skill of rising from a bridge.
Lifting from the bridge to a vertical position
Getting from the bridge to your feet is perhaps the most difficult thing. But if you've trained hard and developed your muscles and vestibular system, then with a little practice you can do it.
While standing in a bridge, try to transfer your body weight to your legs; to do this, you need to bend your knees and push your pelvis forward. You can “come” a little with your hands to your feet. Then, pushing off the floor with your palms and simultaneously moving your center of gravity forward, straighten up. This will require considerable effort.
At the initial stage of mastering the ascent from the bridge, safety net is desirable. Let them help you rise, supporting you at the waist. Once you understand which muscles are involved in this movement, you will soon learn to get into a standing position on your own.
Having mastered the technique of performing a bridge and rising from it, practice this exercise until it becomes automatic and keep it in your training program. Doing bridges regularly will bring many benefits to your health and beauty. But if this exercise is not performed regularly, the acquired skill may be lost.
How to do a side plank correctly?
Side plank technique
- Lie on your left side and straighten your legs.
- Raise your body and support yourself on your left elbow and forearm.
- Tighten your abdominals.
- Raise your hips so that your body forms one straight line. Keep the weight of your lower body on the outside of your left foot.
- Lock the position.
17 Jan
2022 Interesting materials:
How long should you take a contrast shower? How long does it take to bake the soil in the oven? How long does it take to defrost a Bosch refrigerator? How long should you sit with Chemerichnaya water? How long does it take to salt trout? How long does it take to salt fish? How long does it take to sterilize tomatoes? How long does it take to dry fish? How long does it take to dry crackers in the oven? How long does it take to stew rabbit meat?