Hundreds of marathons, flash mobs all over Russia, challenges with the motto “change yourself in a month”: and the bar rules all of this! This exercise has been very popular for many years among yogis and those who lead a healthy lifestyle. It attracts beginners with its apparent simplicity: they say, a super asana for the lazy and very busy! I stood in it for two or three minutes a day - and they already describe the results they describe: extra pounds will go away, the body will noticeably tighten. Indeed, the bar is recommended for losing weight and strengthening the entire body. But not everything is so simple in this asana! To achieve the effect, it is important to perform it PERFECTLY! And this is far from simple. Plus, you need to know about all the contraindications and the strength of its impact, because this is a static pose, and it is not suitable for everyone.
In yoga, the plank is known as Chaturanga Dandasana. From Sanskrit, “danda” is translated as a staff, a log, “chatur” means four, “anga” means limbs or supports. If you combine all the words, it literally turns out: a pose on four supports. This is true. Below we will tell you in detail how to do the plank correctly for beginners in order to lose weight. In the meantime, let's look at its positive properties.
Benefits of planks for men
Is the plank useful for those who perform strength training? It would seem that such a simple exercise gives? Also, does the bar affect weight loss, and how? All these questions will be answered positively below.
- The effectiveness of the classic version, first of all, lies in strengthening the stabilizer muscles, which prepare the body for heavy basic exercises. The technique works not only external, but also deep muscles that are not developed with the help of dynamic strength exercises; the abs and lower back are strengthened and support the spine in the correct position when using a large working weight.
- There are various variations of the exercise that help both strengthen muscles and burn fat. The plank can also be performed dynamically, which allows you to spend more calories and include ligaments and muscle fibers in the training that cannot be worked with a simple base.
- By involving slow-twitch fibers that rest during dynamic exercises, you can significantly increase muscle strength, since it is comprehensive development that allows you to progress and meet standards with better quality.
- The exercise is suitable for both beginners and experienced athletes. The main task is to choose the appropriate option for the load.
- You can perform any of the plank options both at home and in the gym. The techniques presented below do not require additional equipment.
What muscles does the plank train?
The plank trains static endurance - the ability to hold the body in a certain position for a certain time.
The main load goes on the abdominal muscles - rectus, transverse, external, internal oblique. And also on stabilizers - muscles that help maintain position: deltoid, biceps, triceps, latissimus, pectoralis, quadriceps, ankle stabilizers and many others.
Photo: istockphoto.com
These muscles must be strong to support the spine and protect it, for example, from external influences, while also protecting the internal organs. In addition, stabilizers help you perform more complex exercises, such as weighted squats and others.
It's better not to take risks: 10 dangerous exercises in the gym
What are the standards?
There are no strictly established standards for the plank, but the approximate norm for young men is 60-120 seconds, and the latter result for any age is an indicator of good physical fitness, this is the indicator to which one should strive.
As an example, let's remember the record holders. The latest world record for holding a plank on the elbows belongs to George Hood - 8 hours 15 minutes. And the man did this at 62 years old.
How to do it right
First, let's look at the classic version - on straight arms, and then - the correct execution of the version on the forearms.
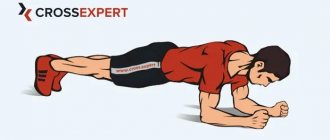
Straight arm technique
- When doing the plank, it is important to position your palms correctly, namely, strictly under the shoulder joints. Thus, the hands will be strictly vertical and, accordingly, parallel to each other, without any deviations.
- Next, your feet need to be placed on your toes, the width of your pelvis.
- The knees and elbows should be straight during the approach.
- The entire line of the body must be kept straight - from the crown to the toes. At the same time, it is important to keep the stomach, hips and buttocks, which are responsible for the correct position of the spine, in tension.
- The lower back should be flat - this means that it is necessary to remove the natural deflection by twisting the tailbone down. This position removes the load from the lower back.
- Do not hold your breath while performing the exercise. Breathe calmly and hold the position until the muscles are able to maintain the correct position. If the technique becomes distorted, stop doing the plank.
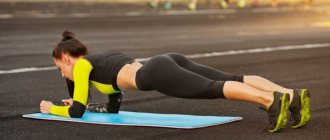
Option on the forearms
This method of execution is the simplest and most convenient, so it is often recommended for beginners. The body position remains unchanged - as in the previous version, the only difference is the stand on the forearms. In this case, the elbows should be located strictly under the shoulder joints, and the forearms should be parallel to each other. The angle at the elbows should be 90 degrees. Otherwise everything is the same.
Obstacles on the path to perfection
It may seem strange to an unenlightened novice athlete that such a seemingly harmless physical exercise as a plank may have contraindications for performance. But professionals won’t warn in vain.
- Interesting situation. When a woman is preparing to become a mother, there should be no stress on the stomach on the way to the birth of a baby. Except, of course, for contractions. So, there is no point in provoking them ahead of time.
- Herniated intervertebral discs, as well as any hernia in the abdominal area (inguinal, umbilical, postoperative) are a serious obstacle to performing the plank.
- Pinched nerve endings in the spine. In a word, if you have back pain, you need to see a doctor.
- Diseases in which the bar will cause pain and discomfort (cysts of various etiologies, tumors, etc.)
Before you start the exercise, make sure you are not at risk
Advice! People suffering from the above ailments can be advised to do yoga.
Complication options for men
At the moment when you can easily stand in the plank for 2 minutes, you will need to complicate the exercise technique and gradually increase their retention over time. Start with 30 seconds, performing each variation with the correct position of the lower back, and then make it more difficult.
Plank on an unstable surface
There are many variations in this case - both in the use of equipment and changes in body position. Choose the most suitable method, but do not rush - this is the most traumatic way to do the plank .
Equipment: bosu, fitball, medicine ball, balance board.
Option with hands on a hill:
- Place your forearms on the balancing surface, maintaining a 90-degree angle at your elbows. You can also complicate the option by performing it with straight arms, especially for a medicine ball, since its diameter allows you to rest only with your palms.
- Fix a stable position of the shoulder girdle and, tensing the muscles of the whole body, alternately move your feet back, resting on your toes, and straighten your knees.
- Take the correct plank position - having aligned your entire body in one line, support your lower back without excessive deflection, and do not raise your pelvis.
- Hold for as long as necessary, then slowly and carefully exit the plank.
Option with legs on a hill:
- In this case, the feet are placed on a fitball, barefoot, etc. To begin, place your arms straight under your shoulder joints, then slowly place your feet on an unstable surface.
- If you wish, you can perform the exercise on your forearms.
- As always, maintain the correct position and do not hold your breath.
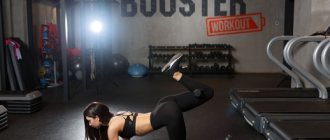
Side plank
This option increases the load on the side muscles of the body, including the obliques. You can perform the plank either on a straight arm or on the elbow.
- Stand in a plank position on your elbows, with your feet hip-width apart.
- Transfer your body weight to one forearm and turn to the side, placing your feet on the side surface.
- Raise your free hand up. Maintain a straight line from head to toe and do not sag at the hip joint.
- Then repeat the approach on the other side, maintaining the position for the same amount of time.
Plank in prone position
This version of the plank, which came into fitness from yoga, involves a static position with an emphasis on the load on the shoulder girdle.
- Assume a plank position with your arms straight. Place your palms under your shoulders, your feet hip-width apart.
- Bend your elbows and press them towards your torso without touching your chest to the floor. The angle at the elbows should be straight. Keep your body suspended as long as your arm strength allows. Don't hold your breath.
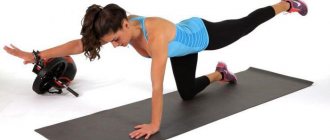
Balance on one arm and leg
This type of plank allows you to improve your sense of balance and strengthen deep stabilizer muscles.
- Get into plank position. Raise one arm in front of you and keep it parallel to the floor.
- Then lift the opposite foot and keep your thigh parallel to the floor.
- Hold the position for 30 to 60 seconds, then return to plank and switch sides.
On one hand
Another way to make the static plank version more challenging is to balance on one arm.
- Get into plank position. Fix the correct position of the whole body.
- Place the support on one hand and place the other behind your back.
- Hold the position as long as necessary, then switch hands.
When is the best time to do a plank?
There is an opinion that it is better to run in the morning. Opponents of this approach argue that physical activity should occur in the evening. As for the bar, there are no clear recommendations. The exercise is also universal from the point of view that it can be performed anytime and anywhere.
If you have a free minute, then why not spend it usefully. Under appropriate conditions, the plank can be performed even at the workplace. Thus, the exercise is ideal for both morning exercises and an afternoon or evening “minute of physical activity.”
Recommendations for training
- Start mastering the plank with the version on your forearms, starting with 30 seconds, gradually increasing to 2 minutes.
- When you feel confident in the plank for 2 minutes, complicate the technique - choose any of the proposed options and hold, starting from the minimum, and so on for 2 minutes.
- The plank can be introduced into any training, both for mass and for relief, performed at the end of a workout or between exercises.
- It is enough to perform variations of the plank for 10-15 minutes, during which time you can perform several suitable variations of the exercise. If you are just mastering the plank, perform 3 approaches with pauses equal to the duration of holding the load.
Program “30 days around the bar”
The plank is not an exercise, but a whole complex designed to strengthen most muscles and allow you to transform your body in just 30 days.
The plank is not an exercise, but a whole complex designed to strengthen most muscles and allow you to transform your body in just 30 days
If you meticulously and methodically work out at least one of the selected elements of the plank, without missing a single day, observing the specified time and performing three repetitions, then sculpted muscles will be ensured.
- Day 1 – 10 seconds
- Day 11 – 50 seconds
- Day 21 – 2.5 minutes
- Day 2 – 10 seconds
- Day 12 – 1 minute
- Day 22 – 3 minutes
- Day 3 – 20 seconds
- Day 13 – 1 minute
- Day 23 – 3 minutes
- Day 4 – 20 seconds
- Day 14 – 1.5 minutes
- Day 24 – 3.5 minutes
- Day 5 – 30 seconds
- Day 15 – 1.5 minutes
- Day 25 – 3.5 minutes
- Day 6 – 30 seconds
- Day 16 – 2 minutes
- Day 26 – 4 minutes
- Day 7 – 40 seconds
- Day 17 – 2 minutes
- Day 27 – 4 minutes
- Day 8 – 40 seconds
- Day 18 – 2 minutes
- Day 28 – 4.5 minutes
- Day 9 – 50 seconds
- Day 19 – 2.5 minutes
- Day 29 – 4.5 minutes
- Day 10 – 50 seconds
- Day 20 – 2.5 minutes
- Day 30 – 5 minutes
While standing in a plank, you can read the news or watch a movie at the same time
Advice! A balanced diet, including vitamin complexes and minerals, will speed up your transformation into an ideal.
How to do it for weight loss: recommendations
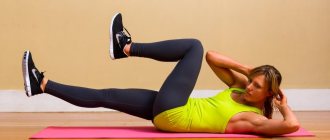
In order for the plank to have a fat-burning effect, the exercise can be performed dynamically, increasing energy consumption. There are many options that can be performed separately or alternated with static techniques, thereby performing interval loading. For example:
- Raising your knees to your chest or running in a plank – 1 minute.
- Static elbow plank – 1 minute.
- Plank jumps back and forth – 1 minute.
- Static elbow plank – 1 minute.
- Plank rise from elbows – 1 minute.
- Straight arm plank in static position – 1 minute.
Read more about dynamic bars →
The complex can be performed 2-3 cycles. This option is suitable for trained athletes, but for beginners, the static plank can be replaced by lifting the body or jumping rope.
Short-term high-intensity interval training has a powerful fat-burning effect, while using a plank as an exercise - you can strengthen all the muscles of the body evenly.
Also read: Is it possible to pump up your abs with a plank? Plank every day: is it useful? Weight loss plank: table for a month →
Contraindications
This exercise should not be performed if you have injuries to your wrists, arms, shoulders or spine. Pain in the hands (wrists) can be reduced by doing an asana based on fists.
People with blood pressure and cardiovascular disorders should perform this asana with caution. Muscle strain may be contraindicated for them. Before starting practical classes, you must consult with the trainer and your doctor.
If you find an error, please select a piece of text and press Ctrl+Enter.