- November 29, 2018
- Home workouts
- Natalia Ivanova
They say that the most effective exercise for everyone is working with your own weight. It is noteworthy that you can do it anywhere, including your own home. To perform it, no special equipment is required at all. All you need is willpower, patience and a little free time. You probably already guessed that we are talking about the reverse plank exercise. We will discuss the features and correctness of its implementation below.
What results can you achieve by exercising regularly?
Regularly performing the reverse plank exercise helps:
- Eliminate the unpleasant layer of fat in the lower abdomen.
- Strengthen your upper abdominal muscles.
- Improve overall muscle tone and strengthen the corset.
- Eliminate pain in the lumbar calving area.
- Achieve body flexibility.
- Improve whole body coordination.
- Prepare muscles to perform more complex loads.
- Strengthen and tighten your thighs and buttocks.
Side plank on elbows
This exercise differs more than the previous one from the usual plank. In it, the entire load falls on only one hand and is distributed completely unevenly. Therefore, this variation of the exercise requires performing on each side.
Execution technique
- We lie down on our sides. We lean on our elbow.
- We keep our free hand on our belt.
- We straighten the body and hold it in this position.
Involved:
obliques, glutes, forearm and biceps.
Photo: istockphoto.com
Is there a positive effect of the plank?
By regularly performing the plank in reverse, you can really feel the effect of it almost immediately. By doing this exercise, you will feel tone in all muscles. Traction works throughout the body. Legs, arms and even the abs remain tense. Regular training helps tighten the whole body, stretches the spine, eliminates various tensions, and strengthens the wrists.
Program “30 days around the bar”
The plank is not an exercise, but a whole complex designed to strengthen most muscles and allow you to transform your body in just 30 days.
The plank is not an exercise, but a whole complex designed to strengthen most muscles and allow you to transform your body in just 30 days
If you meticulously and methodically work out at least one of the selected elements of the plank, without missing a single day, observing the specified time and performing three repetitions, then sculpted muscles will be ensured.
- Day 1 – 10 seconds
- Day 11 – 50 seconds
- Day 21 – 2.5 minutes
- Day 2 – 10 seconds
- Day 12 – 1 minute
- Day 22 – 3 minutes
- Day 3 – 20 seconds
- Day 13 – 1 minute
- Day 23 – 3 minutes
- Day 4 – 20 seconds
- Day 14 – 1.5 minutes
- Day 24 – 3.5 minutes
- Day 5 – 30 seconds
- Day 15 – 1.5 minutes
- Day 25 – 3.5 minutes
- Day 6 – 30 seconds
- Day 16 – 2 minutes
- Day 26 – 4 minutes
- Day 7 – 40 seconds
- Day 17 – 2 minutes
- Day 27 – 4 minutes
- Day 8 – 40 seconds
- Day 18 – 2 minutes
- Day 28 – 4.5 minutes
- Day 9 – 50 seconds
- Day 19 – 2.5 minutes
- Day 29 – 4.5 minutes
- Day 10 – 50 seconds
- Day 20 – 2.5 minutes
- Day 30 – 5 minutes
While standing in a plank, you can read the news or watch a movie at the same time
Advice! A balanced diet, including vitamin complexes and minerals, will speed up your transformation into an ideal.
Correct technique
There are several options for performing the reverse plank exercise. The principle of execution directly depends on your physical fitness. Therefore, there is the simplest or classic position, as well as the complex or advanced one. For ease of understanding, let's consider the classic version.
To do this you need to do the following:
- Wear comfortable clothes.
- Sit on the floor, carpet, mat.
- Place your outstretched arms under your shoulders.
- Place your hands with your fingers spread parallel to each other.
- Straighten your legs.
- Pull them forward in the opposite direction from your hands.
- Leaning on your hands, raise your body.
- Squeeze your legs together, including your feet.
- Place your feet on the heels (in a more complex version, the feet are placed on the entire sole).
- Move the load from the arms and legs to the middle of the body.
It is noteworthy that the head in this position should not bend too far back and overexert itself. It is best to keep your head straight in the reverse plank exercise and not overstrain your neck.
The navel and stomach are directed straight up. It should feel like there is a thread stretching from the ceiling to your navel. While doing the exercise, imagine that someone is pulling this string and forcing you to lift your navel up.
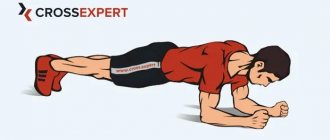
Static bar
This exercise focuses on the hands or forearms, using only your own body weight. The torso remains motionless during execution, but all muscle groups work.
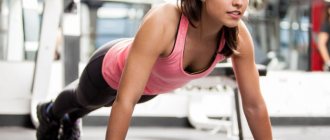
Classic plank with outstretched arms
This is a beginner exercise that you need to master before trying the dynamic plank. The press does the most work. The emphasis is on straight arms, perpendicular to the floor. The back is a straight line. The buttocks and abs are tense.
You cannot perform the plank at the expense of technique; the muscles will not work correctly. If you experience severe pain, it is better to shorten the exercise time, but do it technically.
Classic plank technique
This is a bar for beginners who need to master the technique of the exercise. As soon as you manage to stand for 1-2 minutes while doing a regular plank, you can make the stand more complicated.
Technique:
- Get on your knees, placing them hip-width apart.
- Place your palms directly under your shoulders. You need to ensure that the weight is evenly distributed throughout the palm.
- Stretch your legs back, focusing on your toes. The heels look back, the top of the head tends forward.
- Keep an eye on the pelvis, it doesn’t fall down or lift up. Look at the floor in front of you.
- The abs are tense. Shoulders and neck are relaxed. Remove the arch in the lower back.
- Perform the exercise for 30 seconds.
- To exit the exercise, you need to lower your knees and lift your body up.
To lighten the load, just place your feet a little further apart.
Elbow stand technique
The elbow stand or plank is suitable for beginners; otherwise it is called the lower plank. There is less risk of injury due to reduced stress on the wrists. Standing on your elbows works your abs and upper back better.
Technique:
- Emphasis on the forearms. We do not join our hands together, our forearms are parallel to the body.
- Bring your legs straight back, weight on your toes.
- The abs are tense, the stomach is pulled in, the heels are pulled back.
- You need to make sure that your back and knees are extended in one line. You cannot sink in the shoulder blades or lower back.
- Do not raise your head up, look down in front of you.
- The elbow is located exactly under the shoulder, the arm forms a 90° angle.
- The buttocks do not rise or sag down.
- You cannot turn your elbows too far away from you; they should strive to be as parallel to the body as possible.
- Perform the exercise from 30 to 120 seconds.
By combining a classic plank and an elbow stand, i.e., by alternating them, you get an excellent exercise for working the abdominal and arm muscles. When performing, the body does not swing, but is fixed parallel to the floor.
Side plank
It trains the arms, gluteus medius and maximus muscles well, and tightens the side. Correct execution of the side plank prevents the development of cervical and lumbar osteochondrosis.
Technique:
- Lie on your side. Place your elbow exactly under your shoulder. Lean on your forearm, which completely touches the floor.
- The feet lie one on top of the other. Legs straight, do not bend your knees. The back is straight.
- Raise your body. The thigh does not touch the floor. The body is elongated in a straight line. Look ahead.
- Perform the exercise for 15 seconds. To lighten the load, you need to tense your abs and buttocks before lifting your torso.
- To increase the load, the leg is raised above the floor, holding it for 15-30 seconds.
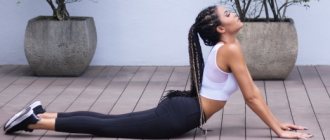
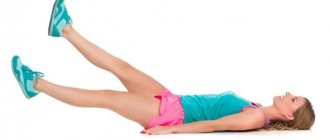
Reverse plank
The reverse plank will get rid of flabby buttocks and cellulite, tighten your legs, abs, and inner arms. The exercise stretches and loads the back muscles.
The reverse plank tones your core muscles. Thanks to them, the body stabilizes and holds the internal organs. You will notice ease when walking, and it will be easier to maintain your posture.
Technique:
- Sit on the mat, straighten your legs. Hands stand shoulder width apart. The emphasis is on the elbows or hands. For beginners, it’s better to start by resting on your elbows.
- Raise your pelvis, stretch your legs, the body is a straight line from the chest to the toes.
- The head looks straight ahead, there is no need to throw it back or press it to the chest.
- The shoulders are relaxed, the buttocks and abs are tense.
- Maintain this position for 1 minute. Perform in the morning and evening for 30-90 seconds.
Reinforced bar
This bar is suitable for experienced athletes. It differs from the classic stance by extending the opposite arm and leg, i.e. lifting the right leg with the left arm and vice versa.
Technique:
- Take a lying position. Place your hands shoulder-width apart. Lean on your forearm, or place your arms straight perpendicular to the floor.
- Raise your torso, stretch out in a straight line.
- Extend your left arm straight forward and lift your right leg up. Remain in this position for at least 15 seconds.
- Return to plank. Extend your right arm and left leg. Also keep your balance for at least 15 seconds.
When do you have wrist problems?
The plank is very easy to do. Especially if you calculate your strengths and do not make a choice in favor of an initially difficult option. But how to do a reverse plank correctly if you have wrist problems. For example, problems may arise in people who have undergone surgery in this area, who have previously had wrist fractures, etc.
If you have any problems in your wrists, you need to perform the exercise with emphasis on straight arms. For convenience and simplicity, bend your elbows. The support in this case will be transferred to the feet and elbows. The wrists in this position will remain free and not involved.
Dynamic bar
A dynamic stance includes movements and changes in body position. The load on those muscle groups that are not involved in the static version increases. The dynamic plank is a weight loss plank.
On one hand
This exercise works the muscles of the arms and abs. The maximum load goes to the supporting hand.
Technique:
- Take a lying position. The hands are located directly under the shoulders. Legs straight and brought together.
- Raise your body and bring it into a straight line. The pelvis and shoulders are at the same level as the body. Arms straight.
- Shift your body weight slightly to the right and place your left hand behind your back. You can also straighten it and place it parallel to the floor.
- The shoulders and hip remain motionless; you cannot lean to the side. The right hand holds the weight of the body.
- Execution time 5-10 seconds. Then return to the classic plank and change hands.
On one leg and one arm
It is quite difficult to perform the exercise correctly, observing the technique. When performing, much more calories are spent, the abs, muscles of the arms and legs are well worked out, and the buttocks work.
Technique:
- Take a classic plank with straight arms. Legs are brought together.
- Bring your left hand forward. Raise your right leg. Maintain balance for 15-30 seconds.
- Return to the classic plank, extend your right arm, left leg. Stand in this position for 15-30 seconds.
Side plank
Here the abs work especially hard and the back becomes tense. Not recommended if you have problems with the spine or lower back.
Technique:
- Lie on your side and place your forearm exactly under your shoulder. The feet lie parallel, one on top of the other.
- Lift your pelvis off the floor, stretching your torso into a straight line. Knees straight, head looking straight ahead. Emphasis on the forearm. The abs and buttocks are tense.
- In a dynamic plank, the pelvis is not fixed, but sways up and down.
What muscles work in the reverse plank exercise?
When performing a reverse plank, several muscle groups work at once. For example, the rectus and pyramidal abdominal muscles are activated. Doing a more advanced version of this exercise targets the obliques and external internal muscles of the abdomen.
Moreover, the exercise allows you to activate the quadratus lumborum muscle. It is she who plays an important role in the formation of the entire muscle corset. As a result, these muscles are slightly stretched and at the same time tightened.
If you pay attention to the photo, the reverse plank exercise is performed with emphasis on four points: feet and wrists (we take as a basis the classic pose without simplifications or complications). This means that with such training, the anterior and posterior muscles of the thigh, medial and calf muscles are activated.
When you lean on your arms, your shoulder muscles work. The armpit area is stretched. The neck is involved, the forearm joints work.
Muscle work
The main muscle groups that support the body in a straightened position during the plank are the abs and back. In addition, the muscles of the chest, shoulders, front surface of the thighs and buttocks are included in the work. In other words, the distribution of the load among the muscles when performing the classic version of the exercise (standing on the elbows) is as follows:
- Abs, especially the rectus abdominis. The abs bear the main load - the abdominal muscles prevent the body from sagging down under the influence of gravity.
- Back muscles, especially the lower part. They support the body in a straight position, tighten the ribs, and pull the arms towards the body, allowing you to stabilize the angle between the body and the shoulders.
- Pectoralis major and deltoid muscles. These muscles allow you to hold yourself up in your shoulders without sagging your chest down.
- Gluteus maximus, quadriceps, calf muscles. These muscles ensure the level position of the legs and pelvis.
Looking at the list above, we can safely say that the plank trains almost all the muscles of the body. Variations of this exercise allow you to increase the load or shift its emphasis to certain muscle groups.
The classic plank exercise (sometimes also called a “plank”) is an isometric exercise. This means that if you do it correctly, there is no movement in the joints, i.e. the pose remains static. However, there are also dynamic options, including turning the body, raising and lowering the arms or legs.
Typical mistakes when performing the exercise
The reason that the pose you perform does not lead to the promised effect is most often due to practice errors. For example, if you want to get a beautifully defined silhouette of your forearms, you should not simplify the exercise and do it with emphasis on your elbows. If there are no problems with your wrists, this position will not give the proper load. To create a beautiful relief, you need to do a classic plank with emphasis on the wrists.
The second mistake is that the thigh is stretched too much in the back plank exercise. This is especially felt if you push your body up too much and forcefully push off the floor with your feet. When performing this exercise, the main thing is not to overdo it. You need to push the body with your legs and arms (all four supports). But this must be done with equal force and at the same time.
Another important point. When performing this exercise, the head is often pressed or thrown back too much. To avoid this mistake, try to keep it level and look ahead. Keep your gaze straight.
When doing a plank, try not to arch or move to any side. At the end point of execution, your body should resemble one straight line. Do not bend in the lumbar region. On the contrary, slightly twist it forward and take the load off this area.
Finally, do the exercise to the best of your ability. You should not bring yourself to the point where your limbs and muscles tremble. Don't overexert yourself. It is better to do several workouts with a small number of repetitions of the exercise rather than hold the pose for a long time. Now you know how to do the reverse plank exercise correctly.
Benefits of the reverse plank
If we talk about the general positive effects of this type of load, then first of all it is worth highlighting:
- improving blood circulation in the body;
- due to increased blood flow, organs and tissues receive an increased amount of oxygen and nutrients;
- the psycho-emotional state is normalized;
- sleep improves;
- the body becomes flexible;
- the back muscles and abdominal muscles become toned due to an increase in their tone;
- posture improves;
- the contours of the body become embossed and clearly defined.
Improved posture
The reverse plank is the perfect exercise to straighten your back.
But it is worth considering that this should only be done with a healthy back that has not undergone degenerative changes. If a person has scoliosis, lordosis, kyphosis, osteochondrosis or another disease, it will be useful to know how to do this exercise correctly and whether it can be done at all, depending on the stage.
Therefore, at the slightest deviations in health, it is necessary to consult a doctor and a physical therapy trainer.
Slim stomach
The weight loss plank is an effective exercise that will help reduce excess subcutaneous fat, especially in the abdominal area. If the training is regular and carried out for a long time, then in combination with proper nutrition, the plank will form the abs, and in terms of effectiveness it will not be inferior to pumping up the abdominal muscles on the uneven bars.
Relief from back pain
Since the load allows you to intensively strengthen the muscular frame in the back area, this contributes to the proper maintenance of the spinal column. And this allows you to eliminate muscle and other types of pain associated with degenerative diseases in the back.
The reverse plank remarkably strengthens the arms without visual changes, which is especially important for girls.
Before performing a straight or reverse plank, if you have various pathologies and problems in the musculoskeletal system of the body, you should definitely consult with a neurologist, vertebral neurologist or orthopedist. Only he will be able, having established the severity of the disease, to say unambiguously in any specific case whether such an exercise can be performed.
Forming a beautiful hand shape
Due to the distribution of the load with the help of the hands, a relief delineation of the biceps and triceps of the arms occurs over time. The shoulders become beautiful, muscle sagging is eliminated.
Strengthening the buttocks
Also, part of the load applies to the buttocks. Therefore, if the exercise is performed intensively and according to the rules (the buttocks should move forward as much as possible, towards the ceiling), then these muscles become more elastic, cellulite disappears and the shape becomes more rounded and regular.
Intense calorie burning
Despite the fact that the load is static, that is, amplitude movements are not performed in the exercise, calories are consumed during a plank stand (both forward and reverse) quite intensively. This happens due to the maximum number of muscles involved in maintaining the correct position.
Therefore, this load can be performed by those who want to lose excess body weight.
Increasing stress resistance
Due to the fact that all muscle groups, when in a plank stance, go into a tense state and then relax, this causes a more intense push of blood through the veins. Due to this, the circulation of cerebrospinal fluid in the body increases. And this leads to:
- increased blood flow;
- acceleration of metabolic processes;
- oxygen saturation;
- reducing swelling due to lymph outflow.
All this, especially the intensive nutrition of organs and systems with oxygen, helps strengthen the nervous system. Due to this, the body’s resistance to stress increases.
When should you make an exercise more difficult?
The reverse plank, like any exercise, ceases to be difficult over time. In other words, your muscles get used to this position and no longer perceive such a load. At one point you realize that it is very easy for you to complete the plank. And then it makes sense to think about complicating the initial exercise.
For this, for example, you can use various weighting agents. Alternatively, you can put a metal “pancake” from the barbell. When lifting your body, you will feel some discomfort. It will be much more difficult to climb with such a load. Consequently, your load on all muscle groups will increase.
You can also transfer your body weight from four supports to three. To do this, lift one leg up. If you want to make this exercise more difficult, put weights or special weights on your raised leg.
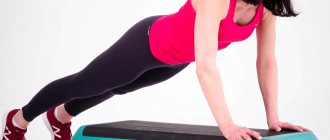
In addition, it is quite possible to shift your body weight from a flat floor to a hill. To perform such a plank, you can raise your hands on the step platform. If it is cumulative, then gradually the number of additional sections that will lift you higher can be increased.
Benefit and effectiveness
This exercise is worth trying, if only because it is kind of like a rebellion, a fight against the system. While everyone in the room is doing the classic plank, stand in the center of the room and do the reverse. Show that you are special, not like everyone else.
But seriously speaking, this exercise is unreasonably ignored or not known about at all. It will load your core muscles just as well as a regular plank and will make your posture straighter than a lamppost. It will also tighten your buttocks. Everyone loves toned buttocks.
If everyone in our world had toned buttocks, then all people would be kinder and happier.
This exercise also perfectly strengthens the lower back . In addition, in this exercise it is much more difficult to harm yourself than in a regular plank, because there is practically no load on the lower back if performed incorrectly.
When should you not do the exercise?
In most cases, the reverse plank has no contraindications. However, it is still not worth doing it in the following cases:
- During pregnancy.
- If there are injuries (of varying duration) to the elbows or shoulder joints.
- When you are diagnosed with a herniated disc.
- For compression fractures.
- Immediately after performing the caesarean section procedure.
- During the rehabilitation period after abdominal surgery.
In all other cases, such an exercise is not only necessary, but also very useful.
For greater results, you can combine the reverse plank with its other variations. For example, in your stretching routine, include a side plank (to develop the oblique abdominal muscles), a classic plank on the elbows, straight arms, and exercises with leg and arm raises. You can also perform plank jumps, imitate climbing and running up stairs, connecting and separating your legs, rising and falling on your hands.
Don't forget to take short breaks between sets. Rest. Don't overexert your muscles. Monitor your feelings. There should be no sharp pain or pulling sensations when performing such exercises. Do everything to the best of your ability.
Summarize
In conclusion, we can say that the reverse plank is a very useful exercise. But they rarely do it. In the Middle Ages, for example, people rarely washed, and this led to the plague. The connection is weak, but I would advise not to neglect the reverse bar. Of course, there won’t be a plague because of it, but it will improve your posture well. Yes, and the muscles will tighten. Good stuff, overall.
Also try doing a side plank and decide what works most effectively in your particular case.