Have you never done a plank?! Shame on you?!
Okay, okay, I'm kidding.
The plank exercise has become very popular over the past few years, and for good reason. The list of its benefits is very long and is not limited to just strong core muscles and a 6-pack on the torso.
Unfortunately, not all people understand the full power of this exercise for the abdominal muscles. In most cases, because they tried doing planks for the abs, but did not get any results.
But really, why is that so? If the exercise is so effective, why don't many people see results?
The answer is simple:
Incorrect technique.
Proper exercise technique is everything when it comes to getting results. And if you do not master the correct version of the standard plank, then you can forget about the result, regardless of which variation of the plank you choose.
Below I will show you what the ideal technique should look like and how to do an ab plank correctly. Don't worry about being new to this because there are several options to complete the entire exercise.
And believe me, you will be glad that you succeed in the end.
Ab plank
Planks are a type of exercise that everyone should do, not just those who want to build up their abdominal muscles.
That's because the benefits of this exercise go much deeper than just six-pack abs.
Let's start with the obvious: planks are the best exercise for strengthening your core muscles.
Yes, they are even better than crunches.
Why? Because crunches don't actually work your core muscles.
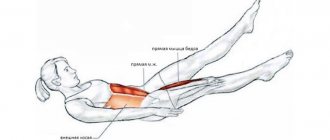
You see, the core includes many more muscles, including those that form your six-pack. They occupy the entire front of the abdomen and lower back.
Core muscles
These include the rectus abdominis (6-pack abs), internal and external obliques (muscles that run down the sides of the torso), transverse abdominis (the innermost layer of muscle around the spine), hip muscles, and lower back muscles.
Crunches bypass most of these muscles and focus only on the rectus abdominis (6-pack). With their help, you can pump up your abdominal muscles, but your core muscles will remain invariably weak.
Planks, on the other hand, work not only the abdominal muscles, but also all the other abdominal muscles.
This leads to the so-called “corset” effect, in which the internal core muscles envelop the torso in a tight corset.
Still in doubt? Research shows that crunches work less core muscle than exercises that work the deltoids and glutes, such as planks.
And now we come to the next reason why you need to make planks:
How to correctly and effectively
The problem is also in performing this exercise. For some reason, in all articles it is recommended to do the plank every day, in isolation from the main training, and with each day you invariably increase both the time and the number of approaches. As a result: you get very tired, sweat, learn to suck in your stomach and that’s it, the abs were still there.
Of course, doing the plank every day is much better than not doing anything at all - even if these 5 minutes seem insignificant to you, but they play a big role for your psyche. However, it is important to understand that this is not safe and in terms of muscle development, in some places it is even harmful.
The plank, of course, is an interesting way to diversify your training and tighten your muscles, but please remember about its possible harm and do not try to stand in this position for 5 hours a day - scientists generally doubt that it is worth doing this anymore.
In a high-profile study from the Journal of Strength and Conditioning, Canadian scientists concluded that several short sets are more effective and much safer than long planks .
Professor at the University of Waterloo, Dr. Stuart McGill, summarizes: “If you want to set a record in the plank, you can try, but there is no benefit to the health of the body, micro approaches of 10 seconds work much more effectively on endurance.”
During the experiment, two groups of subjects performed exercises on the core muscles. The first team held the bar for 10 seconds - first 5 approaches, then 4, and so on until one. The second one did crunches and other dynamic exercises. After 6 weeks of training, those who held the bar according to this scheme strengthened their torso muscles significantly more.
So you shouldn’t constantly move towards increasing the plank time - the body gets used to everything, it’s better to move on to more complex versions of this exercise. If 2 minutes of planking is not particularly difficult for you, then feel free to move on to more complex types.
Moreover, it will be much more beneficial in terms of time and the effect on the muscles to add weight, not time, to the exercise. Yes, it sounds hard, but in fact it is not so scary, because each session should last a maximum of 30 seconds.
Many people make the huge mistake of trying to burn excess fat by only lifting their own weight. This leads to the fact that their form stands still, and their motivation fades not by days, but by hours, minutes and seconds.
A certain type of load develops certain qualities. For example, marathon runners, who endure loads that are simply hellish for any other person, have an extremely thin figure without any special prominent muscles.
This is because they don’t actually need them; they primarily develop endurance. Look at hikers - they generally look like ordinary people who are not particularly athletic, but they can walk 30 kilometers a day over rough terrain with unpredictable terrain and then bawle songs around the fire.
When you work with your own weight (stand in a plank without weights) you improve your endurance - this is cool and all that, but visually your form will practically not change, since a different type of muscle fiber, the so-called “slow twitch”, is responsible for endurance. muscle growth.
If your goal is a toned body, you need weights. It is working with weights that allows you to grow muscles. Plus, standing in the plank for a long time is fraught with problems - almost all people mess up with equipment and the more they stand, the more they mess up.
How to do a weighted plank? Just place a small weight between your lower back and thoracic region - from a weight plate from the gym to a cat or a child.
There are special vest-backpacks for such purposes; you can simply take the weights on your legs/arms and place them spread out on your back.
We would like to especially emphasize: we were not trying to prove that the bar is useless or harmful, no. It just doesn't meet the expectations of the 95% of people who do it and expect absolutely specific effects.
Details about the plank technique
Planks aren't just limited to your core.
In reality, planks are a full-body exercise. Every muscle, from your shoulders to your calves and glutes, works as you hold your body off the ground in a plank position.
Since body position is so important during planks, this exercise is a great way to improve your posture.
They help prevent injury
Remember how we talked about how the elbowstand strengthens the inner core muscles, specifically the transverse abdominis?
This muscle is responsible not only for strengthening the core muscles, but also for supporting and curving the spine. Many of us forget the true function of the core and abdominal muscles: to prevent unnatural flexion and misalignment of the spine and discs.
Compare this to crunches, which literally force our spine into extremely dangerous positions. Unnatural compression of the spine and the load on it when performing twisting increases the likelihood of damage to its lower part; at the beginning, this can only be pain in the lower back.
As you can see, planks would be the most logical choice for strengthening your core, relieving stress on your spine, and relieving lower back pain.
In addition, planks improve stability and mobility throughout the body. A stable spine and strong core muscles make every body movement easier and help you maintain better balance.
This reduces the likelihood of falls and even improves performance during sports or fitness activities.
One interesting study confirmed this, showing that 10-20 seconds of side planks per day can reduce the curvature of the spine.
Tips for beginners on technique
- Do not pull your head into your shoulders, resembling a turtle. The shoulders should be straightened as much as possible and the neck should be elongated.
- When performing the basic plank, keep your hands strictly under your elbows, and your elbows under your shoulders.
- All exercises should be performed while exhaling, preferably with two repetitions.
- Perform dynamic options at the end of the workout, effectively working the stabilizer muscles.
Correct execution of all exercises, without exception, will help you stay in shape and feel 100%.
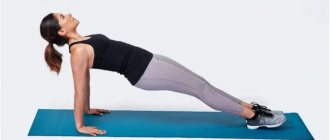
How to properly perform a plank for the abdominal muscles
At first glance, the exercise is very simple.
Is it possible to support your body on your elbows for a few seconds?
Don't jump to conclusions. First, let's try to make several planks in the right manner. There is a reason why they are so effective.
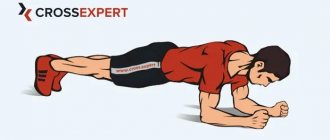
Correct body position when performing a plank involves more than just resting on your elbows and toes.
Below I have listed what and how to do during the exercise, and what not to do. If you concentrate on how to properly hold the bar for your abdominal muscles, then the results will appear faster.
To not allow:
- Sagging hips during exercise.
- Protrusion of the buttocks upward.
- Lowering your head to the floor.
Do:
- Keep your spine straight from head to toe.
- Engage your buttocks.
- Tighten your abdominal muscles.
- Keep your elbows directly under your shoulders.
- Keep your shoulder blades together.
- Execution time 30-60 seconds.
Another tip: if you feel tension and burning in your arms and lower back, and not in your abdominal muscles and buttocks, the exercise technique is incorrect. Try practicing in front of a mirror to make sure all body parts are in the correct position.
Recommendations for training
Despite the fact that the plank is a universal position that can be combined with any type of movement, it is not recommended to be done in a classic block for abdominal training . Muscles exhausted by dynamic movements will get tired very quickly, as a result of which the load will switch to other areas: the lower back, stabilizer muscles and other areas. This is precisely the main mistake of many athletes who prioritize the amount of time spent, rather than the quality of holding the position and concentration on the abdominal muscles.
It is better to give the plank a separate workout , doing 3-5 approaches in a block. You should not count on time, it does not affect real progress in the development of the press. After 50-60 seconds, the muscles are almost completely exhausted and the load moves to other areas. Therefore, it is better to do 5-10 series of 60 seconds than 1-2 sets of 4 minutes.
Planks for beginners
Above we looked at the correct position for performing a standard plank. But what if you've never done a plank?
One of the reasons why this exercise is so effective for the abs is its versatility. It is suitable for girls and effective for men. Let's look at the different types of planks below. They will help you achieve the full plank:
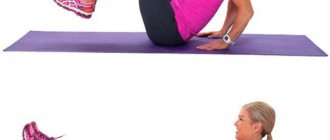
Plank abdominal exercise on knees
- Place a mat or towel under your knees before getting down on all fours.
- Take a plank position with your arms outstretched, placing them strictly under your shoulders.
- Include your stomach and buttocks in the exercise and hold the pose for 15-30 seconds.
- Perform three sets of 15-30 seconds each.
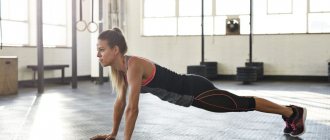
High Plank (Push-Up Position)
- Get into a push-up position with your hands under your shoulders. The body should be straight from head to toe.
- Engage your buttocks, keep your arms straight, hold the pose for 15 - 30 seconds.
- Perform 3 sets of 15 – 30 seconds each.
- If you can hold the plank on your outstretched arms for more than 30 seconds, switch to a standard plank on your elbows.
At this stage, you can try side planks for variety.
Side plank
- Start in a standard plank position with your elbows level with your shoulders.
- Roll onto your side and lift your free arm up, opening your chest.
- Your hips should be in the air with one leg on top of the other.
- Hold the position for 15-30 seconds, then switch sides. Perform 3 sets.
Dynamic plank exercise options
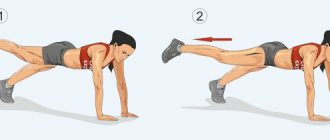
With leg bending
Initial position
The muscles of the chest, legs, shoulders and stabilizer muscles are trained.
Take a push-up position with your legs closed, your heels not touching the floor, and your hands shoulder-width apart. When turning to the left, pull your right knee towards your left elbow, and then return to the starting position. 15 repetitions are recommended.
V-bar
V-shaped bar
Take a plank position with emphasis on your forearms, and your hands are closed. Raise your hips high to visually resemble an inverted “V.” While inhaling, return to the plank position and do so 10 times.
To balance
Take a plank position with emphasis on your knees. As you inhale, straighten your left leg, stretch your right arm forward, and as you exhale, return to the starting position, and so on several times.
On inspiration
Lateral with twisting
On inspiration
Take a side plank position, where the support is on the left elbow, and the right arm is raised high. As you inhale, turn your body to the right and perform a swing, and as you exhale, return to the start.
With the ball rolling
With fitball
The starting position is the plank position, where the hands rest on the hands and the feet rest on the fitball. As you inhale, lift your hips up, automatically rolling the fitball to your hands, and as you exhale, take the starting position.
Circular
Hand steps
Standing in a plank position with emphasis on your hands, perform three steps with your arms in different directions.
Execution Rules
You need to carefully monitor the exercise technique. Beginners are advised to practice in front of a mirror. The surface for training should be flat; you can exercise on the floor or mat.
The body represents a single line. There should be no kinks in the pelvis or lower back. The back is straight. The pelvis is in line with the body, it does not sag down or protrude outward. Focus on your hands and toes.
During execution, the gluteal muscle and abs are tensed. In this case, you need to consciously relax your arms and neck so as not to overload the cervical spine.
Stress in the cervical spine and severe lumbar deflection can cause serious health problems.
Benefits and harms
To lose weight, it is much more productive to use vigorous exercise. However, the plank trains endurance and strengthens the entire body.
Benefits of plank exercise
- All abdominal muscle groups are involved, which allows you to work out your abs well.
- The muscle corset is strengthened, especially the back muscles that support the spine. With prolonged practice, posture improves.
- The core muscles, which are responsible for body balance, equilibrium, and support of internal organs, are strengthened.
- The plank can be static, dynamic, you can give the body a more intense load, accelerating weight loss, working out the abs.
- Metabolism accelerates, making weight loss faster and easier.
Contraindications
Performing the plank may be contraindicated for persons with health problems.
Let's talk about those who should not do the plank, because the exercise is prohibited if:
- injuries of the spine or intervertebral discs, for example, hernia;
- injuries to ligaments or tendons in the wrist joint, ankles;
- the presence of inflammation in the muscles;
- late pregnancy;
- caesarean section (carried out less than 6 months ago);
- going through the recovery period after surgery.
Basic mistakes
Raising the pelvis above head level. This position relieves the load from the entire muscle corset, the meaning of the exercise is lost. The pelvis should be one straight line with the body.
Head lift. A deflection appears in the cervical region, which causes overstrain of the neck muscles. Your gaze should be directed to the floor in front of you. With prolonged violation of technique, disturbances in the functioning of the cervical spine may occur, and muscles will ache.
The hands are locked, and the elbows are spread to the sides. In this position, the head drops down and control over the shoulder blades is lost. Muscles are tense unevenly. Elbows and forearms should be parallel to the body.
Bend in the lower back. The stronger back muscles work, and the weak ones do not receive stress. With constant bending, problems with the lower back may occur.
Raising the shoulder blades. When the shoulder blades are located above the head, sagging of the thoracic region appears, which also provokes an uneven load. The back should be straight.