The plank exercise is considered one of the most common core strengthening exercises.
And for good reason.
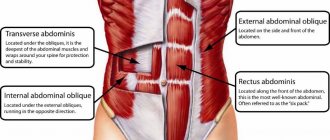
The standard prone plank technique works most of the core muscles:
- Rectus abdominal muscle (these are the same 6-pack abs)
- Internal and external obliques (lateral abdominal muscles located on the sides of the torso)
- Transverse abdominis (the deepest abdominal muscles that support the spine)
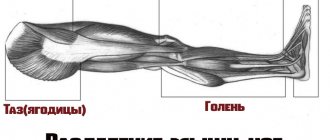
- Thigh muscles (important for mobility and injury prevention in athletes)
- Back muscles (especially in the lower back, responsible for stability and overall strength)
- Gluteal muscles (butt needed for stability and for skinny jeans)
As you can see, the core muscles are not limited to just the abdominal muscles. Here you will find the most effective abdominal exercises to achieve six-pack, or at least make your stomach flat.
They include almost all the muscles that literally “envelop” the torso, providing strength and stability for performing dynamic and athletic movements. Losing weight without a plank is not losing weight.
And there is nothing more beautiful than a 6-pack belly.
What muscles work in the exercise
The plank exercise is a static exercise and involves almost all major muscle groups.
Static tension involves loading a muscle without changing its length. And also without making movements in the joints.
Let's look at what muscles work when doing the plank on straight arms:
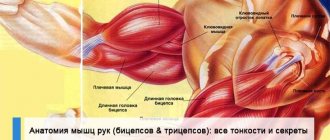
- Shoulder girdle (deltoids, triceps, forearms)
- Pectoral muscles
- Abdominals (rectus abdominis)
- Back (lats and lumbar)
- Buttocks
- Anterior thigh and calf
All of them are loaded to a greater or lesser extent, but the press .
Different types of planks make you stronger
It is best to start with simple variations of the exercise and then move on to more complex ones.
Once you feel stronger, continue to build strength by gradually adding different movements to your regular plank routine.
Soon a regular plank will seem very simple to you.
A well-developed core will improve your appearance and your overall fitness, no matter what sport you choose to play: football, walking, running or weight lifting.
Below are 11 types of planks that are an excellent replacement for standard planks. It's worth noting that most athletes include planks in their core workouts.
They are arranged in order of increasing difficulty of movements, so you can start with the variation that you are comfortable with and move on to the next type as soon as you feel that this one is already simple for you. How to do the plank exercise correctly, read on.
Advantages and disadvantages of planks
At first glance, the bar consists of only advantages. We will list only the main and confirmed ones:
- Benefits for the back
Static tension gently loads the muscles, strengthening them and improving tone. Thanks to this, a muscular corset of the spine is formed, which protects against injury when performing basic exercises.
- Benefits for feet
To hold the body in support on the hands for a long time, the muscles of the legs and buttocks have to strain. This also leads to increased tone, strengthens the stability of the knee joints and trains muscle endurance.
- Benefits for hands
The straight arm plank variation strengthens the shoulders and arm muscles (mainly the triceps and forearms). This helps in movements where shoulder stability and endurance are important. For example, in push-ups.
Execution technique
Now we will figure out how to do the plank exercise using the example of 2 classic execution techniques - on straight arms and on the elbows.
It’s very detailed and clear about the bar in the video – watch it!
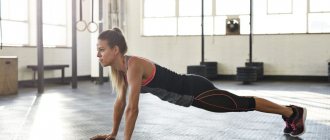
Straight arm plank
Remember that correct technique is important. Further, having understood the nuances of the exercise, you will gradually be able to improve your time indicators. On the first day of classes, standing in the plank for 20 seconds will be enough for a beginner. Every day your result can be gradually improved. Then you will achieve the best results.
If you don’t have a mentor with you to check the correctness of the technique, then perform the exercise in front of a mirror. Also use a fitness mat.
- Take a lying position. From this position, rise up so that you are resting only on your palms and toes. The hands should be located exactly under the shoulders.
- Don't bend your legs, keep them straight
- The position of the back is absolutely straight. The shoulder blades are down. Don't round your back or stick out your tailbone. Gaze forward
- The abs must be kept at maximum tension and not relaxed until the end of the plank.
- The feet can be placed together, or they can be spread apart to shoulder width. The wider your feet are, the easier it is to perform the exercise, but you will reduce the efficiency of the muscles.
- Breathing – calm and continuous
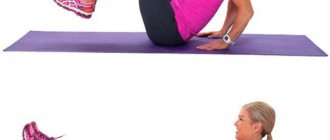
Complicating the exercise
- Single leg plank. It is necessary to stand up, observing all the above rules and raise one leg up, keeping the body position static. After completing the exercise with one leg, repeat with the other. To maintain balance, you can place your hands slightly wider than your shoulders.
© Mihai Blanaru — stock.adobe.com
- Plank with arm extended. While standing in a plank position, extend one arm forward or hide it behind your back and maintain your balance, making sure to maintain a straight back line. Repeat the same steps with the other hand.
© deagreez — stock.adobe.com
Elbow plank
The principle of execution is the same as in the hand plank. The only difference is that you lean on your forearms. To do this, you need to bend your arms, keep your elbows strictly under your shoulders. Make sure that the spine does not bend, the tailbone does not protrude, and the abs remain tense.
Complicating the exercise
- On one leg. Leaning on your elbows, lift one leg up and stay in this position. Then repeat with the second leg.
- With an outstretched hand. While in an elbow plank, extend your arm forward. After standing motionless in this position for several seconds, change your hand.
- The hand and elbow planks can be combined into one exercise. First, take a position on straight arms, then lower yourself to your elbows, alternately bending first one arm, then the other. Then return to the starting position. Repeat several times.
Video with 5 unusual and effective plank variations, for those who confidently do the classic version of this exercise:
Does planking help remove belly fat?
The abs and lower back are the two main muscle groups that bear most of the load in the plank. Therefore, many believe that this is an ideal exercise for working the abdominal muscles, which is even suitable for removing excess fat in this area.
Yes, planks strengthen your abs. But since here it works in a static mode, it does not stimulate muscle growth. In addition, the exercise strengthens the deep layers of the abdominal muscles, which support the internal organs and are not visible to the eye.
This exercise cannot influence the formation of “cubes”. But you can make your stomach flatter by toning the deep muscles.
If you want truly developed abdominal muscles, you will have to do a variety of abdominal movements, both static and dynamic.
The fat-burning effect of planks in the abdominal area is completely fantastic.
To reduce body fat, the emphasis is not on exercise, but on a properly organized diet with a calorie deficit.
Walking on the steps
The simplest, but very effective exercise that anyone can do for themselves. All you need to do is ditch the elevator in favor of steps.
How to do it?
You can complicate the task and climb through a step or run. This will start your metabolism even faster.
What will happen to your body if you start walking 10 thousand steps a day?
Effectiveness for weight loss
To understand how effective an exercise is for weight loss in general, let’s calculate how many calories are burned in the plank.
On average, this is 4-5 kilocalories per minute.
Please note that the unit of time is minute. But most traditional exercises for weight loss use a time interval of one hour. For example, an hour of running burns 600 kcal, an hour of walking burns 400, and so on.
Standing in a plank for 5-10 minutes is considered a record for the average person, worthy of the Guinness Book. And in these minutes you will spend, at best, 50 kilocalories.
In addition, the effectiveness of the bar is measured not by how long you stand in it for maximum time, but by how well you do it.
Planking even for 5 minutes doesn't make much sense. It is better to use several approaches in your program, for example, 30-45 seconds. This way the target muscles will work at their maximum.
In any case, the fat-burning effect of the plank is out of the question.
Exercise helps expend energy, but static exercise is not suitable in this regard, since it burns very few calories.
To burn more calories, choose any basic movements of a dynamic nature for large muscle groups. For example, squats, push-ups and pull-ups.
It's not just exercise that speeds up your metabolism.
If you approach this issue wisely, you can lose a couple of extra pounds in just a week. It is very important to maintain the daily calorie intake without creating a severe deficit for the body. It is also worth remembering that you can speed up your metabolism not only through training. Regular meals, minimal stress and sleep patterns are faithful helpers in this process. And for those who lead a sedentary lifestyle and do not have free time to go to the gym, trainers have developed a set of exercises to speed up metabolism.
A simple cat exercise is good for the back and effective for fat burning
Training Recommendations
The exercise is suitable for almost everyone, from zero level of fitness to professional athletes (of course, in the absence of contraindications).
In order for the plank to be as effective as possible, it is enough to know a couple of things about it.
How long to stand in plank
If you are a beginner, start with 10-15 seconds under load. As your physical fitness increases, so does the duration of holding the bar.
The optimal time is 30-60 seconds. If everything is done correctly, then after this interval the technique begins to suffer and efficiency decreases.
Therefore, there is little point in doing the plank all the way. It is better to do several approaches with maximum impact, with a short rest in between.
Number of approaches
A pattern of 3-5 sets, with a rest interval of 30-60 seconds, is good for beginners.
As the time under load increases, the number of approaches decreases to 2-3. This loading principle is more suitable for more prepared people.
For example, 45-60 seconds for 2 sets, with a rest of 15-30 seconds between work.
Ways to complicate things
The simplest and most affordable option is to increase the duration of holding the plank or reduce the rest between approaches.
The movement is also complicated by performing it at three points, that is, raising an arm or leg.
As for “exotic” types, the technical complexity and high requirements for the level of physical fitness greatly narrow the circle of people capable of doing them. They are more suitable for athletes or yoga and fitness instructors.
Lunges
Ideal for those who want to tidy up their legs, making them slim and beautiful. There is nothing complicated here; most even by the name understood what the exercise was.
How to do it?
It is necessary to put one leg forward and at the same time bend both legs at the knees so that they form parallel to the floor.
Photo: istockphoto.com
30-Day Plank Plan for Weight Loss
This table is compiled specifically for training beginners. If you already have a fairly high level of training and this complex will be easy for you, then you can start classes from day 10 and then independently increase the time you perform the exercise.
- Day 1: 15 sec.
- Day 2: 15 sec
- Day 3: 15 sec
- Day 4: 20 sec.
- Day 5: 20 sec.
- Day 6: 25 sec.
- Day 7: 25 sec.
- Day 8: 25 sec.
- Day 9: 30 sec.
- Day 10: 30 sec.
- Day 11: 30 sec.
- Day 12: 35 sec.
- Day 13: 35 sec.
- Day 14: 35 sec.
- Day 15: 40 sec.
- Day 16: 40 sec.
- Day 17: 45 sec.
- Day 18: 45 sec.
- Day 19: 50 sec.
- Day 20: 50 sec.
- Day 21: 55 sec.
- Day 22: 55 sec.
- Day 23: 55 sec.
- Day 24: 60 sec.
- Day 25: 60 sec.
- Day 26: 60 sec.
- Day 27: 65 sec.
- Day 28: 65 sec.
- Day 29: 70 sec.
- Day 30: As long as you can!
This 30-day plank challenge is a great first step on your fitness journey. After 30 days of planking, your strength will increase and your metabolism will speed up.
Additional sets of exercises will help further improve the overall tone of your body.
Benefits of planks for the abdomen
The plank is a universal exercise that has many advantages. Among the main advantages it is worth highlighting:
- Working all the core muscles, not just the rectus abdominis.
- Tummy tuck.
- Increases endurance in the abdominal region.
- Ability to hold the body straight for a long time.
- Fast results and progression.
- Improving the functioning of internal organs, preventing their displacement due to more rigid fixation of the abdominal wall.
- Strengthens the deep abdominal muscles, which is especially useful for women.
However, there is one drawback to the plank that is worth considering. While holding a position and prolonged muscle tension, the load on the blood vessels increases significantly. This can be a problem for people with hypertension and other cardiovascular diseases. In this case, it is recommended to do the plank carefully and in short sessions.
How to lose weight in your arms and shoulders
Even with active physical activity and rapid weight loss, the arms and shoulders decrease in volume much more slowly than all other problem areas. Therefore, do not forget about performing special exercises for the arms and shoulders to get rid of fat deposits. Note that women's arms are much weaker than men's muscles. It is not so easy to pump up massive arms for a woman; this will require 6-7 times more training than for a man.
Many ladies are afraid to do special exercises to lose weight on their arms for fear of building up muscles and losing their femininity in their shoulders and posture. Firstly, to really increase muscle mass that much, a woman will need to not only do planks or push-ups, but also exercise on machines in the gym. If you just want to tighten your skin and lose weight in your arms, home exercises with dumbbells, yoga asanas aimed at your arms, exercises with a chair or your own weight will be enough.
Lose Weight with the 30-Day Fat Burning Plank Challenge
The proposed 30-day fat-burning plank program will speed up your weight loss process tenfold, taking just a couple of minutes a day.
If you are just at the very beginning of your weight loss journey and have already heard about the plank, congratulations - you are more knowledgeable than I was when I was a beginner!
As I said before, until I started my journey into the world of sports a couple of years ago, I was not familiar with training and different exercises.
I first encountered planks while doing my first Beachbody exercise routine, P90X. I quickly realized how many muscle groups the plank uses.
The planks are extremely varied. All the variety of variations of planks will help beginners strengthen their muscles, and the most trained athletes will receive an adequate load.
Using this 30-day fat-burning plank program, you can train your core muscles, including the back muscles that are most important for our 40-year-old bodies.
In women over 40, core muscles often weaken over time. This can be seen from the saggy, flabby belly.
The back is often injured when doing housework if the core muscles are not trained.
This is where the 30-Day Fat Burning Plank Challenge comes into play. The only exercise that takes just a couple of minutes a day will improve the condition of your core muscles, reduce the risk of injury, speed up your metabolism and lose excess fat.
Push ups
If you make the plank a little more difficult and add movements, the effectiveness will only increase. But again, watch your technique.
How to do it?
Take a plank position with your arms outstretched, which should be placed shoulder-width apart. Your palms should rest firmly on the floor. Then bend your arms at the elbow joint, bending down. Do not push your buttocks back too far and create a large arch in your back.
Photo: istockphoto.com
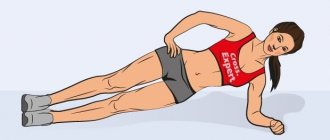
Side plank
The side plank is more difficult to do than the regular plank. But it puts additional stress on the oblique abdominal muscles.
There are two options: side plank with emphasis on the elbow (simplified) and side plank with emphasis on the palm. You can also make it more complicated and do the exercise with rounding the body, lifting the legs, etc., there are different types of planks below.
photo: side plank exercise
How to do a side plank correctly
- lie on your side and rest your elbow on the floor (arm bent at the elbow) or palm (arm straight), place your other hand on your belt or lift it up (more difficult);
- important: elbow strictly under the shoulder, arm 90 degrees to the floor;
- lower your hips to the floor;
- lift your pelvis so that your whole body is in one straight line;
- important: do not lift your pelvis too high up and do not lower it too low;
- strain (squeeze) your abdominal muscles to keep your torso in line with your legs;
- hold the side plank for 30 seconds, each time increase the time by at least 15 seconds.
photo: exercise side plank from the elbow
Plank program (5-10 laps)
| Exercise 1 Plank What you need: no equipment | — approaches | 20 seconds reps | — rest |
| Exercise 2 Rocking bar What you need: no equipment | — approaches | 20 seconds reps | — rest |
| Exercise 3 Plank with wide arms and legs What you need: no equipment | — approaches | 20 seconds reps | — rest |
| Exercise 4 Side plank What you need: no equipment | — approaches | 20 seconds reps | 30 seconds rest |
How long to stand in plank
Beginners can perform the exercise for 15 seconds, gradually increasing the time interval to several minutes. When the muscles adapt to such a load, you can increase the time of static load and try to perform more complex variations.
You should not immediately try to hold the bar for 5 or as long as 10 minutes in a row, as you will not bring any benefit to your body. In a person with insufficient physical fitness, the target muscles are susceptible to rapid fatigue. Therefore, the opposite effect occurs: the load is transferred to the ligaments and stabilizer muscles, the body is held in the correct position by them, and not by the muscles that you need to strengthen.
We recommend that beginning athletes warm up by holding the plank for 20-30 seconds with 10-second rest intervals. You need to perform 2-3 similar repetitions, then proceed to the main training.
If the plank is included in the main workout, hold in each position for 1 minute. If you are working with a trainer and are confident in your form, you can increase the interval to 1.5-2 minutes.
What are the benefits of squats?
Squats help improve coordination. More stable coordination will allow you to improve your strength skills, become more resilient and mobile. Squats keep you mobile. If you systematically perform squats with full amplitude, you will be able to develop more leg muscles.
Interesting materials:
How often should you train? How often should you set a cash limit? How often should you exercise to build muscle mass? How often should you exercise? How often should you exercise? How often should you exercise to lose weight? How often to water watermelons after planting? How often to water begonia in summer? How often are dividends paid on Gazprom shares? How often do you exercise to lose weight?
Squats
A familiar and effective exercise, but if done correctly. Simple mistakes can only harm your knees and lead to injury.
How to pump up your buttocks at home? Effective training
How to do it?
Stand up straight with your arms extended or tied at your waist. The back should be arched and the chest should be straightened. The hips move back as far as possible. The pose should resemble the moment when you are about to sit on a chair.
Photo: istockphoto.com
How to exercise correctly to first get rid of arm fat and tighten skin
- Arm exercises alone will not be enough for complete weight loss; they must be combined with cardio training (30-40 minutes) or aerobic exercises;
- use additional weights for your arms (dumbbells or weights) to speed up the process of returning muscle tone;
- exclude unhealthy foods, fatty, starchy and sweet foods, limit the consumption of bananas and grapes.
A set of exercises for losing weight in the arms develops not only the muscles in the shoulders, but also touches the back, eliminating wrinkles, and the chest.