Few people know, but there are two “Mill” exercises. One thing is the warm-up movement familiar to everyone from physical education at school. Performed without weight, it serves to stretch the posterior chain muscles and strengthen the core. But the second one is a serious power movement with kettlebells. Serves to strengthen the obliques, lats, deltoids, as well as improve stretching and balance. Mills are technically similar, but are different movements from a biomechanical point of view.
Benefits of exercise mill
The hand mill exercise is considered to be a common physical education movement for warming up from the school curriculum. However, this movement has enormous potential for athletes of any level, and is used both for muscle development and as a complete warm-up.
Main advantages:
- Working out the core muscles.
- Improved posture.
- Toning the abdominal muscles (preventing prolapse or protrusion of internal organs).
- Narrowing of the waist by increasing the tone of the oblique abdominal muscles.
- Improving the definition of the press.
- General “loosening” of muscles (prevention of muscle shortening during power loads and prevention of loss of mobility).
Despite its enormous benefits, the movement has several disadvantages, which are rather conditional:
- Poorly suited for strength use (can be done with dumbbells, but you won’t be able to use heavy weights during the movement), which potentially limits progress.
- May cause complications in the presence of lumbar hernias (if there are problems, enter into the program only after consultation with your doctor).
In general, the side and waist mill exercise should be considered an aerobic movement. It can be performed anaerobically, mainly with dumbbells, but this does not make much sense since there are more suitable and effective movements for loading the target muscles.
Wind blades
The blades are the main part that makes a mill a mill. There is no need to worry about their design; after all, we are making a decorative mill. But simply knocking down a structure made of boards and hanging it on the building will not be enough. You should consider parameters such as the size and width of the blades, their weight and tilt from the axis. These parameters determine how the blades will take on the wind and spin.
Windmill blades must be calculated
It is especially important to pay attention to size and weight. The following materials can be used to create blades:
The following materials can be used to create blades:
- Wooden slats with plywood - considered lightweight and practical at the same time;
- Wooden beams and dense polyethylene film;
- Thin wooden slats are attached to the axis that rotates the blades.
At the last stage, you need to install the axle and reinforced beams inside the structure, then put on and secure the blades.
Suitable for whom and when?
Potentially, everyone should do the mill exercise, as it is an effective element of training or warm-up. However, the movement will be most useful in the following cases:
- To maintain muscle tone.
- When training at home.
- To compensate for the negative impact of a sedentary lifestyle on the spine.
- For strength training without regular aerobic training (preventing constipation).
- As exercise or warm-up.
Provided that the athlete does the mill correctly, the movement can be recommended to absolutely everyone, except in cases where it is necessary to exclude or limit physical activity.
Conclusion
“Mill” is a simple, yet effective physical exercise that can be performed at home, for example, during morning exercises. But at the same time , you need to understand that all sports exercises give the desired result in combination, subject to proper nutrition. Therefore, before you start playing sports on your own, it is recommended to consult with a professional sports trainer who will help you choose the optimal physical activity program for you. Only after this can you start working on your body! Exercise mill
Execution technique
To get maximum benefit, you need to do the mill exercise correctly. This applies to the range of motion, body position and other features. Therefore, you first need to master the technique (preferably in a mirror or under the supervision of a trainer), and then move on to further progression.
Technique:
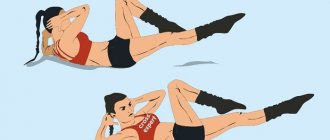
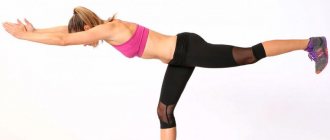
- Stand straight with your feet wider than shoulder height. Lean forward, keeping your back straight, as low as possible, but not below the level when your body is parallel to the floor.
- Rotate your body so that one arm points toward the floor and is perpendicular to the surface. The second arm is straightened at the same upward angle. This is the starting position.
- Begin to rotate your body synchronously so that your hands switch places. That is, the right hand moved from the lower position across the side to the upper one and vice versa with the left.
- Without pausing, repeat the movement at a moderate pace.
The movement itself is quite simple, but requires a certain mobility in the shoulder girdle, so at first a slight decrease in the angle is allowed (when the arms are not on the same line). But, over time, this disadvantage should be corrected.
It is also important to remember that the main movement occurs due to the abdominal and back muscles. Hands should remain motionless.
Tips for maximum efficiency
- If you feel that the exercise is easy for you, add weights. In the classic version, you can pick up light dumbbells.
- In order to decide which option is best, try them all. And already be guided by your own feelings.
- For greater results, try to adhere to the correct technique. Otherwise, the time spent doing the exercise will be wasted.
- If you have a very good stretch, then try to pull your hand not towards the opposite leg, but towards the floor. In this case, it must be touched with a full palm. Those who lack flexibility need to work on the elasticity of their muscles and joints. COOL UP will help you with this.
- When performing a classic mill, it is better to work in a high number of repetitions. Approximately 3 sets of 12-15 reps. One repetition is two turns, left and right. If you work with weights then the number of times is reduced to 6-8 in the same 3 approaches.
- You can perform the mill as at the beginning of training, if this is the classic version. It will allow you not only to work out your muscles. But also act as a warm-up exercise. If you are working with weights then leave the mill for the end of the workout.
At the end I would like to summarize and highlight the main points. The mill is a well-known exercise and, if the correct technique is followed, can bring good results. You can use weights to increase intensity. The main thing is to choose the right working weight.
Good luck to everyone in your training!
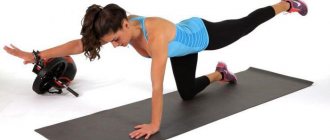
Complicating the exercise
To progress, you can use the following methods:
- Use of wrist weights.
- Dumbbells.
- Kettlebells.
When using weights, the muscle load is partially redistributed. In a mill with a weight, the muscles not only work in the back and abs, which lead the body to rotation, but also the arms and shoulders are actively loaded. However, the most convenient equipment is considered to be a dumbbell that can be held firmly in your hand. Unlike a kettlebell, it does not increase inertia during rotation, which is why it is considered more suitable and convenient.
What muscles work
Of course, if the movement we are considering is more related to aerobic exercise, this does not mean that the muscles are not activated when performing the mill exercise.
Of course they work. But not as much as, for example, it would be when doing abdominal crunches with weights.
In any case, by swinging our arms obliquely, we activate many muscle groups:
- press - I work oblique and straight;
- shoulders - deltoid and rotator cuffs (that is, scientifically speaking, these are the supraspinatus, infraspinatus, subscapularis, teres major and minor muscles - they are not very large, but they make up the corset and their work is also important), this is especially felt if you add weights;
- biceps femoris (back of the legs) - since you are standing on extended straight legs, then
- the biceps of the thighs are perfectly stretched and fully engaged;
- buttocks - the entire gluteal group is also included, if you take a weight, the effect will be enhanced;
Among other things, the small but very important back extensor muscles are also actively involved here. They stabilize the spine and help with further training.
That is, if they are strong, then the likelihood of “breaking your back” when performing a deadlift, for example, is minimal.
Effect on slimming sides
The main purpose of the movement is to tone the abdominal muscles (especially the obliques), back and shoulder girdle. To do the side mill exercise, a high-repetition style without weights is best. In this mode, you can provide long-term load on the target area.
It should be remembered that local fat burning cannot be achieved, so the main effect will be reduced to tone and muscle development. This will tighten your sides and make your waist look more athletic.
And also read how to remove sides and belly →
Child's pose (balasana)
Initial position:
sitting on the floor or mat.
Muscle groups:
Stretching the erector spinae muscles, gluteus maximus, piriformis and other hip rotator muscles, posterior thigh muscles, gluteus medius and minimus, and tibialis anterior.
Photo: istockphoto.com
Kneel down with your feet and knees together and your big toes touching. Lower your pelvis onto your heels and relax. As you exhale, bend forward and try to touch your forehead to the floor. Stretch your arms in front of you.
Weight and number of repetitions
The number of repetitions and working weight depends on your goal and other parameters. But the general recommendations can be presented in the form of a table:
| Strength | 2-6 | 1-5 reps | 100-85% | 3-7 min |
| Mass gain | 3-6 | 6-12 reps | 85-60% | 1-4 min |
| Fat burning | 2-4 | 13-25 reps | 60-40% | 1-2 min |
In order to make the training more diverse and effective you have to change the number of repetitions and the working weight. It is important not to go beyond certain values!
| Fat BurningMass GainGain StrengthActive Recovery | 346 | BeginnerIntermediateExpert | kg |
*Specify the weight and the maximum number of repetitions that you can perform with this weight.
Preparatory work
First of all, you need to decide on a constructive solution for the future construction. The Internet is full of photographs of windmills, so choosing the right option for your garden will be easy. Next you need to prepare materials and tools. To build a mill you may need:
- screwdriver;
- saw and hammer;
- brace;
- hammer drill or drill;
- Sander;
- corner;
- markers;
- ruler;
- building level;
- gloves;
- jigsaw
To build a standard model you should prepare:
- timber 20*20 mm;
- slats for creating blades;
- paint/varnish;
- sheets of moisture-resistant plywood for cladding the frame.
Briefly about the main thing
Elements of small architecture today perform an aesthetic and practical function. A decorative mill can decorate any area; with its help it is easy to disguise the presence of a well, an antiseptic hatch, valves for gas equipment and water supply. Inside a large object you can organize a recreation area, an area for children's games. It is very convenient to place a workshop or storage shed inside the mill for storing tools. Wood or stone is more suitable for its manufacture. The video presents master classes on creating decor from wood and stone.