Pros and fitness enthusiasts have a lot of tricks in their arsenal to quickly and effectively tighten their abdominal muscles. However, swinging on exercise machines, sometimes from the same angles and under repeated loads, often becomes boring not only for us, but also for our “abs”. In addition, they are contraindicated for some back injuries.
This is when it’s time to remember the leg and abs scissors exercise, familiar from kindergarten! About its fitness value, advantages, order of implementation, as well as “fine points” - in our article.
What muscles work?
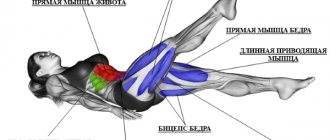
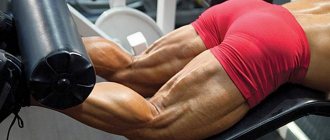
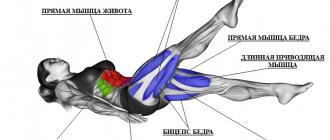
We are interested in the abdominal region, the so-called “abs”, and especially its lower part. The exercise actively involves the hip flexor muscles.
What other muscles are affected by this movement:
- Iliopsoas muscle (this is the “targeted” muscle)
- Synergists (rectus, adductor longus and brevis, as well as pectineus muscles; in addition, sartorius and tensor fascia lata)
- The transverse muscle, which is responsible for centimeters of the waist, maintains the balance of our body and gives beautiful posture
- The stabilizers are the quadriceps in combination with the rectus, oblique and transverse abdominal muscles.
In terms of visual effect, we sculpturally grind the “lower abs” of the abs, while the load is also distributed to the middle and upper abdomen. In terms of effectiveness, this movement corresponds to the “Bicycle” exercise.
Tips for implementation
Since many novice athletes do not have sufficient strength in their abdominal muscles, the biggest difficulty in performing the exercise is maintaining the straight legs off the floor during the entire approach.
If this leads to the fact that the exercise cannot be performed with the correct technique, then the number of repetitions in the approach should be reduced. In addition, while your abdominal muscles are not strong enough, you can perform the movement while resting on your elbows, which will make the exercise easier.
Exercise options
There are several variations of the exercise for more experienced ones.
- Keep your arms not pressed to the floor, but extended forward along the surface of the floor. As in the standard version of scissors, lift your extended legs up from the floor by about 15 cm. Then, as you exhale, lift each leg up in turn, without bending your knees, and smoothly lower it down as you exhale.
- Add an element of static load to the standard version of the exercise, for which you increase the duration of holding your legs in a raised position or perform the exercise more slowly.
- Also, to increase the intensity of the load, you can use additional weights in the form of special weights for the legs, which are put on the legs and secured with straps or Velcro. The weight of such weights varies; as a rule, weights weighing from 0.5 kg to 1.5 kg are used. The use of such weights will make the exercise even more difficult, which will certainly lead to an increase in its effectiveness.
Perform the scissor exercise regularly in combination with other abdominal exercises for best results. After about 2 months, you will see tangible results in the mirror that will definitely please you.
Benefits of exercise
Let's look at some of the beneficial properties of the exercise:
- The “Scissors” exercise is excellent for maintaining the tone of the abdominal muscles and improving its relief.
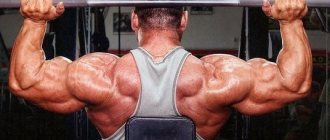
- It is one of the best exercises for working the lower abdomen (below the navel) - a rather problematic area for many. In addition, the entire muscle mass of the abdominal region is visually improved.
- A fairly large number of muscles work, both in active and static loads. The thighs acquire beautiful shapes, namely their medial and lateral areas.
- Systematic exercise helps narrow the waist and reduce fat deposits on it.
- The exercise can be used by people who have suffered back diseases and injuries. It promotes speedy rehabilitation after fractures and strengthens the muscles that are involved in walking and running. Flexibility and mobility of the lower spine develops.
- In addition, the exercise is well suited for postpartum exercises for women (preferably with the permission of a doctor, 1.5 months after birth).
- The technique of performing the “scissors” exercise is simple, and can be performed even by people without sports training. You need to start with a small number of approaches and repetitions and gradually progress the load.
- The exercise does not require a large space and can be performed at home and without any additional equipment.
The “Scissors” exercise can be considered one of the most effective exercises for the abdominal muscles (along with the “Bicycle” exercise) and is a complex movement, as a result of focusing the load on the entire range of muscles of the body.
Put these recommendations into practice, combine abdominal exercises with a proper diet, be consistent in achieving your goals and you can achieve excellent results. Success in sports!
How to do the “Scissors” exercise correctly - 4 levels of difficulty
Masters of the “black belt” of fitness will probably be bored reading about levels zero, one and two. However, we will conduct an educational program, following the slogan: “Art to the masses!” These are levels for beginners, people in periods of post-traumatic recovery, for women in the postpartum period, especially after a cesarean section. By the way, if you are overweight, it is also better to start from scratch , because of the possibility of overloading your back with your own weight.
In the ranking of the TOP 10 exercises for the hips and buttocks, “Scissors” take 7th place .
Zero level - 90°
- Starting position - assume a supine position. To make it even easier, you can grab with your hands any stabilizer behind your head (at home - any heavy piece of furniture, in the hall - the lower bar of a wall bars or any other fixed lever). The main thing is that during swings this object remains motionless and helps you keep your back and especially your lower back pressed to the surface. We pull our legs towards the body without lifting our feet from the floor, thus creating a popliteal angle of 30°.
- Adjusting your breathing . Always before any exercise you need to breathe a little “correctly” (half a minute or a minute is enough). That is, we breathe “with our belly,” inhaling slowly and relatively deeply (not to the point of dizziness!). Ideally, the rhythm of your breathing should set your body up for the work ahead. The easiest way is to start counting rhythmically from 1 to 10, alternately inhaling and exhaling for each count. During the exercise, you must adhere to the given breathing rhythm and not get lost.
- First approach. We inhale, tense our abs and quickly straighten our legs, lifting them up at right angles to the floor. Raising and lowering your legs quickly in the first step prevents your back from becoming overstrained. Next, you yourself should feel the height at which your back will not experience discomfort. If you feel noticeable tension in your back when descending from 90°, stay perpendicular. The abs, legs and back will work even at this height.
- Active phase. Let's do a “scissors” pattern by crossing our legs from side to side, not too wide. Rhythm is your breathing, set at the beginning. Two swings at the same time with each leg, inhaling and exhaling. Let's count to 10 (inhale - 1, exhale - 2, etc.). Mentally focus on the lower abs. Then quickly lower your shins to the starting position with your knees bent 30° and take 2-3 deep and intense breaths and exhales to relax. During this time, you can further relax your legs by stretching them out on the floor surface, but also quickly return them to their original position.
We make 3-5 passes of vertical scissors, preferably every day.
First level - 60°
We move on to it when you can painlessly lower your raised legs from an angle of 90° to a level of 60°.
- We start in the same way as the zero level, then simply lower our legs to an angle of 60°. We perform cross swings as described in the previous section. Then you can first raise your legs perpendicular to the floor again, and then follow the instructions as in the “0th” level.
- If there is no back pain, it is better to immediately lower your legs either to the initial zero level - with your legs bent, or to the floor without bending. Gradually achieve at this level that you raise your extended legs immediately from a lying position to a height of 60°.
Do it in three to five passes and slowly lower it to the floor.
Second level - 30°
After about a month of daily exercise, you can move to the 30° level.
- In the classic version of “Scissors”, the lower back is pressed tightly to the floor , the muscles of the upper back, shoulders and neck are as relaxed as possible. We place our hands under the lower back and buttocks, palms down. Legs at a height of 30°
- We do the same, making sure that the lower back is still, focus on the lower abdomen, and work to the given breathing rhythm. Important! Don't strain your neck muscles .
At a height of 60°, you can do a variation of the exercise - swinging up and down, which will add an effect for muscle tone, and it is this approach that works more on creating “cubes”.
The main thing is at least three repetitions at a time, and at least three times a week.
Third level - 10°
This level is initial for trained athletes. The procedure is the same, but we raise our legs at an angle of 10°. Swings can be done both horizontally and vertically, the main thing is not to touch the surface.
Gradually increase the frequency of the movement, doing 4 swings on one breath, and perhaps some “ninjas” will be able to do 6.
Pay attention! The legs should be straightened as much as possible and the toes should be pointed out.
The slower you raise and lower your legs from the starting position and back, the greater the load on your lower abs. Let's summarize. We can consider ourselves masters of the scissors exercise while lying on our back when we perform it painlessly with legs raised at 10°, 4 swings per rhythmic inhalation and exhalation (that is, in a little more than a second), at least three times 3 times a week .
For a better understanding of the angle at which your legs can be positioned, be sure to watch the video:
Who is indicated for therapeutic exercises?
Exercise therapy exercises are designed to develop the back muscles and ligaments: they relieve tension from overly stressed areas, activate unused muscle groups, and increase blood circulation. During exercise, the tone of the muscular system gradually becomes equalized, and it becomes easier for a person to keep the spine in the correct position. To eliminate deformities, exercise therapy classes should be carried out daily for a long time.
Prices for mats for yoga and fitness
Exercises need to be done daily
The indication for prescribing exercise therapy is curvature of the spine of 1st, 2nd and 3rd degree, S-shaped and C-shaped, as well as any posture disorders.
Degrees of scoliosis, degrees of spinal curvature
Types of Scoliosis
At the same time, a set of exercises is selected for each patient separately, taking into account age, degree of curvature, location and characteristics of the body. The most intense classes are prescribed for people with poor posture and grade 1 scoliosis; for more serious deformities, physical activity should be moderate. Remember that excessive activity, instead of a positive effect, can provoke a lot of complications.
| Degree of curvature | Characteristics | Treatment |
| 1 | The angle of curvature does not exceed 10 degrees, external changes are hardly noticeable. There is slight asymmetry of the shoulder blades, with some vertebrae protruding more than others. | Therapeutic gymnastics, massage. |
| 2 | The angle of curvature is from 11 to 25 degrees, the deformations are clearly visible. The spinal column is displaced to the side, the shoulders and shoulder blades are asymmetrical, and convex and concave areas on the back may be observed. | Complex exercise therapy, massage, physiotherapy. |
| 3 | The curvature reaches 26-50 degrees, arched deformations are observed, and a rib hump may form. Internal organs are compressed, displaced, and the patient experiences severe back pain. | Exercise therapy, breathing exercises, massage, wearing a corset. |
| 4 | Curvature of 50 degrees, severe deformation of the spinal column, presence of a hump in the ribs area. Internal organs are displaced, their functions are disrupted, and the patient feels constant severe pain. | Surgical intervention. |
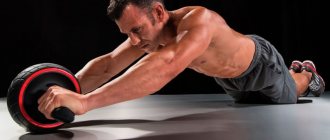
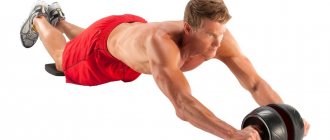
Lying on your stomach
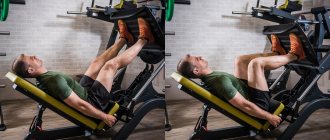
As you know, standing still means rolling back. Therefore, having mastered the classics, we move on to the 2nd grade of the “Scissors” exercise. Precisely - in a supine position. This type of exercise is most conveniently done in the gym on an abdominal pumping machine. But you can have this machine at home, or be creative - adapt a piece of furniture, as long as the surface is hard.
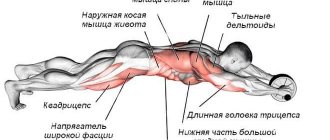
This “Scissors” configuration not only adds variety, but also significantly advances our body in understanding its own capabilities. Working in a prone position, we perfectly strengthen, first of all, the back, tighten the buttocks and the back walls of the thighs.
If you start this subtype after mastering the classics, feel free to work in the correct horizontal position, alternating 10-20 swings horizontally with 10-20 swings vertically. Use your hands to hold yourself motionless on the surface. It would be ideal if you now alternate classic “Scissor” days with “Reverse” days.
See also TOP 10 most effective exercises for the buttocks.
See also:
- How to get rid of cellulite on legs and buttocks - 5 methods
- Is it possible to remove excess muscles from a girl?
- The best complex for legs for 7 days
Types of "scissors"
There are only two varieties:
- Horizontal scissors. In this case, the legs are parallel to the floor;
- Vertical scissors. Move your feet perpendicular to the floor surface.
There is not much difference in execution technique. The only difference is the position of the legs when moving. You can alternate legs, changing horizontal to vertical positions as you go.
Complicated version
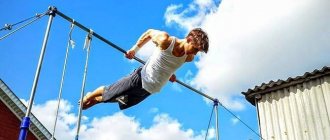
If you want to compete with yourself, do “Scissors” with your pelvis raised. To do this, from the initial lying position we move to the “tilted birch” position, holding the lower back and pelvis with our palms.
The main thing is to observe the principle of keeping your back motionless when swinging your legs.
Want to add an effect to give your abdominal wall more definition? Then, during the exercise, raise your body as much as possible, bending your elbows, as if performing an unfinished classic abdominal swing. Remain in this position throughout all approaches.
Do you like gymnastics machines?
Do cross leg swings while lying on your stomach on a large exercise ball. This is interesting! Bored of working only in the gym or at home? Try it in the pool, holding on to the ladder or side. “Scissors” will burn twice as many calories in water, just don’t overeat after training!
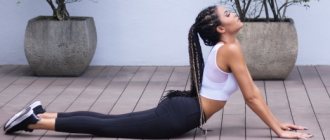
Bending the body back
The exercise is a yoga practice. This exercise should be taken up by people who do not have spinal health problems. The training is performed according to the following principle:
- being in a vertical stance, bring the feet together;
- taking a deep breath, raise the upper limbs above the head;
- simultaneously with a smooth movement of the arms back, make a slight bend in the back;
- As you exhale, hold your breath and then return to the starting position.
To stretch your back, do 3-4 such bends with your torso. You should not bend your spine too much or hold your breath for a long time.
4 more benefits
So, after we have considered all possible movement options, we will briefly list the advantages:
- You are working with your own body , therefore, at a minimum, it is insured against serious overload. As a result, this exercise is universal. It can be performed by both children and adults. Moreover, professional bodybuilders and amateurs will benefit equally. This activity is suitable even for people with back injuries, and in some cases can be included in a complex of post-injury therapy. The exercise is extremely useful for getting rid of unpleasant signs of pregnancy.
- The movement is easy to perform , can begin with small loads with a gradual increase, due to which people can safely start it without preparation.
- It does not require additional equipment and too much space
- The “Scissors” exercise is one of the ten best exercises for the abdominal muscles (along with the “Bicycle”) and is considered a complex exercise due to its focus on the entire spectrum of muscle mass components. At the same time, its effectiveness allows you to resort to training sometimes no more than twice a week with maximum benefit for almost the entire body.
Follow our instructions, achieve your goal, stick to a healthy diet, be positive - and you are guaranteed a flat stomach, toned thighs and buttocks, general vigor and a great mood!
Contraindications
Therapeutic gymnastics in some cases may be contraindicated in whole or in part, until the risk factors for complications are eliminated. Some patients can perform exercises only in a physical therapy room, under the supervision of a specialist. All this is determined by the attending physician during the examination, but it is impossible to independently assess the health risks.
Some patients should exercise under the supervision of a physical therapy doctor
The main contraindications for prescribing exercise therapy are:
- scoliosis 4 degrees;
- accelerated progression of the disease;
- serious dysfunction of the cardiac or respiratory system;
- high intracranial pressure.
Scoliosis 4 degrees
Reasons for temporarily stopping classes:
- exacerbation of chronic diseases;
- infectious and colds accompanied by high fever;
- postoperative period;
- increased pain in the spine after physical activity.
If you experience severe pain, stop training temporarily.
Exercises should not be performed until the condition has stabilized, so as not to provoke deterioration. If pain or discomfort is related to your back, be sure to tell your doctor and do not try to solve the problem on your own. The spine contains many nerve endings that are often pinched due to deformation of the vertebrae. When examined in a clinic, it is easy to identify problem areas and eliminate the cause of pain, but this is unlikely to be done at home. And the more neglected the condition, the more difficult it will be to cope with it.
Hypertensive patients, heart patients, and patients with chronic gastrointestinal diseases should practice under the supervision of a doctor. The same applies to pregnant women over 3 months of age: at home it is difficult to control the distribution of the load, so it is better to practice in a physical therapy room with an experienced specialist.
Preparing for training
Before training begins, you need to select scissors. It is advisable to find special scissors for children, as they are safer and brighter than ordinary ones. Moreover, children's scissors can be selected to the appropriate size based on the size of the baby's hand.
It is very important that the tool is sharp, as scissors that are not sharp enough will wring or tear the paper instead of cutting it.
Another important feature of children's scissors is the rounded nose. This makes the tool safer, because it will be more difficult for a child to inject himself or a friend. Scissors for children are decorated in bright plastic and are often in the shape of different animals. This also makes the item safer. Special scissors are made for left-handed people, since when using regular scissors, they cannot see the cutting line, and the paper breaks.
Before you put scissors in your hands, you should talk about the rules for using scissors. We need to show how to correctly pass scissors to other children and adults. And explain why you need to hand over this item to another person. Next, be sure to tell them that the scissors are intended exclusively for cutting paper and prepared materials. Books, mother's hair, father's documents, cat's whiskers, curtains, etc. are not suitable for working with scissors.
To prepare your child’s hands for a new type of action, start developing your baby’s fingers.
- Draw with your fingerprints on a piece of paper. By the way, then you can invite your child to cut out some of these drawings.
- Create figures from dough or plasticine with your child. The sculpting process develops the fine muscles of the fingers very well.
- Tearing paper into small pieces with your fingers. For this, you can take colored magazine leaves, and also use torn paper for crafts and applications.
- Give your child a small syringe, teach him how to squeeze it correctly so that water gets in and then releases the water. Most children are delighted with playing with water.
When your fingers are prepared and already strong enough, you can move on to getting acquainted with children's scissors. And the first thing to do is show your son or daughter how to hold the scissors correctly, what is their correct position in the hand.
Overview of Disc Degeneration Diseases
The intervertebral disc is a cartilaginous connection of the vertebral bodies that stabilizes them and the spine as a whole. The disc also facilitates multiplanar movements and helps absorb stress on the spine. The disc consists of three parts: the outer layer is the fibrous ring, in the center is the nucleus pulposus and 2 hyaline cartilages - the end plates (64). The ring, consisting of an inner and outer component, contains multiple layers of collagen fibers consisting mainly of type I and type II collagens (39). The ring resists outward pressure, known as circumferential stress, during axial compression and stabilizes the spinal joints during movement (138). In addition, the ring serves as a container for the inner core, which has a gel-like structure consisting of a mixture of chondrocytes, collagen, elastin, and glycoproteins (130). Glycoproteins resist compressive stress due to the glycosaminoglycans (GAGs) they contain (114). GAGs are long chains of polysaccharides that attract and bind water, creating osmotic pressure. The core functions as a “water cushion,” helping the vertebrae cushion under axial load and distribute pressure evenly across adjacent endplates (111). The end plates contain predominantly type II collagen (55), are less than 1 mm thick, and their fibers extend into the disc (138). In addition to preventing protrusion of the nucleus into the adjacent vertebra, endplates also help absorb hydrostatic pressure caused by spinal loading (26, 81) and allow for the diffusion of nutrients (131).
Degenerative disc disease is a multifactorial process involving genetic, mechanical, biological, and environmental factors (59). The first general signs of degeneration often appear between 11 and 16 years of age. Approximately 20% of adolescents have mild disc degeneration (79). Mild signs of degeneration (formation of small clefts and granular changes in the nucleus) are observed at the age of 2 years (21). The disease tends to progress with age and by age 70, signs of degeneration are observed in most discs (79). Age-related degeneration includes a decrease in the content of glycoproteins and collagen (114), a five-fold decrease in the charge density (mechano-electrochemical force value) of GAGs in the nucleus (60) and a two-fold decrease in the level of hydration when comparing discs of young and 80-year-old people (129), which reduces the height of the disc and its ability to withstand loads (8, 22). Men have more severe disc degeneration than women due to greater trunk strength, increased lever arms, greater external loads, and distance for nutrient diffusion (79).
Intervertebral disc degeneration can manifest itself in the annulus, nucleus, and endplates (7). Age, apoptosis, and glycoprotein abnormalities may contribute to degeneration (71). With disc degeneration, localized endplate cartilage defects appear, the nucleus becomes more consolidated and fibrotic, and the number of annulus layers decreases (119). This results in decreased disc height, decreased spinal biomechanics and load-bearing capacity (99), and, in some cases, can lead to spinal stenosis, the most severe degree of disc degeneration that causes compression of the contents of the spinal canal, particularly the neural structures ( 93). Endplate calcification also contributes to disc degeneration by reducing nutrient diffusion, leading to changes in pH balance and increasing nuclear inflammation (34). Although there is a clear association between spinal degenerative changes and increased incidence of low back pain (LBP) (65), many people remain asymptomatic (19, 20, 139).
Notes[edit | edit code]
Stretching the muscles that flex the leg at the hip joint In its useful qualities, the scissors exercise is in many ways similar to the bridge on the shoulders, but it makes more demands in terms of pelvic stability, since both legs are suspended and make movements in a wide range. As in the previous exercise, here the pelvis rests on the hands, and the back is slightly arched in the lower back. Therefore, skillful stabilization of the pelvis and spine is very important to protect the lower back from injury and to gain maximum benefit from stretching the hamstrings and hip flexors.
Stretching the muscles that flex the leg at the hip joint
. Analyzing the bent leg raise while lying on your back, we have already said that the muscles that flex the leg at the hip joint, in particular the powerful iliopsoas muscle, are attached to the front of the pelvis and to the spine. When the leg drops and the iliopsoas muscle stretches to its resting length, it tends to tilt the pelvis forward instead of stretching further. If you keep your pelvis in a stable position, then as you lower your leg further, dynamic stretching occurs, that is, the muscle stretches even more. Learning to stabilize the pelvis to effectively stretch the iliopsoas muscle is an important skill for correcting poor posture, particularly a persistent arch in the lumbar region (lumbar hyperlordosis). Additionally, many Pilates exercises, particularly the 100 and straight leg rolls, use the hip flexor muscles to hold the legs suspended without movement, which can lead to stiffness. Thus, stretching exercises are of great benefit in increasing the flexibility and elasticity of these muscles that are important for posture.
Modifications
If you are unable to maintain pelvic stability or experience lower back discomfort, try this exercise with your pelvis and lumbar spine in a neutral position and support with your arms closer to the lower back rather than the pelvis.
Option
As when performing rolls with straight legs, in the 1st phase you can bend your knees to collect your whole body into a tight ball. Supporting your pelvis with your hands in this position, straighten your legs so that they point vertically upward. Then start moving your legs in different directions. In the position of maximum leg extension, make two muscular efforts, accompanied by active exhalations, to spread your legs even further. This breathing pattern is similar to the one we used for the hamstring stretch. When spread, both legs should be at the same distance from the vertical line, forming something like the letter “V”.
Hiking
Try to walk whenever possible. Reserve an extra 30 minutes before work and choose to walk instead of taking the bus or simply get off at the stop earlier than you need to.
Find more reasons to get up from your desk and go somewhere: during a free moment in the office, take a walk along the corridor or go to lunch two or three blocks away. Walking is one of the easiest and most effective ways to keep your circulation in good condition. Try to walk in the fresh air for at least 20 minutes a day.
For beginners
Before starting the lesson, you need to warm up. It will not take much time (5-7 minutes is enough), it will help warm up the ligaments and improve blood circulation.
Joint gymnastics, including rotation of the knees, feet, and hip area, is well suited. After this you can start executing:
Take the starting position. To do this, lie on your back and stretch your legs. Hands are placed along the body. You can grab them onto a fixed support from behind (a wall unit, a protruding edge of heavy furniture). Pull the feet towards the body, creating a 30 degree popliteal bend.
Correct breathing. Count silently from 1 to 10, adjusting each number to the phases of inhalation and exhalation. In the future, they adhere to the specified respiratory rhythm.
Perform swings. Raise your legs perpendicular to the floor (90 degree angle), spread them slightly wider than your shoulders. At the same pace, bring the right limb behind the left and vice versa.