Osteochondrosis is a serious pathology that significantly reduces the patient’s quality of life. It is especially dangerous when localized in the cervical region, since the negative impact spreads to the brain. The main method of treatment is special gymnastics aimed at working the deep and superficial cervical muscles. Among the many techniques developed by famous specialists in the field of back diseases, Dr. Shishonin’s set of exercises is rightfully considered the most effective. What is Shishonin gymnastics for cervical osteochondrosis, and how to perform it correctly?
Shishonin gymnastics for cervical osteochondrosis
Purpose of the technique
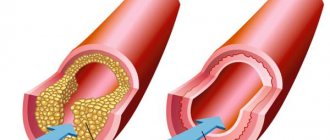
Osteochondrosis is characterized by pathological changes in the tissues of the spine, which is manifested by such unpleasant symptoms as pain in the back and neck, limited mobility, and impaired sensitivity in the extremities. The more the disease progresses, the more painful the manifestations, and over time the condition only gets worse. Osteochondrosis does not go away on its own, and in an advanced state, even complex treatment does not guarantee a complete cure of the disease, and therefore you should seek help as early as possible.
Osteochondrosis in the cervical region leads to serious consequences, including pinching of the spinal nerves and destruction of the vertebral bodies
The purpose of Shishonin’s technique is:
- elimination of pain caused by degenerative processes in the spine and accompanying pathologies;
- restoration of normal blood and lymph circulation;
- normalization of metabolic processes in the tissues of the spine;
- relieving swelling and muscle tension;
- improving the patient's well-being.
All this is achieved through the active work of the neck muscles, and the main condition for obtaining tangible results is regular exercise for 1-2 months.
Regular exercise will help you quickly get rid of painful neck pain.
If you want to know what to do if there is an exacerbation of osteochondrosis of the cervical spine, and also consider the symptoms and effective treatment methods, you can read an article about this on our portal.
Making a rod
If the decision to make a barbell has been made, you need to decide on the material that will be the basis for the barbell - this is the most important point. The base for the bar must be strong; you can use metal or wood.
A metal bar will add extra weight; if this is not desired, a wooden bar base can be used. It is important that the diameter of the bar is at least 4 centimeters, otherwise it will be difficult to grasp the barbell.
The main differences between Shishonin gymnastics
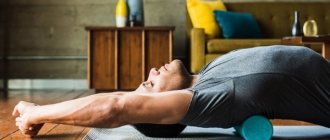
What is the reason for the high effectiveness of Shishonin’s gymnastics? Unlike other methods based on physical exercises, this gymnastics is less traumatic and easy to perform even with severe damage to the vertebrae, when any movement causes excruciating pain. All exercises included in the treatment complex are performed very slowly and do not require much effort. The classes do not require any exercise equipment or sports equipment, and the surrounding conditions do not matter. You can practice in any room and at any time when you have 10-15 minutes free.
Shishonin gymnastics can be performed both at home and in the office
The complete complex consists of three parts:
- warming up the neck muscles;
- basic exercises;
- self-massage.
The best result is achieved by the full complex, but if for some reason it is not possible to devote more time to classes, the main emphasis is on exercises. At an early stage, such gymnastics allows you to completely restore the health of the spine, but in a more severe form you can only reduce symptoms and alleviate the patient’s condition.
The main emphasis is on basic exercises aimed at working deep and superficial muscles.
Important! Shishonin’s gymnastics are indicated not only for osteochondrosis, but also for a number of other diseases: intervertebral hernia, spinal curvature, hypertension, migraines, insomnia. As a preventive measure, it is recommended for sedentary work and a sedentary lifestyle, as well as for people exposed to psycho-emotional stress.
Benefits of Shishonin gymnastics
Streetlifting training program
How to Train and Improve Your Pull-Up Performance with Extra Weight
Below you will find a basic plan that will take your weighted pull-ups up to an acceptable level, such as 50% of your body weight (pull-ups with an additional weight equal to ½ your body weight).
Step 1: Increase bodyweight pull-ups to 12-15 reps
The first step of the plan is to increase your pull-ups to 12-15 reps in a row.
There are many training programs that will get you to this goal, but we advise you to stay away from programs that promise quick results in just a few weeks. Most of them don't work and can even cause harm. Besides, there is no point in rushing, because no one is going to give you a million dollars to quickly achieve your goal.
In fact, it will take you at least a couple of months to go from doing zero pull-ups to doing 15 pull-ups in a row with good form. At the same time, if you have been eating a lot of unhealthy food in recent years, then it will take much longer. Pull-ups are not liked by fat people in general. This goal is much easier if you are thin.
At one time I used the following program to get from 3 pull-ups to 14.
Frequency: pull-ups every 4 days
programming
Here's what your workout would look like if you could do 3 pull-ups in one set.
Day 1: 3,2,1,1,1,1,1 (10 reps total) Day 2: 3,2,2,1,1,1,1 (11 reps total) Day 3: 3,2,2 ,2,1,1,1 (12 reps total) Day 4: 3,2,2,2,2,1,1 (13 reps total) Day 5: 3,2,2,2,2,2,1 (14 reps total) Day 6: 3,2,2,2,2,2,2 (15 reps total) Day 7: 3,3,2,2,2,2,2 (16 reps)
Day X: 3,3,3,3,3,3,3 (21 reps)
Guidelines. Add one rep to the simple sets until you've done the same number of reps for all sets. Then take a few days off, test your max reps per set, and start a new cycle.
Day 1: 7,6,5,4,3,2,1 Day 2: 7,6,5,4,3,2,2 Day 3: 7,6,5,4,3,3,2 Day 4 : 7,6,5,4,3,3,3 Day 5: 7,6,5,4,4,3,3 Day 6: 7,6,5,4,4,4,3 Day 7: 7 ,6,5,4,4,4,4 Day 8: 7,6,5,5,4,4,4
….
Day X: 7,7,7,7,7,7,7
Follow the plan until you reach 12-15 reps per set with good form. I know this procedure may seem slow to you, but it works and is beneficial for people who are not genetic freaks.
You can change the program according to your needs. Actually, that's what I came up with. This is inspired by Pavel Tsatsouline's workout routine.
The original routine requires daily training, but I have found that training every 4 days works better for people with average recovery.
Rest between sets
Keep rest periods short at the beginning and add more time as you progress. How many? At least for a few minutes.
Can I start with weighted pull-ups directly?
I've heard of people adding weight immediately after reaching 5 reps in a row. I don't like this method. The purpose of high reps is to train your body to feel tighter. In the long run, this method won't slow you down one bit. If anything, you're building a strong foundation and preparing your joints for the real hard work. However, remember that you have no masters. Do as you see fit.
Step 2: Linear Progression Once you can do a decent number of pull-ups, it's time for some linear progression (LP).
The first workout might look like this:
Light warm-up consisting of 1-2 sets of bodyweight
Dip/Pull-Up Belt Set
Start doing sets of five with extra weight and stop when the difficulty increases to medium.
The last set should be difficult, but not impossible. You should be able to complete at least 2 more reps if you push yourself. If this is not the case, you have added too much weight - reduce it for the next workout.
This is how you arrive at the starting point of linear development.
For your next workout, add some weight and try doing 5 reps for 1-2 working sets after warming up. Continue adding more weight each workout until you start missing reps.
At this point you have two options - switch to threes and keep pushing, or simply reduce the weight and hit a new personal best for a set of 5 again.
Important Notes
Weighted pull-ups do not tolerate high frequency because the load on the elbow joint is high. Even if you don't feel irritated right away, the accumulation of strong impacts will soon catch up with you. That's why I only do weighted pull-ups once a week.
Here is an example workout
Set 1: 5 reps of body weight Set 2: 5 reps of body weight Set 3: 3 reps with 5 kg/10 lbs Set 4: working set – 5 reps with 10 kg/20 lbs Set 5 – same as 4.
Rest between sets: 3-8 minutes
Step 3: Cycling Once the linear progression has been exhausted, it is time for more advanced training cycles. I can't say exactly at what weight this will happen, but most people end their linear progression at around 30-45% body weight.
Note: I explained how cycling works in more detail in this post.
Weighted pull-ups require small jumps. You will be stuck in a 1-2kg/2-5lb progression. Hence, you may need some microbalance.
When you do pull-ups with 25kg/55lbs, the 1kg/2.2lbs jump is about 5-7% of the total weight. For comparison, 5kg/11lbs is the same percentage as a 100kg/225lbs squat.
A pull-up is simply a lift that relies on small joints. Jumping between workouts should reflect this. The percentage, however, remains the same compared to larger climbs.
Here is an example program.
Let's say your linear progression ends at 25kg/55lbs.
A 6 week training cycle can actually increase the load by about 2.5kg/5lbs. This makes the pull-up 27.5 kg / 60.5 lbs.
Select this weight for the sixth week and reduce the weight by 5-7% over the previous 5 weeks.
Week 1: 20 x 5 Week 2: 21.5 x 5 Week 3: 23 x 5 Week 4: 24.5 x 5 Week 5: 26 x 5 Week 6: 27.5 x 5
After this cycle, you can start a new one, aiming for a PR of 2.5kg/5lbs.
Week 1: 20 x 5 Week 2: 22.5 x 5 Week 3: 25 x 5 Week 4: 27 x 5 Week 5: 28.5 x 5 Week 6: 30 x 5
Reality check: In the best case scenario, you will never miss a replay during the entire cycle. However, sometimes this happens, especially in recent weeks.
Example:
Week 1: 20 x 5
Week 5: 28.5 x 4 – The weight felt like a heavy refrigerator hanging from your waist. Great. Don't kill anyone around you yet. Just cut week 6 down to three, complete the cycle and choose a more appropriate weight next time. Finding the root of the problem. You may need a few extra workouts to reach the top, or it may have been one of those "boss made me stay until 4am" days.
After a few cycles, you will achieve a 50% pull-up within 3-5 reps. This is the basic level. Think of it as a 2 BW deadlift - it's not as impressive, but it's pretty decent, and anything higher takes you closer and closer to the elite level for natural.
Frequently Asked Questions Should I do pull-ups or chin-ups with this routine? I prefer ring and neutral handle pull-ups because they place less stress on the elbows and wrists compared to a straight barbell. This could potentially allow you to exercise more frequently.
The ring pull-up and chin-up will allow you to lift the most weight, but the former is a friendlier joint. The chin is killing your wrists below.
Don't worry about dogma. Just choose what is most convenient for you. In most cases this will be a ring or neutral tackle option, but if it's not - who cares?
The good news is that regardless of your choice, there will be a significant transition to all other versions. Just select one and continue. Good luck.
Disclaimer: Be careful when performing this or any other routine. Listen to your body carefully. If something is bad, just stop and evaluate. NattyOrNot.com is not responsible for pain or injury caused by workouts inspired by the site.
Streetlifting is intended for people who already have a basic level of training. Street lifting is the next level of workout and can be difficult for people who are just starting to train.
PREREQUISITES FOR STREET LIFTING: • At least 15 pull-ups with good technique • At least 20 dips • At least 25 push-ups
If a person is able to perform this with perfect technique, he can begin street lifting training. Subscribe to the newsletter to receive a streetlifting training program, but in the meantime, we suggest that you familiarize yourself with the programs in the following areas: – Max weighted pull-ups – Max weight push-ups – Multi-rep weighted pull-ups – Multi-rep weighted push-ups
Streetlifting will give you the opportunity to gain the most muscle mass you could ever have. Therefore, if you have mastered the art of workout, street lifting should be your next goal.
Conditions for performing exercises
You can achieve maximum effectiveness from gymnastics only if several conditions are met. First of all, this concerns time restrictions for training: exercises should not be done if there is a sharp increase in body temperature, acute pain in the neck and severe dizziness. You should also stop exercising if you have nosebleeds. Shishonin’s gymnastics has no absolute contraindications, and after you feel normal, you can start exercising without fear.
If you have acute pain in the neck, you should not do gymnastics.
And now about the basic rules:
- You need to do the exercises in full, every day, devoting 20-25 minutes to exercise. To improve performance, you can exercise twice a day for a month. In the future, it is enough to train once 3 days to keep the cervical ligaments and muscles in shape;
- When performing movements, be sure to monitor your breathing and maintain your posture, avoid sudden bends, jerks, and turns of the neck;
- the poses indicated in gymnastics should be held for some time - at the initial stage for 10-15 seconds, in the future - at least 30 seconds;
- the load should be gradual, so there is no need to make maximum efforts in the first classes. Between exercises, be sure to rest your muscles for at least half a minute.
Important! Despite the ease of performance, gymnastics puts a certain strain on the muscles, so excessive zeal in the first classes can result in a sharp deterioration in the patient’s condition. This is especially true for older people and those whose osteochondrosis is accompanied by complications - high blood pressure, migraines, problems with the respiratory system, and so on.
In old age, exercises with osteochondrosis need to be done very carefully.
Boxing bandage
By the end of this article, you should know everything to bandage your hands correctly the first time, as well as choose a quality pair of bandages without wasting money on low-quality products.
Like us on Facebook
Why trust me
During my athletic career, I have trained in MMA, Muay Thai and boxing gyms in many countries around the world, using many different hand wraps from at least 12 different brands. I used bands in both training and sparring. I've also tried other wraps that didn't have velcro and loops (old school) to newer brands you can buy, so I have a pretty good idea of what's good and what's not. This article is my experience and will give you a detailed guide on how to choose the right hand wraps.
Why use bandages
A good pair of boxing/muay thai wraps will protect your hand, fingers and wrist when impacted. Never put on gloves without wrapping them, as you could sprain your wrist, damage your knuckles, cause serious injury and be out of training for a long time. Properly protecting your hands is key, especially if you exercise regularly. That's why it's important to know how to properly wrap your hands before training. A good pair (actually several pairs) of hand wraps, besides your boxing gloves, is the most important piece of your Muay Thai equipment. And that's why you have to buy the RIGHT bandages. A bad pair of wraps will waste your time, provide poor protection, and chafe your joints.
Best Muay Thai - Boxing Bandages
If you are looking to purchase a new pair of hand wraps, I suggest you get stretchy cotton hand wraps. These are the best wraps for boxing and muay thai. They are a little more expensive than non-stretch cotton ones, but they don’t cost a lot of money and they can be bought at any sports store or ordered online.
Bar racks
Racks are needed to make it easier to use the barbell, easier to pick it up and put it in place. You can use drawings and dimensions for the bar to understand how much space the entire structure, including the bar racks, can take up.
Note!
FIFA 22 (PS4)Why do you need interior dolls?
- How to choose shoes that don't go out of fashion?
Making weight plates
Making pancakes for the bar is not difficult, since even ordinary plastic bottles are suitable for pancakes. These bottles need to be filled with something heavy, it can be cement, sand and stones, and even plain water. What the bottles will be filled with depends only on how much weight is needed, large or not.
You can use 1.5 liter bottles, as well as 2 liter bottles, it all depends on the desired weight. To make such pancakes, just fill them with the desired contents, and then put them on the ends of the bar and securely attach them with tape.
Rocky (1976)
Training:
- Run.
- Run up the steps (Rocky had 72 steps up to the Philadelphia Museum of Art).
- Speed work with a punching bag.
- One-arm push-ups.
- Push-ups with clapping.
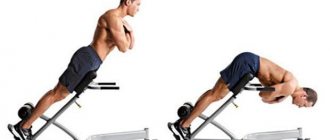
- Press, lifting the body (“Roman chair”).
- Boxing with a big bag.
- Sprint.
The daily distance that Rocky ran was 48 kilometers. Seriously. Philadelphia magazine made special calculations, according to which Rocky ran about 48 kilometers plus the steps to the museum during this scene in the film. 
Speed work with a punching bag
Abs, lifting the body (“Roman chair”)
Workout soundtrack: Bill Conti - Going The Distance.
Back fat: causes in women and men
As a rule, deposits with folds in the back area appear in people who lead a sedentary and sedentary lifestyle and are overweight.
“The reason for this phenomenon is deeper than it might seem at first glance,” says Yulia Malenchuk, X-Fit expert in Russia . - In most cases, these people also experience some kind of lower back problems caused by weakness of the back muscles. Weak muscles cannot provide sufficient support and stabilization to the lumbar region. Therefore, our body, in an effort to protect the spine, accumulates fat deposits in its area in order to provide at least some kind of stabilization.” Therefore, just adjusting your diet and reducing the fat layer will not solve the problem: even if the fat goes away, the functional muscle problem will remain. Moreover, problems with posture and spinal diseases may be added.
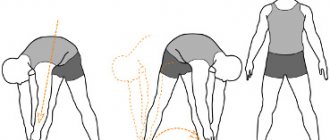
However, individual “exercises to get rid of your back” (it is in these terms that practitioners sometimes ask the coach for a training program) will not help on their own. As we just said, the reason is that the muscles in the back and lower back cannot do their job. This means that you need:
- Strength and functional exercises: deadlifts, balance, etc.
- Proper nutrition to reduce body fat.
- Cardio training to create an energy deficit.
This way, on the one hand, you will remove the reasons why fat is deposited, and on the other hand, you will help it burn.
Materials for making rods and stands
- Wooden or iron base for the fingerboard.
- Plastic bottles for making pancakes.
- Any bottle filler.
- Cement if you need a lot of weight.
To specifically see a homemade barbell, you need to go to any website and look at photos of homemade barbells, this will help you better understand the process of working on the design.