The plank exercise is a great way to strengthen not only the abs, but also the entire muscle corset, increase muscle strength and endurance, make your silhouette fit and improve your well-being. The plank has dozens of variations, varying in degree of difficulty, however, they are all performed based on basic techniques. The exercise is used in fitness, yoga, Pilates and various health practices. Let's look at what muscles work in this exercise, how to perform it correctly and what results it gives.
Muscle work
The main muscle groups that support the body in a straightened position during the plank are the abs and back. In addition, the muscles of the chest, shoulders, front surface of the thighs and buttocks are included in the work. In other words, the distribution of the load among the muscles when performing the classic version of the exercise (standing on the elbows) is as follows:
- Abs, especially the rectus abdominis. The abs bear the main load - the abdominal muscles prevent the body from sagging down under the influence of gravity.
- Back muscles, especially the lower part. They support the body in a straight position, tighten the ribs, and pull the arms towards the body, allowing you to stabilize the angle between the body and the shoulders.
- Pectoralis major and deltoid muscles. These muscles allow you to hold yourself up in your shoulders without sagging your chest down.
- Gluteus maximus, quadriceps, calf muscles. These muscles ensure the level position of the legs and pelvis.
Looking at the list above, we can safely say that the plank trains almost all the muscles of the body. Variations of this exercise allow you to increase the load or shift its emphasis to certain muscle groups.
The classic plank exercise (sometimes also called a “plank”) is an isometric exercise. This means that if you do it correctly, there is no movement in the joints, i.e. the pose remains static. However, there are also dynamic options, including turning the body, raising and lowering the arms or legs.
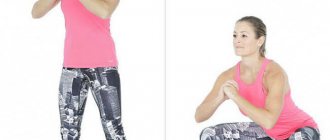
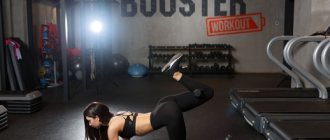
Side plank - execution technique
This type of load involves additional muscles of the chest, back, arms and legs and is especially effective in combating fat deposits on the sides.
How to do it: lie on your side, raise your torso and lean on your bent elbow. We place the left hand on the thigh. We tighten our abs and maintain balance, leaning on our forearm and foot. Start doing it for 20-30 seconds, gradually increasing the time. Repeat the exercise on the second side. Make sure that the body does not sag, the buttocks are tense and fixed in one position. The legs are brought together so as not to increase the load on the joints.
Simple and complicated versions of the side plank
If the exercise is difficult, you can make the task easier by leaning on your knee. Make it more difficult by using support on two points. Take a classic plank position. Raise your free arm and leg up, but do not bend it, but keep it straight.
Benefits of planks
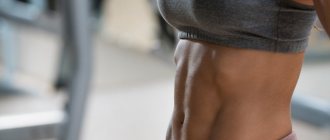
The plank is not an exercise designed to build six-pack abdominal muscles. Its benefit lies precisely in the comprehensive strengthening of the entire muscle corset. The volume of muscles does not increase during its implementation, but the muscles become toned, their strength and endurance increase.
The benefits of the plank exercise are as follows:
- There is a strengthening, development of strength and endurance of a large number of muscle groups (abs, back, legs, chest, shoulders).
- The stomach tightens, the waist becomes narrower, the looseness of the silhouette disappears, which is very useful in the process of losing weight.
- The position of the lower spine is stabilized. At this point it is worth saying that if you have diseases or injuries to the spine, you should consult a doctor before performing the exercise. Sometimes increasing the tone of the muscles surrounding the damaged area may be contraindicated.
- The skill of holding the body straight is developed. This will greatly help you both in everyday life and when you do other fitness exercises, such as squats.
In addition to the above, it can be noted that you do not need any additional equipment for training. You can exercise at home, in the gym or anywhere.
We make a schedule for the month
Despite the fact that the duration of the approaches is selected individually, general recommendations for a monthly training schedule still exist. They consist of gradually increasing the volume of training and its duration. By following this method, you will achieve excellent results and make your body stronger and more resilient. Let's start with the classic plank and short approaches. Looking back at the end of the month, you will be surprised to find that you have increased your approach time several times.
Here's another example of a monthly training schedule (with rest on certain days):
| 1 day - 20 seconds | Day 16 - 2 minutes |
| Day 2 - 20 seconds | Day 17 - 2 minutes |
| Day 3 - 30 seconds | Day 18 - 2 minutes 30 seconds |
| Day 4 - 30 seconds | Day 19 - rest |
| Day 5 - 40 seconds | Day 20 – 2 minutes 30 seconds |
| Day 6 - rest | 21 days - 2 minutes 30 seconds |
| Day 7 - 45 seconds | Day 22 - 3 minutes |
| Day 8 - 45 seconds | Day 23 - 3 minutes |
| Day 9 - 1 minute | Day 24 - 3 minutes 30 seconds |
| Day 10 – 1 minute | Day 25 – 3 minutes 30 seconds |
| Day 11 - 1 minute | Day 26 - rest |
| Day 12 – 1 minute 30 seconds | Day 27 - 4 minutes |
| Day 13 - rest | Day 28 - 4 minutes |
| Day 14 - 1 minute 30 seconds | Day 29 - 4 minutes 30 seconds |
| Day 15 – 1 minute 30 seconds | Day 30 – 5 minutes |
Will planking help you lose weight?
The effectiveness of the plank for weight loss, like any other exercise, is measured by how much energy you expend on doing it. In other words, you shouldn’t consider it as a magic remedy that will help you lose weight. Dynamic variations of this exercise burn more calories than static ones.
Regular planking, along with diet, helps to get more pronounced results in the process of losing weight.
In general, you can create an entire workout solely from planks. However, such monotony will quickly tire you. Therefore, it would be correct to combine the bar with other physical exercises. The weight loss effect will appear if you spend more energy than you get from food.
Visually, the bar helps make your figure slimmer by toning the abdominal and side muscles. In principle, this provides good help for starting to lose weight.
Reverse plank - execution technique
This variation is similar to the classic position, but done in reverse: your body resembles a coffee table. The reverse plank is especially recommended for people with back pain. In this technique, the time that you stand is not so important as the correctness of all actions.
Reverse plank
How to do it: sit on the floor and straighten your legs. Place your palms on the floor and spread your fingers to distribute the load evenly. We tilt the torso back to the floor at an angle of 45 degrees. We place our hands behind the buttocks in line with the shoulders. Raise your torso, legs and butt until they are extended in a straight line. We tense our abdominal muscles. We start with 20 seconds and increase the time. Slowly return to the starting position.
Reverse plank with leg raised
Tip: If you feel your hips starting to sink, stop and do another set after a minute.
The most common mistakes when performing a reverse plank are the head thrown back/chin pressed to the chest/non-compliance with the geometry of the exercise. When the load goes into the hands, the remaining muscles stop working at full strength.
With limb extension
How to do the exercise correctly
There are essentially two classic versions of the exercise:
- in emphasis on straight arms;
- resting on your elbows.
Doing the exercise on straight arms is easier than on the elbows. This is explained by the fact that in this case most of the weight of your body falls on your legs, which is quite common, the load on the upper body is less and it is easier to maintain the position of the body. When you lower yourself onto your elbows, the distribution of weight between the points of support changes. You have to make much greater efforts to maintain your body in an even position.
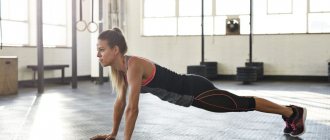
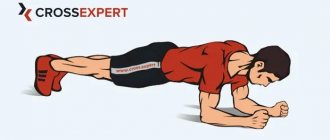
Technique for performing the plank on straight arms:
- Take a resting position on your palms. Place your hands directly under your shoulders. Your entire body should be in a completely straight line. That is, you keep your back straight, without bending in the lower back (your pelvis is slightly twisted), your legs are in one line with your back - your buttocks do not rise up, your stomach does not sag down (your abs are tense). Pay special attention to the position of your shoulders and neck. The chest should not sag between the shoulders. The neck is an extension of the back, the gaze is directed to the floor, there is no need to raise the head. Your legs are straightened at the knees, you rest on your toes.
- Stay in a static position for as long as you can. Continue standing until your technique begins to break down due to muscle fatigue. The fact that the muscles begin to tremble in the last seconds is a normal phenomenon. As soon as you feel that you are no longer able to maintain the pose correctly, lower yourself to the floor, rest a little and repeat the exercise 1-2 more times.
Technique for performing with straight arms.
As for the width of the feet, it is not of key importance. The wider your legs are, the easier it is to do the exercise. Feet together - a more complicated option.
Technique for performing the exercise with emphasis on the elbows:
- The starting position is the same as in the previous version, only you place your hands not on your palms, but on your forearms. The elbows are located strictly under the shoulders, the body, neck and legs form one line. Make sure that there is no deflection in the lower back, the buttocks do not rise up, and the stomach does not sag.
- Stay in this position for as long as possible. Repeat the approach 1-2 times.
Technique with emphasis on the elbows.
Many practitioners have a question: how long should you hold the bar and how often should you perform this exercise?
If holding the plank “as long as possible” seems too vague to you, start with 30 seconds. After you master holding the pose for 30 seconds in three approaches, increase the time by 10 seconds and hold for 40. So, gradually strive to achieve three minutes in one approach. If you have reached a good level of fitness, start mastering more complicated variations of the exercise.
You can do the plank as often as your time and desire allow. It's great for completing an ab workout or full-body workout. You can do this exercise separately any time you have the opportunity.
Next, we will consider the most popular variations of classic types of planks, which will increase the load, make it more varied and increase the effectiveness of training.
General rules for performing the exercise
- Keep your shoulder blades retracted.
- Your buttocks and thighs should be in the same line.
- Keep your glutes and core engaged.
- Don't strain your neck. Keep it in a neutral position, looking down at the floor or up at the ceiling.
- Under no circumstances should you allow your lower back to sag too much.
While the plank is a great exercise, it may not be the best exercise for some of you. Find out if you should give it up completely.
Different types of planks make you stronger
It is best to start with simple variations of the exercise and then move on to more complex ones.
Once you feel stronger, continue to build strength by gradually adding different movements to your regular plank routine.
Soon a regular plank will seem very simple to you.
A well-developed core will improve your appearance and your overall fitness, no matter what sport you choose to play: football, walking, running or weight lifting.
Below are 11 types of planks that are an excellent replacement for standard planks. It's worth noting that most athletes include planks in their core workouts.
They are arranged in order of increasing difficulty of movements, so you can start with the variation that you are comfortable with and move on to the next type as soon as you feel that this one is already simple for you. How to do the plank exercise correctly, read on.
Benefits and disadvantages of exercise
The advantages are obvious:
- The exercise strengthens the core, and exactly as it is necessary for athletics - in dynamics;
- The plank helps not only to “retract” the stomach, but also to strengthen the muscles of the legs and arms, which has a positive effect on the figure;
- The exercise improves posture and forms the correct starting position for all strength movements;
- The plank teaches you to pull in your stomach under load, which helps prevent injuries in strength exercises;
- The movement saves training time, since it uses many muscles at once, and the athlete can effectively work out the whole body with it;
- The dynamic plank can be considered similar to specialized mobility exercises for ligaments and joints, it allows you to improve mobility for the squat, deadlift, running and bench and standing presses, as it works all key joints.
Flaws:
- The main disadvantage of the dynamic plank is the increased impact load on the hands and shoulders, which overloads the ligaments and joints, and can cause inflammatory processes and injuries in people with large excess weight and improperly formed motor patterns. Therefore, the statement “the plank is a good exercise for beginners” is only true if these beginners know how to move and control their body;
- Jumping variations of the plank can aggravate the condition of the knees, hips, ankles, shoulders and hands if there are problems with them. The dynamic plank should be avoided if the musculoskeletal system is impaired;
- Hernias and protrusions of the spinal column can worsen if the athlete performs a lot of dynamic planks, which are accompanied by displacements, twisting and rapid changes of planes during work;
- For many people, careless exercise technique can cause injury, and almost everyone’s technique breaks down in a high-repetition mode.
Flat stomach, toned buttocks and beautiful arms. Dynamic bar.
The amount of effort is relative
There are ways to simplify and weaken the impact of the bar. This is necessary for those who, at the initial stages, find the stress of a seemingly simple exercise unbearable. And, conversely, there are methods that increase the intensity and productivity of classes.
Simplified options:
- By spreading your legs wider during workouts, you reduce the strain on your muscles.
- If you perform the plank on straight arms, and not on your elbows, then the task becomes easier.
- It is possible to reduce the time it takes to complete the plank by breaking it down into several approaches.
Simplified version - on straight arms.
We complicate the bar:
- Do a plank, leaning on your arms bent at the elbows.
- Keep your feet together.
- Increase intensity by adding time to your workouts.
- Challenge yourself by choosing a more challenging plank option.
- Rocking the pelvis with a small amplitude.
Different types of planks work out muscle groups of one kind or another. This is a side plank, and with an outstretched arm, and with a transition, and a reverse one - in total there are about a hundred types of this useful and beloved exercise by many.
Advice! Ideally, the plank should be done with three approaches, with breaks between them no more than a minute.
Body correction with a plank
If you want a clear and clear picture of what the plank exercise will lead to after repeated training, then the results before and after monthly training can be examined in detail not only in the photo, but also read about them here:
- Posture. A sedentary lifestyle or physically demanding work can lead to back problems: scoliosis, radiculitis, osteochondrosis. Regularly doing the plank will free the body from the captivity of these diseases, strengthening the spinal column and the muscular frame of the back.
- Legs. Almost all calf and thigh muscles are involved in the work when doing the plank. Their activation will return strength and elasticity to the legs.
- Hands. Gradually, day by day, confidence will appear in your palms, forearms, and shoulder girdle. Your hands will get stronger and stop shaking from tension. But the result after some 3-4 weeks will encourage further training.
- Buttocks. The sexiest part of the body will be rounded, gain elasticity, and say goodbye to cellulite.
This is a great exercise for getting yourself in order.
- Stomach. The plank will force you to tighten your abs and remove belly fat.
- Waist. The sides and muscle frame around the waist will take shape, and if you also measure the circumference of body parts from the very beginning, then the desire to improve your figure will only increase.
Advice! After the first classes, the muscles of almost the entire body will ache. This is inevitable, but should not be alarming: it means that all actions performed were carried out in strict accordance with the instructions.
Basic mistakes
Raising the pelvis above head level. This position relieves the load from the entire muscle corset, the meaning of the exercise is lost. The pelvis should be one straight line with the body.
Head lift. A deflection appears in the cervical region, which causes overstrain of the neck muscles. Your gaze should be directed to the floor in front of you. With prolonged violation of technique, disturbances in the functioning of the cervical spine may occur, and muscles will ache.
The hands are locked, and the elbows are spread to the sides. In this position, the head drops down and control over the shoulder blades is lost. Muscles are tense unevenly. Elbows and forearms should be parallel to the body.
Bend in the lower back. The stronger back muscles work, and the weak ones do not receive stress. With constant bending, problems with the lower back may occur.
Raising the shoulder blades. When the shoulder blades are located above the head, sagging of the thoracic region appears, which also provokes an uneven load. The back should be straight.
Planks with limb extension
Someone said that the plank is an exercise for the lazy, but if you take a photo before the start of classes and after finishing the course of exercises, it turns out that even the lazy can do it if they want.
Side plank with arm raised
Having mastered the classic and side planks, you can begin to complicate your tasks in performing them.
Having assumed the position of a classic plank, extend your arm in front of you (the plank is called “superman”) or to the side (it’s easier) parallel to the floor line. You must stand in this fixed position for 30 seconds. Then return your hand to the starting point, and lift one leg off the floor and do not bend it. Freeze for 30 seconds.
The removal of a limb may be accompanied by its movement in the air - this complicates the task. For example, standing in a classic plank supported by straight arms, pull your left knee towards your left hand, while simultaneously turning your head in the direction of the directed movements - this allows you to improve the work of your body and neck.
Doing a plank with a lift is a test of endurance and arm strength. Standing in a classic plank position, raise your arm and place your palm in place of your elbow. Straighten your arm as if doing a push-up. Repeat the same using the other hand.
Advice! When performing any type of plank, you need to keep the muscles of your legs, abs, and arms tense. In this case, the lumbar region is not overloaded.
Obstacles on the path to perfection
It may seem strange to an unenlightened novice athlete that such a seemingly harmless physical exercise as a plank may have contraindications for performance. But professionals won’t warn in vain.
- Interesting situation. When a woman is preparing to become a mother, there should be no stress on the stomach on the way to the birth of a baby. Except, of course, for contractions. So, there is no point in provoking them ahead of time.
- Herniated intervertebral discs, as well as any hernia in the abdominal area (inguinal, umbilical, postoperative) are a serious obstacle to performing the plank.
- Pinched nerve endings in the spine. In a word, if you have back pain, you need to see a doctor.
- Diseases in which the bar will cause pain and discomfort (cysts of various etiologies, tumors, etc.)
Before you start the exercise, make sure you are not at risk
Advice! People suffering from the above ailments can be advised to do yoga.