The plank is a universal static exercise that allows you to literally develop endurance, strengthen muscles, tighten your stomach and get rid of a couple of extra centimeters in just 30 days. Rave reviews and photographs before and after classes confirm this: the plank works all large muscle groups, including the abs, no additional equipment is required for practice, and the result will not take long to arrive, even if you do not combine static loads with other sports. In this article, we find out why exercise should become the basis of home workouts, what types there are, and draw up a schedule for the first month of classes.
What and how the plank trains: photos before and after classes
When performed regularly, this seemingly simple but physically challenging exercise will help you lose weight, pump up your stomach, stimulate the burning of internal fat, give relief to your arms and legs, train your back and, of course, speed up the appearance of the desired abs. Get ready that after the first short approaches of 20-30 seconds, all your muscles will ache - this is great, and it means you are on the path to success.
The results of monthly training are clearly visible in the before and after photos.
The plank works with our body in the following directions:
- Exercise strengthens the spine and back; makes pain less pronounced in scoliosis, osteochondrosis and radiculitis.
- Engages the thigh and calf muscles, restoring their elasticity and beautiful expressive shapes.
- Develops strength in the palms, forearms and shoulder girdle as a whole. After three to four weeks, your hands will stop shaking during workouts, and you will feel more confident.
- Your buttocks will acquire a toned, round shape, and there will be significantly less cellulite and stretch marks.
- The abs will be tightened and strengthened.
- Fat will disappear from the waist area, the figure will become slimmer and more harmonious.
- This load has a positive effect on the functioning of the cardiovascular system.
- It prevents joint diseases.
- Increases overall flexibility and endurance.
- Improves mood and fights depression - any physical exercise performed by a person to the limit of his capabilities is better than any therapy or medication in dealing with bad mood and stress.
Of course, such results cannot be achieved with the bar alone in a month.
The exercise also works the rectus and oblique abdominal muscles, the transverse muscle, the gluteal muscles, the rectus abdominis and the proximal femoris. At the same time, the bar is one of the least traumatic types of training and can be contraindicated only in the following cases:
- In the postpartum period, after cesarean section, with diastasis of the abdominal muscles
- After recent operations
- For high blood pressure
- Hernia and serious joint pathologies
- In case of exacerbation of chronic diseases
Tip: Scientists at Columbia University have proven that regularly performing side planks reduces pain in osteochondrosis by almost 40%.
Photos before and after: there are no age restrictions for the exercise if you feel well.
Now let’s figure out what types of planks there are (by the way, there are more than a hundred variations), how to perform the exercise correctly, calculate a training plan for 30 days and see how the body proportions change before and after regular classes with photographs and reviews of practitioners of the technique.
Photos before and after: as your appearance changes, so does your mood
What is a plank?
The plank is a universal stand that allows you to strengthen different muscle groups, having a beneficial effect on the arms, legs, buttocks, back and waist. This is a static exercise in which you cannot move. With high tension throughout the body, there is an increase in the strength and volume of muscle muscles.
Training affects the white and red fibers of the muscles. Combining and alternating the plank with other dynamic activities increases the effectiveness of physical activity several times. Standing perfectly burns fat, which is converted from cells into energy.
Plank for weight loss. Will planks help you lose weight?
You should not hope that doing the plank itself will get rid of extra pounds and excess fat deposits. You can’t do this without proper nutrition and special training. But the plank can speed up the process of losing weight, since the body spends more energy on performing static exercises, which means that calories will be consumed more intensely. But static exercises help build muscle mass faster than dynamic exercises. The body becomes more sculpted, toned and looks slimmer.
The effect of planks for weight loss
The rack is one of the components of the bodybuilder training system, athlete training and fitness programs. Thanks to it, you can strengthen the muscle corset of the back, abs, buttocks, legs and arms.
The following effects are noted from regular exercises:
- Beautiful posture.
- Legs and arms become slimmer.
- The risk of developing osteoporosis is reduced.
- Tightened ligaments and tendons.
- Waist size and the appearance of cellulite are reduced.
- The health status of cervical and lumbar osteochondrosis improves.
Such good results are achieved by a certain amount of muscle tension when balancing the torso and overcoming the force of gravity to keep it in a horizontal position.
How to squat correctly?
You can only benefit from squats if you perform this exercise correctly. Many beginner women and men try to do more reps or lift more weight. In fact, to achieve results, you need to adjust your technique.
Girls who want to strengthen and tighten their buttocks need to adhere to the following sequence of actions:
- Stand up straight, place your feet wider than your shoulders. Straighten your back, bring your shoulder blades together.
- You need to start squats by moving your pelvis back.
- Only after this bend your knees.
- The back should remain perfectly straight. Under no circumstances should the lower back “peck” or become rounded.
- You need to sit below parallel with the floor, otherwise the gluteal muscles will not receive enough load.
- At the bottom point, you can linger for literally one count, and then straighten up with a powerful movement, straining your buttocks.
- You cannot fully extend your legs. This is harmful to the joints and takes the strain off the muscles.
- To fully engage the buttocks, you need to sit down deliberately slowly, and get up quickly due to maximum muscle tension.
It is impossible to completely turn off your legs from work when doing squats. After all, the movement is carried out due to the leg extensors.
Depending on the purpose of the training, the number of repetitions and approaches will vary. To enlarge the buttocks and thighs, it is necessary to use additional weights: a barbell, dumbbells, etc. The number of repetitions should be small (from 8 to 12). But the load on the muscles should be noticeable.
To lose weight and reduce the volume of your butt and thighs, you should use a multi-repetition mode. In 4-5 approaches it is worth doing 15-20 repetitions.
Beginners need to squat without weights. The main goal for them is to master the correct technique.
Squatting too often is not recommended. It will be enough to train 1-2 times a week. After all, if you load your muscles every day, they will not recover. As a result, all training will be in vain.
Benefits and harms
All physical exercises are beneficial for the human body, although they require time, effort and desire.
The plank does not require additional sports equipment or special space. The training can be done anywhere, and at the initial stage you will have to devote no more than 30 seconds to it.
Here are the main advantages of the rack:
- Strengthening muscles. Many people complain of decreased muscle tone due to a sedentary lifestyle. The plank engages most muscle groups and with regular exercise they become stronger.
- Posture. More and more people spend a lot of time at the computer, which negatively affects the spine. Regular standing helps improve posture, well-being and normalize blood flow to the brain.
- Hands. The area of the arms with sagging skin is considered one of the most difficult because it is difficult to correct. The plank will allow you to pump up your upper limbs, getting rid of fat deposits in this area.
- Legs and buttocks. All representatives of the fair half of humanity dream of a beautiful and toned butt. Only some are lucky with good genetics, the rest have to work hard. In a set of exercises, the plank will help you achieve the shape of Brazilian beauties.
- Losing weight. The stand will not be able to remove several tens of kilograms of excess weight, but after 2 weeks you can reduce fat deposits in problem areas and improve your figure.
- Strength of will. Doing the plank daily increases a person’s willpower, which has a positive effect on everyday life.
In addition to its benefits, the stand can cause harm to the body if contraindications to training are ignored. Therefore, before starting classes, it is recommended to consult a doctor to exclude side effects in the future.
Benefits of plank exercise
Why is this exercise so beneficial for the body? The effect of the plank can be divided into different parts of the body, as it affects different zones. The plank strengthens the muscles of the abs, back, legs, and arms.
Back
The most vulnerable part of the body of people who are engaged in “sedentary” work and do not lead a very active lifestyle is the back. Back muscles are often weakened, and spinal discs can become displaced over time. Therefore, we feel severe pain or get tired quickly. Weak core muscles can be a cause of injury in the gym for both amateurs and professional athletes. It is the plank exercise that is aimed at strengthening this group of muscles, which are responsible for stabilizing the body. When you stand in a plank position, you tense all the main muscles of the back: rectus, vastus, lumbar, and also the muscles of the neck.
The load that the bar puts on the body is as correct and uniform as possible. Therefore, your posture is correct and your abdominal muscles are tightened. If you do planks every day, you will not only improve your appearance, but you will also become much healthier. Back pain and the risk of spinal injury will be dramatically reduced. Strong and strong back muscles will hold it securely. The plank is also an excellent exercise for preventing osteochondrosis. This is especially true for those people who spend a lot of time sitting.
But we should not forget that all this can be achieved only if the exercise technique is done correctly. Otherwise, you may worsen your back problems or injure yourself. If you already have any diseases of the back or cervical-collar area, then consult your doctor before performing the plank.
Plank options
Legs
This exercise uses almost all leg muscles. Depending on what kind of plank you do, the gluteus medius and maximus muscles are tensed. The calf and thigh muscles are also affected. Once you start doing the plank for a few minutes every day, you will notice how your legs and buttocks become toned. For girls, it will be a pleasant bonus that the bar can reduce cellulite. By improving blood microcirculation in problem areas, the bar allows you to make your body more toned and your skin elastic and smooth.
Don't forget the contraindications. If you have ankle problems, then you should refrain from doing the plank. But, in any case, it is considered one of the most gentle exercises for “faulty” knees, since the load on them is minimal.
Weight loss
If you want to lose weight, then include a bar in your “diet”. Thus, you will get rid of those annoying extra pounds much faster. Everyone has long known that subcutaneous fat is lost only in case of a calorie deficit. In order not to torment yourself with “starvation” diets, it is better to simply increase your daily energy expenditure. The bar will help you with this. It can also speed up your metabolism, which means you can burn even more calories. The bar also saves you from sagging skin, which affects many who lose extra pounds and decrease in size. The exercise perfectly tightens the muscles along with the skin.
Plank for five minutes a day
What does the bar give?
With regular exercise, metabolic processes in the body improve, the rectus, oblique and transverse muscles develop, the buttocks are rounded and pumped up. Exercise reduces the risk of spinal and back injuries. The plank will allow you to maintain your balance longer and is the best way to combat stress and bad mood.
Will planks help you lose weight?
Many women are interested in the question of whether it is possible to lose extra pounds with a simple exercise. The plank has the ability to engage almost all the muscles of the human body, thus tightening and toning the skin.
To perform it, there is no need to purchase special equipment, and it is easy to find a place for training.
Such physical activity will help you lose weight if you follow a diet, the correct technique and additional cardio exercises.
Does planking help you lose belly fat?
The rack is an ideal abdominal exercise that targets the rectus abdominis, transverse abs, and internal and anterior obliques. With proper and regular training, the muscles are toned and the volume of deposits on the abdomen is reduced.
The exercise makes your waist slim and your posture beautiful. The daily plank stretches your neck, strengthens your back, makes your shoulder line more expressive, and removes belly fat.
How to do it correctly?
To achieve a positive effect from training, you should pay attention to the basic techniques for performing a stance:
- Spine. From head to heel, the body should be straightened in a continuous straight line.
- Hands. The limbs serve only as a support and are not tensed, otherwise there is a risk of excessive stress on the shoulder joints.
- Stomach. The abdominal muscles are tensed as much as possible, the lower back does not bend and should be flat.
How much to do?
To begin with, it is enough to stand in the plank once, but if your physical fitness allows, the number of approaches per day can be increased to 2-3 times. The main thing is that excessive stress does not affect your health.
How often should I do it?
Many people are interested in how many times a static exercise is done. This depends on the physical fitness of the person, because some will be able to stand in the plank for 3 minutes, while others can withstand 30 seconds.
The frequency of performing the stance depends on the goal you want to achieve. To strengthen and tighten muscles, 2-3 minutes daily is enough.
To get rid of excess weight, the training time is doubled. It helps prepare your torso for more challenging weight loss exercises.
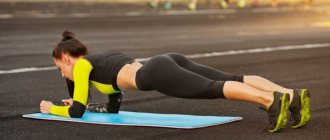
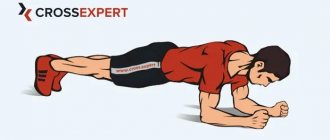
Plank technique
Let's consider two options for performing the plank: the classic one on straight arms and on the elbows. These options are the most common in sports. You can see in detail how to do the plank correctly in the video:
VIDEO: How to Hold the Plank Correctly
How to Hold the Plank Correctly. This is Important to Know!
How to Hold the Plank Correctly. This is Important to Know!
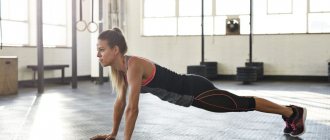
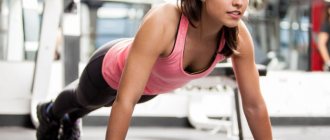
Straight arm plank
The most important thing in performing the exercise is the correct technique. Your results in the future directly depend on it. Once you master the basic technique, you will be able to improve your endurance and hold the plank for longer. For the first time, the result in twenty seconds will be good. Then gradually increase the load every day, adding ten seconds to the time. This way, you will be able to plank for about five minutes by the end of the month.
It's best to do planks with a trainer who can evaluate and correct your technique. But, if you don’t have the opportunity to study with a mentor, then do the plank in front of the mirror. Then you can independently assess whether you are doing everything correctly. You can also place your phone nearby and record the exercise on video. Don't forget to place a fitness mat under your feet and hands. This way, your limbs will not slip on the floor, and you will feel more stable and confident.
1Place yourself in a lying position on a fitness mat. Then rise up and lean only on your hands and toes. Please note that the hands should be located directly under the shoulder joints.
2Legs should not be bent. Keep them straight and pull your socks up.
3The back should also be as stretched and tense as possible, keep it straight, do not round it. Do not arch your shoulder blades upward, as well as your tailbone. Keep your gaze straight ahead.
4Try to tighten your abs as much as possible. Keep it in this state until you finish the exercise.
5You can place your feet in a way that is convenient for you. They can be brought together or spaced shoulder-width apart. Please note that the wider your legs are, the less stress on the body will be, and the easier it will be to perform the exercise.
6Breathe calmly and evenly.
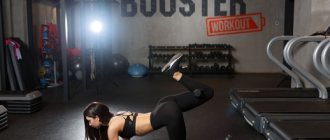
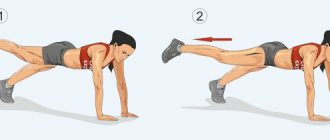
Complicating the exercise
Single Leg Plank Position yourself as described in the tips above. Then lift the toe of one foot off the floor and lift your leg as high as possible. Hold it statically throughout the entire exercise. Then switch legs and repeat the plank. If you have trouble keeping your balance, spread your arms a little wider.
Single leg plank
Arm Plank Take the same position as the arm plank. Now, instead of your leg, raise one arm and stretch it forward, holding it straight in front of you. It is very important to maintain balance and not arch your back or lower your lower back. Repeat the exercise with your other arm extended forward.
Extended arm plank
Elbow plank
The technique of the exercise is practically no different from the hand plank. The only difference is that during the execution you rely not on your palms, but on your forearms. Bend your arms and place your elbows so that they are directly under your shoulders. Tighten your abs as much as possible. The back should be perfectly straight. Do not arch your pelvis down or up.
Complicating the exercise
On one leg Stay on your elbows. Stretch one leg back, lift it if possible. The limb should remain straight. Repeat the exercise in the same way, only change your leg.
With your arm extended, lean on your elbows and raise your arm. Pull it forward and keep it straight. Then change hands after the required amount of time has passed.
Combine the plank on your hands and elbows. First of all, take a position on straight arms. Stay in this plank as long as possible. Then change position to the elbow bar and stand there for the allotted time. Now stand on straight arms again. Repeat the exercise several times.
If you have already adapted to these two standard plank executions, then you can diversify it. For those who are confident in their abilities, we have created unusual and effective versions of this exercise:
VIDEO: Elbow plank. How to do a plank correctly
Elbow plank. How to do a plank correctly, plank technique, benefits and main mistakes
Elbow plank. How to do a plank correctly, plank technique, benefits and main mistakes
Varieties
The plank has several variations, but the simplest is considered to be the straight arm stand. For experienced athletes, there are more complex exercises.
On straight arms
- In the stance, the palms are strictly under the shoulders, and the body is straightened in a straight line.
- The back should be as straight as possible.
- The abs are tense.
- And don’t stick out your buttocks.
- The chest is placed between the shoulders without arching.
- The emphasis is on the fingers, the gaze is directed to the floor, the knees are straight.
From a straight supporting hand
- This is a slightly different variation of the side plank, but the lower arm is straightened.
- There should be no deflections, the body is kept level to evenly distribute the load.
Side plank
- The body is in one line on its side, the abdominal muscles are tense, the upper arm is placed on the belt or extended, and the lower arm is bent at the elbow.
- The legs should be one on top of the other or one should be pushed forward a little.
- Exercise strengthens the internal muscles of the abdomen, thighs and buttocks.
From the elbow
- The body position is the same as in the classic version, but the hands are placed on the forearms, and not on the palms.
- The elbows are located under the shoulders, the body is straight, the stomach does not sag.
Reverse or inverted plank
- While sitting on the floor, you need to straighten your legs and put your palms back, resting them on the surface behind your back.
- The pelvis rises, focusing on straight arms and heels.
- The body should form a straight line above the floor.
- The training is performed dynamically.
Plank with limb extension
We make our task as difficult as possible.
How to do it: get into a classic plank position. Extend your arm forward parallel to the floor. We start with thirty seconds. We return to the starting position. Then we repeat the same thing, but with the leg raised. We perform the technique for the other arm and leg. You can complicate the task if, together with extending your arm or leg, you make various movements in the air, alternately pulling the knee of the same name towards your arm, turning your head to the sides for better body work.
Tip: While in any type of plank, keep your abdominal, arm and leg muscles tense. This distributes the weight evenly and reduces the strain on your back.
Knee Pull Variation
Plank for men
Standing is a simple exercise that requires little time and space. But training brings many benefits.
It is indispensable for men during physical activity, performing the following functions:
- increases the body's endurance;
- helps burn fat during the drying process;
- tightens the stomach;
- forms the press;
- maintains physical fitness in combination with other exercises.
Known standards
Athletes have certain standards for men. They also touch the plank. The record for completing this exercise in time belongs to Chinese policeman Mao Weidong. He held the stand for 481 minutes without breaks. And among girls, Dana Glovaka is considered the record holder. She stood on her elbows for 4 hours and 19 minutes.
But instructors say that it is impossible to identify any standards, since each person’s body is individual. Accordingly, everyone’s endurance is different. It is necessary to take into account your physical capabilities when performing the exercise. The timing of transitions in the plank depends on the athlete’s preparation. It is determined by the time during which a man can stand. The levels are shown in the table:
| Time | Level of training |
| 30 seconds | Newbie |
| 1 minute | Novice athlete |
| 1.5 min | Good preparation |
| 2 minutes | High level athlete |
| 5 minutes | Master |
Learning how to do a plank is not difficult, but you need to stick to the time intervals. Beginners only need to hold out for half a minute. The average is 60 seconds. An interval of 1.5 minutes is considered a good level. A 120 sec. - this is a high figure. Next, the athlete needs to increase the time spent in the stand to 3 minutes. If he can reach five, then he can be considered a master.
You need to work on your body every day. You can start with a kneeling position, which is easier to perform. It is better to repeat the exercise 3-4 times, trying to increase the time from 15 to 30 seconds. But it is not recommended to exceed this figure in the first two weeks, otherwise back injuries may occur.
Plank for women
- The exercise can be considered unique, because when performing it, almost all the muscles of the body are involved.
- The stand strengthens the abs, allowing you to achieve a beautiful relief.
- Regular exercise reduces back pain, which the fair sex often complains about.
- The plank develops willpower and increases flexibility, because even hard-to-reach areas of the body are included in the process.
- Its main advantage for women is that it improves mood after physical activity.
Exercise "Superman"
To perform the “Superman” exercise, you should familiarize yourself with the video instructions or contact a trainer.
- Performing a task such as a plank begins from the usual primary position.
- The left hand is extended forward. It is located at the level with the body, being a continuation of the straight line.
- The right leg lifts off the floor. The spine is straight, the abs, gluteal and back muscles are tense.
- Hold the position for as long as possible, increasing the time.
- From the starting position, the technique is repeated, but with opposite parts of the body.
When performing a “Plank” exercise, it is allowed to complicate the task with the help of additional products - a fitball, books or dumbbells in the form of a support.
Exercise for 30 days
For beginners, the classic version of the plank for a month is ideal, performed on the hands and elbows with a gradual increase in the time of the stand.
To make it easier to navigate, a table with training for the month is attached:
| Day, no. | Time |
| 1 | 20 sec |
| 2 | 20 sec |
| 3 | 30 sec |
| 4 | 30 sec |
| 5 | 40 sec |
| 6 | 40 sec |
| 7 | Rest |
| 8 | 50 sec |
| 9 | 50 sec |
| 10 | 1 min |
| 11 | 1 min |
| 12 | 1.5 min |
| 13 | 1.5 min |
| 14 | Rest |
| 15 | 2 minutes |
| 16 | 2 minutes |
| 17 | 2.5 min |
| 18 | 2.5 min |
| 19 | 3 min |
| 20 | 3 min |
| 21 | Rest |
| 22 | 3.5 min |
| 23 | 3.5 min |
| 24 | 4 min |
| 25 | 4 min |
| 26 | 4.5 min |
| 27 | 4.5 min |
| 28 | Rest |
| 39 | 5 minutes |
| 30 | 5 minutes |
For the more experienced, it is suggested to diversify the exercises over 30 days. A total of 15 lessons are presented, after the end of the last one a repeat round is done.
- Day 1. Starting position: the body stands up, elbows under the stoves, feet touching tightly, abdominal and buttock muscles tense. The plank is done three times for 45 seconds
- Day 2. Starting position: from the low plank, the weight is transferred to the right elbow, the body turns. The left hand rises up, followed by the gaze. After 45 seconds, the elbows need to be changed. 3 approaches on each side.
- Day 3. Starting position: under the shoulders, the hands are straightened, the feet are pressed tightly against each other, the muscles are tense, the legs are straight. 3 sets of 45 seconds each.
- Day 4. Starting position: from the previous stance you will need to turn around and transfer the weight to your right hand, and straighten your left hand forward. You need to hold the plank for 45 seconds, then change sides. The exercise is performed 6 times.
- Day 5. Starting position: low stand on your elbows. You need to alternate bending your knees for 45 seconds. 2 approaches are done.
- Day 6. Starting position: repeat position 3 days. First, one hand and then the second come off the surface and touch the opposite shoulder. The body should not sway. The stance is repeated three times for 45 seconds.
- Day 7. Starting position: the low plank smoothly turns into a high plank with straightening your arms, after which you need to lower yourself back onto your elbows. The body should be smooth. Do 3 sets of 45 seconds.
- Day 8. Starting position: lower position, bend your knees one at a time, move to a high plank. Then you need to touch the opposite shoulder with your hand and return to the lower position. You should do 3 sets of 45 seconds.
- Day 9. Starting position: low stance, elbows slightly forward. You need to slowly lower yourself so that your shoulders drop to your elbows and return back. Three sets of 45 seconds.
- Day 10. Starting position: low plank, turn the hip to the right until about 10 cm remains to the surface. The exercise is repeated in the other direction. Do 3 sets of 45 seconds.
- Day 11. Starting position: high stance, when jumping, legs are spread shoulder-width apart, buttocks are not raised and back to the starting position. Do three approaches of 1 minute each.
- Day 12. Starting position: low position with a turn on the left side. Then the hips rise for a few seconds, after which they lower almost to the floor. Movement exercises with the hips are performed up and down. Then the side changes. The stand is performed for 1 minute on each side, 2 approaches.
- Day 13. Starting position: high plank, the left knee is pulled up to the right elbow, held for a few seconds and returned back. The exercise is done on each leg for 1 minute, 3 times.
- Day 14. Starting position: low stance, right knee pulled up to the right elbow with a two-second delay and return to the starting position. Everything is repeated in turn with both legs for 1 minute, 3 approaches.
- Day 15. Starting position: high plank with arms extended in front of you as much as possible. The stomach should be tucked in and the buttocks should be tense. You need to stand for 45 seconds in 3 sets.
Classic example
A little more difficult to do. The position of the upper limbs does not change. The knees should be straightened and the toes of the feet should rest on the floor. The wider your feet are, the easier it is to stay in this position. The lower back is straight, no sagging. Time doesn't change. You need to start with 30 seconds. The longer you hold out, the better. Can be performed in several approaches.
The position of your arms can be changed - straighten them. Some athletes say that this is a lightweight option. But I believe that you need to approach it individually. If it's easier for you, start with it. But you shouldn’t feel too sorry for yourself either. Otherwise you will not achieve the effect.
At first, you can ask someone to monitor the correctness of your actions. Ideally, you will have a professional trainer. But this is not necessary, the main thing is to understand the technique and explain it to your assistant. Why is it important? At the first stages of classes, you cannot adequately monitor the coordination of movements, but the other person clearly sees all your shortcomings from the outside.
Errors
If you perform the plank correctly, you can achieve the desired effect and not harm your health.
There are five main mistakes that beginners make:
- Arching your back. If you don’t strain your abdominal muscles, but think only about the load on your arms, then they begin to get tired quickly. When it gets hard, a person involuntarily arches his back, which negatively affects the spine, because additional stress is created on it. And training will not be beneficial for the muscles of the back, abs and arms.
- Sight. During the exercise, you need to look down. If an athlete begins to throw his head up or turn it to the sides, the load on the neck increases. It is necessary to control your gaze so that your neck is at the same level as the rest of your body.
- Dropping the hips. When you feel tired in your arms and abs, your hips involuntarily begin to drop down. As a result, the entire load falls on the lower part of the body. To avoid this, it is recommended to raise your buttocks slightly, and to better maintain your balance, spread your legs wider.
- Palm position. The palms should be placed strictly under the shoulders; this rule also applies to the elbows if the bar is done on the elbows.
- Knee bending. This mistake is common for beginners who have not yet learned to control their body. During the exercise, you must not forget about your knees.
Plank and its features
The plank is also popular because it is incredibly easy to do. You will not need any special skills or any special devices or training equipment. In addition, the plank works a huge number of muscles in the human body, which no other exercise is capable of. It turns out that you can kill not two, but ten birds with one stone at the same time, if you devote time to the plank. It improves the condition of the muscles of the buttocks, legs, shoulders, back, arms. In addition, the plank trains endurance. It can be performed separately or in combination with your strength or aerobic exercise.
Classic elbow plank
In this article we will look at:
- The most popular and unusual types of planks;
- Correct technique for performing the exercise;
- The benefits of planks for the body;
- Harm of the plank and contraindications;
- Plank program for 30 days.
Types of planks
In principle, all types of planks are very similar to each other. Therefore, the execution technique is quite monotonous. However, differences can also be mentioned. If you change details, such as the tilt or position of the body, arms, legs, you can transfer the load to one or another muscle group.
Straight arm plank This is a very common, classic version of the exercise. Since it is considered easy to perform, the hand plank is ideal for beginners. It is performed statically and will improve your abdominal muscle stabilization abilities. If you are just starting to get acquainted with the plank, then the straight-arm plank will be an excellent start on your path to health.
Straight arm plank
The elbow plank is very similar to the straight arm plank, only the task is more complicated. Since the angle between the floor and the body becomes smaller, it becomes harder to hold the body. The muscles tense more strongly, the pectoralis major, delta, back muscles, front thigh muscles are activated, and not just the abs, as in the first case.
Elbow plank
Plank with an extended leg or arm There are fewer support points, thereby increasing the effectiveness of the exercise. The load on the core muscles increases. Plus, a plank with less support is great for improving your balance.
Plank with leg or arm extended
Side plank Quite a difficult option. You should stand on only one leg and one arm. Also great for developing balance.
Side plank
The plank can be varied in a variety of ways. Once you've mastered the basics, feel free to mix up the plank with jumps, push-ups, lunges and crunches. Add additional equipment as well. Suitable fitballs, various steppers and platforms, wooden boxes and benches, weights and dumbbells.
Who shouldn't do planks?
This type of physical exercise cannot be performed by everyone; it has a number of contraindications.
Here are the main ones:
- Presence of protrusions.
- Spinal injuries.
- Increased body temperature.
- Hypertension.
- Herniation of the spine.
- Menstruation.
- Exacerbation of chronic ailments.
- Pinched sciatic nerve.
- Neuropathy of the ulnar and radial nerve.
- Pregnancy with complications.
- Joint problems.
- Glaucoma.
- Phlebeurysm.
After a traditional birth or cesarean section, a woman can start exercising 3 months after the birth of her baby.
The plank is a universal workout that is suitable for both athletes and beginners. The rack is an effective method of shaping the abs, developing endurance, strengthening the entire body and losing weight.
It is necessary to follow all the rules for performing the exercise and consult a doctor who will rule out any contraindications.
Contraindications
The good thing about the plank is that it does not require special physical training. That's why it's so common.
However, even such a simple static exercise has a number of contraindications for performance:
- Diseases and injuries of the spine
- Hypertension (static load can cause an increase in blood pressure)
- Injuries and diseases of joints (mainly shoulder and elbow)
- Injuries to muscles and ligaments involved in movement
Consequences of incorrect implementation of the plank
Sport is a risk of injury. When implementing various exercises in static type sports, the following arise:
- pain;
- torn abdominal muscles;
- inflammation.
The results of doing the plank are obvious after a couple of weeks of daily exercises. However, drying the body requires an integrated approach and systematic implementation.
You will become more flexible than ever.
Flexibility is a key benefit of doing planks regularly. With this form of exercise, you broaden and stretch all muscle groups in your back —shoulders, shoulder blades, and collarbones— while tightening your hamstrings , legs, and toes. If you incorporate a side plank into your workout plan, you can work your obliques, giving you additional benefits.