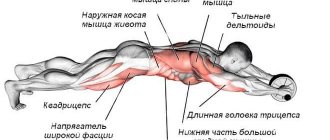
What muscles are used by roller exercises?
It is difficult to answer this question unambiguously. When performing exercises with a roller, we use almost all the muscles of the upper and lower body.
- Rectus and oblique abdominal muscles . In this case, they are responsible for stabilizing the spine and facilitating the return to the starting position by twisting the body. Depending on the execution option, the load will shift from the rectus muscle to the obliques.
- Gluteal muscles. They are responsible for stabilizing the torso in the extreme phase of the exercise (when the arms are straightened).
- Latissimus muscles. Bring your arms towards your body and stretch well in the final phase of the exercise.
- Iliopsoas muscle. Responsible for bringing the hips to the chest.
- Triceps. Namely, its posterior head, together with the lats, leads the arms.
- Pectoral muscles. Especially the pectoralis minor, is involved in adducting the arms.
- Arm muscles. This includes biceps, triceps and forearms. Stabilizes shoulder and elbow joints.
- Deltoid muscles. Helps maintain a level body position. Do not allow the body to sag.
- Neck muscles. The head sets the direction of the spine. If we look down while performing, then the back will round, creating a greater load on the cervical vertebrae. This may cause injury.
Safety regulations
The goal of the exercise is to activate the muscles of the whole body. If the training is carried out incorrectly, increased stress is placed on the spine and hip muscles, which increases the likelihood of injury.
If you have back problems, it is not recommended to exercise on the apparatus.
Before training, you should familiarize yourself with the following recommendations:
- when performing tasks, the abdominal muscles should be kept tense, and all limbs and the back should be straightened;
- you need to check that it is the roller that is moving, and not the gymnastic mat underneath it (or a pillow);
- in case of pain in the shoulder area, it is necessary to reduce the rolling range;
It is also strictly not recommended to bend (in the lumbar region, knees and body) during exercise; the body should form a continuous straight line.
Benefits of roller exercises
- Strengthening your core muscles. This reduces the risk of injuring the spine during heavy basic exercises.
- The strength of the core muscles increases as they are involved in stabilizing the core.
- The muscles become more elastic, they stretch well when performing rolling exercises.
- This exercise machine is quite compact, so it is perfect for HOME TRAINING.
- Thanks to daily exercises with a roller, you can reduce the percentage of subcutaneous fat, thereby making your body more prominent.
- The muscles responsible for stabilizing the spine are actively involved and receive a load, which helps correct posture.
If we talk about shortcomings, then there are none in the exercise as such. We can only point out that rolling on a gymnastic wheel is not suitable for beginner athletes. They will have to start by mastering simpler training movements. We'll talk about this a little later. Otherwise, the ab roller is a great option for strengthening muscles and building a strong core.
Types of roller trainers
There are a wide variety of roller trainers. The most popular of them is a regular roller with one or two wheels in the middle and handles on the sides. With its help, you can perform direct rolling from your knees or straight legs, as well as stand in a plank. For beginners, it is better to take this roller with a wide wheel, as it will be more stable. When you calmly start working with it, you can switch to a simulator with a shifted center of gravity. Working with it will make the stabilizer muscles activate even more.
There are also gymnastic rollers with special pedals where the feet are inserted. This allows you to modify the exercise. Working with him, we will bring not the torso to the pelvis, but the legs to the ribs. This technique will allow you to shift the emphasis from the top of the press to the bottom.
The last one is a roller with two wheels on the sides. It will make the exercise even more difficult. You can work with it with both hands at the same time, or with each one separately. This option will be difficult for beginners, so it is mainly used by professionals as a progression of the load.
What to fear
The abdominal exercise has one drawback - poor physical fitness. A man brings a roller from the store and starts rolling it. The likelihood of injury or sprain is high, so be careful while exercising.
Well, it seems like the theory has been tested, but what about practice? Are you ready to roller skate and get perfect abs and sculpted shapes? Then go to the gym, train, don’t forget to share the results in the comments and subscribe to updates. Good luck to everyone and see you soon.
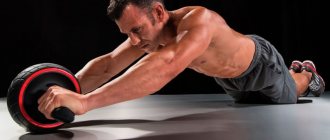
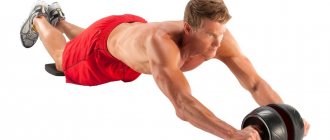
Technique for rolling a roller from your knees
Among the variety of exercise options with a roller, rolling from the knees is the most popular. It is performed by both men and girls. For greater comfort, you can put something under your knees.
Initial position:
- We pick up a roller with one wheel in the middle, choose the width depending on your level of training.
- Let's get down on our knees. You can use a fitness mat or towel as a lining.
- We lean forward and rest our wheel on the floor.
- The back is straight, there should be no arching in the lower back.
- That is, in the end our starting position will look like this.
- The knees and toes are on the floor.
- Knee, hip and shoulder joints are bent at an angle of 90°.
- The arms are completely straight and rest on the handles of the roller trainer, and it, in turn, presses the wheel to the floor.
- The neck is straight, the gaze is directed to the floor.
Performance:
- From the starting position, we exhale and roll the roller forward, stretching the body like a string. It is important not to arch your lower back. To do this, the abdominal muscles must be tense.
- Having reached the maximum possible point, we begin to return back. It is important that the reverse movement be performed by contracting the abdominal muscles, and not the gluteal and iliopsoas muscles.
The more we lean forward, the greater the force of gravity becomes. And in order to cope with it, we need to additionally strain our abdominal muscles, this will allow us not to bend in the lower back and load only the target muscles.
What is
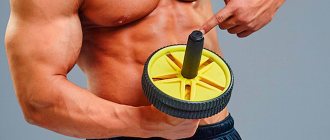
The sports equipment in question has a fairly simple design, which consists of the following elements:
- wheels;
- a handle that acts as a central axis;
- often a bearing;
The design consists of an axle that runs through the center of the wheel. At the same time, the wheel is located strictly in the middle of the axis in all planes, which ensures balance during training.
As a rule, the sports equipment in question in the classic version does not have other main structural elements; it differs only in the type of material used in manufacturing and decorative qualities.
Recommendations for implementation
- At the initial stage, you do not need to move the wheel very far, since you simply physically will not be able to work with the correct technique. You can limit the rental level using a wall. To do this, we stand facing it at a certain distance and, while performing it, rest against it with a roller. Then we move further and do the same until we reach full amplitude.
- As mentioned earlier, the main task is not to return the roller to its original position at any cost, but to load the target muscles, in our case the abs. Therefore, it is important to begin the movement precisely by contracting it, performing twisting of the torso. If you start returning the roller by bringing your arms, most of the load will be taken by the latissimus muscles. The same applies to the backward movement of the pelvis. This exercise will load the iliopsoas muscles.
- Watch your lower back. It should not bend down or bend up. Throughout the entire process of working with the roller, the lumbar region remains level. This is the position that will force the abdominal muscles to work at maximum speed.
- As for the arms, we do not bend them both when retracting the wheel and when returning it to its original position. This shifts the load from the abs to the shoulder joints and can lead to injury.
- In the initial position, there is no need to sag in the shoulders, thereby loading the trapezius muscle. The position of the torso should be the same as in PUSH-UPS.
Execution options
Plank on a gymnastic wheel
It is recommended to start performing this exercise only after mastering the CLASSIC PLANK. It is from this exercise that you should master the roller trainer. There are several levels of difficulty for this bar. At the beginning, they perform it on their knees, then they stand up and do it with their toes resting on the floor.
Performance:
- Get on all fours or in a prone position.
- We place our hands on the handles of the roller, and rest the wheel on the floor.
- Raise your torso and get into the classic plank position.
- That is, the torso should form a straight line, from the heels to the back of the head.
- The arms are completely straight, the abs are tense, there is no deflection in the lower back.
- You need to stand in this position for 15-60 seconds.
Side roller rental
This option shifts the load from the rectus abdominis to the obliques. Now we are working in three directions. First, we will introduce the video diagonally to the left, then forward and to the right. You can perform the exercise both from your knees and from straight legs.
Performance:
- We accept the already known emphasis on the knees.
- We take the simulator in our hands and rest the wheel on the floor.
- Next, we move the wheel to one side and return to the starting position.
- We repeat similar movements forward and in the opposite direction.
- While moving diagonally, you need to feel how the oblique muscles stretch.
Rolling with straight legs or frontal
This is the most difficult of the options presented. We begin the exercise standing on our feet, not our knees. This rental is performed by professional athletes after they have mastered the classic one. If you also want to gradually switch to this version of the exercise, then you should start with a wide stance. This will reduce the angle of inclination and make it easier to control the movement. Then we gradually begin to bring our feet closer together.
Performance:
- Take the roller in your hands. Place your feet wider than shoulder-width apart if you are a beginner; professional athletes connect their feet together as much as possible.
- Lean forward and place your wheel on the floor.
- From this position, roll forward, stretching your abdominal muscles as much as possible.
- Then return to the starting position.
- Repeat this movement for a specified number of times.
Rolling on one hand
To perform this option, you will need another roller, with two wheels and a handle between them. Beginner athletes perform this exercise with one hand resting on the floor. Professionals place it on the hips or behind the back.
Performance:
- We rest our knees on the floor. We take the roller in one hand, rest the other on the floor, or put it behind our back.
- Slowly we begin to move the roller forward while stretching the abs.
- Next, we return to the starting position by contracting the abdominal muscles.
- After you have done the required number of repetitions on one hand, take the roller to the other and repeat the same thing.
Bringing the knees to the body (reverse roll)
This option can rarely be seen in the gym, since it requires a special roller with pedals where the legs are inserted. Now we will bring the hips towards the ribs. This is to shift the emphasis a little to the lower part of the press.
Performance:
- Insert your feet into the special cuffs located on the roller handles.
- Place your palms on the floor, arms straight, and your torso does not sag on your shoulders.
- The legs are also straight.
- From this position we begin to twist the body and try to bring the hips to the ribs.
- Next, we return to the starting position and straighten our legs.
- In order for us to be able to twist, we need to slightly raise the pelvis up at the moment of adduction of the hips.
The view shows an option together with push-ups. This is also one way to make the exercise more difficult.
How to choose
Today, the sporting goods market is overflowing with offers to buy an ab roller. It is represented by such a wide range of models that it can be quite difficult for a beginner to choose. A brief overview of each modification is indispensable.
Kinds
With return mechanism
An ideal choice for beginners and those who want to get rid of fat deposits in the abdominal area. It allows you to control the load, is easy to operate, and is inexpensive. The return mechanism makes rolling back easier; it occurs almost by inertia, which minimizes back injury. Price - within 700 rubles. (hereinafter the approximate cost of the models is indicated).
With wheels
There is a roller on one wheel, and there is a double one. Allows you to effectively pump your abs due to the need to constantly maintain balance. When purchasing, keep in mind that two-wheeled ones are more stable and work well for stretching and strengthening muscles. Unicycles should be chosen by those who plan to train the vestibular apparatus and coordination. To protect yourself from traumatic sliding and ensure noiselessness of the projectile, the wheel must be equipped with a soft rubber tire. Price - up to 500 rubles.
With a shifted center of gravity
This training equipment is best chosen by experienced athletes with sufficiently pumped up abs. Spinning a wheel is extremely difficult and requires special physical preparation. The training is as intense as possible. The heavier the projectile, the more difficult it will be to perform the exercises. Price - 400 rub.
With pedals
An interesting model that will surely appeal to those who are pumping not only their abs, but also their leg muscles. It has minimal risk of injury as it prevents slipping. However, it is worth considering that additional equipment is also an increase in price, which soars to 1,400 rubles.
Trimmer with tensioners
It is a double wheel on an axle with a flexible cable. Its end is attached to the legs or arms, and the muscles receive additional stress due to tension. Price - 1,500 rubles.
Criterias of choice
- A roller with a return mechanism is for beginners, with a shifted center of gravity for advanced ones.
- The more wheels, the more stable the structure.
- For more powerful pumping of the press - one-wheeled.
- The larger the diameter of the wheel, the heavier the projectile, the more difficult it is to perform the exercises.
- To work the leg muscles - with pedals.
- It is better to choose handles with a rubberized coating; the fastenings are reliable and made of high-quality materials.
- It should be a well-known brand that has proven itself well in the market.
- You need to buy equipment in specialized sports stores.
Rating
- Artist ES-0808 is the simplest two-wheeler. $9.
- StarFit RL is the simplest one-wheeler. $14.
- Start Up AB Roller is an innovative, polypropylene sports ab roller that can withstand up to 100 kg. $15.
- Ab Wheel Fitness Equipment is the simplest exercise machine. $17.
- Odoland 3-In-1 - 3 built-in wheels + expander. $17.
- Bradex “Ideal Press” is the top seller at Sportmaster. $21.
- Vanshi - high-tech design + thermoplastic rubber and ABS plastic. $26.
- Perfect Fitness - with built-in resistance. $29.
- Core Wheels Dynamic Strength & Ab Trainer from Sklz - professional. $30.
- Lifeline Power Wheel is the most powerful, with a foot mount. $42.
The best ab roller is the one that will meet your physical capabilities and allow you to achieve your goal - sculpted abs on your stomach and pumped up muscles in general. Therefore, when choosing a projectile in a store, do not hesitate to ask sales consultants questions that interest you, pick it up, feel it for material and reliability of fastenings. The safety of your training depends on this.
Tips for maximum efficiency
- Before you start working with the gymnastic wheel, you should perform a set of WARM-UP EXERCISES. Particular attention should be paid to the shoulder and hip joints.
- Start mastering this exercise with easier variations. As soon as you achieve good results in them, move on to the next difficulty level.
- There is no need to try to move the video away from you as much as possible from the very beginning. Work in the amplitude you can. And when you feel ready to go lower, do it.
- You should not save money on this simulator. Choose a model that will be as reliable as possible. Ideally, the handles and the wheel itself should be rubberized.
- At the beginning, it is best to perform rolling exercises every other day, allowing the muscle to rest and recover. After all, we know that good rest is the key to developing a beautiful figure.
As you can see, working with this simulator can be not only effective, but also varied. Every athlete, regardless of training level, will be able to find the option that best suits him. The main thing is to work out the exercise technique and feel the work of the target muscles. And the results will not keep you waiting.
Good luck to everyone in your training!