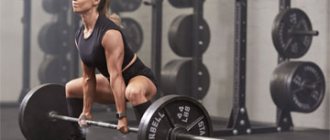
The chest pull-down is an exercise for developing the latissimus dorsi muscles. It allows you to build a beautiful V-shaped figure, eliminates postural disorders, and serves as a prevention of scoliosis. The movement helps correct "forward rolled" shoulders and is not only an exercise for bodybuilders, but also a good assistance movement for the bench press and holding the barbell on your back during the squat. Variations in the movement depending on the width of the grip and the direction of the palms allow you to involve or exclude the biceps from the movement. The exercise serves as an accessible alternative to pull-ups, which some cannot do due to the anatomical position of the shoulders, excess weight, muscle weakness and injuries. The lat pulldown allows you to use one of the largest muscle groups, speed up your metabolism and burn fat if necessary. It is also included in mass-building programs as a good multi-joint exercise that builds strength and mass. The result of a workout depends not only on technique and style, but also on the entire program and the athlete’s nutrition. The movement is suitable for both men and women, and can be used in the general physical training of adolescents and children.
Features of the exercise
The vertical pull-down is an ideal alternative to pull-ups. However, there is a significant difference - the trainee can independently choose the weight for training.
It was this opportunity that made the exercise as attractive as possible, both for beginners who cannot train with their own weight, and for experienced athletes who do not have enough body weight to exercise.
The block row is a good solution for girls, and performing it in a simulator greatly facilitates the exercise.
In the material we will consider all the advantages, features and nuances. It is worth noting that this variation differs from the head pull:
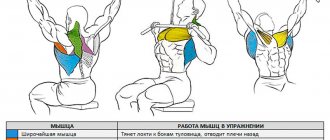
- Chest rows completely duplicate pull-ups and evenly distribute the load across the entire back, in particular the emphasis falls on the middle and upper muscle sections.
- But head pulls put more stress on the upper back. In fact, this is a very traumatic option for the shoulder joints. Therefore, I would not recommend using this type of traction. Additionally, if you have a stooped posture or excessive kyphosis of the thoracic spine, the overhead pull-down will also not be suitable.
note
In the basic version, the main load is received by the middle part of the back. Therefore, many experienced athletes lean back (and quite strongly), which allows them to load the latissimus muscles. But if the goal of the training is to give your back a lumpy appearance, then keep your torso perpendicular to the bench. Charles Glass (famous trainer, bodybuilder) recommends lowering the handle as low as possible while pulling a block, trying to hold it in the lower position for a couple of seconds. This little trick allows you to additionally pump the middle part of the back muscles. But keep in mind that you won’t be able to lower the handle below your chest with too much weight.
Lever deadlift: essence and features of the exercise
Of all the variants of traction movements aimed at working out the muscle mass of the back, those performed in a special lever-type simulator occupy a special place. They resemble rows using free weights (barbells and dumbbells), differing in simplified technique.
Lever Pull Trainer
In almost every gym there is one or more power structures for performing lever pulls, presented in different modifications.
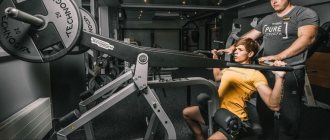
The horizontal traction device has a height-adjustable seat and a chest support pad.
Devices for horizontal traction provide the ability to adjust to the athlete’s parameters
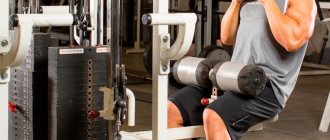
The design for vertical traction is equipped with rollers for fixing the legs and a seat with the ability to set the desired height.
The bolsters on the vertical row machines help stabilize your lower body.
As a rule, the design of the handles in such devices makes it possible to practice with different positions of the hands.
The levers of the simulator move along a given arc-shaped trajectory, in its final phase a slight extension to the sides is carried out. The arms move independently of each other: this allows each of them to work separately.
What muscles are activated in the lever deadlift?
The exercise in question is designed to train the back muscles. Participating here:
- latissimus muscle;
- teres major;
- trapezoid;
- rhomboid muscle.
The deltoids (posterior bundles) and biceps brachialis (biceps) receive additional load.
The lever row activates multiple muscle groups in the upper body.
Due to the fixed position of the body in the lever pull, unlike similar movements with free weights, the work of the stabilizer muscles is minimized.
Advantages of linkage
Back exercises using lever devices are suitable for almost all categories of athletes, regardless of level of training.
Beginners here will learn to concentrate on contracting the target muscles (this is fundamentally important in back training) without the risk of injury, experienced athletes will complement basic movements with free weights with lever traction, giving their back relief
Training in the devices under consideration will help athletes with pronounced muscle asymmetry: here you can target lagging areas.
Lever traction is a suitable option for training the back muscles for girls who want to strengthen this area and form beautiful posture without building muscle mass.
Lever-type rows are great for women's training programs
While working in lever simulators, the body is fixed, and the spine is not subjected to excessive stress. Therefore, this training is suitable for those who are not recommended to perform similar movements with free weights (bent-over barbell rows) due to problems with the health of the spine. The movement here occurs along a given trajectory, and therefore the risk of injury is minimal.
Variability is an important advantage of lever traction. By changing your grip and adjusting the height of the seat, exercising each hand separately or with both hands at the same time, you can shift the working emphasis to different parts of the back muscles
Adviсe
In addition to the technique and anatomy of the previously listed exercises, we would also like to give you some important recommendations that will help you improve your pull-ups and training in general.
- Don't exercise every day. If you exercise daily, this will not lead to muscle growth, but, on the contrary, will slow it down significantly. This applies to all exercises, including wide-grip chest pull-ups. Reviews from experts say that the muscles must be allowed to rest, otherwise they will not withstand the load that you give it. Such activities can ultimately lead to overwork and loss of desire to exercise.
- Use additional weights. If you are training to gain muscle mass, then over time you will have to increase your training weight. When the number of your pull-ups exceeds 15-20 repetitions, you can safely start using additional weights. In a gym setting, these could be chains or a belt to which you can attach weights from a barbell. At home, you can use a backpack in which you can put books, water bottles and any other available items. Try to increase the weight gradually so as not to get injured! In addition, before moving on to increasing weights, we strongly recommend that you be examined by a specialist, just in case.
- Do pull-ups with gloves on. This is not a prerequisite, since many athletes do without them, but if calluses have begun to appear on your hands from pull-ups, which prevent you from fully performing the exercise, then a pair of special gloves will be very useful for you.
- Focus on the muscles you need. Since wide-grip pull-ups on the horizontal bar are aimed at working the back, try to exclude the arm muscles from the work as much as possible. To do this, you can imagine that on the crossbar, instead of your hands, there are ropes with hooks that simply hold the horizontal bar.
- Eat right. This applies to both those who train for endurance and those who work to increase muscle mass. It is worth understanding that to achieve great results in sports, it is not enough just to train regularly. It is also necessary to provide your body with enough quality proteins, fats and carbohydrates so that it can fully function and cope with heavy training loads.
We can finish here. We hope that the information from our article was useful to you. Remember: if you perform wide-grip chest pull-ups correctly, the results will follow!
Exercise options and technique
This exercise can be performed in several ways.
Straight-grip chest row
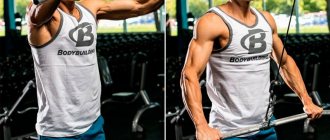
When performing lat pulldowns to the chest, you need to take the handle of the machine with the widest possible grip, much wider than your shoulders. Then you need to sit tightly on the bench and press your hips with the upper bolster. Having assumed the starting position, you can begin the deadlift by jerking the handle towards you. Next, it should be pulled up to the upper chest. Not the entire movement should be performed as a jerk, but only the first part.
In the rest of the exercise, you need to tighten the handle by straining your back muscles. At the end of the exercise, it is advisable to bring your shoulder blades together and hold it for a couple of seconds, while straining your back. The handle of the exercise machine must not be lowered sharply to return to the starting position. It is necessary to smoothly, straining your back, return the handle back.
For information on the technique of performing lat pulldowns to the chest, watch this video:
In this design, the middle of the back works. Some athletes perform this exercise while leaning back. Thanks to this, the latissimus dorsi muscles work. But if the goal of the workout is a pumped-up back, then the body should be kept perpendicular to the bench.
You cannot pull the handle using your body weight and return it back with muscle force. This can cause ligament damage.
Close-grip chest row
This exercise is similar to the previous one. But, when performing such a pull-down of the upper block to the chest, the handle of the machine must be taken with a reverse grip. In this case, the palms should be turned towards you and close to each other. When performing this exercise, the load is placed on the latissimus dorsi muscles.
By doing a close-grip lat pull-down toward your chest, you'll work your biceps and a little less of your forearms. Your arms get tired much earlier than your back. Therefore, you will have to complete the exercise without fully loading your back. To solve this problem, you can use wrist straps and continue deadlifting without paying attention to arm fatigue.
There is another way to properly work out your back. To do this you need to use special equipment
Pay due attention to the position of your shoulders: when you take the handle of the exercise machine, you need to make circular movements with your shoulders forward and up, and then back and down. Your arms should be slightly bent and the handle of the machine should be down.
In this position, you need to begin the deadlift, straightening your arms at the end of the movement. If you do everything correctly, your back will be well loaded, while your arms will rest.
Parallel Grip Chest Row
To perform this exercise, you need to install a special handle, which is used to pull the lower block. It consists of two parallel handles. The technique of this method is much easier than the first two. Having assumed the starting position, the body leans slightly back.
The middle of the chest acts as the point of contact. At the top of the exercise, the body needs to be pulled up as much as possible. You shouldn't lean too far back. Before pulling the handle down, you need to inhale, touching it to your chest - exhale.
When doing this, you do not need to straighten your arms completely. The elbows should always be in a slight bend to avoid sprains. You cannot throw the weight, but you always need to control it. Like other deadlifts, this one requires attention to your back and arms. When you lean back slightly, the teres dorsi muscles work.
In 1857, the first exercise machines were made by the porters - people from high society and the royal family ordered them from Russia.
Advantages and disadvantages of traction in a hummer
The main advantage of lever arms is the lack of stress on the spine. The hummer row allows you to work your back muscles as efficiently as possible due to the large range of motion. When performing this exercise, the latissimus muscles are well stretched and contracted. This exercise increases the width of your back and also creates a V-shaped silhouette. Traction in a lever trainer allows you to work with large weights. This type of deadlift can be used in training by athletes with back problems. This is possible due to the support and fixation of the spine throughout the entire range of motion.
But there is still a fly in the ointment! Despite the fact that this exercise relieves stress from the back, it is not recommended for those athletes who have shoulder injuries.
Description of the exercise
Someone keeps their back straight. Someone stretches forward behind the weight. In my opinion, it's better to stretch. This will allow you to get the most out of this exercise. You can even hunch slightly at the end. But at the end of the movement, be sure to bend and move your shoulders back.
Main features
1. There are two different types of performance of this exercise. With a fixed back and with a movable back. With a fixed back, your back is locked in place. Only the arms and shoulder blades move. With a moving back, the back extensors are included in the work, and the amplitude of movement increases. I personally like the option when the back is mobile, but within reasonable limits. This allows for a greater stretch and contraction of the latissimus muscles.
2. There is no need to neglect different handles either. It is advisable to use both a wide and narrow grip. As well as direct, reverse and parallel grip. All this will allow you to work your back from all sides. Just don’t need to “indulge” in all this variety in one training session. Change your grip every week.
3. Set the weight so that you can do 6 – 8 repetitions.
4. Legs are slightly bent during the exercise. There is no need to straighten them. You're not rowing, after all.
5. In the final phase (when you pull the handle towards you), your back should be slightly tilted back, arched at the lower back, and your shoulder blades should be brought together. This is the only way you can make your lats work to their maximum.
6. You can hunch your back a little when you release the handle away from you. This will allow you to stretch your back more.
Complicated options and trajectories
The difference in grip of the handle distributes the load on different muscles.
There are three options for gripping the bar:
- straight (brushes turned away from you)
- reverse (the hands are turned towards you)
- parallel (the forearms are parallel and the hands are turned towards each other).
Straight-grip, wide-grip rows work the latissimus and teres major muscles while stretching ligaments and connective tissues. With a narrower grip, the load falls on the trapezius, biceps, lower part of the latissimus and posterior deltoid muscles. The close-grip row can be performed in a reverse or straight version.
When pulling a block with a reverse grip, the biceps are worked more. The parallel grip is a simplified version of the overhead pull-down and is best suited for beginners. If you have mastered and easily performed all the variations of exercises with the upper block, then you can move on to pull-ups on the bar.
Reverse grip lat pulldown technique
It is not complicated and has the lowest possible trauma. But, to obtain the desired result, compliance is mandatory:
The exercise begins by setting up the simulator to your parameters.
To do this, you need to adjust the bolster so that your knees are firmly fixed when landing. In addition, it is important to choose the neck. It can be either long or short. The grip width is selected depending on specific goals
The wider it is, the more the edges of the lats are involved, and the narrower it is, the better the middle of the back works. Don’t forget to do a mandatory warm-up, in particular, work out your elbow and shoulder joints well. The first few sets are done with minimal weight to prepare the body for the work.
Let's take a closer look at how to do it correctly:
Starting position: sit on a bench, feet under bolsters, facing the block. Take the bar with a reverse grip, shoulder-width apart. In this case, the forearms are parallel to each other. There is a natural arch in the lower back, the chest is straightened and slightly forward. The exercise will be performed in this position.
As you exhale: lower the handle down to the chest due to the isolated movement of the elbows and shoulder blades
It is important that the hands do not take the load, and that the entire movement is carried out using the strength of the lats, elbows and shoulder blades.
While inhaling: after holding the position for several seconds, with a controlled movement we return the block to the starting position.
Do the required number of approaches and repetitions. It is recommended to include it in the training program after performing heavy basic exercises with barbells and dumbbells. In addition, the exercise is great for those who want to learn how to do pull-ups. Beginners do not need to lift heavy weights.
The optimal number of approaches is 3-4, and repetitions, depending on the goals:
- for strength and muscle mass – 6-10 times with heavy weights,
- for relief – 12-20 times with light weight.
What variations are there?
Variation – changing the grip width to a narrower one to better work the bottom of the lats. The distance between the brushes should be approximately 20 centimeters:
- Also, in this variation the load on the biceps will increase.
- But it cannot be used to pump the biceps muscle due to the lack of isolation from other muscles.
What muscles work
Main movers:
- Both are wide;
- Rhomboid muscles;
- Biceps
Movement aids and stabilizers:
- Large pectorals;
- Press;
- Trapezoidal;
- Muscles of the palm and forearm;
- Longus dorsi muscle
During the exercise, static tension in the muscles of the thighs and buttocks is possible if the athlete is accustomed to resting his feet on the floor in order to help himself well during the training process. But this should not be considered as a training activity. Trapezius work (shoulder lifts) is also discouraged and is only done if the lifter is advanced enough to perform the movement with a slight cheat.
How long should you do the exercise and how often?
It is not recommended for girls to include vertical rows in every workout in the gym. The optimal frequency of working with a block simulator is considered to be 2 times a week, provided that the athlete complies with the minimum number of weekly sessions (at least 3 times).
In one training day, you should perform from 2 to 4 sets of upper rows with different grips (the type of load is determined by the main goals of the individual girl’s training) with 10 to 15 repetitions within each of them.
Insufficient frequency of inclusion of vertical rows in the training program will lead to uneven development of the muscle corset (the lower part will become more prominent and stronger than the upper).
Such a shift in load will provoke a change in the girl’s appearance for the worse, making her hips, legs and buttocks heavy and voluminous compared to her arms, chest and back.
Excessive frequency of inclusion of the exercise in question in the athlete’s complex can lead to:
- the occurrence of general overtraining of the body (the muscles of the upper body will be temporarily unadapted to performing daily exercises. For example, when lifting a bag, your hands may begin to tremble or quickly get tired);
- receiving injuries of various types (from simple muscle sprains to serious joint dislocations requiring medical attention).
What is so special about vertical rows for girls?
First of all, it pumps the muscles of the upper back, with a secondary effect on certain muscles of the arms and neck. But that's not all. This exercise opens up a good prospect for the weaker sex to learn how to do pull-ups on the horizontal bar and gain strength for this basic exercise.
Depending on the nature of the loads and goals, representatives of the fair sex can work both on strength indicators and on the so-called “drying” of the upper shoulder girdle and upper back. And yes, it is also possible to work for the masses, if any of the girls are interested in this.
But in every barrel of honey there is a spoonful of what? That's right, fly in the ointment. Although the block exercise machine has proven its usefulness and indispensability, it is still not working with free weights or your own weight, as is the case with full pull-ups: the abdominal muscles (rectus and obliques), as well as the lower back, are largely excluded from the work.
And the pulling technique is quite specific for an untrained person - either you need to keep your back arched, or you need to pull not with your biceps, but with your shoulder blades... In short, there are a lot of “problems” in the technique, but I’ll tell you about them a little lower.
Mistakes and how to deal with them
MAIN MISTAKE #1: the movement comes from the arms, not from the back.
WHY IT ARISES: Every chain is only as strong as its weakest link.
This is a great analogy for many back exercises because they involve the biceps. The problem is that our biceps are smaller and weaker than our backs, and accordingly they get tired earlier. You will have to figure out how to pull the weight with your back and not your biceps, otherwise your back workout will end much earlier than necessary.
The rule for these (and many other) exercises is that if you feel that the exercise is not working the same muscle as intended, then something is wrong, you need to reconsider your views on the technique.
SOLUTION: Part of the solution to the problem is to distribute the effort correctly. It is necessary that the movement begins with the back muscles, moving the shoulders. At the same time, the arms are bent at the elbows only to allow the shoulder to move with maximum amplitude. Imagine that your hands are just ropes with which you cling to the handle, and your motor, locomotive, driving force is your back. Do it smoothly. There is no need to split the work of the back into separate phases.
MISTAKE #2: lowering the pulley handle too low.
WHY IT ARISES: It doesn’t matter at all why you are torturing yourself so much, trying to reach the handle of the block to your feet. After all, it's none of our business
The important thing is that you are trying to work with a weight that you cannot control, thereby reducing the effectiveness of the exercise. Below the level of the upper chest, the triceps comes into play, which no longer pulls, but pushes (without the help of the back!) the handle further, towards the hips.
HOW TO FIX: Don't pull low, that's all. Control your movements! To begin the lat pull-down, grab the handle of the pulley with any grip, sit up straight and arch your back slightly. Pull the handle of the block forcefully toward your upper chest, not lower, (or behind your head), trying to bring your elbows together behind your back. At the end point, pause for a second and then slowly, fully controlling the weight, return to the starting position - until your arms are fully straightened up.
MISTAKE #3: a very common one - the back is too rounded.
WHY DOES IT ARISE: the answer is simple, because it’s hard. Research shows that it all comes down to which muscle groups you have the most developed. When your back is arched, you rely primarily on your back extensors. However, if your back is not that strong, or if your hips are much stronger than your back and can “pull” the load onto themselves, then it is quite possible that when lifting serious weights, you will tend to have a rounded back.
Most people can actually lift more weight when they round their back. This movement is to some extent “natural”, since in such a position it is easier for the body to take a complex weight. Of course, you shouldn’t do this, because it threatens with all sorts of injuries and pain.
Robert Panariello, director of a physical therapy center in Bayside, New York, explains: “By rounding your back, you are depriving yourself of the necessary reserve of stability and this is very dangerous. From a biomechanical point of view, when performing any exercise, you need to take the most stable position.” If you do not provide yourself with the necessary reserve of stability, you can easily injure yourself.
HOW TO FIX: In all pulling movements, you should try to maintain a natural back position, without rounding it in either the upper or lumbar regions. You need to keep your head straight and not relax for a second! Take lighter weights and be sure to have someone supervise your technique!
How to start classes correctly
It is recommended to perform the exercises in the first part of the workout in the gym. To begin with, you need to choose the right weight (block weight) and number of repetitions. For this, it is better for beginners to contact an instructor.
Weight is determined by the level of physical fitness and the goals of the bodybuilder (to lose weight, build muscle mass, to “dry” the body). Beginners first need to work out the technique correctly, so it is better to start training with minimal weight.
It is necessary to start with 10 repetitions of 2 - 3 sets with weights of 25 - 30 kg for men and 15 - 20 kg for women . It is advisable for athletes with little experience to do 12 times for 4 approaches, for athletes with experience - 15 times for 4 approaches.
The main thing when performing an exercise is to adhere to the quality of the exercises, and not their quantity. To “dry”, gradually increase the weight or number of repetitions.
Before each session, be sure to do a warm-up (cardio exercise on an exercise bike, squats, bends, exercises with dumbbells) to warm up your muscles and prepare them for a safe and effective workout. At the end of the session, you need to relax the working muscles by stretching.
Before training, it is recommended to drink a glass of water (green tea), and during training, drink a little every 15-20 minutes. To increase muscle mass, you need to eat protein (powdered protein drinks, lean poultry or fish, egg whites) and carbohydrate foods (rice, oatmeal, wholemeal bread, freshly squeezed fruit juices diluted with water) in the first 20 minutes after training.
Almost eliminate fat from the diet. It is not recommended to eat food 1-2 hours before training.
Technique for performing exercises on a vertical machine
Strict adherence to the technique of performing exercises in a vertical simulator will help minimize the likelihood of injury to the athlete.
The generally accepted algorithm consists of successive stages:
- Set the required number of blocks that you plan to use during the exercise. Take the starting position, sitting on the supporting part of the structure and clasping the handrails of the simulator with your hands. The legs must be fixed in special bolsters.
- As you exhale, pull the handle down until it is level with the area slightly below the back of your head. During exercises, the elbows move in a perpendicular plane. The back remains consistently straight.
- Hold the position for 5 seconds.
- Slowly relax the muscles and return to the original position.
The direction of muscle development depends on the grip at the time of performing a vertical row.
Grip width
The most commonly used exercise in this exercise is:
| Type of grip | Short description |
| Straight grip | The backs of the palms are turned forward. It is recommended to use for the best pumping of the latissimus dorsi muscles. |
| Reverse grip | The backs of the palms are directed back. To work your biceps, you need to pull the block towards your chin. |
| Neutral grip | Used when working with heavy weights. |
| Wide grip | Most effective for strengthening the muscles of the shoulder girdle. The hands are located slightly wider than the shoulders. |
| Narrow grip | The hands must be placed on the handle of the block structure at a distance less than the distance between the shoulders. When performing the exercise with a close grip, the elbows are slightly moved to the sides. |
The difference between rows and pull-ups
The main difference between rows and pull-ups is the technique of performing the exercises. If in the first case the athlete is required to pull the block-structured handrail down (the working weight is determined by the fitness instructor), then when doing pull-ups the person works with his own weight.
Vertical rows in the simulator differ from pull-ups in that in the second case you can only work with your own weight. The weight on the machine is adjustable.
Vertical rows are included in the training program if the athlete has contraindications for pull-ups or does not have sufficient strength.
How many repetitions should women perform?
To avoid injury while performing vertical rows, athletes must strictly follow the fitness trainer's recommendations regarding the number of sets and repetitions. For women just starting to practice strength training, 3 sets of 10 repetitions would be optimal. In this case, the “working weight” should not exceed 15 kg.
As the muscle corset adapts to a given level of load, the number of approaches can be increased to 4, and repetitions to 12. If a girl has previously been involved in sports and is now recovering after a long break, the initial load for her will be 4 sets of 15 repetitions.
Weight for women when pulling a block
The initial working weight for women when performing exercises in a block simulator should not exceed 15 kg. After 3-4 weeks of active sports, it is recommended to increase the total weight of the blocks used to 20.
Further weight gain should occur as the muscle corset adapts to the given level of load (but not more than 5 kg in 2-3 weeks).
Technical errors
The most common mistakes that prevent you from achieving maximum results from regularly performing vertical rows are:
Scroll:
- stooped position of the shoulders during the exercise;
- curved spine due to incorrect position;
- lifting the buttocks from the supporting surface while relaxing the muscles;
- shifting the load (from the back to the arms, in particular the biceps);
- incorrect selection of “working weight”, which prevents compliance with the exercise technique.
The above mistakes are made not only by beginners who have not previously dealt with power loads, but also by experienced athletes who do not pay due attention to the technique of performing the exercise in question.
Possible mistakes
To minimize the risk of injury while performing vertical rows in a machine, it is recommended that the athlete avoid the most common mistakes.
| Possible error | Consequences of its implementation |
| Excessive body movement forward or backward. |
|
| Excessively large distance between hands with a wide grip. |
|
| Insufficient retraction of the shoulder blades when the hands are at the lowest point. |
|
| Insufficient fixation of the legs with soft rollers |
|
| Ignoring the “bear grip” (thumb on the bottom of the bar, the other 4 fingers on top). | Shifting the load on the wrist muscles. |
Technique for performing horizontal lever pull
Before starting a lesson, you need to configure the simulator in accordance with individual parameters.
- The back of the seat is installed so that during traction the hands are located in the waist area, without rising above the level of the solar plexus. At a higher position (at chest level), the biceps will actively engage in work and take a significant share of the load from the back muscles.
- The thoracic support must be adjusted so that at the end of each repetition, the arms straighten at the end point of the trajectory, but the weight is kept suspended. This way the amplitude of movement will be maximum, and the load will not go away from the target muscles.
The effectiveness and safety of the lever pull depends on the correct setup of the machine.
With a high position of the arms, the biceps takes on a significant share of the load
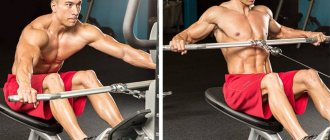
Two-handed horizontal lever pull
Sitting in an adjusted device with your chest resting on a vertical surface, grasp the handles with outstretched arms. The back is fixed in a straight position, the shoulder blades are pressed.
- As you exhale, pull the handles towards you with a powerful force, trying to bring your shoulder blades together in the final phase of the movement. When working with a narrow grip, the elbows are kept close to the body; a wide stance of the arms involves spreading them to the sides. At this time, the chest should not come off the support, the position of the back remains unchanged.
- They pause for a second, bringing their shoulder blades together as much as possible and concentrating on the peak contraction of the back muscles.
- While inhaling, with a controlled movement, bring the device to its original position, preventing the weight from returning to the support.
Do 8-12 reps in 3-4 sets.
Until the approach is completed, the back remains level and naturally arched.
All movements are made smoothly, without jerking, preventing the body from tilting back. The back remains level with a natural arch in the lower back.
Returning to the original position, for maximum muscle stretching, it is permissible to slightly move your shoulders forward without locking your arms at the elbow joints.
Video: Proper Horizontal Lever Technique
One-handed horizontal linkage
This method of performing horizontal rows allows you to exercise with a larger weight and an increased amplitude compared to the previous method. The muscles here receive a concentrated load.
Having adjusted the simulator, sit down with support in the thoracic region. Hold the handle with one hand and grasp the support lever with the other. The body is straight, a natural deflection is recorded in the back.
- While exhaling, use your working hand to pull the handle towards you, trying to keep it close to the body.
- At the end point of the movement, move the elbow back, retracting the shoulder blade towards the center. Here they pause for 1–2 counts, concentrating on muscle contraction.
- While inhaling, bring the working hand to its original position with a smooth movement, preventing “throwing”.
- Having done the required number of times with one hand, repeat similar actions with the other.
Perform 12 repetitions on each arm in 3-4 approaches.
When pulling the handle towards you, you do not need to make a rotational movement with your body following the movement of your working hand.
This way of performing the lever row will help eliminate back muscle asymmetry.
Contraindications and restrictions for training
There are virtually no contraindications for overhead pull-downs, with the exception of:
- Hernia of the spine in the thoracic region.
- Injuries (sprains, dislocations, fractures) of the shoulder girdle, hands, elbows, back.
Don't miss the most popular article in the section: Morning exercises for those over 40, 50. Gymnastics exercises for weight loss, video lessons.
Exercise options and technique
The exercise can be performed in several variations. The main difference: wide and narrow grip. We recommend trying both options to understand which muscles receive more load.
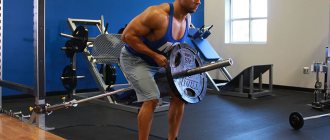
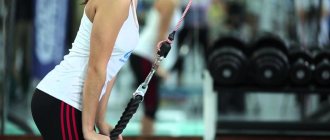
Wide-grip lower block row to the waist
The peculiarity of using a wide handle for seated rows with arms raised to its edges is, first of all, that it is possible to move the shoulder blades further. In addition, the bend on such a handle allows you to increase the amplitude of the compression movement. The hands extend further than the chest, that is, further than the ribs. In any case, due to the increase in amplitude, the shoulders are pulled back to a greater extent - this is precisely the advantage that is given by pulling the lower block to the belt with a wide grip.
Pulling the wide handle is carried out not to the stomach, as in the classic movement, but to the chest, and the elbows move through the sides at the height of the handle itself.
Pull-down of the lower block to the waist with a narrow grip
The closer the grip, the more convenient it is to do the exercise. Therefore, every tenth person training on the simulator prefers to use a narrow grip when pulling the lower block to the waist while sitting.
To begin with, a consistent description of the classic technique of pulling the lower block to the stomach (it is to this that the handle is pulled up when pulling with a narrow grip), a characteristic feature of which is the static position of the back, without dynamics in the lower back.
- At the starting point, the arms are straightened without bending the torso forward, the knees are slightly bent, and the legs are supported.
- A traction movement is performed towards the abdomen, during which the shoulder blades move back and are brought together. Pull with your shoulder blades, not your arms, and keep your back straight.
- After this, straighten your shoulder blades again, but throwing the handle of the exercise machine. Allow your shoulders to stretch forward and stretch your back muscles.
- After straightening the arms, the beginning of the movement is repeated (while exhaling).
The hands in the classic version move smoothly, stopping at the extreme point (the inner parts of the palms touch the ribs) while simultaneously retracting the shoulder blades.
When you finish the exercise, be sure to release the weight with a straight back. You can either lean forward and give up the weight, or loosen the support in your knees, the weight will pull you forward along the bench until the plates are in place. In any case, keep your back straight to avoid injury.
There are other modifications of the narrow-grip row in stock:
- the back is still straight, but dynamics appear in the lower back (this option is also within the classic one);
- reverse (backs of palms down) narrow grip of a wide handle (other technical details remain unchanged) - this movement is more convenient for the hands, since the biceps are connected to it;
- narrow grip of a wide handle from above - used to simulate a bent-over barbell row. Since not everyone uses the barbell in the gym, this type of exercise is rare.
With a narrow grip, the muscles of the lower back work more intensely, and with a wide grip, the muscles of the upper back work more intensely.
One-handed pull-down of the lower block to the waist
Pulldowns from a seated position with one hand perfectly replace boring games with weights and dumbbells.
Performed with each hand in turn. The free hand is placed on the thigh or on the side bone.
The principle of the movement is the same as the bent-over dumbbell row: as you exhale, the block is pulled towards you (while simultaneously rotating the hand to the position of the palm facing upward), and in the meantime the shoulder blade is contracted on the back. Only one shoulder blade works, specifically directing the load to the latissimus muscle. The reverse movement is done while inhaling.
Despite the weight of the block being no less than that of a barbell or dumbbell, the effectiveness of such traction is no less.
Analysis of the exercise
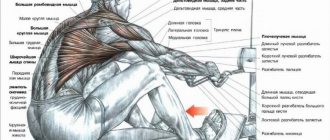
What muscles work
- The main muscles are the latissimus and posterior deltoids, plus the rhomboid muscles of the back due to the adduction of the scapula to the spine.
- Auxiliary muscles are the abs and longus dorsi as stabilizers, biceps, forearm muscles, teres major and minor, and trapezius muscles.
Benefits of Exercise
- The work of the lats is quite difficult to isolate. In classic rows with a barbell and dumbbells, the stabilizers, legs, muscles, and core are significantly involved. This movement allows you to completely transfer the load to the widest;
- The design of the simulator is such that a powerful athlete can receive the required amount of load in it and will be able to perform the exercise with significant weight, and a beginner will be able to work on technique, posture and use the weight that will be suitable for him;
- The exercise allows you to work both “halves” of your back separately and avoid muscle imbalances;
- The amplitude of the work in the Hummer is slightly greater than when performing a conventional block pull. The exercise is performed with maximum stretching of the muscle, this helps to get excellent quality muscle development;
- Using the machine allows you to exercise safely and will help beginners develop the necessary neuromuscular connections and learn to feel their muscles before moving on to free weights.
Flaws
- The movement is not accessible to all athletes due to the fact that the exercise machine is quite rare in minimalist gyms. Large fitness centers are already buying a car, while smaller ones are forced to make do with only a crossover;
- The exercise is not suitable for athletes with very short arms and short stature. They simply do not have enough arm length to effectively work in the machine;
- Beginners can pull the levers toward themselves using their biceps rather than their back; this does not allow them to achieve the goal of the exercise;
- There is a risk of injury if the weight is selected incorrectly. Many people like to “hang” a large amount in the block simulator and then pull it due to inertia, but this is not the right strategy. For an isolation exercise, even for a strong muscle group, medium weights are required.
Lever rod: technique and nuances
Watch this video on YouTube
Execution technique
As I said earlier, there are several options for performing the exercise.
Dynamic
That is, we make the movement not only using the latissimus muscles and shoulder blades, but also include the shoulders a little in the work. It looks like this. When returning the shoulder blades to their original position, we bring the deltoids forward a little, trying to bring them together in front. Thus, we stretch the lats more strongly and can work through the full range of motion. This will activate more muscle fibers in movement. But there is also a drawback to this. When a muscle is stretched, it relaxes a little and our lats lose their load for a while. Some professionals lean forward a little more and help themselves with their lower back to take as much weight as possible. This is a very risky technique and can be classified as “cheating”. Beginners are strictly forbidden to do this! And in general, if you are not sure that you can do everything correctly and not hurt your back, then it is better to refuse such an adventure.
Static
This option, in my opinion, works the back muscles better, since we constantly keep them under load (static). It looks like this. Just like in the previous version, we pull the block towards us, but when returning to the starting position we do not bring our shoulders forward. Of course, this way the lats stretch less, but they do not go into a relaxed mode. If you are a beginner, do only the static version of the lower block row. And after a while, once you learn the correct technique, you can try the dynamic version and decide which one works best for you.
Initial position
First you need to decide what type of exercise machine you have. There are those that have adjustable cable height or seat height. If you have one, then you are lucky. Install the cable so that it is perpendicular to the area to which you will pull the handle. In our case, this will be the middle of the abdomen.
If your exercise machine is not adjustable, then hope that it will fit your height. Basically it is made for the average person. Therefore, there should be no problem with the cable height.
For those who do not have this simulator (this happens extremely rarely) or the cable height is not suitable. The only alternative would be to perform lat pulldowns in a crossover. Simply install the block to the height you need. Sit on the floor and do this exercise.
Having decided on this point, we can now proceed directly to the starting position.
- Take the handle you need and attach it to the cable using a special carabiner.
- Set the limiter to the desired weight.
- Grab the handle and sit on the bench. Place your feet on the special foot rests and bend your knees slightly. The main thing is not to sit too far away, as this will make it more difficult for you to maintain a bend in your lower back.
- Lean back until your body is parallel to the rack of the machine.
- We keep our back straight, there is a slight arch in the lower back, and our chest is pushed forward.
- The arms are fully straightened and extended forward.
Execution technique
- Take a deep breath and as you exhale, pull the handle towards the middle of your abdomen. That is, we begin to slowly move our elbows back. Thus, we will bring the shoulder blades towards each other and pull the cable along with us.
- Stay in this position for a while and squeeze your latissimus muscles properly. Then, while inhaling, we return to the starting position.
If you perform the exercise in a dynamic version, do not forget to bring your shoulders forward.
There are a few more technical points. They concern variants with wide hand placement. In these variations, we will move our elbows out to the sides a little more.
Alternative
How to replace the traction of the upper block to the chest? As already mentioned, this exercise is very similar to pull-ups on the bar. Therefore, for those who have a crossbar at home, there are no problems. But if there is none, then you will have to show a little more ingenuity. You can replace the exercise with a bent-over row of a barbell or dumbbells. Here the back muscles will be worked from a different angle, but this is not scary, the main thing is that they will work well. If you do an exercise with dumbbells, the grip can be either straight (as with a barbell) or neutral (dumbbells parallel to the body).
The second exercise that can replace the overhead pull-down is a pullover with a barbell. To begin, you need to lie down on a bench and place your hands with the barbell behind your head. In the starting position, your elbows need to be bent so that the barbell is close to your forehead. This angle must be maintained throughout the entire range of motion. You need to lower the barbell until the muscles feel a good stretch, and raise it until the barbell is at chest level. To make the exercise as effective as possible, monitor the level of elbow bend - it should not change.
Basic errors during execution
Common mistakes:
- Stooping (curvature of the spine).
- Lifting the buttocks from the seat.
- Full extension of the forearms at the top point.
- Redistributing the load on the biceps of the arms, rather than the body.
- Too much weight or a large number of approaches, which will make it difficult to perform the exercise correctly.
Consequences of incorrect execution:
- injuries;
- pain in the body, resulting from the accumulation of lactic acid;
- ineffectiveness of working out the spinal muscles and hypertrophy of the arms, not the back.
Almost all bodybuilders include overhead pull-downs in their basic training routine. In addition, this simple strength exercise is widely used by beginners. The main thing in forming a beautiful figure is to adhere to systematicity and the correct technique.
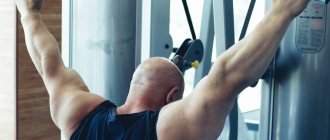
The technique is performed only in the gym on a special simulator
The overhead pull-down is suitable for expanding the size of the torso due to the growth (hypertrophy) of the latissimus muscles. Simulates standard pull-ups, as it works a large number of muscles. However, it has its advantages compared to pull-ups.
On the simulator, you can adjust the weight and exercise in a descending pattern, even for beginners, that is, gradually increase the load. This allows you to make a larger range of motion and, accordingly, better work out the torso.
Advantages:
- Increasing the width of the back.
- V-shaped torso and thin waist.
- Smooth posture.
- Muscular and sculpted torso.
- Availability and ease of implementation.
- Suitable for those who cannot do pull-ups.
- Suitable for beginners.
- Suitable for men and women.
Unlike the front row, which targets the rhomboids and increases their thickness, the overhead row increases the width of the muscles.