The exercise is designed to develop the back muscles that lie closer to its central part, and has a weak effect on the outer side of the latissimus muscles. In addition, with this form of execution, the biceps are also involved, and much stronger than with a standard grip, which also needs to be taken into account. The exercise will not give much muscle mass, and is not intended for beginners, for whom there is no particular need to separate and give relief to the muscles.
Options[edit | edit code]
Source Iron World Magazine No. 5
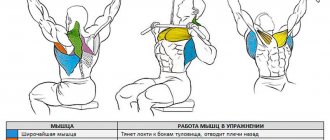
Lat rows are used when working on the back muscles. In fact, they are “pull-ups in reverse”: in this case, it is not you who are pulled up to the bar, but the bar (more precisely, the handle of the machine) that is “pulled up” to you.
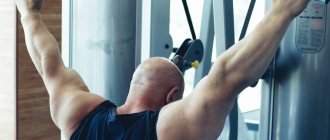
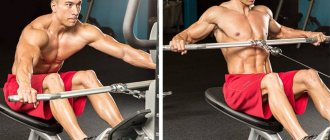
Option 1: Straight Wide Grip Row[edit | edit code]
Close-grip row
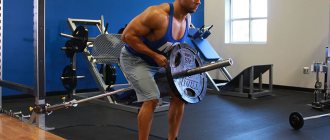
We grab the handle of the machine with a grip much wider than shoulder-width. At the ends of the wide handle you can see downward bends - these are the places you need to grab (sometimes the handle is a continuous bend - in this case you just need to grab its edges). We sit tightly on the seat - our hips should go under the upper bolster of the “seat”. You jerk the handle (part of the amplitude of movement, the weight must pass due to the inertia of this jerk), then forcefully pull the handle to the top of your chest, hold it for one or two counts, additionally straining your back muscles, and return it to its original position. Basically, the muscles in the middle of the back work; the latissimus muscles have less load. If you've watched videos of professional training, you may have noticed that many athletes lean back when performing this exercise - sometimes significantly, sometimes not so much. This style of execution allows you to use a much larger weight of weight and shifts the emphasis from the middle of the back closer to its edges.
Clue
Charles Glass advises performing this row with a straight back and lowering the handle as low as possible, holding it for one or two counts at the bottom. Indeed, this method of execution particularly hits the middle of the back, the rhomboid muscles. As a result, the back acquires the necessary tuberosity. Naturally, in order to lower the handle below the top of the chest, the weight should not be very heavy.
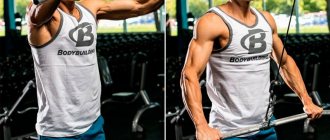
Option 2: close-grip row[edit | edit code]
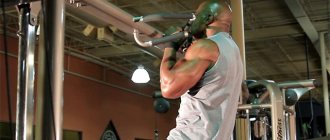
Everything is exactly the same as in the previous version, only you grab the handle with a reverse grip and try to place your palms as close to each other as possible. In this version of the rows, the main load falls on the latissimus dorsi muscles.
Hints
When performing rows with a reverse grip, the biceps are largely involved, and to a lesser extent, but still significantly, the forearms. Since these muscle groups are inferior in strength to the back muscles, they get tired earlier, which means that the exercise has to be completed when the back has not yet been properly worked out. One way out of this situation is to use wrist straps. For others, a special technique for performing the exercise, which we will tell you about now.
The position of the shoulders plays a major role here. Holding the handle of the machine with a narrow reverse grip, make a circular movement with your shoulders, moving them first forward and up, and then moving them back and down. At the same time, your arms will be slightly bent at the elbows, and the handle will go down a little. It is better for someone to hold this very handle, although you can get smart and make such a movement without outside help. From this position, start rowing to the same level and straighten your arms at the end of the movement. You will see that the hands will practically be excluded from the work, and the main load will be placed on the lats. Yes, the weight on the simulator with this option should be reduced somewhat.
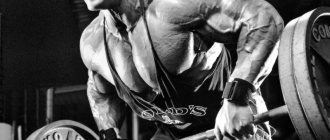
Option 3: parallel grip row[edit | edit code]
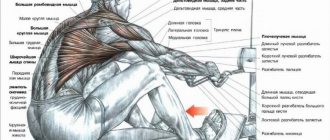
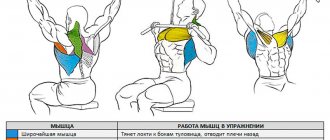
Muscles working in the upper pull of the cable: 1 - latissimus dorsi;
2 - biceps To perform this version of rows on the upper block, we will need a handle, which is usually used for rows of the lower block. In terms of technique, this is the lightest version of the “upper” rows, so here you can use slightly more weight than in the previous version, and even more so than what you usually use when performing wide-grip rows. The technique is absolutely similar to that described in the previous chapter; the use of straps is mandatory. As in the previous version, the latissimus dorsi muscles are mainly loaded.
Upper cable pull with parallel grip[edit | edit code]
Source:
“Bodybuilding.
Book trainer" .
Editor:
Oksana Usoltseva
Ed.
: Eksmo 2013
Inventory
: training apparatus.
Core muscles
: latissimus dorsi muscle.
Additional muscles
: biceps.
Level of training
: average, professional.
Various inclination angles and handles make the machine's vertical rows more effective for the muscles.
Step 1
. Grab a parallel bar and sit with your arms fully extended. Tilt your body back about 20°.
Step 2
. Pull the bar towards your chest
Step 3
. Stop and slowly return to the starting position.
Working muscles
Thanks to this exercise, a large number of muscles of the back, arms and chest are involved.
Basic
Mainly involved:
- teres major muscles;
- lats;
- biceps;
- brachial muscle.
Additional
When performing various types of deadlifts, additional muscles work:
- trapezoidal;
- diamond-shaped;
- pectoralis major;
- small pectoralis.
A person has more than 400 muscles. Each performs strictly its own specific function.
Upper pulley to the chest for girls[edit | edit code]
Source: “Strength training for girls”
.
Illustrated manual. Author:
Frederic Delavier, 2016
Chest Row Example of
Chest Row
belongs to the category of basic exercises, since it moves the shoulder and elbow joints. As a result, not only all the back muscles work, but also the rear deltoids, biceps, long heads of the triceps and forearms.
Performance
Sit on a cable machine bench set in the upper position and grab the handle with an underhand grip. Hands approximately shoulder width apart (medium grip). You can also use an overhand grip. In this case, use a wide hand position (wide grip). Experiment with hand positions until you find one that suits you best.
Performing the exercise with a straight grip with a narrow hand position (narrow grip) is easier than with a wide reverse grip, however, in this version, the biceps work more and the back muscles work less. If you are a beginner, start with a straight, narrow grip.
You can also use a neutral grip, which allows you to put more force into the exercise than a straight grip. In the lower position, the back muscles are stretched more, and in the upper position the range of motion is limited.
Pull the handle at least towards your forehead. If you feel comfortable, pull it up to your upper chest. Hold this position for 1-2 seconds, then slowly return the handle to its original position. Without straightening your arms completely, repeat the exercise.
The handle can be pulled to the chest or placed behind the head. The last option is the most difficult and traumatic for the shoulder joints, so we do not recommend it.
When performing rows and pull-ups, never extend your arms FULLY. When you straighten your arms, the muscles become severely stretched, which can lead to tears in your biceps and shoulder muscles. You should maintain constant muscle tension without fully extending your arms. Some women straighten their arms to rest between reps. If you choose this option, keep in mind that hanging from a bar puts your shoulder ligaments in a vulnerable position. Try to perform rows and pull-ups in one smooth motion, without jerking.
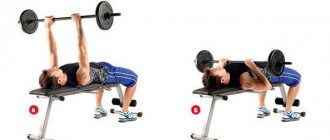
Option: pull-up[edit | edit code]
As you get stronger, you can move from machine rows to pull-ups. So, grab the bar with a reverse medium grip. Bend your knees at an angle of 90 degrees, leaving your hips motionless. Cross your legs so that your right foot is on top of your left ankle. Make sure you have a firm grip on the bar (press your index finger or even your middle finger with your thumb).
Using your back muscles, pull yourself up to a position in which your forehead is at the level of the bar. If you can, pull yourself up a little higher and rest your chin on the bar. To do this, tilt your head back a little. Hold this position for a second, then slowly lower down. Do not straighten your arms completely. Maintain constant muscle tension to avoid injury.
It's common for you to sway as you do a pull-up. To avoid this and keep your body straight, tighten your buttocks and press your right foot onto your left ankle. This will help you avoid swaying.
To increase the intensity when you can easily perform 12-15 bodyweight pull-ups, you can hold a dumbbell between your legs.
Advantages
- It does not require much time and works a large number of body muscles at the same time.
- Allows you to change the load you want to apply to the muscles. After each subsequent approach, you can change the load a little. When doing pull-ups, it is much more difficult to do it.
Flaw
- Unfortunately, many women cannot do pull-ups on a horizontal bar, which is very frustrating for them. To solve this problem, you can use pull-up machines, which allow you to choose a load that matches your strength level. This will allow you to complete the set number of repetitions.
Recommendations
You have already understood the technique and features of the exercise, now we would like to give you some useful recommendations that will help you make the parallel grip pull-down a safer and more effective exercise:
- Warm up before every workout. This applies not only to back training, but to all training in general. Many beginners do not pay enough attention to warming up, considering it simply unnecessary. Indeed, at first, when you work mainly with light weights, there may not be much need for a warm-up. But after some time, when the weights of the projectiles become heavier and heavier, the likelihood of injury will increase significantly. By warming up, a person prepares his muscles and joints for subsequent loads, which significantly reduces the risk of injury from exercise.
- Do the exercise technically. As we mentioned earlier, incorrect technique is one of the reasons for lack of results. Before adding an exercise to your program, make sure that you perform it efficiently and technically. If possible, ask a coach (or a more experienced athlete) to monitor your technique.
- Don't exercise too often. By working your back or any other muscle group several times a week, you will not only not speed up the growth of muscle mass, but, on the contrary, will slow it down significantly. Remember that muscles do not grow during training, but during rest!
We can put an end to this. We hope that this article was interesting to you and you gained a lot of new useful knowledge. We wish you success in your training!
Read also[edit | edit code]
- Raider chest thrust
- Pulling the block to the side with both hands
- Pulling the block down with straight arms
- Wide grip pulldown
- Seated chest row
- Standing chest row
- Seated row of block to the waist
- Block row for biceps
- Vertical block thrust
- Horizontal block thrust
- Head pull on a high block
- Abdominal row on the machine
- Chin pull
- Pull the lower block forward
- Smith One Arm Row
- Standing one-arm row
Common Mistakes
When working with a block simulator, inexperienced athletes can make various mistakes, the most common include:
- strong arch in the lower back;
- flexion and extension of the hands;
- abduction of elbows to the sides;
- use of heavy weight;
- deviation of the body back at the moment of lowering the handle to the chest.