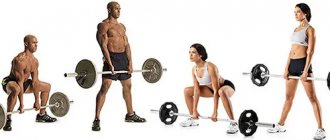
The horizontal (lower) block row is an effective exercise aimed at working the back muscles, and mainly at working out the so-called “thickness” of the back.
The lower block row is a type of horizontal row that serves to increase the thickness of the back, but unlike such classic basic exercises as, for example, the bent-over barbell row or the bent-over dumbbell row, it is more of a formative exercise than a mass-building exercise.
When performing horizontal block rows, you purposefully work certain areas of the back, shifting the emphasis of the load using different directions of traction to the body, as well as handles attached to the cable.
Of course, most people working out in the gym strive to load the latissimus dorsi muscles to the maximum, which is what this exercise is perfect for.
The exercise allows you to work your back muscles in a focused manner, easily select the optimal working weight for you and does not require too complex a technique, so it is recommended for regular performance and inclusion in back muscle training for both men and women.
Let's look at the lower block thrust in more detail.
Technique for performing horizontal block rows
The lower block row, as already mentioned, can be performed in different ways. Each of them will be discussed in detail below.
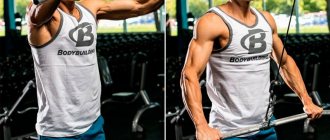
Wide grip row.
This wide-grip exercise, in turn, can be performed in several ways. This can be a horizontal block pull to the belt (also known as a pull to the stomach), as well as a pull to the groin and chest.
Abdominal exercise allows you to pump up the middle part of the latissimus muscles. Rows performed to the groin help pump the lower part of the latissimus muscles. It's the hardest thing to do. The chest exercise also helps to work mainly the latissimus dorsi muscle. It is usually done by beginners because of its ease of implementation.
But no matter which direction you choose, the technique will be the same:
- Install the handle and the required weight on the machine. After this, grab the projectile with a wide grip, or more precisely, spread your arms to a distance greater than shoulder width, with your palms lying on top of the projectile. Keep your head straight, bend your knees, and bend your back slightly.
- If you prefer to perform the exercises with a straight back, then inhale and pull your arms towards your chest, stomach or groin. Don't tilt your head. Tighten your back muscles and biceps. Hold the position for a couple of seconds. If you are doing a bending exercise, then first move forward a little, inhale and bend back, pulling your arms to your chest, belt or groin. Don't tilt your head. Tighten your back muscles and biceps. In this position, also freeze for 2 seconds.
- Exhale and come back. Perform the exercise the prescribed number of times.
Block row with a narrow grip.
The lower block row can be performed with a narrow or reverse grip. With its help you can better work your biceps. In this case there are also several types of exercise. This is a block pull to the waist while sitting, as well as pull to the chest and groin.
advertising is not displayed
The execution technique for all types will be the same:
- Install the handle on the machine and set the weight. Grasp the projectile with a reverse grip. This means your palms should be on the bottom of the bar. You also need to hold the handle with a narrow grip. This means that the distance between your palms should be approximately the width of your wrist. Keep your head straight, legs slightly bent at the knees.
- When performing a bending exercise, move your body forward a little and then exhale, move your body back, pulling your arms towards your chest, stomach or groin. Keep your head straight. Tighten your back muscles and biceps. Freeze in this position for a couple of seconds. If you are doing the exercise with a straight back, then inhale and pull your arms towards the selected part of the body. Don't tilt your head. Tighten your back muscles and biceps. Freeze in this position for 2 seconds.
- Exhale and return to the position you originally occupied.
Parallel grip block row.
One of the most popular exercises of this type is the parallel grip row. You can perform it, like the previous exercises, in the following ways: pulling your arms to the chest, abdomen and groin.
The technique for all types will be as follows:
- Install a parallel handle bar on the machine. Also set the desired weight. Grab the handles with your palms, keep your head straight, legs slightly bent at the knees.
- When doing the bending exercise, lean your body forward, inhale and move it back slightly, pulling your arms towards the desired area of the body. With your back still, simply take a deep breath and bring your arms toward your waist, chest, or stomach. In any of the options, the position should be fixed for a couple of seconds.
- Exhale and come back.
The horizontal pull-down is an excellent exercise for the back and biceps muscles. Correct and regular implementation will certainly give the desired result.
Row Handle Options
There are two types of exercise:
- Classic horizontal block pull to the belt - performed with a narrow V-shaped or L-shaped handle .
- The horizontal block pull-down to the chest is an execution option that is aimed at working the upper back (mainly the rear deltas). A rope or wide handle with bends is suitable for this .
The grip depends on the type of handles chosen.
- For a narrow V, this is the neutral position.
- For Wide – straight grip.
- When working with ropes, use a neutral grip with a slightly modified position of the hands.
Technical errors
Most horizontal rowing machines are designed taking into account the anatomical characteristics of a person, and allow you to pull weights without jerking, pushing, or breaking technique. The movement can be performed smoothly and accurately, and this applies to people with any anthropometry.
Typical mistakes should be avoided simply because making them will not allow you to get enough load, or will redistribute the work in such a way that a person injures muscles, joints or ligaments.
While deadlifting, you should avoid:
- Works like a rowing machine. Some athletes push their feet into the pedals of the block exercise machine, and manage to straighten and bend them at the knees, fidgeting on the seat. This allows you to additionally load your legs, and does not allow you to work in the amplitude that is needed to work your back. By shifting the pelvis back and forth, a person reduces the amplitude of the latissimus muscles and redistributes the load. In addition, “rowing” can cause strain in the trapezius muscle and shoulder injury due to shifting force vectors;
- Rounded back workout. Those with “office posture”, that is, the heads of the shoulders are twisted forward, and a weak rhomboid back muscle with an overdeveloped trapezius, often perform this exercise incorrectly. They do not pull the shoulder blades towards the spine and do not work their back actively enough. This option does not allow them to load the lats and rhomboids; the pull is performed with the biceps and, in part, due to “throwing” the weight up with the shoulders, the biomechanics of movement are significantly disrupted;
- "Movement in three planes." Recently, it has become fashionable to promote wave-like work of the spine in some strength exercises. This is called three-dimensional fitness. But this is not appropriate for belt pulls, since due to the sitting position, the lumbar spine completely takes on the load. Excessive “looseness” in the back leads to overload and injury;
- Stretch your arms forward with each repetition. This may be caused by the athlete's anthropometry. People with long legs and short arms should fix their legs as rigidly as possible and perform the tilt with traction only once - when they grab the handle of the exercise machine;
- Work in different planes in one approach. Pulley rows can be performed either to the waist, to the abdomen, or to the top of the chest. But working in different planes is harmful to ligaments and joints. It overloads the shoulder joint and can cause the person to suffer pain later. In addition, part of the load will shift to the hands, since it is they who “direct” the handle of the simulator in different planes.
Technical errors can be avoided if you select the correct weight for the work and do not rush through repetitions. Movement control should be the basis of training.
Types of simulators
From the point of view of the principle of creating a load, the equipment offered by our store is divided into 2 groups:
Machines with tile sets
(built-in stacks), where the working weight changes in increments of 5 kg.
Versions loaded with sports weights
– suggest a much larger range of resistance selection.
Another classification is based on the way the exercise is performed. Available for sale:
models for deadlifts sitting vertically or horizontally
combined two-in-one exercise machines
T-bars for bent-over chest rows
In a separate category it is worth highlighting models with the help of which lever traction is performed. They allow you to work with each hand in turn, separately pumping the right and left parts of the body to eliminate their asymmetrical development and strengthen lagging muscles. Mechanically, the exercise is similar to pulling a block in a horizontal plane.
The advantage of the presented machines is that during the execution of approaches, the working muscles are completely stretched and contracted, and the load is felt at each segment of the amplitude. Ergonomic, well-thought-out designs guarantee comfortable training, adherence to correct technique and, as a result, user safety.
Exercise technique
- We fix the selected handle and sit down on the simulator with our torso forward. The lower limbs are slightly bent at the knee joints. The feet rest tightly in a specially designated place and do not come off throughout the entire training.
- Starting position. While sitting on the machine, you need to keep your back straight, your lower back slightly arched, and your chest straightened. We hold the handles with our palms facing each other on outstretched arms, slightly leaning our shoulders forward.
- As you exhale, we pull toward the abdominal cavity, at the same time the elbow joint bends, and the shoulder joint is retracted to the extreme posterior position. The elbow joints should always be as close to the body as possible.
- When the handle comes into contact with the abdomen or solar plexus, it is necessary to connect the shoulder blades as much as possible, fixing for a moment, straining the spinal muscle fibers. The maximum angle of inclination of the body back is 15 degrees. This is the extreme point.
- As you exhale, we smoothly return to the starting position. We straighten our upper limbs at the elbows and lean our shoulders forward.
- The spine should be kept straight with a preserved deflection in the cross-lumbar region. It is necessary to ensure that when performing this exercise the body remains as isolated as possible from unnecessary movements.
When performing this movement on the simulator, focus on the latissimus muscles. Follow the rules of execution, and the result will not keep you waiting
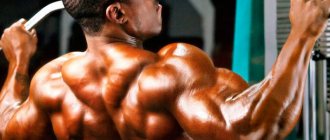
The meaning of the exercise and muscle work
Horizontal rows in a pulley machine are one of the required exercises on the day when you train your back. By varying your grips, you can work your lats from all angles. This is very convenient when, with the help of basic exercises, you have already built up mass and want to give the muscles the desired shape.
During the exercise the following works:
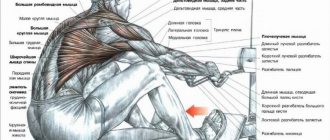
- The latissimus muscles bear the main load.
- Biceps - Helps you pull weights by bending your elbows.
- Spinal extensor muscles. They are responsible for straightening the back.
- Additionally, the trapezius muscles, teres major, rhomboids, and rear deltoids are included.
If you do the exercise incorrectly, the biceps or lower back will work, and the lats will tighten last.
Therefore, pay special attention to technology
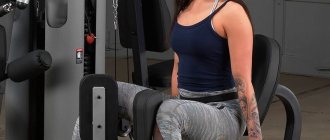
Seated pulley rows, also known as rowing rows, are performed using a special pulley machine. Usually the simulator has a lower and an upper block. The top one can be pulled behind the head or to the chest, and we will pull the bottom one to the belt.
Don’t be confused, rowing a barbell to the waist and rowing a horizontal block are two different things. The first exercise is basic mass-gaining. The second is more formative, it is done while sitting.
So, let's start doing the exercise:
- Set the desired weight (for men – 10 kg, for women – 5). Now we will do a warm-up with light weights.
- We rest our feet on special supports, bend them at the knees, and find a comfortable position (the angle can be from small to 90 degrees). Keep your back straight, with a natural arch in your lower back.
- We stretch our arms forward and clasp the pre-installed handle.
- We pull the weight towards ourselves until the body reaches a position perpendicular to the floor. From this point we begin to do repetitions.
- Straighten your shoulders, bringing your shoulder blades together, pull the handle towards your stomach. You should feel the load in your back, not your biceps. We will return to this later.
- When the handle touches your waist, hold this position for 1 second. In this position, your shoulder blades are retracted as much as possible.
- Then release the weight back. In the classical technique, the body remains motionless. If you perform the exercise by tilting your body forward following the weight, then you should not bend over too much and round your back. Even if the tiles of the machine have not completely lowered. During the entire exercise, the deflection in the lower back is maintained, and the shoulder blades remain pressed. The difference between the two techniques is described below.
When, during an exercise, you lean your body forward while lowering the weight, and then lean it back again during the next lift, you also force the back extensors to contract. These are long muscles that run along the spine. The latissimus muscles (namely, the exercise was originally intended for their development) are responsible for bringing the arms to the body. That is, the lats work precisely when you pull your elbows back.
Therefore, if your goal is the lats, fix your body in one position and work exclusively with your hands, without leaning forward with the weight. If you want to work your entire back, bending forward will help you stretch your muscles better before your next rep. But remember that in this case there will be a risk of injuring your lower back.
Do 10-12 reps in 3-4 sets with the working weight.
What muscles work
Performing these exercises involves maximum load on the latissimus dorsi muscles. The following groups are also included in the work:
- Biceps muscles (biceps).
- Extensor part of the spine (responsible for straightening the back).
- Trapezius, rear deltoid, rhomboid muscles.
If you violate the rules of doing the exercises, the latissimus dorsi muscles will be the last to be loaded, and the arms and lower back will be mainly involved. In this regard, special attention must be paid to technology. Rowing is an activity with a minimum of disadvantages. By observing all the nuances of execution and load rules, the athlete will be able to quickly pump up and form a V-shaped torso. The lower row on the machine is indispensable for people who want to improve their posture. Often these exercises are included in a complex with pull-ups.
If, when performing horizontal rows in a crossover (while standing), the elbow areas of your arms begin to hurt, you should stop exercising. This symptom may indicate a sprained brachialis muscle. If you ignore this point, the injury will take a long time to heal, causing discomfort with increased load.
Example of a workout with the addition of horizontal rows
What is the proper training for seated deadlifts? To begin with, a complete warm-up of the whole body, even the legs. After this, it is better to switch to pull-ups or a vertical block as a replacement. Only then should you start deadlifting, when the muscles are sufficiently warmed up and you can push yourself to the maximum in heavy strength approaches. The entire back workout after warm-up and cardio will look like this:
- Pull-ups/vertical pull-downs with wide handles.
- Horizontal block traction.
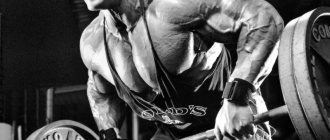
- Bent-over barbell/dumbbell rows.
- Shrugs with dumbbells.
- Hyperextension.
If a deadlift is added, then it should be placed in the middle of the workout, and also perform 2 sets of hyperextension to warm up the lower back.
At home
Even without going to the gym, horizontal rowing is available to everyone. How to replace a bulky exercise machine? The answer is simple - rubber bands. Just secure them at the desired height and perform deadlifts just like you would in the gym. The movement can be performed with one hand for greater clarity and focus on the back.
- Warm up.
- Pull-ups on the horizontal bar.
- Horizontal pull of the rubber band.
- Shrugs with dumbbells.
The harness exercise can be alternated with bent-over dumbbell rows for weeks at a time.
In the gym
Perform deadlifts as usual, after 1-2 back exercises and a full warm-up. Choose the repetition mode depending on your training goals, but I do not recommend going beyond 3-5 sets.
Example of a gym workout:
- Weighted pull-ups/vertical rows.
- Lever row in the machine/dumbbell row in an incline position.
- Horizontal row in a block machine.
- Shrugs.
- Hyperextension.
Grip Features
Depending on which handles are used, there are several options for traction on a horizontal block. They differ from each other not only in the equipment used, but also in which area of the lats the load will fall on during execution.
- Deadlifts with a narrow grip, with the handles toward the lower abdomen, mean that the central part of the latissimus muscles will be loaded.
- By performing deadlifts with a wide grip, you can work the upper part of the lats in detail;
- Using a wide bar, you can work on the outer part of the lats. This is achieved by using a wide grip.
In addition, there is the option of pulling on a horizontal block with one hand. This option has both its pros and cons. It takes quite a lot of time, since it must be done for each hand separately. In addition, heavy weights cannot be used here.
The advantage is that this option is very effective when used to “finish off” muscles at the end of a workout.
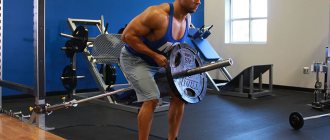
Pulldown of the lower block to the chest
What muscles work when placing your arms wide and pulling to the chest?
A version of the horizontal block pull-down on the shoulders is performed to the chest with a wide grip. This ensures the development and shifting of the load on the following muscles:
- Posterior deltoids.
- Lat.
- The big and small ones are round.
- All parts of trapezoids.
- Infraspinatus.
The main emphasis shifts to the trapezius and rear deltas.
Technique for performing horizontal block rows to the chest for the shoulders
The technique of pulling the lower block to the chest is almost no different from the classic version, with the exception of the angle and width of the grip.
Peculiarities:
- Take a position with your knees bent on the platforms. Take the long handle where it bends (this is anatomically more convenient, although if such a handle is not available, you can use the usual straight version).
- Start pulling the handle towards your lower chest. Elbows should point to the sides so that your arms are parallel to the floor.
- At the peak point, squeeze your shoulder blades together as much as possible and pause for 0.5-1 second.
Recommendations
The first rule that should be remembered when performing lower block rows to the chest is that despite the similarity of the movement, you cannot use a lot of weight in this exercise. If in the usual version you can take the maximum possible weight with which you can perform the movement without distorting the technique, then when focusing on the rear deltoids and trapezius, this approach is not only ineffective, but also dangerous.
It is much more effective in this type to work with moderate weight, at a slow pace and in a high-repetition mode (12-15 repetitions). Approaches with a weight of 40-50% of 1RM to failure also work well.
Another difference between the traction of a horizontal block to the chest is the abduction of the body. If, when working on the lats, the body can be swayed up to 10 degrees (to provide additional stretching), then in this option a strong deviation should not be made. The body must be securely fixed, eliminating any swinging and inertia.
How to choose a working weight
The general rule for fitness is that the final 2-3 repetitions of the approach should be done with difficulty, through burning muscles, but without compromising the technique. That is, the ability to perform the exercise should be preserved, but the person should not work through extreme effort.
You can use a simple scheme:
- Set the weight to 10-15 kg and perform 5 repetitions;
- If the work is very easy, add 2.5 kg and do a couple more repetitions;
- Work your way up to a weight that is actually hard to lift;
- Leave the set and rest for 2-3 minutes or until complete recovery;
- Perform 12 reps with this weight;
- If it was easy, add weights again.
Important: you need to rest during the approach until complete recovery in order to truly select the right weight.
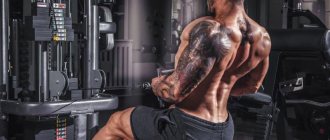
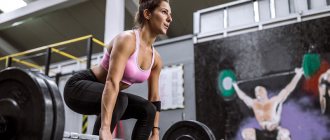
Block pull in the simulator
The seated row of a block to the waist engages almost all the muscles of the upper body - the latissimus dorsi as the main muscles, as well as the muscles of the arms (forearms, biceps and triceps), shoulder girdle and lower back. In addition, the muscles of the legs and abdomen are indirectly involved.
The exercise is important in training the back, giving it visual width. The pull-down row is a variation of the basic barbell row exercise, essentially repeating the movement but with a different angle of application of force due to the seated position.
Execution technique
Starting position
: sitting in the simulator, legs placed on the front platform, knees slightly bent, but not fixed. Reach forward to grasp the handle of the pulley, while maintaining the natural roundness of your back and without trying to straighten up as much as possible.
Pull the weight towards you with straight arms. Stop at a point where the angle between your torso and legs is approximately 90 degrees; then, pushing your chest forward, bend your back slightly in the lumbar region. You should feel tension in the latissimus dorsi muscles.
Mechanics of movement
Keeping the position of your torso as motionless as possible and trying not to lean back, while inhaling, slowly pull the handle towards your belt until it touches your stomach. As you move, straighten your back, pushing your shoulders back and pushing your chest forward.
As you make the movement, arch your lower back and bring your shoulder blades together until you feel a fairly strong “compression” of the muscles of your upper back. Stay in this position for a few seconds, and then slowly, as you exhale, return to the starting position.
Preparing for the exercise
When preparing the machine for training, be sure to adjust it to your height: the height of the seat should be such that the cable of the pulley remains parallel to the floor when performing deadlifts, and the feet should have support to prevent the body from sliding forward.
The classic pull-down of a block to the belt is performed with a V-shaped handle (palms facing each other, see illustration). The use of wider handles or handles from a machine for upper rows is permissible only after full mastery of the technique.
The main secret of technology
The correct technique for performing block pulls to the belt involves two stages of pulling the weight towards you. The initial stage ends when the arms are bent when the elbow reaches the torso. The second stage begins with further movement and the elbow moving further than the back.
The working muscles of each stage are different - in the first stage the arms are involved, while the back itself works in the second
It is important to note that moving your shoulders back and pushing your chest forward should occur just as you transition between stages.
Runtime errors
In most cases, incorrect execution of the block row to the belt leads to the fact that the arm muscles are involved in the work rather than the back muscles. Trainees use too much weight and try to pull it towards themselves by arching their whole body.
Remember that when performing the exercise correctly, it is important to keep your elbows as close to your body as possible and not spread them to the sides. In addition, maintain a vertical body position and do not lean back more than 10-15 degrees
Should you round your back?
Sometimes you can hear the opinion that at the starting point of the movement it is necessary to round your back quite strongly in order to “stretch” the latissimus muscles and increase their involvement in the work - this is exactly the technique that Arnold Schwarzenegger advised.
However, it is important to note that rounding your back significantly increases your risk of injury because it places dangerous stress on your spine. FitSeven strongly discourages the use of this technique by non-professional athletes
The belt row is an important exercise for working the back muscles. Correct technique involves keeping your elbows close to your body and minimally deflecting your body from the vertical. The most common mistake: working with the muscles of the arms, not the back.
When not to deadlift
The horizontal pull-down is a relatively safe exercise. Despite the fact that in the process of performing it all the muscles of the posterior upper surface of the body are involved, and the movement is carried out in several paired joints at once, the risk of injury is minimal.
The lat pulldown is often practiced for minor injuries in the target muscle group. Light loads and the ability to use individual bundles of back muscles in isolation make it possible to use this exercise as a restorative and preparatory set of movements for the start of sports activities after injuries.
However, there are a number of contraindications in which you should not perform deadlifts. These include spinal injuries, shoulder dislocations and subluxations, and muscle ruptures in the upper half of the body.
The training is contraindicated for all girls and women who are not allowed by the attending physician to exercise in the gym.
Additional recommendations
To increase the effectiveness of your training, you need to avoid basic mistakes. Among them:
- Jerks. The lower block must be pulled slowly and thoughtfully, feeling the work of the core muscles.
- Performing a bending exercise with excessive forward movement. It should be remembered that the latissimus muscles should work, not the lower back.
- Pushing off the platform with your feet. This results in a loss of efficiency as the load is distributed across all muscles.
- Hand weight pull. There are other complexes for biceps and triceps; here the back should be included as much as possible.
- Looking down. It is necessary to look straight so that the spine does not receive excessive load.
The number of repetitions and sets depends on the physical condition and preparedness of the athlete. You should start with 10–12 times in 3–4 approaches, gradually increasing the indicators and the weight used. Horizontal rows with a reverse grip or one arm are a complication of the exercise that is recommended for professional and experienced athletes. For girls, a triangular back is not a standard of beauty, not counting weightlifters. To tighten the latissimus muscles and tone them, women only need to perform 10-15 repetitions in 3 sets with minimal weight.
The exercise must be performed slowly, without jerking. You cannot push off the platform with your feet, this leads to a decrease in efficiency. The latissimus muscles should work, not the lower back.
What weight to use
In the horizontal pull-down exercise, recommendations for selecting weights are almost the same as in other exercises. When working on mass, try to choose a weight that you can easily perform 8-10 times in one approach. At the same time, without resorting to cheating.
To feel the muscles and warm up, use about a third of the maximum weight. The lats are a fairly large and dense muscle group. Therefore, it is very important to warm it up properly before training.
Lower pulley to the waist (stomach): features, technique, video
The exercise “Pulldown of the lower block to the belt (stomach)” is basic for training the back and mainly involves the latissimus muscles. It also indirectly targets the biceps, triceps, deltoids, forearms, lower back muscles, quadriceps and hip flexors. This movement is one of the best for giving the back visual width and is used by almost all professional athletes.
Basic requirements of the exercise
Traction of the lower block to the waist while sitting requires compliance with certain conditions that will make it as effective as possible.
- The height of the seat should be such that when moving the cable is parallel to the floor at all times.
- There should be support for the feet that prevents the body from slipping when moving forward.
- Choose a handle with your palms facing each other.
Technique for performing lower pulley pull-downs to the waist
- Grasp the handle with both hands and pull it towards you. Maintain an upright body position.
- Start pulling the handle toward your waist until the handle touches your body and your elbows are no further than your torso line. Feel the strongest contraction of the latissimus muscles. Stay at this point for 1-2 seconds.
- Slowly return the handle to its original position. After that, start a new repetition.
Practical tips and advice
- The main condition for the effectiveness of the exercise is the elbows pressed to the body, due to which the lower latissimus muscles and lower pectoral muscles receive the maximum load. If you spread your elbows to the sides while moving, the maximum load will be taken by the top of the latissimus, the middle of the trapezius and the rhomboid muscle.
- When performing block rows to the belt while sitting, the deviation of the body from the vertical should not be more than 10 degrees. The more the body deviates from the vertical, the higher the risk of lower back injury.
- By changing the handle and grip, you can shift the load to other areas of the back. For example, if you take a straight bar with an overhand grip and point your elbows up and to the sides, the load will shift to the middle trapezius, rhomboid muscle and rear deltoids. When using a mid-curved handle, the elbows can be pointed down and toward the torso or up and out to the sides. In both cases, the deltoids are almost completely turned off from work, the main load falls on the rhomboid muscle and trapezius.
Video on the topic: Correct execution of the lower pulley to the waist.
Types of handles and grip method
Exercises on this simulator can be varied. The front row is performed in several grip styles, with different handle configurations. The features of the last elements are shown in the table.
| Handle type | Description | Additional Information |
| V-shaped | Suitable for classic block rows with a narrow grip | Recommended for performing exercises to work the latissimus dorsi and trapezius muscles |
| L shaped | Universal option for all grips | Allows you to work the muscles of the back, arms, deltas |
| Ropeway | Used with a neutral grip and variable hand position | Focused on pulling the block to the stomach or chest |
| Wide with curves | Designed for pulling the lower block with a wide grip, but you can also hold it in bending areas | When a wide grip is used, the range of motion decreases and the load on the biceps decreases. |
Working on a pulley with a lower row to develop the shoulder girdle is done by pulling the load to the chest with a wide grip. This makes it possible to emphasize the load in the right place. The technique is identical to the classic version, except for the angle and width of the handles.
It is recommended to perform lower rows of the block to the waist while sitting using special straps for the hands. This advice is relevant for most back muscle exercises. This approach allows you to remove excess tension from the forearms and radial areas of the wrists, directing the main effort to the part of the body being worked.
V-shaped
L shaped
Ropeway
Wide with curves