Hello blog readers! A large number of different bench press methods have been developed to develop the pectoral muscles. One of the most effective and safest is the seated press in a machine. It is used both to improve form in an ongoing training program and for recovery. Let's look at how to do a bench press correctly and what its unique properties are.
What's happened
A seated press is pushing, “squeezing” the weight forward with your arms using your pectoral muscles. This embodiment is isolated, since the main load falls on the pectoral muscles, as well as multi-joint ones. Despite all the benefits and effectiveness, it is considered auxiliary. The seated press is used to consolidate the success of working on the chest muscles and enhance the effect.
Types of bench presses
Horizontal
These benches are equipped with two racks for attaching the barbell. The distance between them is up to 110 cm. You can perform bench presses on such equipment only in a horizontal position. Racks can be stationary or adjustable (a more universal solution).
Adjustable
These solutions allow you to do a variety of exercises at a chosen angle - sitting, lying or reclining. Thanks to this, adjustable designs are considered the most versatile.
Oblique
Inclined models have a fixed angle. On average it is 45°. The athlete cannot adjust the angle of inclination, so such designs are used only for working the upper part of the chest muscles.
In models of each type, a bolster for resting the legs, handles for attaching the torso, and a rack for the barbell can be installed.
More information about the simulator
The seated chest press is performed in a special lever-type machine called a hammer. In it, the burden is transferred to the handles using levers. They come forward when the muscles contract, which are the end point of the application of force. On the one hand there is the weight of the burden, and on the other the pectoral muscles: and a transmission system using levers between them. The hummer has a comfortable seat and a pedal for adjusting the handles, as well as a system for adjusting their location according to height. The essence of the exercise is to contract the muscles and bring the arms forward using a bench press.
Varieties of exercise
There are different modifications of functional seats:
- large block;
- loadable.
Depending on the design, presses can be done vertically or horizontally, but the movement algorithm for all devices will be the same. It is recommended to pay special attention to warming up the upper torso and shoulders. If you are attempting the exercise for the first time, light weighting is necessary, but a set with a lighter weight will be considered a warm-up.
If the gym has structures that allow movement at an angle or horizontally, the equipment can be used in combination.
When performing the exercise for the first time, you can use the help of a trainer to adjust the position of height and height. You can check the comfort of the exercise machine by placing your buttocks close to the back of the device. Your shoulders should be straightened and your chest slightly forward. It is better to place your legs to the sides, taking a rigid support.
Alexander Shestov
TRX Certified Trainer
Ask a Question
You can grasp the handles of the exercise machine with any comfortable grip, and the weight must be held with both hands. Beginners are recommended to use a special pedal that helps return the weights to their original position.
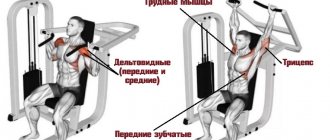
What groups are involved in the movement?
Often athletes do not know which muscles work in the bench press. There are practically no stabilizing muscles in the exercise. And this is one of the main differences between the seated bench press and its other variations. All muscle groups participate in contraction, taking on a dynamic load. The following work in the bench press:
- The pectoralis major muscle is the main element;
- anterior bundles of the deltoid muscle;
- triceps and biceps.
The exercise is multi-joint: movement occurs in the elbow and shoulder joints. It is also called “pushing” because the weight is “pushed” forward during the press.
Shoulder anatomy
In an anatomical sense, the shoulder muscles include all muscle tissues that are located from the neck to the elbow joint.
I have already written a detailed article on the blog, where I described the anatomy of the shoulders, be sure to read it!
To put it simply, the shoulder refers to the area of the body from the neck to the arm - in anatomy it is called the shoulder girdle.
The main muscle that determines the appearance and functionality of the shoulder is the deltoid muscle (deltoid).
It consists of three parts or bundles (heads):
- anterior or clavicular part;
- middle or acromial part;
- posterior or spinous part.
The anterior bundle is responsible for flexion, adduction and abduction, retroversion, internal rotation (rotation) of the shoulder, the posterior one is responsible for extension and external rotation, abduction and adduction, and the middle, most massive one is for abducting the shoulder and holding it in this position.
It is extremely important to pump up your shoulders, because... it adds a very cool look to your body and makes your figure V-shaped on top.
Working on the development of deltoid muscles or deltas allows you to:
- it is advantageous to highlight the size of the biceps and triceps;
- make the hand more prominent;
- visually expand the width of the shoulders;
- improve the results of exercises on other muscles in which the deltoids act as assistants.
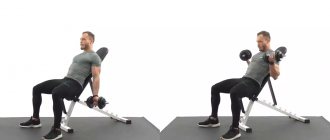
To develop the deltoid muscles, the seated dumbbell press exercise is often used.
It belongs to the basic ones, since it is multi-joint and, accordingly, in addition to the delta, other muscles are worked out when performing it.
By the way, read my article about types of physical exercise if you haven’t already.
What is the benefit
The seated press is a truly unique and beneficial exercise. It has the following advantages over other methods:
- emphasis in work on the pectoral muscles, their middle part;
- increase in volume - good pumping and further muscle growth;
- symmetrical development of the pectoral muscles is combined with their harmonious stretching during the press;
- less risk of injury and damage;
- no assistant required;
- can be practiced during the rehabilitation period due to its high safety;
- there is no need to “hold the pose” - there is no work of stabilizer muscles;
- wide range of working weight;
- does not increase blood pressure, fewer medical restrictions;
- movement along one trajectory that does not need to be monitored;
- there is no risk of “swinging” the breasts too much.
This method is often used by girls who don’t really like barbells and are afraid to pump up their pectoral muscles. Due to its simplicity and safety, the press is used by different categories of athletes: beginners, people after injuries in rehabilitation, as well as experienced athletes.
Recommendations for pumping deltas
There is no universal exercise for the deltoid muscles. Basic exercises involve several bundles, but individual zones are still a priority. Therefore, the training program should include a variety of movements for all three beams.
It is extremely rare that this muscle group develops evenly. As a rule, some bundles lag behind - most often these are the back and middle ones, since they are either forgotten about, or the exercises are performed incorrectly, or they do not do enough work, concentrating on the presses alone. Over time, you can focus on these particular beams, starting your shoulder day not with a bench press, but with swings on the rear and middle deltoids. But at the initial stage it is necessary to lean on the base, while not forgetting to pay attention to each beam. For beginners, two or three movements will be enough. Experienced athletes use 2-4 basic and 2-4 isolation exercises.
The recommended number of approaches per movement is 3-5, the number of repetitions is 8-15. It is recommended to train your shoulders once a week. Only with specialization among experienced athletes can deltas be divided into bundles over two to three days.
Pay special attention to warming up. Shoulders are a complex complex that can be easily damaged. It makes sense to include shoulder movements in the program after training the large muscle groups of the body. This will prepare the deltoids for stress and reduce the risk of injury.
If you experience pain in your joints and ligaments, stop training immediately. It is best in such cases to contact a specialist. By ignoring the problem, you risk missing out on pumping your case for several months.
Execution technique
To do the bench press correctly, follow the instructions:
- adjust the position of the handles according to your height: they should be at the level of the upper chest (arms extended forward should be at chest level);
- set the desired weight;
- sit in the exercise machine: press your spine to the back, place your legs on either side of the bench;
- keep your head straight;
- press the pedal to bring the handles to the starting position;
- grab the handles from above;
- Place your elbows parallel to the floor;
- open the chest with an inhale;
- point your forearms forward;
- lower your hands a little;
- as you exhale, push your arms forward in a straight line away from you;
- hold for a few seconds at the top point, squeezing the pectoral muscles;
- return to starting position;
- repeat 10-15 times.
During the chest press, it is important to keep your back pressed to the seat and not lift your legs. It is also necessary to monitor your posture: avoid bending and bending to the side. When “pushing” the weight, the hands move in a straight path forward and slightly upward.
Technical nuances
The secret to the success of bench presses in a seated machine lies in the correct technique and nuances of execution:
- elbows should be parallel to the floor;
- you should not wind them too far back at the start;
- It is not recommended to straighten them completely at the end point: they should be slightly bent;
- keep your elbows in line with your wrists;
- you should return to the starting position slowly, and push forward from yourself quickly;
- in the starting position, you need to try to stretch the pectoral muscles;
- at the end point, it is important to feel the contraction of the chest and mentally try to strengthen this feeling;
- Always squeeze while exhaling, returning to the starting position while inhaling;
- keep your chest straightened throughout the entire exercise: shoulders slightly down and back, shoulder blades together;
- pushing your arms forward, focus on the movement of your elbows: mentally push the weight forward with them (this will help strengthen the work of the chest area).
For convenience and technical correctness, ask a more experienced colleague or trainer to explain the design of the simulator and the features of its implementation. It is very important to remember the correct movement the first time in order to consolidate it yourself later.
Exercise Tips
The seated barbell press requires the correct weight of the sports equipment. If you can’t do it more than 10 times in 1 approach, then the weight of the bar needs to be reduced. However, you need to feel the load. If the exercise is easy and the body does not feel tired, then the weight is too light. It is necessary to find a middle ground.
If you have back diseases that are not contraindications to physical activity, then you should use an orthopedic belt during training. It is a good preventative against complications.
Useful tips for training:
- During exercises without back support, you should not rock your body to make the task easier. It's better to take lighter weight.
- You should adhere to the execution technique. You should not change the trajectory of your hands, as this can lead to injury.
- If the barbell cannot be lowered to the required depth, you need to change the grip width. However, it is worth making sure that the angle of the elbow when tilted does not become obtuse.
- If you lift the barbell with a wide grip, the biceps and elbow joints will be overloaded. This can bring discomfort and pain.
- You should not work with heavy weight. It is necessary to accustom the body to stress gradually. It is better to increase the number of approaches than to take on a large mass at once.
No matter how much a beginner prepares for the technique, he is not immune to mistakes.
The most common ones are:
| Error | What to do |
| Lack of warm-up before training | To preserve the health of your shoulders and back, it is worth pre-warming their muscles and joints. You can even lubricate these areas with a warming cream. The training begins with light weights, and only then moves on to working ones. |
| Improper breathing | The work of muscles and lungs must be harmonious. If this is not ensured, then the shoulder muscles will not show the desired result. The rhythm of breathing must be maintained throughout the entire exercise. |
| Body jerks | If the barbell is heavy, then the person instinctively tries to lift it, helping himself with a jerk of the body. When the mass is light, an involuntary movement of the body occurs due to excess strength. Beginners should use a back support, as well as choose the appropriate weight of sports equipment. |
| Elbow movements in different directions | The technique of elbow movement should be strict: vertical trajectory. It is worth performing the exercise in front of a mirror to control your hand position. |
Very often, beginners are faced with the fact that they do not know how many times they need to do the exercises.
The trainers answer this question as follows:
- To develop physical strength, do 2 to 6 approaches 1-5 times. Between sets, rest should be from 3 to 7 minutes.
- To gain mass, perform the exercise from 6 to 12 times. The number of approaches is from 3 to 6. Rest between sets is 1-4 minutes.
- For relief and drying, perform 2-4 approaches of 13-25 exercises in each set. Break – 1-2 minutes.
When performing a seated press, you should adhere to the exercise technique. The barbell needs to be changed only depending on the type of work. Beginners should work in pairs with an experienced athlete who will help make the training more effective.
Common mistakes
When performing a bench press, the following errors often occur:
- dropped elbows;
- rounded back;
- deflection in the lower back;
- movement of the legs and back during the press;
- head tilt;
- arms are not parallel to the floor;
- elbows straighten to the end;
- no fixation at the end point;
- the height of the handles is incorrectly selected;
- grip with hands from below, not from above;
- movement is not coordinated with breathing.
Errors in technique often lead to a decrease in results, sometimes even injuries can occur: joint damage, especially the elbow, muscle strain, and sometimes back pain may appear. To feel your body and avoid inaccuracies, it is recommended to do several approaches without weights or with minimal weight. This will allow you to understand which muscles contract and how the torso and legs behave during this process.
What muscles work in the seated barbell press?
The seated barbell press engages an entire group of muscles throughout the body. At the same time, to perform the exercise you will need only 2 equipment: a strength trainer and a bench.
If you follow the physical activity technique, the following muscles will work:
- Anterior and lateral heads of the deltoid muscle.
- Muscles in the creases of the wrists.
- Diamond-shaped.
- Front serrated.
Seated barbell press
In addition, the abdominal muscle group works.
Restrictions
The seated press is considered one of the safest chest exercises. It can be used even during the recovery period with an appropriate weight. But it also has contraindications for implementation:
- exacerbation of chronic diseases;
- chest pain of any origin;
- acute injuries and damage to muscles and joints;
- exacerbation of arthritis of any localization;
- osteochondrosis with severe radicular syndrome;
- pronounced changes in the spine;
- pregnancy, breastfeeding.
In these cases, it is better to refuse bench presses in the simulator. For an accurate diagnosis, you should consult a doctor.
Seated bench press helps improve chest shape and develop strength. It is used as an additional element of the program for the pectoral muscles. The exercise is technically simple and safe. Difficulties may arise when getting acquainted with the simulator. Therefore, at the beginning of classes it is useful to work with a trainer. The bench press is suitable for both beginners and experienced athletes. See you in the new blog! Subscribe to updates and invite friends!
In conclusion, we recommend watching the video:
The Best Shoulder Workouts
Shoulder workout to gain muscle mass
For some of us, there's nothing better than lifting heavy weights over our heads. This old-school free weight workout starts with heavy power presses and then works the side and rear delts using dumbbells. For dessert, you can do a couple of workout exercises for the trapezius muscles - this is a good combination.
Set of exercises:
- Push press - 3 sets of 6-8 reps (rest 2 min.)
- Seated Arnold Press - 3 sets of 10-12 reps (90 sec rest)
- Incline Dumbbell Rows - 3 sets of 8-10 reps (90 sec rest)
- Dumbbell lateral raises - 3 sets of 10-12 reps (90 sec rest)
Shoulder workout for beginners
Beginners don't need to get fancy with their shoulder training, especially if they're already working their front delts through a significant amount of chest training. Perform these three exercises intensely, increase the weights over time, and this may be enough to produce muscle growth in the initial stages of training.
Set of exercises:
- Seated dumbbell press - 4 sets of 8-10 reps (rest 2 min.)
- Seated dumbbell lateral raises - 3 sets of 12 reps (1 min rest)
- Seated dumbbell lateral raises - 3 sets of 12 reps (1 min rest)
Exercises 2 and 3 can be combined into a superset without a rest break between them.
Shoulder training on simulators
Experienced athletes know that deltoids grow well if you include in your training several exercises performed on simulators to pump up muscles. If you agree, then you will love this workout. It can be great on its own or as a second shoulder workout 72 hours after one that focuses more on free weights.
Set of exercises:
- Seated overhead press - 4 sets of 10-12 reps (rest 1 min.) For the last set, perform a single drop set.
- Abduction of the arm to the side from the lower block - 4 sets of 10-12 repetitions with each arm (rest 1 min.) In the last approach, perform a single drop set.
- Pulldowns from the lower block in front of you - 4 sets of 10-12 repetitions with each arm (rest 1 min.) In the last approach, perform a single drop set.
- Machine raises - 4 sets of 12 reps (rest 1 min.) In the last approach, perform a single drop set.
Step-by-step production
To make a bench press with your own hands, you need to prepare the necessary materials, select and correct the drawing. The procedure for creating a bench consists of two stages: the production of a frame and a deck chair. To manufacture the product, experience with construction tools is required. You can make your own exercise machine from wood and profile pipes.
Made of wood
To manufacture the structure, you will need furniture panels and wooden beams. The bench elements are fastened with bolts and nuts, nylon and body washers, self-tapping screws, and wood glue. Using rubber pads on the legs you can protect the floor covering from scratches. From the materials you need to prepare a circular saw, a jigsaw, a chisel, a grinder, a drill, and wrenches. The bench is made using a drawing with dimensions and step-by-step instructions:
- Wooden beams are cut in accordance with the diagram.
- The grooves necessary for mounting the supports are cut out on the central bar. The parts are connected using fasteners and glue.
- Cross bars are mounted on the supports. The bolts should be recessed into the elements; holes must first be made in them.
- Small bars, pins and bolts are used to make elements that regulate the height of the deck chair.
- The shield is fixed to movable bars; depressions are cut out in the central one to install a rod that will help change the height.
A finished wooden structure will last longer if the elements are impregnated with stain and then covered with a layer of varnish. A convenient exercise machine will help you build muscle mass, pump up your triceps and deltoids.
Master classes on making simple benches for the garden with your own hands
Prepare a drawing
Saw the wooden beams in accordance with the diagram, cut the grooves necessary for mounting the supports on the central beam
Place the crossbar on the supports and secure it
Attach bars of smaller diameter to the side of the main crossbar
Using studs and bolts, make elements that regulate the height of the deck chair.
Attach a plywood panel to the movable bars
Cut depressions in the central beam to install a rod that will help change the height
Impregnate the finished structure with stain and cover with a layer of varnish
From profile pipes
Making a home simulator begins with preparing pipes with a cross-section of 4 x 4 cm, steel sheets, sanded boards, fasteners, and the necessary tools. The work includes several stages:
- The creation of the frame begins with cutting profile pipes. You will need 2 pieces of 83 cm each. These elements can be used as racks and support for the barbell.
- Cut a piece of pipe 52 cm, this is what will connect the legs. The fourth piece, 34 cm long, will be needed to mount the rear part of the rack.
- The front and rear knives are fastened with a 97 cm piece of pipe. It is welded to the rear pillar; self-tapping screws can be used for this.
- Pre-prepared petals consisting of steel plates are fixed to the supporting parts. The long side of these elements should be 7 cm, the short side - no more than 3 cm.
- Holes with a diameter of 1 cm are made in the crossbar that connects the front pillars. 30-centimeter rods are placed in them, with the help of which the height of the lounger will be adjusted.
- The bench consists of two parts. The short sheet is fixed at the back of the structure, the long sheet at the front. Fastening is done using a furniture hinge, which is welded to the frame.
- Reinforced rods necessary for raising the sunbed are fixed in the lower part.
- A wooden board is fixed to the steel sheets, the width of which should be 5 mm larger than the metal elements.
The final stage of manufacturing a metal simulator will be preparing the hole for installing the board and welding the fasteners to the support. This is done in 3 places to increase the stability of the structure. Next, the lounger is fixed with self-tapping screws, and the product is completely ready for use.
The bench press bench is considered one of the most popular sports equipment. The high-quality design allows you to fully pump the chest muscles, which contributes to the formation of a beautiful torso. For home activities, it is not at all necessary to purchase expensive equipment; you can make a bench yourself using wood or profile pipes.
Cut the pipes according to the diagram
Mark the joints of the parts
Cut support
Weld the support to the rear pillar from above, and to the front pillar from the side
Prepare petals from steel plates and install them on racks
Cut corners and drill holes to attach the board
Weld the fasteners to the support element in three places
Secure the bed with self-tapping screws
Fix the seat on a metal piece
Install the backrest and lounger
Install the adjustment foot
The simulator is ready
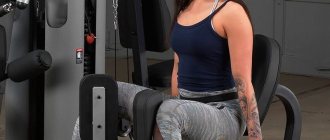
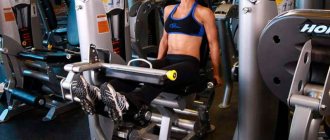
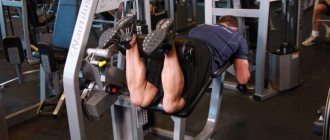
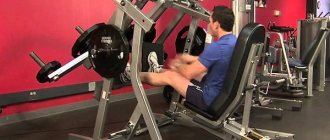
How to pump up your calves on the presented simulator
This exercise is a universal option for pumping up the leg muscles in one go. Calves also fall under this category. However, in this exercise they are not the main loaded group. However, there are several options that make it possible to increase the level of load that goes to a given muscle group.
One of the most effective ways to improve the quality of calf training is to select the optimal position of the legs on the platform of the simulator. The optimal option for placing your feet in this situation would be to place your feet parallel to each other with your heels as close as possible to the edge of the platform. In this case, the load distribution will occur in an optimal way in order to ensure intensive training of the calves.
Our store offers an inexpensive vertical leg press machine Body Solid Powerline PVLP156.
Criterias of choice
If you still decide to buy a bench press bench, you need to adhere to the following criteria:
- The practicality of the product, which is achieved by the quality of the material.
- No jamming when adjusting the elements of the simulator;
- Availability of hypoallergenic and water-repellent coating;
- If the machine is foldable, this will allow you to remove the bench after classes, thereby freeing up free space.
- If you don’t have a training partner, you need to choose a product with safety stops that ensure safe training without the possibility of the barbell falling onto your chest or causing other injuries.
These criteria are also relevant when making a bench with your own hands. To obtain a high-quality result, you must use only high-quality and durable material.
Let's consider the benefits
So, why not dumbbells or a “standing” version? The exercise has a number of advantages that allow you to confidently introduce the seated press into your training complex. These are the benefits :
- Effectively working the pectoral muscles with minimal stress on the back.
- Platen racks are useful when dealing with injuries.
- The isolating type allows you to maximally work specific muscle bundles.
- The technique is quite simple.
- The risk of injury is reduced to a minimum.
- The trajectory of movement of the handles is rigidly fixed.
Which exercise machine should I use?
Let us explain that the choice of a simulator (or let us agree that we will henceforth talk about the angles of the force vector relative to the floor) depends on what muscles you want to pump.
We recommend reading: How to get rid of orange peel on buttocks and thighs
In this article we will take an overview of the most important techniques in various simulators:
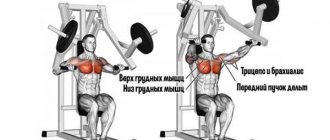
- To pump up your chest, you need to choose a machine that simulates a bench press. Usually this is a device with a seat and a backrest at right angles to it. The handles that will need to be pushed away from you (press) are located at the level of the bottom of the chest. The exercise is more similar to a reverse grip press, although the palms are in a straight position.
- To work the shoulders you will need a hammer and a Smith machine. In a Hummer you can pump up the front deltoids. This is a good option after the classic bench press and incline press.
- In Smith, you can do presses at different angles, as well as a seated barbell press (when you press it vertically up, bringing it behind your head or onto your chest).
Thus, the choice of a simulator will directly depend on what you want to train today. And, of course, it depends on what kind of exercise equipment is available in the gym you come to.
Mistakes and how to avoid them
Despite the fact that the mechanics of the movement are limited by the machine and are quite safe, there are still a few points to consider when performing the exercises.
The following errors should be identified and corrected in order to increase the effectiveness of the exercise and avoid injury:
- No warm-up. It is necessary to warm up the muscles thoroughly before performing the exercise. Therefore, it is important to stretch your shoulders, rotor cuff and joints well.
- Do not lift the body away from the back. The head, back and buttocks should be pressed firmly against the surface throughout the entire movement. When pulled away, an unwanted axial load is created.
- Sudden movements, jerks. You need to work with weights slowly and under control, this ensures there are no sprains or injuries.
- Follow your breathing technique. It is not recommended to hold it, especially when working with heavy weight.
- Lowering the handles of the exercise machine below the shoulders. This artificial increase in the amplitude of movement will not lead to anything good, but it will increase the incidence of injury.
- Full extension of the arms at the top point. This should not be done so as not to overload the elbow joint.
- Pulling your elbows back. Your forearms should be vertical and your elbows down. This is a natural movement that is not dangerous for joints and ligaments.
Swing dumbbells to the sides while standing
Swinging dumbbells to the sides while standing is an exercise for developing the middle bundle of the shoulder deltas. The exercise is one of the additional (finishing) exercises that should be done after the basic/press exercises.
- To pump up our shoulders with an exercise, we only need dumbbells as equipment, as well as the correct technique.
- The mechanics of execution is to raise the dumbbells to the sides. During the extension, the arms from the shoulder to the elbow are in the plane of the body. The brushes move slightly forward. At the top point of the dumbbells at shoulder level or slightly lower, elbows at or slightly higher than the dumbbells, the handles of the dumbbells are parallel to the floor. At the lowest point, the dumbbells are on the thigh muscles, the arms are slightly bent.
The exercise consists of 1 warm-up approach and 3 working sets. The warm-up approach is done with 60-70% of the working weight. Number of repetitions in warm-up and working approaches: 8-12.
For a visual representation of how to perform the exercise correctly, watch the video below:
It's a STANDING DUMBELL SWING, baby.