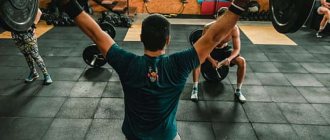
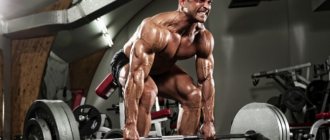
Equipment in powerlifting is what fundamentally distinguishes powerlifting from other sports, giving it something mysterious and incomprehensible to ordinary people. Equipment is armor, a means of protection and an assistant in achieving your goals. You feel like a medieval knight, dressed in armor, your joints and muscles are tightly compressed, you experience discomfort, sometimes even pain. But all this gives a feeling of security, self-confidence and allows you to lift huge, inhuman weights.
Why do you need equipment?
Initially, the appearance of special clothing and equipment for powerlifting was justified by the need to prevent injuries and the desire to increase the working weight by 5-10 kg in each exercise.
Modern equipment has significantly expanded its capabilities: now an athlete, thanks to the right choice of clothing and accessories, can increase weight by an average of 50 kg in each exercise, and the maximum figure reaches 150 kg. Thanks to such equipment, powerlifting has become even more spectacular.
Powerlifting equipment includes wrist and knee wraps, squat suit, bench press tights, bench press shirt, deadlift suit and special shoes (deadlift boots, weightlifting shoes).
Equipment is not just clothing for training, it is clothing, shoes and additional devices that are used during lifting and are approved by federations for use during competitions. The main purpose of powerlifting equipment is to prevent injury when lifting heavy weights, as well as to help the athlete during the exercise.
Equipment is divided according to the types of powerlifting exercises for which it is intended:
- Equipment for squats includes overalls (suit, tights) for squats, knee and wrist bandages, belt and weights.
- Equipment for an effective bench press is a wrestling pad (shirt, tank top), wrist wraps and weights.
- Equipment for deadlifting - overalls (suit, tights) for deadlifting, belt, knee bandages and special shoes with rubber soles without heels. These shoes allow you to keep your weight on your heel and prevent you from leaning forward. As a rule, powerlifters use special deadlift boots, sneakers, shoes or wrestling shoes.
Why do you need special bench press shirts and shoes? Why can’t you train and perform in regular sneakers and a T-shirt? Let's take a closer look at the most important elements of powerlifting equipment.
Content
- 1 Equipment for powerlifting 1.1 Equipment for bench press
- 2.1 Olympic barbells and weights
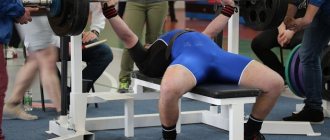
Squat suit
When performing squats in weightlifting, an athlete has three weak points: the ankle, back and knees. They can be protected by also using powerlifting equipment during the exercise: weights, belt and bandages. However, the technique of performing squats in powerlifting creates other weak points.
Changing the position of the legs puts additional stress on the groin area. If the barbell is very heavy, then at the lowest point of the exercise there is a chance that the bottom will sag greatly, which can lead to serious ligament injury.
It is to prevent these injuries that a special overall made of hard material with good strong seams is used.
Such powerlifting equipment tightly grips the athlete's back, pelvis and upper thigh, reducing mobility of the hip joint. Thanks to this, during the drawdown, not only the athlete’s strength acts, but also the elastic force of the material, which helps prevent injury and improve the powerlifter’s results.
How much can powerlifting equipment give?
The total gain from equipment in powerlifting varies from 30 kg to 300 kg - depending on the skill and strength of the athlete. It is not difficult to calculate the increase that equipment gives as a percentage of the maximum without equipment. On the squat it is 80%, on the bench press - 70%, on the deadlift 20%. And this is far from the limit.
We can say with a guarantee that a person who assembles a KMS without equipment, having correctly selected and learned to use it, will assemble a master! But this does not mean that by purchasing and putting on powerlifting equipment, you will immediately be able to put on 50-100 kilograms.
Working with equipment has its own specifics and requires certain techniques. This is long, hard and painstaking work, which ultimately determines the champions and masters of their craft on the platform.
The equipment gives a powerful breakdown, that is, it helps at the bottom and slightly at the middle point of the movement. The athlete must complete the upper final phase himself. In addition to technique, the amount of increase from equipment depends on the strength of your half-movements - half-squat, push-up (bar press), deadlift. Situations have happened more than once when a person who benches a lot without a shirt and has never done push-ups lost in a T-shirt press to an athlete who benches 15-30 kg less without a shirt, but at the same time has a good push-up.
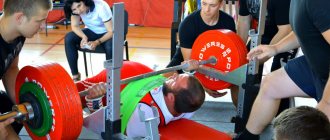
Shirt
The shirt helps minimize shoulder and chest injuries. In appearance, this is an ordinary T-shirt made of very durable and elastic fabric, however, when you look at it more closely, it becomes noticeable that it is significantly narrowed in the chest area.
This shirt fits tightly to the body of a powerlifter, slightly “rolling” the shoulders forward. During the bench press, when the barbell needs to be lowered to the chest, the material of the shirt in the athlete's chest area takes on a significant load. As it lowers, it stretches and contracts to help the powerlifter lift the barbell off his chest.
Main differences between the equipment
The equipment gives a powerful breakdown, that is, it helps at the bottom and slightly at the middle point of the movement. The athlete must complete the upper final phase himself. From this follows the specificity of equipment technology. The main task of the athlete is to learn how to use this breakdown to the greatest benefit. So we come to the main difference between equipped and unequipped exercises.
This may seem surprising, but when using equipment, the main thing is not to press, stand up and pull, but to lower, sit and sit down, that is, it is the negative part of the movement that is important, it will determine your skill and the weight that you can handle.
In equipment powerlifting, the correct “pressure”, lowering the barbell to the chest and “planting” it to the bar in the deadlift is an almost one hundred percent guarantee that the weight will be lifted. How does it work? Properly selected equipment “breaks” the movement: on the squat it makes your knees collapse, on the bench press it makes you throw the barbell on your head, stomach, anywhere but on your chest, on the deadlift it makes your back hunch.
The athlete’s task is to resist the equipment and perform the movement correctly, not to allow the equipment to control the barbell. After all, only with an ideally correctly executed negative phase of movement does the equipment work at its maximum. Otherwise, it only gets in the way.
But let's tell you a secret - in fact, equipment is needed so that you can lift incredible weights so that people will admire your strength. And the most common question from beginners: how much can equipment increase your results?
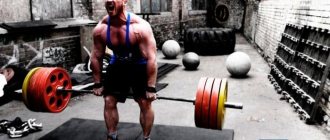
Powerlifting belt
A wide leather belt allows the athlete to prevent injuries to the ligaments of the lumbar spine. This powerlifting equipment also allows you to add more weight during squats, chest presses, and deadlifts.
When you wear this belt, intra-abdominal pressure increases significantly, so the load on the lower spine is reduced by about 50%. This releases some of the muscle force, which allows you to increase the working weight.
Bridge
Train the bridge! During training, get into a bridge from a lying position. 6 sets of 20-30 seconds. Having pre-warmed up, with each approach try to place your feet closer to your head. Each time you lie down under the barbell, devote 5-15 seconds to deflection.
It doesn’t matter if it’s 20 or 200 kg. Before any bench press workout, bend your back on the bar for 1-3 minutes. Just come up, sit on the bench with your back to the bar, and your partner bends you back by your shoulders. Raise the bar from zero to 2-3 positions to arch your back in different positions.
How to Bend on a Press in Equipment
There are two ways to bend on the bench press:
- The first way is to take the bar and throw yourself forward with straight arms. Place your shoulder blades on the bench (arms straight, triceps tense), lift your buttocks and, moving your legs, push your body towards the bar. At the same time, the deflection in the back increases, the arms gradually bend. Do this until your back hurts. Place your feet either on the ribs or on the soles, firmly, as close to your head as possible so that the bridge does not move apart.
- The second way is exactly the opposite. You go behind the bar, take the bar, fix your legs, firmly, close to the racks. Throw your body forward, belly up and fix your shoulder blades.
Wrist wraps for powerlifters
Bandages are designed to protect joints and ligaments from injury. They are necessary not only in sports, but also in fitness during strength training with serious weights. Elastic fixation around the joint allows you to stabilize the working limb, which helps protect it from tears and sprains during training.
It is advisable to use bandages only during working approaches and remove them for rest periods. This will allow maintaining normal blood flow in the peripheral blood vessels.
Wristbands can be used to prevent wrist pain. They are similar to bandages, only a little shorter, however, they are in no way inferior in rigidity.
Bench Press Shirts Ma
Equipment powerlifting is not complete without bench press shirts. They are made of fairly durable materials, but at the same time very elastic. At the very beginning, bench press shirts served to prevent injury, but now they serve more to increase the result in the bench press.
You need to choose the right T-shirt and then the result is guaranteed, and the design of the T-shirt itself will help you bench press extra weight.
Externally, the T-shirt is similar to a regular T-shirt. If you look briefly, you won’t even see the difference, but it is there. The jersey will have compaction in some places, especially in the collar area.
In this case, T-shirts are divided into two types: for athletes who use a bench press and those who do not use it. These two jerseys will be different from each other. This is important, because the peculiarities of performing the bench press are different.
Weightlifting weights
Barbells are shoes made of hard leather that are laced along the entire length, tightly fixing the foot. They have a small heel and a hard sole, which prevents you from falling back.
These shoes are used by weightlifters (hence the name) for training and performances. Weightlifters are also used by athletes in powerlifting, barbell biathlon (snatch/jerk), bench press and kettlebell lifting.
It is the feet that receive enormous stress when working with heavy weights. Therefore, the legs must receive good support to be able to easily maintain balance. During exercises, the foot must be firmly fixed, so powerlifting shoes are high-laced and made of leather.
We recommend men's weightlifting shoes Adidas Power Perfect III for beginners.
High-quality equipment for powerlifting plays not only an aesthetic role, but also seriously supports the athlete’s health. A strong body, correct technique and properly selected equipment are your faithful assistants in achieving better results.
What kind of equipment is there and how to choose it?
The equipment can be single-layer or multi-layer (professional). The material from which it is made also differs - polyester (softer), denim and canvas (harder). If you are a beginner, then no matter how much you would like to become a master of sports or even gather the elite, you should not buy double equipment - it is best to start with single-layer equipment. In such equipment it is easier to develop technique. It stretches quite quickly to fit the body, after which it sits much more comfortably. Small flaws in technique may have almost no effect on movement, which cannot be said about double equipment.
If you decide to take double equipment, you should know its features. In it, even the smallest mistake can ruin the entire approach. It makes sense to purchase two-layer equipment only when you have become the standard for working in single-layer equipment. The increase from a two-layer layer is, of course, greater, but it does not forgive mistakes. On the squat it is much harder to reach the desired level, on the bench press it is harder to touch the chest.
But there are many advantages besides the increase. Double equipment lasts much longer, as it stretches less well. It fits more comfortably and is easier to take off and put on. Another plus of double equipment, in particular overalls, is that you can adjust the density of the straps, tightening them tighter from approach to approach, thereby achieving a greater increase.
In any case, no matter what you choose, your equipment should fit as tightly as possible: no more than one finger should fit under the leg of a suit or under the sleeve of a T-shirt; it is better that there is no space at all. We do not recommend selecting equipment using size charts, since all people are proportionally different. You need to find an experienced coach, athlete, or at least a seller, and it’s best to be able to try on the equipment before purchasing.
The main criterion for choosing a jumpsuit is that it should fit very tightly in the hips, buttocks and legs. If the straps are long, they can be hemmed; if they are short, they can be stretched by first wetting them. It’s easier with double overalls - they have Velcro straps.
How to determine if it fits tightly? You need to put on a jumpsuit, put on a belt, remove the straps and try to sit down. If you cannot reach parallel, the jumpsuit is suitable for you. If you calmly sit in the scoring corner, the overalls are too big for you - take a size smaller or a different model.
When choosing a T-shirt, the main thing is that it fits snugly on your shoulders and arms. In it, you must forcefully open your arms to grasp the bar with a competition grip, and lower the empty bar no more than half a movement. If you can get the bar to your chest, the jersey is big.
It happens that a T-shirt that is the right size for you in the chest and shoulders puts a lot of pressure on your arms. Then the sleeves can be stretched. To do this, you need to wet them and insert a large object. Typically, a glass bottle or jar is used along the diameter of the sleeve, and pencils are inserted around it (the more pencils, the more the sleeve can be stretched). Then, in this form, the T-shirt is placed on the radiator and we wait for it to dry completely. We take everything out of the sleeves - they are stretched! The main thing is not to overdo it; it is better to repeat this procedure several times.
Sports supplements for competitions
Taking sports supplements - creatine, arginine, intra-workout, bcaa amino acid and pre-workout complexes will help you increase your strength. These sports nutrition products are specifically formulated to improve performance in sports and fitness for men and women. Just add it to your diet and go ahead to conquer new heights.
| Multi-component protein | It is a source of protein of different origins, which allows you to diversify the amino acid composition and make it more unique. Building material for muscles. |
| Creatine | Participates in energy metabolism in muscle and nerve cells. Widely used to increase strength, muscle mass and short-term anaerobic endurance. |
| Vitamin-mineral complex | During intense physical activity, vitamins and minerals are consumed by the body faster. They are also responsible for protein synthesis and are the engine of metabolic processes. |
| BCAAs | Allows muscle fibers to recover faster and provides building material for the growth of lean muscle mass. |
| Glucosamine and chondroitin | Fills joints, ligaments and tendons with essential substances for prevention or recovery after injury |
| Dough booster | It will increase the production of your own testosterone, the male sex hormone necessary for the growth and development of muscle muscles. |
Technique for performing bench presses.
Technique for performing bench presses.
The bench press is one of the most popular competitive movements. Athletes of many sports in the preparatory period use the bench press in their training. The bench press is the second competitive exercise, so it is very important that the athlete in this exercise is able to further develop the success begun in the squats. If he manages to successfully solve this problem, then as a rule this is the key to victory in triathlon. Let's start looking at the technique of performing the second competitive exercise of the bench press in the same way as in the squat by familiarizing yourself with the technical rules.
Bench press (rules and order of execution).
- The bench should be located on the platform with its front (head) part parallel or at an angle of no more than 45 degrees relative to the front side of the platform.
- The athlete should lie on his back, with his shoulders and buttocks in contact with the surface of the bench. The sole and heels of his shoes must be in contact with the surface of the platform or blocks. The fingers should wrap around the bar lying on the racks, with the thumbs positioned “locked” around the bar. This body position must be maintained throughout the exercise.
- To ensure firm support for the legs, the athlete can use flat slabs or blocks no higher than 30 cm from the surface of the platform. At all international competitions, blocks of 5, 10, 20, and 30 cm in height must be provided for placing under the feet. Light or very slight movements of the feet while on the platform or blocks are allowed.
- During the bench press, there should be no more than three and no less than two spotters (assistants) on the platform. After the athlete independently takes the correct position to start, he can ask assistants to help him remove the barbell from the racks. In this case, the barbell is fed to straight arms.
- The distance between the hands on the bar, which is measured between the index fingers, should not exceed 81 cm (both index fingers should be inside the 81 cm marks). In the case where an athlete has an old injury or is anatomically unable to grasp the bar at the same distance with both hands, he must warn the judges about this in advance before each approach. In this case, if necessary, the barbell will be marked accordingly before each approach of the athlete. The use of a reverse grip is prohibited.
- After removing the bar from the racks with or without the help of assistants, the athlete must wait for the signal from the senior judge with his arms fully straightened (“on”) at the elbows. The signal to begin the press should be given as soon as the lifter is stationary and the bar is in the correct position. For safety reasons, the head judge may ask the lifter to return the barbell to the racks by giving a clear command to “return” (“replace”) with a simultaneous movement of the arm back if, after five seconds after removing the barbell from the racks, he has not been able to assume the correct starting position to begin the exercise .
- The signal to start the exercise is a downward movement of the hand along with the distinct command “start” (“stat”).
- After receiving the signal, the athlete must lower the barbell to his chest and maintain it in a stationary position on his chest with a certain and visible pause. Standing still means stopping. It is recommended to apply the “one second rule”, i.e. hold the barbell on your chest for a count of one. Then the athlete must press the barbell up onto straight arms without excessive (too strong) uneven straightening of the arms, and the straightening of the arms at the elbows should occur simultaneously (together). After fixing the bar in this position, the senior judge must give a clear command to “rack” (“rack”) while simultaneously moving his hand back.
- If anatomically both arms cannot be fully straightened, the athlete must warn the judges about this in advance before each approach. [ 16
]
Reasons why weight lifted on a bench press does not count.
- Failure to comply with the senior referee's signals when starting or finishing an exercise.
- Any change in the starting position during the exercise, i.e. any lifting (separation) of the shoulders, buttocks from the bench or feet from the surface of the platform (blocks), or movement of the hands along the bar. Light or minor movements of the feet are allowed. Toes and heels must remain on the surface of the platform (blocks).
- Raising and lowering, bouncing, or moving down (pushing into the chest) the barbell after it has been secured in a stationary position on the chest in a manner that assists the lifter.
- Any obvious (excessive) uneven extension of the arms during the press.
- Any downward movement of the barbell during a bench press.
- Lack of squeezing the barbell with fully straightened arms at the end of the exercise.
- Touching the barbell or the athlete by spotters (assistants) between the signals of the senior referee to facilitate lifting the barbell.
- Any contact of the athlete's feet with the bench or its supports.
- Failure to comply with any of the requirements contained in the description of the rules for performing the bench press. [ 16
]
Bench press phases.
table 2
| Author | Phase 1 | Phase 2 | Phase 3 | Phase 4 | Phase 5 | Phase 6 | Phase 7 |
| Bill Jamison (USA) [7 ] | Position on the bench and eat pcs. from racks | Lowering the bar to the chest | Actually the bench press | ||||
| John Lear (Canada) [7 ] | Position on the bench | Removing the bar from the racks | Preparing for the bench press | Lowering the bar to the chest | Actually the bench press | ||
| Theodor Arcidi (USA) [7 ] | Position on the bench | Removing the bar from the racks | Preparing for the bench press | Lowering the bar to the chest | Actually the bench press | ||
| Charles Poliguin (USA) [7 ] | Position on the bench | Removing the bar from the racks | Lowering the bar to the chest | The actual press Fixation of the apparatus | |||
| Rick Well(USA) /21/ | Preparatory part | Overclocking | Actually the bench press | We'll put the pressure on | |||
| Ostapenko Leonid (Russia) [7 ] | Position on the bench, grip of the barbell | Removing the bar from the racks | Preparing for the bench press | Lowering the barbell to the chest | Fixing a pause | The actual barbell press | Returning the projectile to the racks |
| Tsedov Roman (Russia) [14 ] | Removing the bar from the racks | Waiting for the “Start” command | Lowering | Maintaining a “noticeable” pause | Squeezing | Waiting for the command to “stand” | Lowering the bar onto the racks |
| Sheiko Boris (Russia) | Acceptance of pre-launch position | Starting position (fixing the barbell with straight arms) | Lowering the barbell to the chest | Fixing a pause with a barbell on the chest | The actual bench press | Fixing the projectile in the final position | Returning the projectile to the racks |
As can be seen from the table, Russian powerlifting specialists, unlike foreign ones, break down the bench press technique into phases in more detail. Below is a description of the phases of performing the bench press technique proposed by Honored Trainer of Russia B.I. Sheiko.
First phase
— The pre-start position technique consists of:
a)
the athlete’s position on the bench (bending the back, placing the legs);
When positioned on a bench, the athlete should try to arch his back as much as possible, keeping his shoulders and buttocks in contact with the bench. (see photos 1,2,3) Since January 2001, technical rules have allowed lifting your head off the bench. Photos by IPF Secretary General Köbirich Hainer.
| Photo 1. 5-time World Champion Marina Kudinova (Russia) | Photo 2. World champion Midote Daisuke (Japan) | Photo 3. World record holder in bench press Kisshimo (Japan) |
The more the athlete arches his back, the shorter the distance of the barbell, the less physical effort the athlete will have. Moreover, the height of the bridge can be limited only by the flexibility in the lumbar and thoracic regions of the athlete, since the height of the bridge is not limited by the competition rules. In this case, you should try to “pull” your shoulders as close to the pelvis as possible. The athlete’s first point of support in this position is the neck and trapezius, the shoulder blades should be brought together and should not touch the bench, the shoulders should be lowered as far as possible. The muscles of the legs and back are in a tense state, the pelvis should touch the bench but not rest on it ( see photo 3
), the second fulcrum is the athlete’s legs.
[ 2
] At this moment, it is very important at what height the bar is located; it should lie on the racks at a height at which the athlete could accept the bar from the assistant without breaking the bridge.
If the barbell lies high on the racks, the athlete will have to reach for it and the deflection in his lower back will decrease, which will increase the length of the press. If the barbell is in a low position on the racks, the athlete will not be able to bend to its full extent and will have difficulty removing the barbell from the racks. [ 15
]
b)
grip of the barbell;
The fingers should wrap around the bar lying on the racks, with the thumbs positioned “locked” around the bar. Athletes mainly use two grips: a wide grip of 81 cm, the maximum allowed by the competition rules, in which the main load falls on the pectoral muscles, and a medium grip with a width of 70-75 cm, which more strongly involves the triceps and deltoid muscles, depending on the length of the arms and strength potential of the athlete's pectoral muscles. Because people have different body measurements, limb lengths, and strength areas, the ideal grip width may be different for everyone. [ 7
] But nevertheless, the axiom is the same for everyone: the wider the grip of the hands (but not more than 81 cm), the shorter the path of movement of the barbell from the chest and, as a result, the physical work performed by the athlete will be less and, conversely, the narrower the grip of the hands, the longer the path movement of the barbell, and the physical work performed will be great.
We also must not forget that the wider the grip of the hands, the greater the load placed on the pectoral muscles, and the narrower the grip, the more the triceps and deltoid muscles are loaded. The anterior lobe of the deltoid muscles should be below the line of the pectoral muscles. Due to the fact that athletes have different body parameters, limb lengths and strength areas, the ideal grip width is strictly individual and may be different for everyone. c)
removing the bar from the racks.
The lifting of the barbell is carried out by the athlete independently or with the help of assistants. Recently, at all international competitions, in 99.9% of cases, one assistant in the center helps remove the barbell. Receiving the barbell from the assistant from the racks, the athlete slightly raises the pelvis, brings the barbell forward and lowers it as far as possible with straight arms, by bringing the shoulder blades together and lowering the shoulders down, then lowers the pelvis until it touches the bench. [ 2
]
d)
position of the legs.
The feet should be placed as close as possible to the vertical projection of the pelvic girdle. [ 18
] The leg muscles are in a tense state.
The athlete must stand on his feet and only touch the bench with his buttocks ( see photo 3
).
This practice helps stabilize the entire body, and the muscles involved work more efficiently. Wide-legged positions are just as common as close-legged positions, but both positions involve elements of closing the body on the bench. Second phase
- Starting position consists of:
a)
fixing the barbell with straight arms until the senior judge commands “start” - (“stat”).
After receiving the barbell from the assistant, the athlete fixes the barbell in a stationary state with his arms fully straightened at the elbow joints and waits for the senior judge’s signal “start” (“stat”). The third phase
is lowering the barbell to the chest.
After the senior judge’s signal, the athlete lowers the barbell to his chest. Lowering the barbell to the lower edge of the pectoral muscles should be carried out relatively slowly, with full control of the tension of all muscle groups involved in the movement. [ 4
] In this case, the athlete makes a counter movement with his chest towards the bar, without lifting the support points of the body from the bench.
The angle between the shoulder and the torso is approximately 45 degrees both when lowering the barbell and when pressing. Lowering the barbell to the chest and pressing from the chest is performed while holding the breath. The fourth phase
is fixation of the pause with the barbell on the chest.
After receiving the signal from the senior judge, the athlete must lower the barbell to his chest and hold it in a stationary position on his chest with a certain and visible pause [ 16
].
Standing still means stopping. Fifth phase
- The bench press itself consists of:
a)
tearing the bar off the chest;
After the barbell has apparently stopped on the chest, the athlete puts maximum effort into the muscles that directly perform the press - the pectoralis major, deltoids, triceps and lats. With the so-called “chest” style of pressing, the shoulders of the arms should be positioned perpendicular to the body, while getting maximum benefit from the inclusion of the anterior deltoid muscles in the work. When performing a “triceps” press, the elbows should be shifted somewhat closer to the body; the initial impulse to tear the barbell from the chest is also given by the latissimus dorsi muscles, moving the athlete’s shoulder joints forward. With the “chest” style, the bar moves almost vertically with a slight deviation towards the racks, with the “triceps” style - deviating backwards from the vertical plan. A powerful exhalation is performed in the upper third of the press, practically when pressing on straightened arms [ 4
].
Some athletes, when lowering the barbell to their chest, tense their pectoral muscles and relax their arm muscles a little. They explain this by saying that this is necessary to ensure a sharp release from the chest, a small acceleration, which is achieved by relaxing and then sharply tensing the latissimus dorsi muscles with the immediate involvement of the pectoral muscles, deltoids and triceps. Other athletes, placing the barbell on the chest, do not relax the muscles of the arms, so they cannot sharply tear the barbell from the chest. When an athlete rips the barbell from the chest, the movement at this moment should go from the legs (by tensing them) towards the head, but in no case upwards, otherwise the pelvis will be torn from the chest benches. [ 15
].
The bar should move approximately vertically upward, with a slight slope towards the racks. Try to ensure that the bar does not move strictly vertically upward or towards the legs, this excludes the deltas from working. Postgraduate student at the Kuban State Academy of Physical Culture R.A. Tsedov videotaped athletes at competitions at a frequency of 25 frames per second. In the process of processing the video recording using a computer and a package of specialized programs, 12 trajectories were obtained and the frame-by-frame horizontal and vertical movements of the CTS were calculated. As a result of a visual analysis of the resulting 12 graphs of the CTS trajectories, R.A. Tsedov chose the fact of intersection of the trajectories of the vertical lifting phase drawn through the CTS at the beginning of the lowering phase as a distinctive feature allowing to classify various bench press executions. Due to this fact, all trajectories of R.A. Tsedov divided into 3 groups. He includes trajectories that do not cross the vertical into the first group ( Fig. 1
), trajectories that cross the vertical once into the second group (
Fig. 2
), and trajectories that cross the vertical twice into the third group (
Fig. 3
).
The type of trajectory of the TSP when lifting the bar is significantly influenced by the trajectory of the TSP when lowering it. Trajectories of group 1 are observed when the athlete, in the lowering phase in the NE section ( Fig. 1
), places the projectile excessively forward and down. Then, due to the elasticity of additionally stretched muscles in the 3rd phase during lifting (section VA), the CTS has a relatively vertical trajectory that does not intersect the vertical of the starting position SE.
| Fig. 1. Trajectory graph of group I CTS | Fig. 2. Trajectory graph of group II CTS | Fig. 3. Trajectory graph of group III CTS |
Consequently, the boundary position (BP) between the 2nd and 3rd phases (C), compared to that between the 5th and 6th phases (A), is closer to the head relative to the athlete’s body. Group II trajectories are observed in the case when the athlete has difficulty overcoming the “dead spot” in the lifting phase (section BA in Fig. 2), which is associated with the approach of the CTS trajectory to the vertical of the starting position SE and its intersection at point D. In this case The GP between the 2nd and 3rd phases is located further from the head relative to the athlete’s body, compared to the GP between the 5th and 6th phases. The trajectories of group III, according to R.A. Tsedov, are associated with the fact that the athlete at the beginning of the lifting phase (section BA in Fig. 3), having lost the elastic impulse due to a long delay in the “dead point” (section BF), vigorously lifts the bar forward and upward, which predetermines the repeated intersection of the vertical starting position CE at point D. In this case, the ratio of GP (C) and (A) coincides with group 1. V)
passing the “dead point”;
When analyzing the graphs performed by R.A. Tsedov in the 5th phase (see Table 2), a “stumbling threshold” (hereinafter referred to as “dead point”) was identified - the most inconvenient area for the manifestation of an athlete’s active muscle strength. This zone is one of the main factors limiting athletic performance ( Fig. 4
). The section of the graph enclosed between verticals A and B is the indicated zone. Correlation analysis showed that the height and time of manifestation of the “dead spot” for each athlete is purely individual. Their values depend on: the qualifications of the athlete, gender, the percentage of the weight of the equipment to the individual maximum result in the bench press. It has been established that with increasing qualifications of athletes, in competitive conditions, a more pronounced “dead point” is observed. This fact is probably due to the weight of the projectile approaching the record result of a certain athlete.
The time for the manifestation of this zone from the GP between the 4th and 5th phases (see Table 2) averages 0.4 - 1.2 s. Depending on the anthropometric characteristics of the lifter, the distance from the chest at this time is 11 - 18 cm. /14/ g)
we'll put the pressure on.
During the final part of the press, approximately in the upper third of the press, it is recommended to make a powerful, sharp exhalation. Straightening your arms at the elbows should occur simultaneously. The sixth phase
is fixing the barbell in the final position with straight arms, until the senior judge commands “on the racks” (“rack”).
After full and simultaneous straightening of the arms, the athlete fixes the barbell in a stationary position and waits for the senior judge’s signal “on the racks” (rack). The seventh phase
is the return of the barbell to the racks (after the senior judge’s command “to the racks” - (“rack”). After the senior judge’s signal, the athlete returns the barbell to the racks independently or with the help of assistants by shifting the center of gravity of the projectile located in the straightened arms , back, behind the vertical projection of the athlete's eyes. Frame-by-frame decomposition of the bench press technique performed by the Honored Trainer of Russia, senior coach of the Russian junior team I. G. Derevyanko.
The bench press is performed by Mail Jennifer (USA, world champion among juniors in 2000, in categories up to 48kg
Frame 1.
Receiving the bar from an assistant.
After the assistant released the barbell, Jennifer brought the barbell forward a little more and stopped it against the lower part of the pectoral muscles. Frame 2.
As we see, Mile has arched her back and rests on two points: the first is her neck and trapezius, and the second is her legs.
The pelvis only touches the bench. The heels are maximally pulled up to the vertical projection of the pelvic girdle. The athlete fixed the barbell in a stationary state, with her arms straightened at the elbow joints, waiting for the senior judge’s “start” signal. Frames 3 and 4
show how Mile, when lowering the barbell to his chest, makes a counter movement with his chest towards the barbell, without lifting his pelvis from the bench.
The deflection of the “bridge” has reached its maximum ( see frame 5
), the legs are tense, the pelvis barely touches the bench, the athlete seems to be on her feet.
In this position, she made a visible stop of the barbell on her chest ( see frame 6.
).
After stopping the barbell on the chest, the athlete makes a maximum explosive effort with the muscles of the upper shoulder girdle. The barbell is lifted from the chest using the pectoral, deltoid, triceps and latissimus muscles ( see frames 7 and 8
).
The initial impulse (movement) at this moment comes from the legs towards the head. The most difficult moment of the press has arrived, passing the “dead point” ( see frame 9
).
The athlete, by concentrating volitional and muscular efforts, successfully passed the “dead point” zone and presses the barbell until her arms are fully straightened ( see frames 10 and 11
).
Please note that the higher the barbell, the smaller the height of the athlete’s “bridge” becomes. This suggests that she seems to be moving her body away from the bar. After full and simultaneous straightening of the arms, the athlete fixes the barbell in a stationary state and waits for the senior judge’s signal “to the racks.” ( see frame 12.
)
The most common mistakes in the competitive bench press technique.
- uncentered grip on the projectile bar; may lead to misalignment and, as a consequence, to uneven squeezing of the bar, which is prohibited by technical rules;
- “open” grip of the bar; due to the risk of injury, this grip is prohibited by technical rules; [ 16
] - positioning the head too close to the posts; if you lie on the bench with the bar below your eye line, then when you press the barbell you may hit the racks, which will lead to unnecessary friction of the bar on the racks or stopping the barbell;
- non-optimal angle of flexion of the legs at the knee joints; a non-optimal angle of leg flexion can lead to relaxation of the back muscles and a decrease in deflection (bridge), which will lengthen the path of the barbell and increase the athlete’s effort;
- failure to maintain a stationary position on the chest (pause), knocking the bar off the chest; pressing the barbell without a visible stop of the barbell on the chest, or pressing the barbell on the chest without stopping or beating the bar off the chest is prohibited by the technical rules of the competition; [ 16
] - incomplete “turning off” of the hands at the end point of the press; Not completely turning off your hands is prohibited by technical rules. If anatomically both arms cannot be fully straightened, the athlete must warn the judges about this in advance before each approach. [ 16
] - lifting the heels after the start of the press; lifting the heels after the start of the press is prohibited by technical rules; [ 16
] - separation of the pelvis from the surface of the bench; lifting the pelvis from the surface of the bench is prohibited by technical rules. [ 16
]
A little about the equipment:
Bench press shirts. The use of bench press shirts has not only reduced the number of bench press-related injuries, but has also allowed new world records to be set. A bench press vest works the same way as a squat suit, meaning it adds extra support to help your muscles move the weight. Bench shirts vary in thickness, the thicker the thickness, the more support. We will go into more detail in the “Equipment for Powerlifting” section. Bench press tights. As a rule, tights are loose-fitting, made of elastic, and stretch freely. Unlike squats, the bench press tights do not protect you in any way and do not provide any assistance. But according to the technical rules of the competition, the athlete is required to wear tights over his bench press shirt. Bandages on the hand. We also recommend using hand bandages to keep your hand stationary. Belt. The opinions of coaches and athletes are divided on the need to use a belt in the bench press. Some people think that a belt is needed, others think that it is not needed, it just gets in the way. We recommend using a belt during training and competitions; this will give greater stabilization to the body during the press and will keep the bench shirt in a taut position. We recommend using a weightlifting belt; it is softer and smaller in size. Pay attention to photographs 1, 2 and 3, as well as to the filmogram of K. Pavlov performing the bench press. These great athletes perform the bench press with a belt.. Shoes. Shoes for pressing should be non-slippery to provide reliable support and preferably with a heel. But we remind you that according to technical rules, the maximum heel height should not exceed 5 cm.
Bibliography:
- Bill Kaitzmeier Bench Press for Upper Body Power. J-l: “Muscle and Fitness” No. 4 1984
- Zavyalov I. Bench press. J-l: “The world of power.” №1 2000
- Craig Tokarski Craig Tokarski, world record holder in the bench press. Jl: “Muscle and Fitness”. June 1995
- Mac R. Stewart Bench press 180 kilograms. "Wider Sport" 1999
- Mike Sipson My Russian bench press program. Jl: “Muscle and Fitness”. September 1987
- Ostapenko L.A. How to increase your bench press performance. “Sports life in Russia” No. 12 1995
- Ostapenko L.A. Features of the training process in powerlifting at the stage of selection and initial training. Thesis. 2002
- Richie Smith "BREAKTHROUGH" in the bench press. “IRONMAN” No. 5 2001 Tom Venuto
- Simmons Louis Using chains on the bench press.
- Sloan S.S. Bench press. J: “Ironman”. №10 2000
- Starov M.D. Bench press technique in powerlifting.
- Williams James Auxiliary exercises to improve bench press results. "Muscular Development" May 1974
- F. C. Hatvild's Comprehensive Guide to Strength Development." New Orleans 1983
- Tsedov R.A. Computer videographic analysis of sports technique of powerlifting exercises. Bachelor's final qualifying work. KGAFK Kranodar 2000
- Chernyshev P. Bench, nothing but a bench press. J-l: “The world of power.” June 1999
- Shantorenko S.G. Technical rules. Omsk 2001
- Sheiko B.I. How I train the bench press. J-l: “Olympus” No. 2-3 1999
- Schwub Joseph Bench press technique. "Trainer". November 1980
- Daniels Douglas Close Grip Bench Press. Powerlifting USA. January 2000
- Zulak Gregory Boost Your Bench Press. "Mscul Mag International UK" December 1994
- Rick Well Rick Wells Benchpress. 1986.
- Simmons Louis More Big Benches. Powerlifting USA. January 2000
- Wogman Dan The Bench Rules. "Muscle and Fitness". August 1998
What is this?
To understand the meaning of powerlifting, it is enough to know that this word comes from the merger of two English words: “power” (strength, power) and “lifting” (lifting).
A little history
Back in the early 20th century, powerlifting originated from exercises that weightlifters added to their routines. In the mid-20th century, competitions were already held in Western countries. From the beginning of the 60s, their rules were determined, after which powerlifting began to acquire modern features. 1964 can be considered the year of birth of this strength sport.
It was then that the first US powerlifting championship took place, albeit unofficial. A year later, the athletes participated in the first national championship. 1972 was the year the International Powerlifting Federation (IPF) was founded, and a year later the first world championship took place. In 1980, women competed for the first time at the World Championships, which took place in the USA; in 1989, the championships for men and women were unified.
There are a huge number of sports that will make your leisure time not only useful, but also interesting, and even extreme. Among them are cycling, snowboarding, swimming, parachuting, bungee jumping, surfing, parkour, and race walking.
The World Powerlifting Congress (WPC) was formed in 1986, and later a large number of similar organizations appeared. Since then, powerlifting has become widespread in many countries of the world; it is loved not only by the stronger sex, but also by the beautiful part of humanity.
Powerlifting today
Currently, powerlifting is a complex that includes the following exercises:
- back squats;
- bench press;
- deadlift.
Due to the fact that there are three competitive exercises, there is another name - powerlifting.
All competing athletes are divided into different categories according to their weight, the number of approaches in each exercise is three. The overall result of an athlete is the sum of indicators for all exercises. Whoever lifts the heaviest weight is the winner.
But this type of strength sport is practiced not only for participation in competitions, but also for amateur purposes to improve strength and strengthen the muscles of the back, chest and legs.
Did you know? In powerlifting, it doesn’t matter how defined an athlete’s body is, as opposed to bodybuilding. The most important assessment factor
—
this is power. However, many bodybuilders started with powerlifting, these include Arnold Schwarzenegger, Ronnie Coleman, Andrei Sorokin, etc.
Bench press - main muscles worked:
1) The so-called “direct movers” - they perform the most difficult work and are the main characters. These include the anterior deltoid, clavicular portion of the pectoralis major, sternal portion of the pectoralis major, triceps;
2) When you perform a bench press, “auxiliary movers” also interact with them: the clavicular, subscapularis, teres major and latissimus dorsi muscles, as well as the biceps;
2) Stabilizing muscles - responsible for the correct technique of performing the exercise - stabilize the position of all parts of the body involved in the work.
You must clearly monitor which muscles are involved in the work at each stage of the exercise. This will allow you to track where the minimum load falls and then improve your technique and your overall strength indicators.